According to current laws Russian Federation, in particular, the amendments made to the SDA, any vehicle driving even during the day must be with the low beam headlights on. In addition, instead of them it is permissible to use fog counterparts, as well as daytime running lights.
In view of the fact that the operation for this purpose of the head and fog lights is associated with a number of disadvantages, the vast majority of car owners prefer to purchase modules running lights and install them yourself. In view of this, it is worth figuring out how to connect daytime running lights with your own hands?
Operation features
Legislation quite clearly regulates the rules for the use of such elements in the design of a car. According to the requirements of GOST, the running lights should turn on immediately when the ignition key is turned on, and automatic deactivation should occur if the driver activates the headlights.
In addition, such a standard provides that the inclusion of head lights should occur only after full inclusion overall analogues. The only exception is when they are used to signal. This must be taken into account when wanting to install daytime running lights with your own hands.
 Do-it-yourself DRL connection, It has whole line features that need to be taken into account in order to achieve correct sequence work and long term module services. To increase its service life, it is reasonable to use a special stabilizing block designed for LED lights.
However, this measure is aimed only at increasing the duration of the circuit; without such a block, all elements will function normally.
One of the most common problems m, characteristic of DRL modules, are voltage surges, which cause overheating of the crystal responsible for the radiation. In this regard, the brightness of the lights gradually decreases, after which they cease to perform their main function.
Connection options
Considering the most common options for connecting DRLs, it is advisable to disassemble the simplest circuit connection of running lights without using a stabilizer, generator and other additional elements. In order for the DRL to be activated when the engine is turned on, it is recommended:
- Connect the positive wire to the positive terminal located on the ignition switch;
- The negative cord is fixed on the body of the car in any place convenient for the owner;
- When the ignition is turned on, the DRL will work.
The main disadvantage of such a connection scheme is the constant operation of the lights with the ignition on. Besides, work lights in this case , is not coordinated with other auto lighting systems, which means that such a connection does not meet the requirements specified in GOST.
The second connection option is much more suitable for this purpose, as it uses a circuit position headlights. The positive wire of the daytime running lights, in this case, is connected directly to the battery. Negative connect with positive marker lights, after which, the LEDs begin to glow. At the same time, the lamp coil does not burn, which is associated with low current consumption.
After the parking lights are activated, the driver will be able to notice that the DRL potentials are equalized, which causes the LEDs to turn off. As a result, the car's lighting circuit switches to normal operation. Despite the fact that this scheme works without serious violations, it has a number of disadvantages so it shouldn't be installed.
It would be appropriate to include:

Since this scheme also does not meet the requirements of the state standard, it will be necessary to consider the simplest and most suitable under existing norms option.
DRL controller
For the vast majority of owners, the most acceptable is the use of a special control unit that allows you to connect the HDO via correct scheme, without the use of relays and other elements. As a result, the connection scheme is simple and safe. , due to the unique advantages controller operation.
These should include:
- Stable inclusion of DRL after starting the engine;
- Provides protection against overloads;
- Supports any type of lights, including LED;
- Does not affect the operation of other nodes.
The control units for daytime running lights, in the vast majority of cases, fully comply with the state standard, which allows them to be safely used for their intended purpose. However, some manufacturers may introduce various functions into such equipment, which, despite their usefulness, may not meet the requirements of GOST, which means that their use is not recommended.
Another advantage of this kind equipment, it is possible to connect it according to the scheme provided in advance by the manufacturer. At the same time, it must contain information about maximum load, as well as other important technical specifications. This allows you to quickly and easily connect DRL without any experience and special knowledge.
 If the purchase of a special controller is not planned, it is advisable to give preference to the option of connecting through a relay. It involves the use of 5 contact relay which will be involved in general scheme DRL connections. Such a scheme allows eliminate any shortcomings inherent in the previous options and makes it possible safe use DRL without any additional equipment.
Features of connecting the DRL relay:
- 30 to "+" outputs of LED modules;
- 85 on the "+" cord dimensions;
- 86 is taken to the machine body;
- 87a on the "+" ignition;
- 87 isolate.
To implement such a connection through a relay, it is necessary to acquire wires for connection, terminals, ties, heat pipes and tools. Among other things, you should consider a way to securely attach the assembled circuit to the vehicle structure.
Some owners prefer use a generator in the connection diagram, which is not recommended in most cases. Indeed, in order to install DRL through the generator, you will need to install a resistor. Despite the efficiency of the scheme, its reliability leaves much to be desired.
DRL or daytime running lights can be connected to the car in several ways. All of them involve connection through a generator or battery.
What is dho
ATTENTION! Found a completely simple way to reduce fuel consumption! Don't believe? An auto mechanic with 15 years of experience also did not believe until he tried it. And now he saves 35,000 rubles a year on gasoline!
Modern traffic rules provide compulsory use daytime lights. The solution was implemented for safety reasons, because a car with the lights on will be much more visible to other road users even during the day. As a result, the risk of accidents is reduced.
Traffic police officers today can legally stop a vehicle that does not use daytime running lights. And the owner of the car will bear the same responsibility for this as if he did not have dipped headlights or PTF.
Daytime running lights are a mandatory element in the list of standard equipment for new car models. But this does not mean that all is lost for used car owners.
Despite the fact that for some Russian drivers, connecting DRL is too expensive pleasure, it is possible to do this without “raping” the family wallet.
Using dipped beam or PTF as an alternative, unfortunately, does not bring anything sensible. The constant operation of the optics leads to the fact that the headlights wear out faster, as a result, such savings lead to even greater costs.
But you can really help save on the service by connecting a DRL according to a scheme that is easy to implement with your own hands.
Only self circuit connection, it is desirable that it is consistent with the following mandatory rules:
- daytime LEDs go out a priori when head optics are activated (“low”, “high” light or PTF);
- it must be possible to turn off the DRL using a separate button, without the use of extraneous tools;
- The navigation light must be turned on randomly as soon as the engine is started.
Thus, the issue with the law is resolved. The inspectors have nothing to complain about.
What's with the generator
As it was written above, the connection of the DRL can be carried out in several ways, but one way or another, you have to use the generator and relay.

According to experts, connecting DRL through a generator gives best effect because complexity and cost can be kept to a minimum. You can also integrate the DRL with your own hands, without using a generator, by conducting a positive impulse from the battery.
Circuit options
So, there are several ways to connect.
- DRL turns on as soon as the ignition key is turned. The lights do not go out until the car's engine stops. It is considered the simplest method, which does not involve the use of onboard network. It is enough just to connect the minus from the lights to any place in the car body, and the plus - to lead from the lock to the output of the high-voltage module, always through the fuse.
- The same scheme, only the DRLs immediately go out as soon as the dipped beam is activated. To implement this connection option, you need to adhere to the above scheme, with the only difference being that the minus is connected to one of the positive wires of the dipped beam lamp. As soon as the car is turned on, a positive impulse will appear on the minus DRL, the lights will go out. DRLs will light up again as soon as they are activated. high beam or the head optics will turn off.
- Wiring diagram, which includes automatic connection dho as soon as the car starts. It is considered the most reliable option for self-integration of daily led lights. To implement this scheme, the minus DRL is connected to the car body, and the plus is connected to the contact of the relay.
A simple circuit with a 4-pin relay
There is a simplicity of circuit number 1, carried out through a 4-pin relay. However, this option does not always meet the requirements of GOST, since the DRLs will shine separately from the head optics. The lights are not turned off by a push-button mechanism, everything happens automatically.

The photo above shows this circuit, connected via a 4-pin relay. It implies the following procedure:
- during the start of the automotor, a pulse is sent from the generator to the relay, the LEDs light up;
- as soon as the dimensions are turned on, the DRLs are turned off.
This connection method is also possible without the use of a generator. Then, instead of it, the battery will become the source of voltage, to the plus of which the 30th contact in the photo should be connected.
It is also possible to connect the plus from parking brake. In this case, as soon as the handbrake is activated, the daytime lights will go out - that's the button.
Diagram with 5-pin relay
It provides for the use of 4 contacts. Ideal connection option for Priora vehicles. The difference from the above diagram is not only in the number of relay contacts. This circuit does not provide for the use of output 87. An alternative to mass is output 86.

The circuit with a 5-pin relay provides for the use of DRL control. A push button mechanism is built in between the generator and the 30th relay contact.
The work of the dho is as follows:
- the internal combustion engine starts, thereby, the impulse from the generator goes to the 30th contact of the relay, and from there to the plus of the DRL;
- the lights light up, the minus is connected to any part of the car body;
- when the dimensions are used, the coil is activated, the 30th contact is integrated with the 87th, the impulse is no longer received - the DRL is turned off.
with reed switch
In a circuit using a reed switch, three important automotive systems: alternator, battery and relay.

The photo above shows detailed diagram connection according to the option using a generator. The plus is integrated, as can be seen from the diagram with point 30. The relay contact, marked with point 87, is integrated with the battery plus. Another relay contact, marked with the number 85, is connected to the vehicle ground through the DRL.
Attention. Such a scheme implies the mandatory use of a reed switch - a device capable of changing the state of the connected electrical circuit when exposed to a magnetic field.
A contact is connected to the reed switch, marked on the diagram with point 86. From the reed switch there is a connection to the plus of the generator.
Thus, the scheme implies the following. As soon as the internal combustion engine starts, the driver activates the reed switch with the button, the relay is activated, and the DRL is turned on. The reed switch must be packed in a thermopolymer and securely fixed to the generator.
Advice. It is important that the reed switch is fixed exactly in such a place of the generator where the relay would work.
Without reed switch
A variation of the scheme at number 3, only without the use of a reed switch. In this case, the contact marked with the number 86 is integrated with the oil pressure lamp in the tidy. Thus, the option of turning on the DRL after the ICE plant is supported.
It is noteworthy that this scheme is much easier to implement with your own hands than the version with a reed switch.
Video: how to connect a DRL from a generator
As you can see, the connection of the DRL to the on-board network of the machine is carried out through the use of several schemes. Plus is taken from the output of the generator, less often - from the battery.
Not so long ago, our authorities passed a law that, regardless of the time of day, fog lights or DRLs must work on cars. This decision was due to the experience of European specialists, who proved that thanks to the working light elements on the PBX, it is possible to significantly reduce the percentage traffic accidents. In this regard, since 2010, changes have been made to GOST and SDA, according to which inoperative fog lights or missing DRLs (DRL) can cause a rather “unpleasant” fine (1,500 rubles).
But, despite the fact that the installation of daytime running lights has now become mandatory, some car owners are convinced that they have found a way out of the situation. Particularly enterprising drivers decide to simply connect the dimensions in the low beam headlights, so that they turn on with the engine, naively believing that this will be enough. Unfortunately, side lights will not save you when meeting with a traffic police officer, since you cannot use them instead of DRLs. Therefore, if you are not the owner of a modern car in which "hybrid" fog lights with DRL are already installed, then there is no escape from installing new light elements.
You can install navigation lights in a specialized workshop or on your own. If you are confident in your abilities, then before you start work, carefully study the rules for installing navigation lights on a car.
GOST requirements for the installation of DRL
According to GOST R 41.48-2004, installation and connection of running lights with your own hands must be carried out strictly according to the following requirements:
- A distance of 600 mm must be maintained from the edge of the car body to the DRL. It is allowed to reduce this indicator to 400 mm, but only if the overall width of the machine is less than 1.3 m (clause 6.19.4.1).
- The distance from the ground level to the lighting elements should be in the range from 250 mm to 1500 mm (clause 6.19.4.2).
- DRLs should be directed forward and mounted on the front auto vehicle(clause 6.19.4.3).
- A certain geometric visibility is maintained. According to paragraph 6.19.5, the horizontal angle beta should be 20 degrees in and out, and alpha 10 degrees down from the horizontal and up.

At the same time, a certain scheme for connecting navigation lights is not reflected in any way in GOST, so here you are free to make a decision yourself. However, there is a small nuance. The installation of running lights according to GOST also implies the automatic switching on of DRLs together with the engine of the car and turning them off when the headlights are on. The only exception is to turn on the high beam for a few seconds to signal other drivers.
Based on these requirements, the choice of running lights must be approached carefully.
How to choose running lights
Presented in stores wide choose DRL from the most different manufacturers, different configurations and colors. However, not every lamp is suitable for use as running lights. For example, halogens and xenon will not withstand permanent job, will "eat" a lot of energy and discharge the battery. Incandescent lamps are also not the best the best choice, but LEDs are considered the best when installing DRLs.
There are also many diode running lights. The best are considered to be products in glass cases and lensed LED DRLs for fog lights. The rest (for rubber bands, "eagle" and "dragon" eyes, in the form of SOV platinum) do not meet the stated GOST requirements.

Before connecting the daytime running lights with your own hands, make sure that:
- DRLs match the shape, type and design of your vehicle's bumper.
- The size of the DRL unit, which is selected based on where the running lights will be installed (in the air box or on the bumper), allows you to mount them in your car.
- The number of LEDs in the block does not exceed 5 pieces for each. If the light is too bright, the daytime running lights will shine like "gauges", which is unacceptable.
- The DRL luminous intensity indicator must be not less than 400 cd and not more than 800 cd, and temperature Range lamps range from 4,300 to 7,000 K.
- Running lights emit pure white light (yellow and blue products are not allowed).
If we talk about manufacturers, then the most reasonable thing would be to purchase a ready-made Hella or Philips DRL kit. Such blocks are equipped with everything you need (including the controller) and fully meet the requirements of those. regulations.

Having purchased DRLs for a car, or having made them yourself, it remains only to prepare everything necessary so that the installation of daytime running lights with your own hands goes without “surprises”.
What is required for self-installation of DRL
Required to work the following materials and tools:
- Any crimping device, such as pliers.
- Wire cutters.
- Blowtorch and lighter. The latter will be required in order to tighten the heat shrink tubing.
- 3-4 meters of insulated two-wire wire, for example, PVA 2x1.5 or 2x0.75 (required when two DRL units are connected in parallel to each other).
- Any sealed contact (reed switch).
- A single-core wire with a diameter of about 1.5-2.5 mm and a length of about 3 meters.
- Plastic clamps.
- The usual four-pin relay for 12 V.
- LED DRLs.
You should also take care of a clean, dry place where you will work. After that, you can begin to install additional light elements.
First of all, decide where exactly the daytime running lights will be mounted. On some cars, there are already ready-made holes for additional foglight modules; in other cars, a radiator grill is used for DRL. The last option is the best, as in this case you will be able to withstand all the necessary distances and boundaries.
Just remove the grille and cut out the holes for future lights yourself. It is important to remember that the light must be supplied at a certain angle of inclination. You may need to drill an extra hole for this.
DRL connection diagrams
Since the DRL can be mounted as you wish, there are many connection schemes that allow you to configure the optics in the most convenient way for the driver. Consider the most popular of them.
Option 1 (to speed sensors)
This connection of running lights through a relay, the diagram of which is shown below, is considered one of the simplest. In this case, DRLs will turn on depending on the operation of the speed sensor. In order to implement this circuit, it is necessary to connect the K1.1 contacts to the circuit section (into the wiring break) from the low beam switch button to contact 85. In this case, you can use any relay with a breaking pair, but experts recommend using the product with the TS code.

If you want the proximity lights to work while the engine is on, and not the parking lights, then the contacts must be “paralleled”.
Option 2 (to oil sensor)
Another scheme for connecting daytime running lights through a relay uses an oil sensor. It’s worth checking right away that it is working, because if the regulator gives incorrect information about the fluid pressure, then the operation of the entire system will be disrupted.

With this installation of DRL, the lights will turn on when the engine is started, disconnected from the dimensions. As optics, you can also use low beam or fog lights.
Option 3
It will be a little more difficult to connect DRLs in such a way that they turn on when the engine is started and turn off when it stops. In this case, the running lights will turn on together with the low beam headlights. This will require two low-power diodes (for example, 1A + KD10), which must be connected in series. After that, wires about 400 mm long are soldered to the bulbs and they are connected. Do not forget that they are polar.

At the next stage:
- Dismantle and disassemble dashboard machine and connect the "blank" to X1 (most often the wire is yellow).
- Remove the button through which the optics will turn on.
- Plug the other end of the wire into the connector.
- Reinstall the button and check if it works.
Option 4 (connecting running lights from a generator)
To implement such a project, you can use one of three schemes.
The first is suitable if only the handbrake and the motor are involved.

The second circuit for connecting navigation lights from the generator will require the use of an additional resistor responsible for turning off daylight at the time of activation of the dimensions or headlights.

The third scheme will allow you to deactivate the running lights:
- When lifting the handbrake, during engine start or during automatic start of the engine together with an alarm.
- When turning on the dimensions (in this case, it is necessary that the headlights or foglights work in normal mode).

Roughly speaking, this type of connection "nulls" automatic start DRL simultaneously with the ignition of the generator.
Healthy! It is this scheme that is “working” during the passage of the TRP.
Before connecting the running lights from the generator, it is recommended to watch the video at the end of the article. The fact is that there is not one or two ways to activate DRL. However, the connection will be much easier if you have purchased a ready-made set of running lights.
Option 5 (connecting a ready-made kit)
In order not to puzzle over how to install running lights on a car yourself, the easiest way is to buy ready-made control units, for automatic shutdown and turning on the DRL. To install this module you need:
- Connect the black wire to the negative of the battery, and the red wire to the positive.
- The orange wire (if it comes with the kit) must be connected to the "gauges" or low beam. If the wire is not connected, then the lights will not be deactivated when the dipped beam or parking lights are turned on.

After installing DRL according to any of the schemes described above, it is necessary to check that installed elements worked correctly. To do this, start the engine and see if the light on the control panel is functioning, if the running lights are activated, and so on.
In custody
In order to activate the DRL on the car, you just need to comply with the requirements of GOST and understand at least a little about electrics. If you bought ready-made LED DRLs from well-known manufacturers, then the process of installing light elements will be much easier.
Many car enthusiasts have not yet installed daytime running lights on their car, but maybe they have been thinking about it for a long time. It's no secret that the lack of navigation lights, as well as the low beam / fog lights turned off, can cause your vehicle to be stopped by a vigilant traffic police inspector, which is not very desirable for most drivers, unless the latter lack communication with people and are happy any company at any time.
In addition, if you use dipped beam or fog lights as daytime running lights (hereinafter referred to as DRL), you will probably have to change the lamps in these headlights much more often. There's still a moment increased consumption gasoline at constant driving with low beam on. Of course, this expense is negligible compared to the main one, but still it takes place.
If you have a certain amount of time (depending on skills and experience) and desire, correctly installing DRL on a car is not such a difficult task for people who know how to hold a soldering iron in their hands and crimp terminals with wires, and in this article I will tell you how to do it .
Of the tools and materials we need: a crimping device (if you have some skill, pliers are also suitable), a soldering iron, wire cutters, a knife, a lighter (as an option for tightening a heat shrink tube), 3-4 meters of a two-core wire in PVA insulation 2x1.5 (2x0 can be .75 if the DRLs are LED, not fog lights with halogens!). This wire needed for parallel connection two lanterns to each other.
You will need a standard 12-volt automotive relay, four-pin, reed switch (any), a single wire with a diameter of 1.5 to 2.5 mm. about 2-3m., plastic clamps, heat shrink. It seems to be all.
Now a few words about connection options.
Option 1. You can make the DRLs turn on when the ignition is turned on and not turn off until the engine is turned off. This is the easiest option. The negative wire is attached to the car body in any convenient location, plus - to the plus from the ignition switch or to terminal D of the high-voltage module, preferably through a fuse (not indicated in the diagram).
Option 2. The same option, but when the dipped beam is turned on, the DRLs go out. In this case, we connect the plus in the same way as in the first option, and the minus to the positive wire of the low beam lamp (either of the two). The fact is that an incandescent lamp consumes much more current and has much lower resistance than LED DRLs and therefore, when DRLs are turned on in this way, the filament of the lamp will not heat up even to the minimum glow at full heat, and the resistance of the filament of the lamp (even heated) will practically not affect the operation of the DRL.
As soon as you turn on the dipped beam, a plus will appear on the minus of the DRL, and they will go out. True, if you turn on the distant, the DRLs will light up again. In this case, you can connect the DRL to the marker lamps in the same way (if incandescent lamps are used as such, and not LED ones!). In most cars I know marker lamps are a priori connected in parallel, so that you can connect a common negative wire from two DRL lights to any marker lamp.

Option 3. This is an option when the DRLs turn on automatically only when the engine is started and running. In this case, we connect the minus of the DRL also to the car body, and the plus to the 30th relay contact. 87 contact is connected to a more powerful plus (you can connect to the positive terminal of the battery), 85 contact of the relay - to the ground of the car through the running lights, and 86 - to the reed switch, to one of its outputs.
We also connect the second output of the reed switch to any plus nearby (you can from the generator or from the same place - from the battery). We start the car and moving the reed switch around the generator, we achieve the operation of the relay and the ignition of the DRL. We fasten the reed switch, pre-packaged in heat shrink, with a plastic clamp to the generator in the found position and you're done.

Option 4. If there is no reed switch. Everything is the same, only 86 pin - to the oil pressure lamp in the instrument panel.

That's all. In conclusion, I will say that using something that is made by one's own hands is much more pleasant than that which is made by strangers. Good luck in implementing your and not yours, but, most importantly, interesting ideas.
Daytime running lights (DRL) in the headlights, fog lights, in turn signals installed separately, but wherever they are not installed. Are there any rules at all? regulate the installation of DRL? Is it possible install DRL yourself? They also say that they consume many times less energy, and therefore you save on gasoline. Everything in order..
What are DRLs and what are they for?
"Daytime running lights" have nothing to do with side lights. This new concept appeared in the rules due to the fact that they began to equip modern cars. This term refers to external lighting fixtures designed to improve the visibility of a moving vehicle in front of daylight hours days. On new European cars you can often find lights in the headlights that stand out structurally in it. In most DRLs, this is LED bulbs. When using daytime running lights, additional light signals (fog or dipped beam) are not required.
Rules for installing DRL
Excerpt from " State standard of the Russian Federation GOST R 41.48-2004 (UNECE Regulation N 48)":How to beat an online casino for 368,548 rubles using a hole in the algorithm?
Step-by-step instruction
Hello! On the Internet, they know me like Jerome Holden and I make money by testing the algorithms of the well-known Vulkan casino: looking for vulnerabilities in games, placing bets and hitting the jackpot.
Now I am gathering a community for a more global project, so I am sharing the circuits for free. I tell everything in as much detail as possible, there is nothing complicated, you can work directly from the phone, even girls can handle it)). You can test algorithms, earn money and decide whether to join my team or not. Details here.
In three months, I earned 973,000 rubles on my schemes:

6.19.1 Installation
Optional on cars. Not allowed on trailers.
6.19.2 Number
Two.
6.19.3 Installation plan
There are no special instructions.
6.19.4 Placement
 6.19.4.1. Width - the point on the surface as seen in the direction of the reference axis, which is farthest from the median longitudinal plane of the vehicle, shall be not more than 400 mm from the edge of the overall width of the vehicle.
 The distance between the inner edges of the two visible surfaces must be at least 600 mm. This distance may be reduced to 400 mm if the overall width of the vehicle is less than 1300 mm.
6.19.4.2 Height - at a distance of 250 to 1500 mm above the ground.
6.19.4.3. In length, on the front of the vehicle. This requirement is considered to be met if the emitted light does not interfere with the driver directly or indirectly as a result of reflection from the rear-view mirrors and/or other reflective surfaces of the vehicle.
 6.19.5
Geometric Visibility
6.19.5
Geometric Visibility Horizontal angle beta = 20° out and in.
Vertical angle alpha = 10° up and down from the horizontal.
6.19.6 Direction
Forward.
6.19.7 Functional wiring diagram
If fitted, the daytime running lights should turn on automatically when the engine start/stop control is placed in the "on" position. It shall be possible to activate and deactivate the operation automatic start daytime running lights without the aid of a tool.
Daytime running lights should turn off automatically when the headlights are turned on, except when the headlights are turned on for a short period of time to signal traffic.
6.19.8 Control signal
Optional in the form of a closed loop.
6.19.9 Other regulations
No.
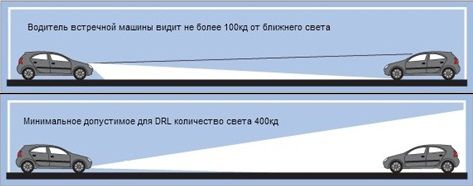
GOST R 41.87-99 (UNECE Regulation N 87). According to the rules, daylight emitters must occupy an area of 25 cm to 200 cm (in Russia "not less than 40 cm") and emit light with a power of 400 to 1200 cd (in Russia from 400 to 800 cd).

This standard establishes uniform provisions concerning the approval of daytime running lamps for motor vehicles.
According to this GOST, all certified running lights must have the appropriate designation.
Table 6a - Requirements of the UNECE Regulations for the presence of external lighting devices on vehicles:
- Daytime running light: White, 2 pcs.
- Recommended for categories M, N. (passenger and utility vehicles, trucks)
- Prohibited for categories O (trailers with two or more axles, trailers with a central axle and semi-trailers)
How to connect daytime running lights
DRL connection diagrams many, some of them are very simple, others require some experience with a soldering iron. All of them allow you to turn on the running lights automatically: Scheme No. 1. Headlights turn on automatically when driving and turn off when stopped. When parked, the car is marked parking lights.
Such an algorithm for the operation of the outdoor lighting system fully complies with the requirements of traffic rules.
The scheme was tested on all Russian cars.
The source of information about the movement is the vehicle speed sensor
Contacts K 1.1 of the low beam headlight switch are included in the wire break from the low beam switch to terminal 85 of the RBS. (if you need to turn on the low beam on the spot, then you need to parallelize the contacts of the low beam switch).
Relay K1 - automotive, 851.3747, but any one that has a breaking pair of contacts and works stably at a voltage on the winding of 6 ... 14 V can be used. For example, RES10, passport: RS4.529.031-07.
V. Yugrin Radio №8, 2005
 Scheme No. 2. Using PTF in daylight mode and automatically turning them off along with the ignition.
Disable staff scheme turn on the PTF and remake it to turn on after turning the ignition key.
Any thyristor with a permissible current of 0.3 A is suitable. A 1500 microfarad 25 Volt capacitor will produce 23 seconds. delays. Resistors should be from 0.25 W to 47 (51) and 10 kilo ohms.
It is convenient to place the circuit in the relay case by surface mounting and place it in mounting block. We also take the plus we need after the ignition switch.
Procedure:
- Disable negative wire to power the winding of the power window relay and isolate it.
- Find the wire going to PTF key, disable it from regular place and insert instead of disabled in paragraph 1
- Insert finished structure into the socket.
 Scheme No. 3. Turning on the PTF when starting the engine (generator).
The scheme is used on the VAZ 2110.
The headlights will turn on automatically when the generator is started. The engine is started - the generator is running - the PTFs are turned on, it does not work - vice versa.
The dimensions are turned on by the button and the ignition switch is open at the same time.
The essence of this method is to install a jumper from the power supply of the excitation winding of the generator to the PTF relay.
- We remove the tidy and do as in photo 1.
- We take out PTF button and disconnect the corner wiring from the plug photo 2.3.
- We connect it to our wire (12 on connector X1 of the device), photo 4.


Insert into free place on the plug and put the button in place.
Scheme No. 4. Implementation of DRL using low beam. The principle of operation is the same as in scheme No. 3, the dipped headlights turn on after the engine starts and turn off when it stops, while the dimensions are turned off. Everything else works as normal.
You will need two low-power diodes (1A, for example KD10) and we connect them in series. Solder wires to them. overall length about 40cm. Because the diode is polar, then they should be connected as shown in the photo.
We disassemble the dashboard and connect the workpiece with the 12th pin of the X1 connector, as in the photo (the color of the wire is yellow, but the essence is the same).
We take out the button for turning on the lighting and connect the second end of our workpiece to the green wire of the connector. Or insert the stripped wire into the socket of the connector. We insert the button into place and check the performance.


If you need to stand with the dimensions when the engine is running without dipped headlights, then we put the button in the cut of the wire.
Scheme No. 5. Automatic on/off daylight by on/off generator.
The schemes were tested on Lada Priora and VAZ 2110.
- The first scheme - if only the work of the generator and the handbrake is tied.
- The second circuit contains another transistor that turns off the DRL when the dimensions or headlights are turned on by supplying "+" to the base of the KT814 transistor.
- The third scheme of Roman Toropov. It cancels the DRL under the following conditions: The handbrake is raised (for autostarting the internal combustion engine from an alarm or parking with the internal combustion engine running) and for turning on the dimensions (transferring to the normal operation mode of the headlights or PTF). In other words, under these conditions, "automatic activation of DRL" is disabled when the generator is started. This DRL scheme, which passed the TRP.


Scheme No. 6. Auto-turn on DRL when starting the engine and turn off from the dimensions / dipped beam. (oil level sensor)
The scheme was tested on the VAZ 2110.
IN this option the engine operation signal is taken from the minimum oil pressure sensor (from the instrument panel block). Running lights turn off if you turn on the dimensions or dipped beam.
PTF or dipped beam can be used as running lights. 

 Scheme No. 7. Automatic switching on of DRLs when the engine is started, and work at full strength when the PTF or dipped beam is turned on.
The scheme was tested on the VAZ 2110.
When the engine (generator) is started, the DRL lights up. When the dimensions are turned on, the work of the DRL continues, and when the PTF or dipped beam is turned on, the DRL begins to shine at half strength. This is due to the switching of relay 2 when the circuit is energized when the PTF or dipped is turned on. And also due to the resistor, which we have in front of the DRL on the excitation wires from the PTF and the neighbor. We use a diode so that the power of one device does not flow into another device.  Scheme No. 8. The inclusion of DRL after starting the engine after 7 seconds. Goes out when switched on.
The scheme was tested on the VAZ 2110.
When the engine is turned off, the running lights go out. There is no additional load at the factory. When blinking high beam, DRLs do not go out.
For example, the button is located in the console next to the heater control unit. This is a manual shutdown. We hook up assembled circuit clips to the fuse box. It is convenient to assemble the delay circuit itself in the case of a non-working relay. 


Scheme No. 9 (Author on Skype: polimarh16). With the start of the movement, the dipped beam turns on and the interior lighting turns off.
The illumination in the door handles turns on when the engine is running and only when the car is stationary.
There is a free contact on the relay, to which it is connected additional illumination interior (for example, illumination of door handles) 


 Full description of the circuit: insert the ignition key, and turn it one notch. The low beam turns on for a few seconds and goes out. We start the engine. The interior lighting is switched on (door handles and LED Strip Light). With the start of the movement, the dipped beam is turned on, and the interior lights are turned off. After stop- reverse procedure, but with a delay of a few seconds. The delay time is provided by R3 and C2. The larger they are, the longer the duration.
The board is placed for the instrument cluster on a double adhesive tape and is connected there to the X2 connector and to the near, dimensions / far switch.
Auto headlight controllers
Who is not friends with electricians and is happy to buy a ready-made automatic headlight switch, you can use:- Automatic switching on of outdoor lighting (controllers LC-7-V09, LC-7-V10, LC-7-V09U)
- DRL Headlight Control Controller (Daytime Running Lights)


