Equal Hinge angular velocities(SHRUS), which is usually referred to simply as a "grenade", performs important function and is the most important node car. The CV joint transmits torque from the gearbox to the drive wheels, while setting the direction of movement. That is, in addition to rotation around the axis, the CV joint must be able to rotate , typically the rotation angle is limited to 70 degrees.
Based on the purpose of the CV joint, we can conclude that it is used in vehicles with all-wheel drive and front-wheel drive (that is, in those in which the drive wheels set the direction of movement).
The vast majority of modern cars have a front or four-wheel drive, therefore, it will be useful for every car owner to understand the design of CV joints and their possible malfunctions. Further, in the article we will briefly describe the CV joint drive device, as well as its most frequent malfunctions and their causes.
CV joint design
Before starting any repair work or trying to diagnose a problem, you need to be clear about what you are dealing with. Therefore, below you will see a photo of the CV joint drive, on which its elements and their names are signed:
For a complete picture of the structure of the drive elements, below you will see its sectional image:

Possible malfunctions
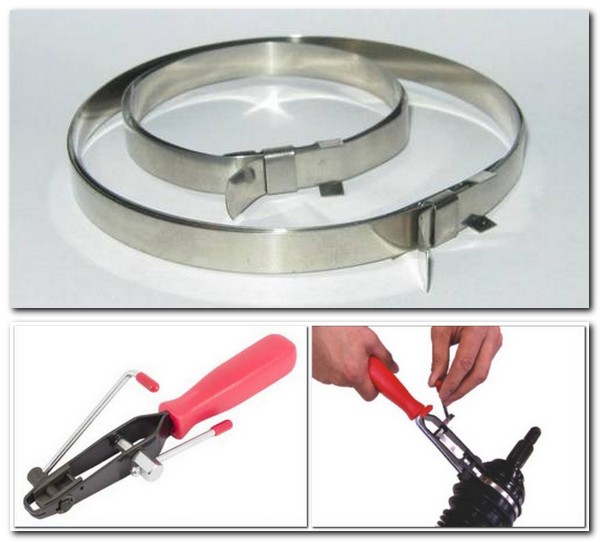
This unit is very reliable: under normal operating conditions, its service life may exceed the service life of other elements of the car. However, the ingress of a small amount of dust, dirt or water into the hinge increases the friction in the hinge many times over, thereby increasing its wear and tearing it down. Because of its importance to normal operation car CV joints are well protected by special "protective covers" - anthers. They provide a hinge reliable protection from dust and dirt, as well as complete tightness. Usually, anthers are made of dense rubber or plastic and are fixed to the drive shaft with clamps. By the way, usually anther clamps have a slightly unusual appearance. In the photo below you can see the clamps on the anthers, special device for their tightening and the tightening process itself:
One of the main causes of CV joint failures is related to the ingress of dirt or water through damage to the anther. If it so happened that your anther was damaged and dirt got into the hinge, you must immediately inspect it and then clean it (repair if necessary). To do this, remove the drive, rinse all its elements. Next, make sure that there is no excessive wear in the elements and install them back after filling the CV joint with fresh grease.
Important! Be sure to replace or repair the damaged boot.
A damaged boot can be repaired with a regular tire patch and sealant. Also you can use the repair method as in the video below:
External CV joint
There are two ways to detect possible malfunctions in the external (external) CV joint:
- visually detect a violation of the integrity and tightness of the anther: cracks, kinks, traces of grease on the outside;
- by characteristic sounds (characteristic crackling, crunching) when turning the steering wheel, entering a turn, etc.
If you have disassembled the outer CV joint and found wear on one of its components, then it is possible to significantly extend the life of the hinge without replacing it. First of all, if you find the wear of the separator at the points of contact with the balls, then there is no point in panicking. The rolling elements are installed in it with a gap, and a significant one, so that the development at the points of contact is completely harmless. Another thing is if wear appeared on the rolling elements themselves or elsewhere in the separator.
If only the rolling elements are worn out, then their repair is not possible. But finding the same ones at the nearest car parsing, car market or car shop is not difficult. The main thing is to choose the balls of the desired diameter.
If the separator is worn out, then there are two main repair methods:
- replace the entire outer CV joint;
- replace separator;
- swap CV joints.
The first method is simpler and most preferred, although it will be more expensive than the second. A lot of articles have been written about how to properly replace the outer CV joint and many video tutorials have been shot. Features and subtleties associated with each specific model car, maybe a lot.
The second way is to purchase a repair kit (which are produced mainly for domestic cars) or find an external CV joint for your car during disassembly, remove the separator from there and install it in the old CV joint. Naturally, before installing a used separator, you need to make sure that there are no visible signs of wear. Next, immerse it in a rust converter if it shows any signs of corrosion. After that, it will be useful to clean it with sandpaper.
The essence of the third repair method is to rearrange the grenades of the left and right axle shafts in places. This will help, because the direction of rotation of the rolling elements will change (there will be unworn areas involved). However, this will cause a crunch when moving. in reverse.
Another "cunning" way that allows you not to spend money on the purchase of the entire CV joint or its components. However, not every car will be able to “repair” in this way. Its essence is to replace the outer cage separator with the inner cage separator. There are, of course, two conditions:
- First, the separators must be identical to each other.
- Secondly, the wear of the outer ones should not be too strong, and the inner ones (ideally) should have almost no wear.
Since these two conditions are not met on all car models, therefore, such repairs can not be made on any car.
Internal CV joint
The inner CV joint, as well as the outer one, is protected by an anther from the outside. Accordingly, if its integrity is violated, dirt and water enter the hinge, which leads to its failure. Methods for repairing internal CV joints in this situation do not differ from repairing external ones: they must be washed, lubricated and the damaged boot replaced.
Another main problem with internal CV joints is the backlash of the drive shaft from the gearbox side. Visually, the difference between the "normal" state and the backlash can be seen in the video below:
Two types of backlash of the inner CV joint should be distinguished:
- directly in the inner hinge;
- in the connection of the drive and differential.
Since it is impossible to visually determine the presence of backlashes, and not every car owner will regularly crawl under the car and “shake” the internal grenade, it is necessary to be able to determine them differently. Most in an efficient way understand that there are backlashes in the internal CV joint - observe the behavior of the car at speed. Accelerate the car to approximately 80-90 km / h and see if the steering wheel beats and body vibrations appear at this speed. Pay special attention to the vibrations of the front panel, in particular, in the area of the pedals.
Important! Accelerate to this speed, and then continue driving without changing speed.
If you find vibrations, then accelerate the car again. Now the speed should be in the region of 100-110 km / h. If vibrations disappear after acceleration, we can conclude that backlash during internal grenade are present. It is necessary to remove it as soon as possible and make sure of this. If you have difficulty removing the CV joint drive, then use the following video instruction:
The reason for the backlash in the grenade is most often the wear of the spline connection of the shaft and the tripod. If the wear is small, then there is a simple method for repairing such a malfunction. So, first of all, it is necessary to clean all the elements from dirt and grease. Solutions will help you with this. detergents with water and gasoline or kerosene. After you have cleaned all the elements, look at spline connection. If you find corrosion on them, treat them with a file.
Do the same with the splines on the shaft. In order to completely get rid of traces of corrosion, place the shafts and sprockets in a rust converter. Next, dry the parts and treat them with a degreaser. Then assemble all the elements on the shaft, excluding sprockets. Before doing this, apply Loctite 648 to the shaft and sprocket. It is a kind of "glue" for such connections.

Put the sprockets on the shaft, twist them a little so that they fully engage. Now leave the whole structure stationary for 10 minutes. After that, you can finally assemble the drive and install it back on the car. Such a repair will completely eliminate backlash in the spline connection.
Another problem that motorists face is tripoid damage. In general, there are repair kits for the inner CV joint that will save you a lot of time. True, and they will cost a lot. If you do not want to spend money, then you can use the following method of repairing the internal CV joint:
The constant velocity joint - CV joint, is designed to transmit torque to the drive wheel of the car from the gearbox. This indicates that it is very important to maintain the assembly in good condition, when its parts are worn out, it is necessary to install new elements or completely replace the outer CV joint on the VAZ 2109.
The VAZ 2109 car is equipped with two types of CV joints:
- Internal, which transmits torque from the transmission to the shaft.
- External, engaging with the wheel hub.
On a VAZ 2109 car, it often fails outer element, therefore, it needs to be changed much more often than the internal one. This article proposes to get acquainted with the rules and procedure for carrying out work to restore the normal operation of the external CV joint with your own hands.
CV joints in a car VAZ 2109
After the production of front-wheel drive cars began, the question arose of effectively ensuring the equality of the angular velocities of the shafts - driving and driven. Further use in driveline crosses, with four needle bearings, led to an increase in the dimensions of the unit, the price of the structure increased, and the torque began to be transmitted with great vibration, the larger the angle between the shafts, the stronger it is.
Initially, the pledged resource for using CV joints is similar to the resource of a car, but after the start of operation, it was found that there is still wear and the outer part of the assembly wears out more. The use for the manufacture of moisture and frost-resistant material with good flexibility made it possible to protect the CV joints from rapid wear.
However, the action external factors, such as: moisture, abrasive, permanent deformations lead to a limitation of the service life of CV joints. In addition, there is a possibility that during operation and repair the anther may be damaged.
Cracks may form on the protective rubber, which is unacceptable for the normal operation of the assembly. The defect of the shaft, its curvature, is less noticeable to the naked eye, but the use of the part in the future is unacceptable.
Therefore, from time to time it is necessary to control the state of the external CV joint on the VAZ 2109 car, and, if necessary, perform it timely repair or replacement.
How to disassemble the outer hinge of a VAZ 2109 car
If, when cornering a car in front wheel drive knocks are heard, it is necessary to check the hinges of equal angular velocities. The presence of backlash, when shaking the hand drive shaft, or a torn anther indicates that a replacement of the outer CV joint VAZ 2109 is needed.
The design of the assembly is quite complicated, the parts are not interchangeable, when the boot breaks, dirt enters the hinge and renders it unusable. That's why the best option there will be an external VAZ 2109.
However, if the protective cover is damaged, a lubricant change is needed, and the hinge is disassembled to assess the condition of the parts.
To do this, the CV joint is disconnected from the car, and then:
- Using a special tool, the clamps in the photos of positions 5 and 9 are removed, holding the protective cover pos. 8, which is then shifted on the wheel drive shaft. If the drive of the right wheel, the cover must be tightened or turned out.

- With a punch or hammer, the hinge is knocked off the shaft. In this case, the force is applied to the clip pos. 3.
Tip: Do not attach pos. 2 load.
- The hinge is washed.

Positions: 1 - body; 2 - hinge separator, 3 - clip of the outer CV joint; 4 - balls.
Tip: Before you start disassembling the product, you need to note the relative position of all parts of the assembly, except for the balls. For this, paint or a touchstone are used.
- The outer hinge is fixed in a vise.
- The cage and the separator are tilted so that as much as possible one ball comes out of the groove of the CV joint housing.
- From soft metal with a screwdriver, the ball is squeezed out of the separator.
- All parts are unfolded in such a way that the adjacent ball is in the same position.
- All balls are pulled out. They can be pulled out in a different sequence - through one.
Tip: Don't let great effort separator rotation. This can lead to blocking of the balls and difficulty in further disassembly of the assembly.
- The separator with the cage is installed so that the elongated windows of the separator are located against the protrusions of the structure body.
- The separator is pulled out along with the clip.
- The clip is removed from the separator. To do this, a protrusion of the clip is placed in the elongated window of the separator, which is then rolled out.
Tip: If the separator has the same windows in the outer hinge, then it does not matter which window is used to remove it.
- All parts of the CV joint are washed again.
- Visually inspect their condition. Cracks are not allowed on the separator jumpers, there should not be deep pits, large scratches, corrosion on all working surfaces of the CV joints on the tracks of the cage.
The limit wear of the working surfaces of the elements should not exceed 0.1 mm. - If it is not possible to replace the outer CV joints of the part on a VAZ 2109 car, the entire assembly is replaced.
Assembling the outer CV joint of a VAZ 2109 car
The order of work is the reverse of disassembly, taking into account the following operations:
- All parts must be lubricated with SHRUS-4 grease before assembly.
- When installing the separator hinge with a cage into the housing, ensure that the marks that were made before disassembling the assembly match.
- The installation of balls in the separator must be carried out by tilting the cage, approximately, at an angle more than twice that of the separator.
- The hinge is filled with SHRUS-4 grease, with a volume of 40 cm3.
- Strictly in the center of the shaft, a new retaining ring is installed in the groove. The groove is filled with grease.
- The shaft rests against the cage, while it is necessary to maintain the alignment of the ring relative to the cage and the shaft.
- The end of the shaft is sharply hit with a hammer so that the retaining ring is compressed and slips through the hole of the cage.
- The “excess” air is released from the cover. To do this, the landing belt of the cover is pulled from the drive shaft with a screwdriver.
- Mounting clamps are installed.
- The presence of cracks in the zone of fixation and tightening with clamps, deformations, traces of contact between clamps and pavement. If present, the clamps are replaced with new ones.
- After completing the work, the CV joint should rotate without jamming, smoothly from the effort of the hand.
Replacing the outer CV joint of a VAZ 2109 car
The VAZ 2109 car care instruction suggests removing the outer CV joint on the VAZ 2109 on the raised part of the car and the removed wheel.
So:
- The hub nut must be unscrewed.
- Remove crankcase protection.
- Detach from lower arm pendants ball joint. If it is pressed in, both the support and the lever are unscrewed at the same time.
- Remove ball joint.

- The rack is retracted to the side, while the CV joint should be bent. The pulley that enters should be at an angle to the drive shaft.
- The hinge shaft, on which the splines are located, must be knocked out of the bearing, from the outer part of the wheel. For this, a metal spacer is used.
- The duster is removed.
- The grenade is knocked off the drive shaft.
- All old grease is removed. An aerosol such as WD-40 will help facilitate this operation.
Tip: The replacement of the external CV joints of the VAZ 2109 is carried out simultaneously with the replacement of the rings - the retaining and thrust rings located inside the grenade. The entire assembly is lubricated abundantly with grease.
- By setting new CV joint on drive shaft, it must be centered so that the fork enters evenly, excluding jamming.
- Perform final press-fitting of the drive shaft.
- Install the hinge into place.
- Clamp the boot with a clamp.
- Assembly of the entire node is performed in reverse order.
How the external CV joint is replaced on a VAZ 2109 car can be clearly seen in the video. Timely work to ensure the normal operation of CV joints will ensure reliable performance car VAZ 2109, and the price of subsequent repairs will be reduced.
The constant velocity joint (CV joint) is essential element any modern car, although a small number of motorists and auto mechanics know about its existence, and even more so repair.
The hinge performs a very important function - it transmits torque from the gearbox to the drive wheels. Due to the design features, the CV joint can rotate up to 70 degrees. That is why hinges are mounted on wheels, which also serve as guides.
Summing up, we can conclude that constant velocity joints are present on all front-wheel drive, as well as fully drive vehicles. In conditions modern market this is the vast majority of cars.
Since CV joints have become so widespread and so important role in normal operation vehicle, each car owner needs at least a minimum set of knowledge about the device, the principle of operation and the most common malfunctions of this unit. In this article, we will describe, among other things, repair work that will allow you to return faulty CV joints to normal operation, or at least get to the nearest car service.
SHRUS device
Before talking about repairs or hypothetical malfunctions in the CV joint drive, you need to accurately imagine what you have to deal with. If you hear the abbreviation "SHRUS" for the first time, we recommend that you read this paragraph especially carefully. In the photo below - an image of a CV joint drive, with the names of its main elements printed:

Usually, when the term "CV joint" is mentioned in a conversation, they talk about the entire drive. When it is necessary to indicate one of the two hinges (external or internal), this is specified separately. Externally, the drive does not look like a particularly complex unit, but it consists of two complex hinges. To have an idea of what you will face with a possible repair, look at the photo with a section of the CV joint drive:

The main elements of the drive include:
- retaining rings;
- the hinges themselves;
- protective covers - anthers.
The outer CV joint is connected to one of the front wheels of the car, the rear one is attached to the gearbox, and the shaft itself engages with the differential. Based on the location of the hinges, it is obvious that the outer CV joint will be subjected to heavy loads and interact more with the environment. This leads to the fact that it fails more often than the internal one. That is why it is so important to be able to determine the malfunction or changes in the operation of the external hinge in time in order to prevent serious damage.
Determining a malfunction in the outer CV joint
So, before disassembling the outer CV joint and proceeding with the repair, you need to make sure that it is really necessary. The following signs with a probability of almost 100% indicate that something is wrong with the external CV joint:
- Before driving, shift the vehicle into forward gear ( automatic transmission gears) or first gear ( mechanical box gear), turn ru left wheel all the way to one side. Next, start abruptly, pushing the gas pedal to the floor. A signal of a malfunction will be crackling and clicking from the front of the car (more precisely, “from the wheels”).
Important! Before starting such a maneuver, make sure that you have enough space to do it.
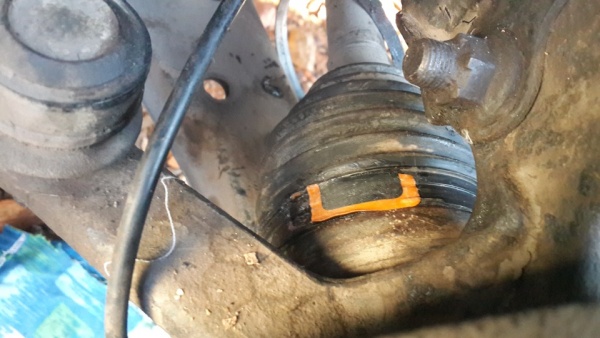
- Visual method: inspect the front rims. If you find traces of thick grease on them, it means that the outer anther has torn and the CV joint is virtually without lubrication and protection. It is most convenient to apply this method on cars on alloy wheels, because the stamped ones leave little room for review.
- Second option visual inspection: carefully inspect the anthers of the outer CV joints. If you find cracks, oil traces or any other signs of anther defects, it is necessary to repair the outer CV joint.
You can see complete information about diagnosing malfunctions of external CV joints in the video below:
Possible malfunctions
Despite the fact that the CV joint is the most reliable and durable unit in the entire car (its resource can significantly exceed the resource of any other part of the car when normal conditions operation), it often causes various problems. Usually they are just related to the violation of the so-called regime normal operation, that is, with the ingress of water, dust or dirt into it. From exposure environment the hinge is protected by a protective cover - anther, which is usually made of rubber or plastic.

Anthers are attached to the shaft with the help of special fasteners - clamps. However, the clamps for external CV joints are different from those used for water pipes. They look like this:

Also in the photo you can see a special tool for tightening clamps and the principle of its operation.
So, the main malfunctions of the outer CV joint are usually associated with a violation of the integrity of the anther and the ingress of dirt and moisture into the CV joint. This leads to the formation of corrosion and an increase in wear tenfold. If you are faced with such a problem, then the severity of its consequences directly depends on how long you have been using the car with a damaged boot.
To repair the boot, you will need a rubber patch for car tires, sealant, new clamps. The algorithm of actions upon detection of a violation of the integrity of the anther is as follows:
Important! This method only suitable for repairing rubber anthers, not plastic ones!
Another method of repairing the anther is rather a temporary measure that will allow you to get to a car service or garage, where you will replace the anther or carry out a thorough repair (the first way). Its essence lies in the winding of the anther big amount polyethylene and tape.
First of all, jack up the car, remove the wheel and clean the boot. Next, add lubricant to it with a syringe. Certainly, the best option it would be the removal of the boot, washing the outer CV joint with kerosene, stuffing with new grease. But since we are considering the budget express method, we will be faithful to it in everything. Now take a plastic bag or film, carefully wrap it around the boot and nearby areas of the shaft. To make sure that the winding does not interfere with the normal operation of the shaft - twist it in the direction of wheel rotation. Now all that remains is to rewind everything with tape and hit the road, avoiding pits, puddles or clearings with tall grass.
Advice! You can also squeeze out old grease by replacing it with a new one. This will greatly increase the likelihood that no serious malfunctions inside the hinge will not happen.

In more detail, the process of repairing the anther in the second way is considered in this video:
Dismantling and repair
There are several ways to detect malfunctions in the outer CV joint:
- detect visible destruction of the protective cover, violation of its tightness: cracked areas, grease on the outer surface, other defects;
- by ear to recognize the sounds characteristic of this type of malfunction: clicks, crackling.
If in one of the two ways above, you have determined that you may have one or both external CV joints faulty, then you need to disassemble them and make sure of this. I think that many motorists will need instructions on how to disassemble the outer CV joint. It should be understood that the different brands cars may have their own design features, so the instructions below will contain the main points common to most cars.
Before you start, find a garage with viewing hole or a lift. If you do not have such an opportunity, a dry room with a flat floor will do. Next, rip off the wheel nuts and hub nut. Jack up the car, completely unscrew the wheel nuts and remove it. For safety, place a wheel or any other support under the car.
Now unscrew the hub nut to the end and remove the retaining ring from the shaft. Next, remove brake pads and a caliper, securing it with some kind of hook to the shock absorber strut, otherwise it will hang on brake hose that can break the waters by its weight. Then unscrew the bolts securing the wheel drive with the head.
Then you need to press the ball joint out of the fist. Since we removed the caliper in advance, this will greatly facilitate the task (although this step can be skipped if access to the CV joint drive and ball joint is fairly free on your car). Loosen the ball joint bolts and then light blows hammer, knock the ball out of the fist. For those who still have questions about how to press in a ball joint, a detailed video instruction:
Now you can remove the hub, which means there is direct access to the outer CV joint. Learn more about how to get to external CV joint you can find out in the video:
So, you disassembled the outer CV joint and found signs of wear on its elements. Does this mean that you will have to completely replace the outer grenade, or are there ways to make repairs yourself? Of course the options self repair exist and it all depends on which of the elements of the grenade was damaged.
If only the rolling elements are worn out, then there can be only one repair option - buying new ones. You can easily find balls in any car shop or at the nearest car market, and at a very low price. The most important thing is to choose balls right size.
If the separator is worn out, you can try two ways to repair it (excluding the option of buying a new CV joint):
- immediate replacement separator;
- rearrangement of CV joints.
The essence of the first method is to purchase a repair kit for external CV joints or to purchase a used separator for analysis. When buying a bushy separator, inspect it carefully and make sure it is much less worn than yours. Before installation, soak it in a rust converter, and then clean it with sandpaper. Even if there were no signs of corrosion on it, such a procedure will not harm it.
The second method is very simple: you will need to rearrange the grenades from the right and left half-axes to the other side of the car (that is, the left - to the right, the right - to the left). This method can help, because usually the cage wears unevenly and when changing the direction of rotation, non-worn areas will be used.
Inner CV joint VAZ 2110 or constant velocity joint , or popularly "grenade", is integral part transmission of a front wheel drive vehicle.
Its main role is the continuous transmission of rotation from the gearbox to the wheels at different angles. Despite the same principle of operation of all CV joints, various models cars they are different design features. Besides different conditions operation cause differences in the device of the external and internal CV joints.
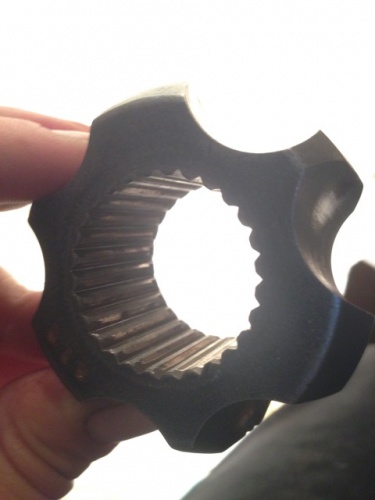
The CV joint performs an important function in the car, it consists of seven parts:
- Retaining ring.
- Balloons.
- Separator.
- Anther, which technical guidance listed as bellows.
- Frame.
- drive shaft.
- Inner rim.
The VAZ 2110 drive unit is responsible for transmitting torque to the wheel from the gearbox. The CV joint allows the front wheelset to perform turns by normalizing the changing angle between the axle shafts. There are two grenades in the device of the machine: the outer one transmits rotation to the hub, and the inner one is needed to transfer rotation from the gearbox to the shaft.
Where is the inner CV joint VAZ 2110
It is easiest to see it from the bottom of the car, by the way, and you will have to remove it by crawling under the bottom, although you can do without it (For example, you can put planks under the front wheels and raise the front part with two jacks, provided that both jacks will stand on these planks, thereby before will be higher, this is especially convenient if the car is tall), but still better car drive onto the lift and replace the CV joint you need with a new one, but we’ll immediately explain to you what the outer and inner CV joints mean, so that you understand this and don’t get confused anymore (It’s just that in the article we will often talk about them and so that you immediately get what kind of CV joint are we talking about), so the outer one is the one that faces the car wheel and is inserted into the hub (Both outer ones are indicated by green arrows), and the inner one is the one that is inserted into the box (They are indicated by yellow arrows) and the entire CV joint in the front four drive cars, two of them are placed on the left side and go to the left wheel, and the other two are on the right and go to right wheel, but there are only two drives on which CV joints are installed, and both of them are indicated in the photo by blue arrows.

The location of the inner and outer CV joint VAZ 2110 is indicated by arrows
Diagnostics and troubleshooting of the internal CV joint VAZ 2110
If you constantly pay attention and monitor the internal CV joint, then it will quietly serve 150-200 thousand km. Otherwise, malfunctions may appear already in the first hundred thousand km.
The main enemies of any hinged mechanisms are dust and dirt, which play the role of an abrasive and accelerate the wear of the grenade. It is worth the car owner to miss the damage to the elastic cover and drive for some time without replacing it, as the same dirt gets inside, which sooner or later will do its job, even if you change the boot.
There are other reasons leading to malfunction and replacement of elements:
- there is not enough lubrication in the mechanism or its quality leaves much to be desired;
- too aggressive driving bad roads, constantly creating extreme loads on CV joints;
- factory marriage in the details of the assembly.
Conclusion: most of the causes can be foreseen and prevented with the help of prevention, postponing the replacement of grenades indefinitely.
If during the operation of the VAZ 2110 car the following symptoms of a malfunction appear, then additional diagnostics must be carried out:
- while cornering, a characteristic crispy sound is heard from the front of the car, as if during operation, steel balls touch the body;
- the same, only instead of a crunch, a knock is heard, it can disappear during rectilinear movement;
- a constant crunch that does not disappear when driving in a straight line indicates wear on the internal grenade.
Remember that after the appearance of such noises on one side or both, it is impossible to immediately delay the repair. Otherwise faulty CV joint can do a lot of trouble right on the go.
To make sure that the grenade is broken, you can check it in 2 ways:
- Choose a flat area so that there is enough space for the Niva to turn around. Make a few circles on it for and counterclockwise, turning steering wheel all the way. Listen carefully for the sounds that come up. If they look like a crunch, go to part 2 of the diagnosis.
- Install the machine above the inspection hole and check for play in all 4 nodes by manually swinging and turning the axle shaft in different directions. A worn hinge will immediately make itself felt.
- If at the same time it was found that the anther was damaged or water was flowing out of it, then the CV joint in this place must have become unusable.
Now let's talk in more detail about the backlash in the ball bearings. The backlash resulting from the wear of the support will also negatively affect the condition of the CV joint. And if, when driving at speed, the pin of the ball joint is pulled out of the mount, the inner CV joint can generally be broken. By the way, all the main blows of fate are taken by external grenades. And this is due to the fact that they are connected through the hub to the wheel. It is from the wheel that the CV joint receives powerful shocks and shocks. Yes, and water with mud from under the wheels gets faster and more on the outer CV joints. Therefore, in order to damage the CV joint, which is connected to the box, you need to try. An exception is the situation when the pin of the ball joint is pulled out.
Inner CV joint VAZ 2110 - do-it-yourself step-by-step instructions for replacing
Before starting work on self replacement internal CV joint VAZ 2110 you need to prepare everything.
To do this, you need to fix the car, turn on speed 4, tighten the handbrake. Fix rear wheels anti-rollback wedges. If they are not available, use bars of a similar shape. Remove the protective cap, unscrew the hub nut with a “shoulder” (extension) - a pipe or a mount. After being removed hub nut, unscrew the wheel bolts.
Let's move on to the step-by-step instructions:
- Jack up the wheel on which the CV joint is to be replaced.
- Unscrew the bolts to remove the thrust washer of the hub nut.

- Remove the 2 bolts that secure the lower ball joint of the steering knuckle.
- If the CV joint is replaced on the right, turn the steering wheel to the maximum to the left, and if on the left, then to the right.

- Pull back rounded fist and a rack. Remove the splined end of the outer CV joint from the hub.
 Remove with a crowbar internal hinge from the gearbox.
 - Fix the drive shaft in a vise, remove the clamps from the outer and inner CV joints. Turn the anthers inside out. If they are torn or cut somewhere, you can simply cut them off with a knife.

- Dismantle the CV joint VAZ 2110 from the shaft. You can use a hammer and a wooden or bronze tip.
- Assembly is carried out in the reverse order. At the same time, install a new hub nut. At the end of the tightening, you need to tighten its edge to avoid unwinding.

- When installing the inner CV joint, a plastic plug is placed on the end of the shaft.

- Before you put the CV joint VAZ 2110, you need to make sure that it is applied enough lubricants. Install the retaining ring on the inner CV joint.

- After the drive is put into the box, put it in the side gear so that it is completely fixed. This can be done by lightly tapping with a hammer on the surface of the wooden adapter around the entire perimeter of the shaft axis.
On front wheel drive cars mobiles there is such a part in the drive as a CV joint - this It provides the transmission of torque from the transmission to the drive wheels. Motorists call this part "grenade". There are two CV joints in the car. It is external and internal. Let's talk about the outdoor grenade.
Device
For those who have just got behind the wheel and purchased a front-wheel drive car, this information will be very useful. Often, beginners are practically unfamiliar with the device of the car and cannot correctly diagnose problems. Let's try to fill this gap. An external grenade, or CV joint, is mounted on a half shaft. The element is a shaft with retaining rings that hold the hinges. CV joints work in difficult conditions and are equipped with anthers for protection and durability.
The outer hinge is connected to the front wheel through a spline connection. The hub nut holds it on the wheel. At the other end of the axle shaft is an internal hinge, which is fixed to the gearbox and meshes with the differential.
As for the CV joint itself, most front-wheel drive cars use the so-called Rzeppa joint, or a six-ball joint. It has an outer and inner cage with grooves in which the balls go. The device also has a separator. A hinge of this type shows itself perfectly even on very high revs and the maximum turned wheels in any direction.
There is another type of SHRUS. It is more commonly installed in Japanese and European cars. This is the so-called tripod. In its body, a part in the form of a three-beam star is fixedly installed, on which the rollers are mounted. The hinge receives torque through a fork with spherical channels in which the rollers move. This design is good from all sides, but the only drawback is the small angle of change of the axis of rotation. But the very possibility of axial movement makes it possible to use the tripod as a hinge of equal angular velocities.
The inner CV joint works when the angle of rotation of one of the drive wheels is from 10 to 30 degrees. The outer grenade is rotated at the same angle when moving straight. When the driver turns the steering wheel and the car turns, the outer joint angle rises up to 60 degrees. When the car moves over bumps, the distance from the outer CV joint to the inner one is almost constantly changing. The axle shaft, located between the two hinges, is fixed so that when the distance changes, the shaft moves in or out. Half shafts, where on the one hand there is a “Rceppa” hinge, and on the other hand, a tripod, expensive to manufacture. Therefore, on budget models Rceppa hinges are installed on both sides of the axle shaft.

Typical malfunctions
There is an opinion that an external grenade is a very reliable and durable element in the entire car. The resource of CV joints can very noticeably exceed the resource of all other elements under normal operating conditions. Any serious problems does not happen with hinges. Usually, all malfunctions are associated with a violation of their normal operation.

As we know, inside the hinge there are balls and channels for them. Under the influence of dust, dirt, water channels and balls wear out intensively. The CV joint is protected by a rubber boot fixed to the axle shaft with special clamps.
Any malfunctions are associated with defects in the anther and ingress of sand, dirt, water into the assembly. This leads to corrosion and intense wear. In this case, a replacement will help. The price of a grenade is different. For example, for the "top ten" it costs about 1100-1300 rubles.
Symptoms
If the grenade (CV joint) is faulty, then this can be determined by the characteristic crunch when driving on inverted wheels. The crunch will not be during the direct turn of the steering wheel, but in the process of turning the car in one direction or the other. Also, the sound can be heard at the beginning of the movement, especially when sharp starts.
Causes of malfunctions
So, it often happens that there is a defective defective VAZ external grenade on sale (more often Chinese made). It's all about the low quality of the metal. You can also highlight the violation of the installation rules during the replacement process. SHRUS will quickly become unusable if it contains an insufficient amount or complete lack of lubrication. Lubricant may leak from the unit if the boot is damaged while the machine is moving.

Often, careless driving on bad roads leads to failure of the hinges. CV joints do not like bumps and bad bumpy roads. And finally, we can distinguish normal wear and tear when the hinge "dies" on its own due to age.
Diagnostics
The first thing to try is to determine if the outer grenade is crunchy. The vehicle must be stationary. In turn, pull the axle shaft on each side. If there is a knock, then there is a backlash in the grenade. This hinge needs to be changed. Another method will require the dismantling and disassembly of the assembly - a malfunction can be detected in this way.

Next, the car must move along flat road. To find out which hinge is out of order, turn the steering wheel all the way to the right, and then to the left. If there is a crunch after turning to the right, then you need to replace the outer grenade with the right one. If it crunches after turning to the left, then you need to change the left one.
Repair
First you need to get to the grenade. To do this, you need to break wheel bolts and hub nut. Then the wheel is removed completely, and then the hub nut is unscrewed. Next, the retaining ring is removed from the shaft. Then - stopping support. Next, the drive mounting bolts are unscrewed, the ball joint is pressed out. Now you can completely remove the hub and get direct access to the outer grenade. She takes off and understands.
If there are signs of wear on the hinge elements, then the grenade changes completely. However, this will not particularly hit your pocket. For example, the price of a grenade for a VAZ is on average 1200 rubles. If there is wear only on the balls, then they are sold separately in car dealerships at low prices. The most important thing is to pick up the balls right size. If the separator is worn out, then the hinge can be repaired by replacing the separator or rearranging the CV joint grenade.

In the first option, it is enough to purchase repair kit for repair or choose a suitable separator at one of the dismantling sites. The main thing is to wear new part was smaller. The second way is to swap the CV joints from the right and left axle shafts to the other side. The point is that the separator has uneven wear. With a different direction of rotation, non-worn parts will work.
Replacement
Not everyone knows how to change the CV joint. It's actually quite easy to change. Instead of the one removed, they install on the axle shaft new node, fill with grease and assemble in reverse order.


