Problem: Starter cranks engine with difficulty, "sticks" and stops. Wherein accumulator battery ok, loaded. The reason for the “jamming” of the starter is that the anchor touches the stator. The gap between the armature and the starter stator is tenths of a millimeter, so the slightest misalignment of the starter armature shaft relative to the stator leads to the armature poles touching the stator poles. The misalignment of the starter armature shaft occurs due to wear of the plain bearings in which the armature rotates (wear of the armature shaft necks is negligible). The front bearing wears out more intensively, because. it bears the main load. The bearings are brass bushings. front bearing fastened (inserted with an interference fit) into the hole in the clutch housing. Rear bearing mounted in the back cover (housing) of the starter. Starter with permanent magnets The stator has an additional bearing on the front cover of the starter. Starter with stator windings (BOSCH 00 208 416 (417) WV AUDI 055 911 023 J) has no bearing on the front cover.
Treatment. Disconnect the wires from the + battery, disconnect the wires from the starter.
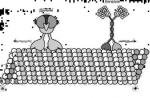
We unscrew the lower long starter mounting bolt and screw it in from the opposite side - this is necessary to “attach” the engine to the front support, otherwise it will “dive” forward. You can jack up (with a hydraulic jack) the engine behind the gearbox closer to the left wheel. Unscrew the remaining two starter mounting bolts and remove the starter. As mentioned above, the sleeve is inserted into the clutch housing with a slight interference. To extract it, you will need an M12 tap (internal diameter of the sleeve 11mm) and a drill chuck. We insert the tap into the cartridge, clamp it, then carefully try to screw it into the sleeve (cut the thread). This must be done very carefully, because. the steel of the tap is very fragile (especially in the cold;) and the slightest distortion with effort - the tap is broken - the shank remains in the hand - the cutting part is in the sleeve - everything is fine, they have arrived. No, not a freak. The length of the sleeve is about 14mm, which means that about 10-20mm of the cutting part of the tap is left in the hand. We take a nut (or an old sleeve) with an M12 thread (like a tap) and screw it onto a broken tap (if it breaks off so that there is nothing to screw on, we take a bolt 10 centimeters long and with the corresponding thread and grind the grooves like a tap or run for a new one tap). The tap (usually for these cases) has 3 grooves, then we insert nails into these grooves (under the nut) right size so that the ends of the nails protrude beyond the end of the tap by about 10mm., see Fig.1. Now we must try to insert this design into the sleeve with the broken end of the tap - it will not work the first time, but then try to unscrew the chip.

If the sleeve is planted without a large interference (factory assembly, factory sleeve - the sleeve has not changed), then after 1-3 turns of the tap it will begin to scroll and it can be carefully “turned out” with a tap without distortions. If the bushing is “sticky”, then it is necessary to cut a thread in it by 5-8 turns, then remove the tap and screw in a suitable bolt instead of it and pull out the bushing for it. The new bushing is inserted and lightly pressed in.
After several replacements, the new sleeve is already inserted easily by hand. However, during operation, this leads to the fact that the sleeve can rotate in the mounting hole and then, over time, the mounting hole breaks, an eccentricity is formed in the crankcase hole, which leads to a misalignment of the starter shaft and further - starter jamming - the impossibility of starting the engine. As it turned out from communication with various servicemen, this is a fairly common disease of golf courses and trade winds over 10 years old.
I managed to cure it in the following way.
0. Determine the size of the eccentricity.
1. a. We grind (purchase, order) a larger bushing (by the value
eccentricity) outer diameter. Remove excess metal.
b. We take new bushing and solder a few mm of solder on the side. We remove the excess.
2. We insert the sleeve with a slight interference.
3. If the starter is with permanent magnets, then it is better to replace it with a starter with windings on the stator - such a starter has a larger gap between the armature and the stator and, therefore, the permissible shaft misalignment is also larger (during disassembly, the starter costs about 2500 rubles, when buying, pay attention to the condition shank - this is which will be inserted into the sleeve - it should be without scratches, polished). It is optimal to also replace the rear starter bushing at the same time in order to “forget” about the problem for a long time. By the way, at the same time, you can replace the brushes, since the starter is disassembled, the brushes can be taken from the VAZ-2108 and turned a little. Regular brushes welded, but you can also solder neatly with a powerful soldering iron, pinch the current leads of the brushes with round-nose pliers during soldering so that they do not get tinned, otherwise the current leads will lose flexibility. That's all, good luck with the repair!
Good afternoon, dear site visitors site. In this article, we will talk about starters, specifically we will talk about such work as replacing the starter bushings VAZ 2107-2110. This problem(wear of starter bushings), very common among cars that have been in operation for a long time and need partial after-sales service due to gradual wear of parts.
The starter armature rotates on special bushings made of bronze with graphite additives to reduce frictional wear. The resource of the bushings is usually large and their failure is possible only during long-term operation.
On VAZ cars, several types of starters are installed, which differ significantly from each other, but the principle of replacing bushings is almost the same, so we will consider everything in order.
We do not wake up, as they say, "pour water" and immediately get down to business.
Let's start with VAZ 2101-2107 cars.
In the starters of this model, we need to replace two bronze bushings, which are located in the front (in the toe) and in the back cover. Here is the bronze bushing pressed into the starter toe.
She needs to be knocked out of her seat. This is done with a hammer and a specially made tip. The tip can be a piece of a suitable pipe or a metal round timber of a certain diameter.

When pressing out, be careful that the guide does not go skewed, because it is possible to damage the bushing seat in the starter toe.
After removing the old bushing, we begin to install a new one. When buying new bushings, be careful that they are the size and shape you need, for this you can use a caliper and measure the dimensions of the old bushing. This is how it looks, worn and new.

After lubricating the new bushings with oil, we press them back into the starter toe. The bushing should go in without much effort, but if it goes tight, you need to process it a little on the outside with fine sandpaper, otherwise there is a danger that the body of the starter nose may burst at the place of pressing.

After pressing, the sleeve is pressed in and its internal size is reduced. If in removed position she found the starter armature freely on the shaft, then after pressing the starter armature does not enter the sleeve or if it enters it is very tight. For free rotation of the anchor, we need to process the sleeve with a special reamer with a diameter of 12 millimeters. It is better to take a sweep of this type, this will be the best option.

Such reamers do their job perfectly and you can easily adjust the inner diameter of the sleeve to the desired diameter. The ideal bushing fit is when the armature shaft turns freely in the bushing and does not dangle.
Rear hub changes in the same way as the front.

The rear hub changes in the same way as on all starters, but there are some problems with the front one, and I will continue to talk about this.
The fact is that this type of starter is used on this car (VAZ 2109).

Here, the starter has only one support at the rear, and the second support is located in the gearbox housing. This is the whole task, in order to replace the sleeve, which is installed in the crankcase of the box.

Here, just taking and knocking out the damaged bushing will not work, because there is no through hole where it would go, so we need a special puller with which we can pull it out of the gearbox housing.
There is also such a situation when the bushing is removed together with the starter and for a turn it is not fixed in its seat How to fix this, I'll tell you a little further.
Now imagine you removed the starter and found this picture.

You can see how flattened the sleeve. In this state, the anchor moves from its place and starts to get on the magnets (shoes), as a result, the starter does not turn well and the battery runs out quickly.
To pull out the bushing, you need to make such a puller.

It is based on an M14 tap and a handle welded to it. Then a massive metal clip. The tool is ready to use. We twist the tap into the sleeve and knock it out. This design is similar to a small reverse hammer.

In this way, we easily removed the old bushing.

Before installing a new bronze bushing, we need to make sure that it is of a normal size, because if we press it into the body, then it will not be possible to go through it with a reamer, which means we need to make the inside diameter a little larger in the bushing. You can simply buy a new bushing with an already larger inner diameter.
If the sleeve calmly falls out of its place, then you can make a new one with increased dimensions or seat a standard one on the thread lock, while degreasing the landing site with a solvent.

These replacement options apply to all VAZ car starters, and proper work will ensure normal work starter.
If the bushings are tight, the starter will jam after two seconds of operation, or generally turn slowly and heavily. Some masters say that a tight fit of the bushing shaft is good, they say, it will grind in, believe me, while they grind in, you will want to remove the starter ten times and redo it all over again. So it's better to do it right now.
Well, that's all for now.
Until new posts.
I found a video clip on how to replace the bushing on the starter. Share your knowledge on how to change the bushing on the starter with your own hands?
Comments
Andrey wrote (a), 09.06.2014
Somehow I got in trouble. I had to go somewhere, I get into the car, but it won't start. And the battery is charged, and summer is in the yard, and iron Horse stands like a statue. The reason lay in the worn starter bushing. This leads to a warping of the armature, and it clings to the stator. Replacing the bushing, in my case it is the front bushing, in general, is not difficult. We recline the wires from the battery, as well as remove them from the starter. Now you need to unscrew the lower bolt that secures the starter. But it should be screwed on the other side so that the engine does not move where it is unnecessary. You can insure the motor, a jack under the gearbox. When this is done, unscrew the remaining two bolts, and remove the starter itself. The actual worn sleeve is inserted into the clutch housing, and in order to remove it, we need a twelve tap. Carefully cut the thread into six or seven turns, after which we screw in the bolt of the appropriate diameter and remove the bushing. Then, with effort, we insert a new one and assemble the entire structure back. And by the way, be careful, the tap can break and you have to sweat to remove the sleeve.
Michael wrote (a), 12/16/2014
Let's first figure out what type of starter you have. To do this, it must be removed from the engine. Attention! Be sure to disconnect the battery before removing! Check out the starter. If your bushing is assembled in a single housing with a starter, then there is no problem. Disconnect the starter. Press in or knock out the old bushing and insert the new one. Another thing is if you have a starter like on a VAZ - 2109. A bushing in the engine housing. A special bushing puller is required. You can find it at any auto market or auto parts store. The replacement process with a puller will not be difficult. How to determine when to change the bushing? The machine itself will tell you this! When starting the engine, the starter will begin to wedge. So it's time to change the bushing. Good luck to you!
Stabilizer bushings roll stability i are an integral element of the system that ensures the lateral stability of the machine in corners. During the turn, the centrifugal force tends to tilt the body in the opposite direction, and the stabilizer torsion bar, which is attached to the body and suspension with bushings, resists such influence. Over time, the bushings wear out, collapse and become unusable, after which they must be replaced. We will talk about how to determine if the bushings require replacement and how to change them.
What are bushings for?
The anti-roll bar works on the principle of a torsion bar - a twisting beam, due to which a change in the height of the right wheel relative to the left one leads to twisting of the steel bar from which the stabilizer is made. The task of the bushings is not only to attach the stabilizer to the body, but also to reduce the noise of the entire system. Rubber or polyurethane, from which the bushings are made, has good strength and elasticity, due to which the change in the height of one of the wheels of the axle takes place without knocks and squeaks. In addition, it is impossible to rigidly attach the stabilizer to the suspension and body due to the fact that as the bend changes, the distance from the edge of the stabilizer to the suspension attachment point also changes. Very often, faulty bushings make various sounds - knocks, squeaks, especially during the passage of speed bumps or in sharp turns. This is due to the fact that the sleeve either loses its elasticity, becoming too rigid, or sand or dust is packed under it.

How to check bushings
Checking bushings consists of two stages:
- visual inspection;
- mechanical impact.
To check the bushings, the car is rolled into a pit or overpass. It is undesirable to perform these works on a lift because the stabilizer has to be pulled hard to check the bushings, and this can lead to a fall of the machine. It is all the more undesirable to use jacks, because by pulling the stabilizer a couple of times, you will tip the car over. It is not difficult to predict the consequences of such a development of events. Even the quick arrival of rescuers and emergency delivery to the hospital will not allow to avoid serious harm to health. If the rescuers are delayed, then you can die from a crash syndrome, internal bleeding or pain shock.

Target visual inspection is to detect cracks and breaks in the bushings. If at least a small crack or tear is found on any bushing, then the entire set must be changed. For mechanical impact grab the stabilizer near the bushing that connects it to the suspension, and start pulling hard in different directions. If squeaks or knocks appear at the same time, the bushings must be replaced. Do not be afraid to damage the bushings, body or stabilizer, because the loads during movement are much stronger than you can create, even pulling with all your might.
How to replace front and rear bushings + Video
In contrast to the test, which must be performed only on a pit or overpass, the replacement of bushings can also be carried out on a lift or jack and two stands. For more information on how to properly raise the car on jacks, read the article (safety for car repair and maintenance). You will need the following tools to replace bushings:
- a set of socket and open-end wrenches;
- metal brush;
- soap solution;
- graphite lubricant.
Preparation for replacing the stabilizer bushings on all machines is the same. It is necessary to hang out the front or back machine, make sure the machine does not fall, then remove the wheels and engine guard (if fitted). After that, with an iron brush, clean all the bolts and nuts securing the bushings to the body or suspension. Often, the bushings that fasten the stabilizer to the suspension are made in the form of a part with two holes and silent blocks installed inside. It is much easier to change such bushings as a whole, rather than individual silent blocks. It will cost a little more, but you won’t have to suffer with pressing out old silent blocks and pressing in new ones.
The only difficulty that arises in the process of replacing the bushings is the difficulty in unscrewing the bolts that secure the bushings and clamps to the body. It is especially difficult to do this work on a machine with a subframe, so you need to tune in hard labour in difficult conditions.

- First of all, the stabilizer is disconnected from the suspension;
- Then the bolts securing it to the body are unscrewed and the stabilizer is pulled out;
- Old bushings are removed from the stabilizer, cleaned of dust and dirt and washed with soap. This procedure allows you to remove dust from the surface of the stabilizer, because dust is a strong abrasive that can quickly render a new bushing unusable;
- Now the new bushings are smeared with soapy water from the inside and put on the stabilizer;
- After that, the stabilizer is inserted into place and screwed to the body and suspension.
It is advisable to lubricate the threads of bolts and nuts with graphite grease, this will keep them from sticking and make it easier next replacement bushings. Then they put on the engine protection, wheels, tighten the nuts or bolts and remove the car from the stands or lift.
If the transverse stabilizer bushings in the suspension fail, this can hardly be called a critical failure requiring immediate repair. Because of this breakdown, the car will not lose control and the wheels will not fall off. But in order to drive a car with broken bushings, the driver will need very strong nerves. Because the knock and rattle that appeared due to worn bushings will be heard in any cabin. In this article, we will tell the reader how to do it yourself with the replacement of the anti-roll bar bushings in cars both domestic and foreign production.
Functions of the stabilizer bar bushings
Made from thick rubberMost modern machines the anti-roll bar is a mandatory element of the suspension. When the vehicle enters a curve, its roll increases and it may roll over under the action of centrifugal force. When the car exits the corner, its body begins to sway, which makes it difficult to align the trajectory of movement. As a result, anti-roll bars appeared in the car suspensions to prevent unwanted swaying. The stabilizer is attached to the suspension with steel brackets, under which there are elastic bushings made of polyurethane (or extra dense rubber). Their purpose is to dampen suspension vibration and guide the stabilizer bar when entering a corner and when driving over rough roads.
signs of wear
- A strong creak that occurs when driving on a rough road. When entering a turn high speed this creak turns into a rattle.
- Stabilizer bar lift. It manifests itself in the form of a thud, which is heard when the front wheels of the car simultaneously fall into a deep pothole in the road.
Causes of failure
- Physical deterioration. Most cars (especially domestic ones) are initially equipped with rubber transverse bushings which have a short service life. After 2–3 years, they completely exhaust their resource, become covered with cracks and fall apart (it is for this reason that prudent car owners change rubber bushings to polyurethane ones immediately after purchase).
- Chemical impact. Since the bushings are located close to the wheels, they are regularly exposed to de-icing chemicals, the effect of which will significantly reduce the life of the rubber bushings.
- mechanical impact. If the car is constantly used on roads whose quality leaves much to be desired, even reliable polyurethane bushings will not last long (because in such conditions they are subjected to increased friction and are constantly subjected to strong shocks).
Which bushings to choose
When choosing new stabilizer bushings, preference should be given to products made of polyurethane. Often, motorists opt for bushings from SASIC, 555 and TRW.
Tools and Consumables
- Set of new stabilizer bar bushings.
- Open-end wrench set.
- Screwdriver flat (medium size).
- A set of socket heads with a collar.
- 2 jacks.
- Anti-recoil shoes.
Replacement sequence for VAZ 2107
- The car is installed on the inspection hole, after which the crankcase protection (if installed) is removed using open-end wrenches. Then under the rear wheels of the car are placed wheel chocks and the front wheels are jacked up.
- Now, with a 12 open-end wrench, the nuts on the brackets are unscrewed, where they are attached to lower arm pendants. This is done on both sides of the stabilizer bar. Under the nuts are engraving washers. They are removed by hand.
 Nuts are shown by arrows
 - Now you can remove the brackets. After removing them, you can remove the bushings. To extract them, the stabilizer bar is bent with a crowbar. The rod is held with a crowbar, the sleeve is removed manually. The bushing on the other side is removed in the same way.
 Scrap is used for this.
 - In addition to the two extreme bushings, the VAZ 2107 has a pair of central stabilizer bushings. If you need to replace them, you will have to completely remove the stabilizer bar, which is mounted on two brackets. The nuts on the brackets are unscrewed with an open-end wrench by 14.
- After removing the rod, the bracket is clamped in a vise, and the rod is carefully removed from the sleeve, then the central sleeve itself is removed.
 The sleeve is inside the bracket, clamped in a vise
 - Worn bushings are replaced with new ones, after which the stabilizer bar and crankcase protection are installed in their original places.
Video on work
Important Points
- When unscrewing the nuts on the brackets, care should be taken: the studs on which the brackets are attached become brittle over time and are easily broken with an open-end wrench.
- It should be remembered: the brackets holding the extreme bushings are different, although it is far from always possible to see this with the naked eye. The distance between the pin holes in the left and right brackets differs by 3 mm. Therefore, before removing, it makes sense to mark the staples with a marker or chalk so as not to confuse them during reassembly.
- Removing the stabilizer bar from the bracket can be difficult, especially if it is heavily rusted. To facilitate the task, the rod and bracket should be liberally lubricated with WD-40. If liquid is not available, liquid dishwashing detergent or plain soapy water will do.
Bushing replacement sequence for Mitsubishi Pajero 4
- Using a 12 open-end wrench, 4 bolts are unscrewed, which hold the crankcase protection of the car.
 To do this, unscrew 4 bolts
 - Access to the bolts on the mounting brackets of the anti-roll bar.
 Bushings are underneath.
 - These brackets are easily unscrewed with a socket head with a ratchet.
 Removable with socket head
 - After the brackets are removed, the stabilizer bar moves down, and access to the bushings opens. Installed in place of worn out
If we compare the device of anti-roll bars on domestic cars and foreign cars, you can see that on our cars it is a little more difficult to get to the stabilizer bushings. If on Mitsubishi Pajero 4 to replace the bushings, it is enough to unscrew a few bolts, and this can be done in any garage, then in the case of the "seven" you will need scrap and viewing hole. However, with due patience, it is quite possible to fix the breakdown on your own.