In this article "Tuning KAMAZ" we have collected the best tuning in photos and videos from around the Internet. KAMAZ is perhaps the most famous Russian-made truck in the world. This car has been mass-produced since 1976. Since those times, a lot of time has passed, and KAMAZ has been modernized more than once. The KAMAZ team also participated in the world-famous Paris-Dokar races, where it repeatedly won prizes, including first place. This machine is used in many fields of human activity, ranging from military to consumer. You can also see it on our website.


Tuning KAMAZ is not a simple thing. Since this truck is designed to transport goods or people, it all depends on the modification of KAMAZ. Tuning KAMAZ can be both winding and home-made, that is, made by hand. The tuning uses various cab optics that improve the aerodynamics of the truck. Also, the car is supplied with additional light, including fog lights. The cab, body, sleeper, engine, suspension and other units capable of improving the appearance of KAMAZ are subjected to tuning. All these upgrades can be seen in the photo and video in the article.


In the photo, KAMAZ tuning was made by the plant's specialists to participate in the Paris-Dokar international races. The machine has been upgraded to drive in the most severe and unfavorable conditions of our planet.


Tuning this KAMAZ made for experimental purposes. The machine is equipped with caterpillars, which is extremely convenient for areas of the far north. Where snow lies most of the year. Such KAMAZ can transport both cargo and people to hard-to-reach areas.


Video tuning Kamaz
In this video, you can see interesting options for tuning KAMAZ, both from the manufacturer and from the lover of these trucks. After viewing the article, be sure to leave your feedback for our users or subscribe to one of our channels to receive the latest news, photos and videos collected for you.
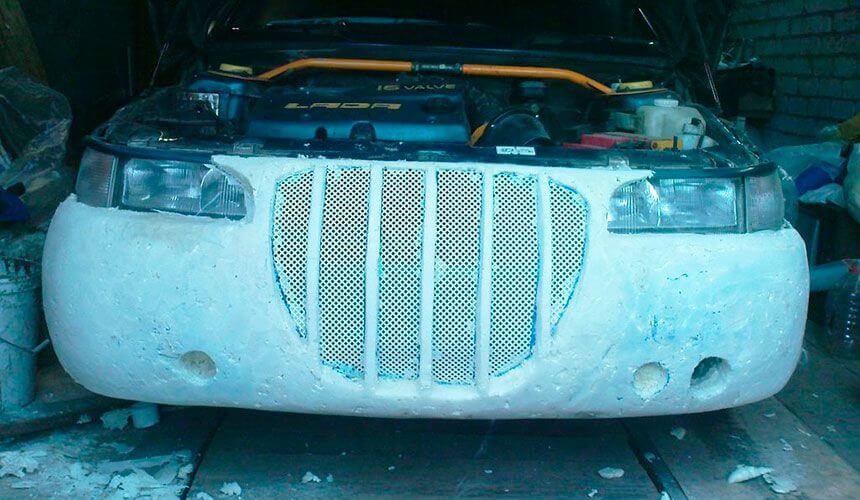
If you want to radically change the look of your car, then you should think about tuning the front bumper - this is an easy way that gives you many opportunities for a flight of fancy. Moreover, the modernization of this part can be completely done at home, and at the same time, do-it-yourself bumper tuning will cost much cheaper than the same services performed by professionals. So, what do you need for a full tuning of the front bumper?
There are two main ways to improve the appearance of a bumper. It all depends on how you imagine it - either strengthening an existing element, or completely new rear parts from improvised materials. Both the one and the other method are quite often practiced by motorists, the difference is only in the tools and materials that we need.
So, if you are going to go the first way and improve the front or rear bumper, then you will have to purchase special pads that you can install yourself. For their installation, stock up on marking tools, an electric drill, fasteners (bolts and self-tapping screws), as well as sealant for a better fit. The only problem is that such an overlay will be relatively expensive. But to make such an overlay with your own hands can be very cheap, not to mention the invaluable experience that you will gain by making tuning for the front bumper with your own hands.
Creating a new bumper requires certain tools that are very easy to find in almost any garage or purchase at a hardware store:
- Sandpaper of different grits.
- Fiberglass, which is also called fiberglass.
- Mounting foam.
- Putty.
- Primer composition.
- Epoxy resin.
- adhesive composition.
- Putty.
- Dye.
- aluminum powder.
- Sharp utility knife.
In addition, you will need to find at least an approximate layout of the future product in order to simplify your work and better imagine how the finished bumper will look like. After all of the above is available, you can start creating the part.
Tuning instruction
As you already understood, the basis for creating tuning for the bumper will be such simple and affordable materials as mounting foam and polystyrene. However, the point is not only in their cheapness, but also in the simplicity of work, since it is very easy for both foam and foam to give the desired shape with your own hands. Another reason for using just such a base is its light weight - the new lining will not make it heavier, which means it will not affect the power of the car in any way.
In general, the instructions for tuning the front bumper look something like this:
- To begin with, using the selected material, the desired shape is created. This is where sharp tools come in handy.
- Then you need to properly prepare the resulting surface for processing with resin.
- Resin and fiberglass are applied to the future overlay in several layers.
- Now the turn of putty has come - with its help we give a more perfect shape and smooth out all the corners.
- Before applying paint, it is imperative to prepare the surface with a primer, otherwise it may be partially absorbed or lie unevenly. Therefore, the next step is to apply a primer.
- Finished painting in the appropriate color. The shade can completely repeat the factory one or be different. Now you should wait until the bumper dries and you can install it in place.
Many are interested in exactly how polystyrene and polyurethane foam differ in the process of using them as the basis for a bumper cover. And the main difference is that the foam does not need to be dissolved with resin, since it can be sculpted directly.. And the foam must first be sealed with special technical plasticine. The plan is outlined and you can start creating a bumper tuning with your own hands. For greater clarity, we will talk about each of the methods - and which one to choose is up to you.
foam bumper
You will need about eight large sheets of Styrofoam to create the overlay. If you have already got hold of the necessary amount of material, then you can get to work.
- To begin with, the bumper must be dismantled and thoroughly cleaned of accumulated contaminants. Then the surface is degreased and wiped to dryness.
- Styrofoam sheets must be fastened together with glue. It is best to use liquid nails, since this composition is able to tightly glue any materials. At the same time, you need to act carefully so that the layers do not dry out in the wrong position.
- While the foam is drying, you need to sketch the future product and transfer the contours to the material. Styrofoam is much more difficult to cut than foam, so it can take a long time to create the correct symmetrical shape. It is important that the knife is sharp enough.
- Now you need to apply technical plasticine to the workpiece, and on top - a couple of even layers of putty.
- In order for the surface to be even, it must be properly sanded. Here you need sandpaper with fine grit.
- Several dense layers of resin are applied on top, as well as fiberglass. The resulting structure should be left to dry completely.
- Now you need to do the finishing work and apply a primer to the bumper.
At the final stage, the bumper is painted and varnished. When the decorative layer dries, the part can be installed in its rightful place and admire the result.
Foam bumpers
The stages of creation are very similar to working with foam. But during the process, it should be borne in mind that mounting foam acts quite aggressively on any metal, which means that it cannot come into contact with metal parts until it dries completely. In total, you will need about four cylinders of material.
- First you need to pour the entire composition on a flat surface and wait until this mass dries. This usually takes at least 48 hours, so be prepared to wait a bit.
- You will have enough time to think through and implement your ideas in the form of a sketch. Then you need to transfer all the lines to the dried mounting foam and you can start cutting.
- Try to make the gaps as symmetrical as possible so as not to spoil the product. After you can proceed to the application of resin, as well as glass wool.
- We wait until the new material dries, after which we carry out all the above procedures - sanding, priming, painting and varnishing.
Among other things, there is another, combined option, when the foam is combined with the foam. Using this method, you can make an additional overlay on an existing bumper.
Also, do not forget about installing a mesh for tuning the bumper - you need to purchase it in advance. We can conclude that tuning the bumper with your own hands is not such a difficult task. However, experts advise first to practice on unnecessary material, so that the tuning of the front bumper comes out of high quality the first time.
Video "Do-it-yourself bumper tuning"
In this video you can see how the tuning procedure takes place on the example of a Lada Priora car.
https://pandia.ru/text/80/359/images/image002_104.jpg" align="left" width="153" height="86">  Recently, many KAMAZ drivers are changing the bumper 53205 with plastic fangs on the sides, to the bumper 65115 with a wide black lining. But most of them have their bumper in good condition... In this regard, one of the frequently asked questions is “ Is it possible to put a plastic pad 65115 on the 205th bumper?» The answer is no, you can't. But you can convert the bumper 53205 to 65115 with your own hands. You will need skills to work with a grinder and a welding machine.

 So: how to make a bumper
53205 (euro2) bumper 65115 (euro3)?
Cooking the bumper.
We take all new hardware. From what you need you will need:
Bolt m6x20 - 8 pcs., nut m6 - 12 pcs., graver for 6 - 12 pcs.
Bolt m8x20 - 9 pcs., nut m8 - 13 pcs., graver for 8 - 13 pcs.
Bolt m8x30 (fungus) with a round head and a square base under it 4 pcs.
Bumper bolt m14x30 with a nut and a graver (you can leave the old ones) - 4 pcs.
 Next we buy:
Pad (facing) buffer 65115. Keep in mind, there are at least 4 different manufacturers in addition to the factory and all have their own characteristics.
 Repeater UP1 - bumper turn signal 6520, 65115 -2 pcs.
 Upper bumper pad (metal)
 And most importantly rem bumper kit 65115
The meaning of this whole alteration is that you save on the purchase of an iron bumper 65115 (3.5 tr. coop -5 tr. factory) and headlights (factory 1100 rubles each). And your old bumper will last another 5-10 years instead of rotting in a landfill.
Begin
We remove the bumper from the KAMAZ, completely disassemble it. We will leave the lower step, it will help not to confuse the top and bottom of the bumper during assembly.
We cut off the ends of the bumper on both sides with a grinder (just cut off the edges).

 With a grinder (125mm), carefully cut off the extreme fastenings of the headlight (slats). You can leave the internal ones, they will not interfere. We clean the places of cuts, in the future they will need to be painted over.


 Now we need to mark and grab the brackets. On the desktop (preferably put something soft like foam rubber first), put the lining of the buffer 65115, face down. First we put the headlights into it, on both sides, then our cropped bumper. (Of course, in a larger production, everything is done differently, but it will be very long and difficult to describe. The described method is simple and reliable). If there is no bottom step, do not confuse the top and bottom - the bumper is symmetrical. At the headlights, we also pay attention to the top / bottom. There are no left and right. We carefully place the headlights between the plastic trim and the iron buffer. Try to move the headlights closer to the center. Now comes the most crucial moment: we attach the headlight and turn signal mount to the bumper. See photo. One side of the bracket, where there are two protrusions, comes between the bumper and the headlight. The second one is pressed close to the pad (lining) of the buffer, so that the holes match. We press with tongs or carefully grab by welding. We do the same on the other side. We immediately note the front mounting holes (for the M8x30 bolt - fungus). The plastic lining is attached to the iron bumper with 6 bolts. Of these, 4 fungi - 2 on the sides (we have already prepared there) and 2 in front. As a rule, the buffer lining already has all the connection holes. On them we note where to drill holes in the bumper. And 2 holes connect the metal lining - the plastic panel and the iron bumper. On bumpers 53205 (PJSC KamAZ) manufactured after 2010, all holes from bumper 65115 are already provided. If they are not, we drill. Next - we take out our iron frame, weld the scarves to the headlight brackets (see photo). From the inside, the headlight is mounted on a wide plate, which is also supplied in rem. bumper kit. We attach, mark, install, drill, cook. We paint over the places of cuts, welding and new welded parts.
Assembling the bumper
First we put the headlights, then the turn signals. Then, in advance, we put the bumper bolts 4pcs m14x30 (large fungus) on which the towing fork is attached. If you forget to put them, then you have to remove the lining. Next, we put the finished frame into a plastic overlay. We fix with mushrooms m8x30 on the sides and front. Now it's time to put the metal top plate..jpg" align="left" width="201" height="113">holes (see photo). Fasten with m8x20 bolts. That's it, the bumper is ready.


 Of the minuses of this bumper, I would like to note that it is problematic to remove the finger from the towing fork, since the developers did not provide in this model any hole or recess where it would go. But still, it is possible - you will have to crawl under the bumper every time and do it from under the KAMAZ. The second disadvantage: If your cabin is not raised and there is no distance of 8-10 cm between the bumper and the facing panel, then the cabin will break your new bumper with the lining when it rolls over. Or open the hood every time the cabin rolls over, which everyone does.
Let me return to the beginning of the article. I wrote that you can not put a plastic overlay on a regular 205 bumper. In fact, there is such an overlay (see photo), but it is not popular among drivers. It is also advisable to buy footrest guards with it, all this is also on sale.
You can order all described details and accessories on our website www. kabinkam. ru, which we keep in full assortment, in stock and in different configurations.
Almost every motorist is interested in the question of what means the appearance of the car can be made special. Nobody wants to merge with the crowd, so many come up with various ways to highlight their car.
For this, various tuning and restyling options are offered. You can use various paint options, specialized vinyl films, installation of additional elements. Bumper tuning is also a fairly common way to give the appearance of the vehicle some originality.
 Do-it-yourself bumper tuning is not at all difficult!
 To perform this operation, you can seek the help of qualified specialists. However, if you want to get by with a small financial outlay, you can do your own bumper tuning. This, of course, is a rather time-consuming process, but it will give you the opportunity to fully express your creative abilities and do without unnecessary expenses.
Experts say there are two ways to go:
- make a new product from scratch;
- properly process the regular bumper of your car.
The first path requires quite serious skills in terms of mechanical processing of materials and ownership of tools. Here you need a certain experience, an eye and set hands. By choosing the second option, we greatly simplify our task, because it is much easier to modify a regular car bumper than to re-manufacture it.
 One of the most common tuning options involves the use of foam
 How do-it-yourself bumper tuning is done
So, if you decide to do all the work yourself, let's look at the front bumper as an example, how you can tune it.
First you need to stock up on all the necessary materials. To complete the work, you will need the following things:
- epoxy resin;
- sandpaper with different grains (from 80 to 220);
- fiberglass;
- wire;
- polyurethane foam in cylinders;
- thick paper (namely paper, not cardboard).
 We create a new bumper shape with our own hands
 After you have stocked up on everything you need, you will need to imagine in as much detail as possible the look that you want to give to the front of your car. For fidelity, you can sketch out sketches or make an approximate drawing - this will greatly simplify the task in the process of its implementation.
After completing the sketches and drawings, you can get to work. Let's take a closer look at how the tuning process looks step by step:

Conclusion
Tuning the front bumper is one of the common ways to change the look of the car, to make it special. Processing a standard bumper is a simpler procedure compared to making a new one-piece product. In fact, this is a simple process - it is quite possible to perform it on your own. The main thing is attention, accuracy and conscientiousness.
Many are accustomed to seeing cars on public roads that have a modified body, as well as an interior. But to see KamAZ, the tuning of which is done at a high level and with taste, is a rarity. If you decide that the time has come to change the appearance of your truck, improve it, then we recommend entrusting tuning to specialists. Although it can be done independently, having the necessary skills and free time. Let's look at two options with which you can decorate our truck with your own hands.
Appearance
The most common and less expensive way is tuning the KamAZ cab. Most often, styling of all kinds of complexity is used for it, and glass is also tinted. On sale there are various moldings and plastic canopies that are easy to install, thanks to the adhesive surface. Using decorative elements, you can quickly and tastefully decorate the interior.
Most motorists modify the steering wheel, embodying the most daring design decisions. An example is the photo of KamAZ posted in the article, whose steering wheel tuning is impressive.
The regular seat is easily replaced by a more comfortable one, having (a pillow).
Optical elements are also amenable to tuning, but require more attention. You can make the interior lighting by choosing your favorite color and even the projection of the logo. In addition to the instrument panel, install a tachometer. Cover the dashboard with leather, velor or plastic. Often a podium is made above the windshield, into which acoustics are mounted.
To "reduce noise", as well as to insulate the cabin, it is enough to cover the bottom with a heater. When choosing a material, it is necessary to take into account its fire safety.
To increase the rigidity and safety level of the cab, it will be necessary to strengthen the metal profile of the doors. An upgrade like this could save your life in the event of a serious accident.
Chip tuning
If you, when tuning KamAZ, are not going to limit yourself to external changes, but want to correct the program installed in the engine control unit, then you should take care of purchasing additional modules that can cope with such tasks. With their help, you can achieve a significant increase in power (up to 25%) by increasing the boost pressure. This operation is carried out to reduce fuel consumption, which can be reduced to 5 liters per 100 km. Such manipulations are optional, but sometimes they are done when replacing various engine components (air blower, nozzles, etc.).
Nodes and assemblies
The most difficult and serious for any car, including the KamAZ brand, tuning units and assemblies. This is done exclusively by specialists who carry out complex calculations using modern equipment. After such changes, which significantly increase engine power, they must be replaced with reinforced ones:
- clutch;
- wheel drive;
- brakes;
- suspension elements.

Suspension
Truck drivers do not lag behind motorists moving in understated cars. Quite often, shorter springs are installed on KamAZ, which looks very unusual. In this case, it is necessary to study the suspension geometry, which will have to be changed in such a way as not to damage the bottom when driving on an uneven road. Popular in KamAZ trucks is the tuning of the gearbox, in which the gear ratio changes.

In order to improve the appearance of the components and assemblies of the car were of high quality, we recommend that you seek help from specialists. It is best to have a sketch or photo of KamAZ, the tuning of which you liked. Service centers specializing in tuning trucks can be found in almost any large city.


