Every driver notices chips on the body of his car. In fact, this is inevitable for every car that is intensively used not only in the city, but also outside it. Scratches and chips on the body appear not only from hitting other cars or objects, but also from flying stones while driving. Such chips most often appear on arches, sills and lower parts.
Many drivers mistakenly think that in order to remove chips from the car body, it must be painted. This is not so, in order to eliminate chips on the car body, the first step is to determine the nature of the damage and fix it yourself.
Troubleshooting
As already mentioned, before getting rid of, you need to determine the nature of the damage. If there are many scratches and chips on the bodywork that only damaged the surface paintwork, then you can get by with budget options.
The first way to eliminate such damage is to use a wax pencil. Such a repair of chips on the body is not particularly difficult, except that before you start cleaning the chips on the car, you need to rinse it, and locally treat the area around the scratch or chip with gasoline. This is very important, because a layer of wax can fall off the paintwork of the car.
You should pay attention to the fact that chips on the car body will still need to be treated with a special polish, which is enriched with a certain color. This will help to hide the traces of bodywork as much as possible.
It is clear that you can do it yourself, while saving a considerable amount of money.
There is also a second option to eliminate chips from the car paintwork. This method is called body polishing. In this case, you need to wash the car thoroughly so that the grains of dust or sand during polishing do not cause even more damage. In this case, you will need to purchase special creams for local polishing of the paintwork. In addition, you need to have a special machine for this process, and if it is not there, then an ordinary drill can become an alternative. Removing chips in this way can be done by hand, provided that everything is done correctly and accurately.
The fact is that many drivers during the first polishing remove a layer of paint to the very ground, after which they have to paint the area where the polishing was incorrectly and carelessly done.
After polishing paintwork it needs to be varnished, this will help extend the life of the surface. This method is considered the most effective in comparison with the method where a wax pencil is used. There are several reasons for this, the main one being speed. Getting rid of chips on the machine using this method is much faster than in the variant with the first method due to the fact that the machine processes a large area of the paintwork faster.
Complete renovation
Unfortunately, there are also such scratches that do not reach the ground, but they cannot be eliminated using the first two methods. Such scratches primarily include wide or long damage. In this case, local painting of the damaged area of the paintwork will be required. You need to tint the area with a special brush, which is similar in softness to the one with which girls paint their nails. In fact, for this procedure, you can use it.
- First of all, such a brush must be washed in gasoline, this will help get rid of particles of varnish or old paint.
- Before you start painting over the damaged area of the paintwork, you should treat the surface, you can do this with gasoline or a special alcohol solution that is in each car shop. Removal of irregularities and damage in this way must be done with extreme care, it depends on how much traces of repair will be noticeable after elimination.
Of course, there are also cases when a scratch reaches the ground or even metal. There are two ways to get rid of such a scratch.
- The first method is only suitable for minor damage, it is based on using a wax pencil. The above describes how to use it. Unfortunately, this method has its drawbacks, the main of which is that after a while the wax layer will soon move away from the body, and the scratch will be more and more noticeable. Therefore, such a scratch will have to be repaired after a certain amount of time. Recovery in this way can be done independently at home.
- There is also a second way to eliminate scratches that have touched a layer of soil or even metal. In this method, you need to cover the scratch with paint. This method is suitable even for such damage that is very wide and long. In this case, you need to treat the surface that will be subject to coloring. Treatment consists in the fact that the surface will be treated with gasoline or special alcohol.
The main problem in the method of painting a car is that you need to perfectly match the paint for the body.
This is very important, because every driver wants that after the repair there are no traces of the fact that the repairs were made by hand. In this case, you need to apply paint to the car in two layers. This method is considered more reliable than the method using a wax pencil. It should be noted that this rule applies only to such cases of coloring, when the coloring was carried out correctly and according to all the rules. If the painting was done hastily, then the paint will fall off, and you will have to make all the repairs again. If you doubt your abilities, then you can find information on the Internet on how to paint over chips on a car.
You can repair damage to the paintwork not only with a pencil, but also with the help of a special can of paint, which has a certain color code. Often, such chips appear on cars that seriously damage not only the paintwork, but also the metal. Such scratches must be removed immediately. IN this case removing chips on a car using a pencil will not work. Most often in this case, the layer of paint remains in place and is held only due to the fact that the paint is very dense.

- It is necessary to start the repair by removing the dead layer of the coating.
- After that, you need to inspect the metal and carefully repair the irregularities with putty.
- If the metal layer is already damaged by corrosion, then you need to start the process of its removal.
- After that, you need to apply a layer of soil, which will protect the iron from corrosion.
- The removal process must not be skipped, for the reason that if the rust is not removed, it will continue to grow, and soon a new layer of paint will fall off due to the increase in the corrosive layer. Practically in all similar situations local painting of the entire part is required.
- Before carrying out local painting of minor damage, it is necessary to completely remove the entire layer of the old coating to the metal and re-coat the metal with primer and locally paint the spare part.
Attention should be paid to the fact that this should be done only in a warm and dry room, otherwise everything will have to be redone.
Summary
As you know, over time, various damages appear on the body of any car, which you need to get rid of either with your own hands or in the service. The restoration of the paintwork must be done urgently, otherwise the scratch may begin to rust, and as a result, the entire part will have to be painted.
Before deciding that it is necessary to urgently repair such damage, you need to soberly assess the nature of scratches and chips.
Scratches and chips very often appear on the car - this can happen due to a number of different reasons. Stones flying out of your car or any vehicle passing by, bushes and tree branches that can be touched, the car can be scratched in the parking lot by careless motorists, or a bully, passing, will hold a nail, as well as in the event of a traffic accident. Any damage to the paintwork must be removed in time. Otherwise, rust may appear, which will lead to corrosion of the metal.
Ways to remove chips on a car
There are several ways to remove chips on a car. The coating consists of several layers, which include primer, car enamel and lacquer coating. The depth of damage can affect both the top layer and extend to the ground cover. How to remove chips on the car body? Elimination of these damages is carried out in different ways. The very first thing to do with any method is using a special car shampoo to remove all dirt and dust from its surface.
When only the top layer of varnish is damaged on the body, you can remove the malfunction with your own hands using. Is only getting thinner protective layer to the depth of damage, and the defect will be impossible to notice. In order to quickly mask a scratch, you can use a corrector with wax or gel. When the damage is serious, but does not touch the ground, they can be repaired by painting the part on which the defect was found. If the damage has affected the metal, they can be corrected with a degreaser, primer and paint. As a degreaser, you can use white spirit, gasoline, or even dishwashing detergent. But it is better to clean such damage in a professional car service for the master to do the work.
Minor scratches and chips

How to repair chips on a car with your own hands? In order to remove small and not very deep scratches and chips on your own, you will need polishing pastes different types, sponges, microfiber cloths. To perform work, it is necessary to thoroughly wash the surface to be treated, then first apply a coarse-grained abrasive paste to the sponge and rub it into the damaged area, the surface becomes a little more matte, the damage on it will disappear, and remove the remaining paste with a dry cloth. With the help of a polish with our own hands, we achieve shine. Polishing can be done with polishing machine or by hand with a microfiber cloth. This method should not be used often, as it can damage the varnish layer after several times. You can also use correctors that contain wax or gel. The wax pencil allows you to repair the chip, and excess wax is removed with a microfiber cloth. The wax pencil will need to be used after each visit to the car wash. The corrector with gel looks like a felt-tip pen or a tube. It is filled with acrylic paint that fills in scratches and hardens and becomes invisible. If the damage to the body is deep, it is necessary to carefully carry out the operation several times. The gel hardens well and becomes more durable. There is a possibility that the coating does not adhere tightly to the chip and rust and corrosion form. The use of correctors for processing the body is not difficult.

Elimination of chips and scratches of moderate severity
When the soil layer is not damaged, car painting is used to eliminate scratches and chips. Defects can be quickly removed with your own hands using a marker with auto enamel. It is difficult to guarantee the color to be as close as possible to the shade of the original tone, which has changed during operation. For carrying out, there are palettes that are available in almost all stores selling auto paints. It is necessary to take any part of the car to the car dealership, it will be used as a sample for selecting the shade of enamel. Very often they take a cap from a gas tank with them, it is applied to the palette and this helps in choosing a shade of paint. You can also choose the color with computer program, which with almost one hundred percent accuracy will select the tone of the paint. After selecting the color, you can paint the body yourself or leave it for painting in the cabin.
Repair of deep damage to the metal
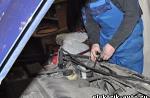
Repairing damage to the bodywork that has already reached the metal will take more time and require more effort. Work on the removal of chips on the car must be carried out in a dry, well-ventilated area. It is necessary to clean the chipped area from all dirt and rust, using sandpaper, then we degrease the cleaned area. The part must be leveled, the chipped area must be puttied and the surface leveled. We must apply a layer of anti-corrosion primer to the metal, especially if we carry out work in autumn and winter, and let it dry. If you try to dry the car artificially, the coating may swell. We cover the soil with several. At the end we apply a layer of varnish. But it is better to contact a car repair shop for such work and entrust the work to professionals. It will cost more than do-it-yourself work, but you can get a better result.
Prevention against the appearance of minor damage to the car body
If you carry out work to protect the car body from external damage in advance, then in the future the restoration of the coating will be cheaper. There are several protection options:

- A polish that forms a protective film over a layer of paint. They are Teflon, the protection period is three months. Epoxy polishes protect up to 12 months. Nanopolishing gives results within 36 months.
- Liquid glass (silicate glue). Adheres very well to paintwork and provides protection for approximately 36-38 months, it can be applied by hand and then polished with a soft cloth.
- A liquid cover, the cheapest way, turns out like a rubber film, which is easy to remove over time.
- The protective film is applied to a carefully and thoroughly cleaned surface, which is treated with a special solution. It lasts for several years, you can apply a drawing on it and it will cost less than airbrushing.
- Fabric cover. Mounted only on the hood, made to order for a particular car.

Write to us if the article was useful.
No driver is immune from chipping on the car. Even careful driving a car does not allow you to avoid the appearance of small fractures and scratches formed from trips to high speed flying towards insects and stones. Such imperfections that are hardly noticeable to the human eye lead to adverse consequences. Untimely painting of chips on the car can lead to the destruction of the body.
What kind of damage is there?
Depending on the type of damage to the paintwork, different ways fight them. Surface chips need quick and timely treatment to prevent corrosion. Delete not deep chips and scratches can be done with your own hands using special means designed to care for the appearance of the machine. In this case, defects can be tinted with a liquid agent or special pencil. The disadvantage of such an economical method is the regular work with the surface layer after the first car wash.
The appearance deep damage leading to major and costly repairs. When attempting to remove defects on your own, you should know how it is carried out correctly and what basic rules should be followed during work.
Do-it-yourself painting of chips
To get rid of damage to the paintwork of a car, you will need patience, time, special materials and tools. Professional craftsmen of specialized car services are advised to have with them: putty, spotter, primer, paint, sandpaper, rust converter, varnish, thinner, polishing machine with a set of circles, spatulas and paintwork tools.
 Every car enthusiast should understand that tinted scratches look great for the first time and require subsequent restoration. Deep scratches are subjected to complex priming, puttying and painting. The process of eliminating major damage involves stripping to the substrate, puttying and final painting of the car, which is desirable to entrust to experienced craftsmen.
Painting stages
- Wash the car part to be processed.
- Removing the part from the machine.
- Cleaning rust from a metal surface.
- Processing the place with sanding paper.
- Elimination of fine dust from the part and degreasing.
- Coating the surface of the car with a primer.
- Applying paint to the primer.
- Lacquering after drying.
- Treatment of the area with a restoration polish to add shine to the coating and create a protective film.
The consequences of painting scratches on a car can be completely different. For example, too thick a composition leads to an orange peel effect, liquid paint causes streaks, and due to high humidity, the painted area sometimes becomes matte. Incorrect application of the first layer causes the formation of grease spots or small bubbles.
Painting chips on a car with your own hands allows you to save money, but at the same time requires the implementation of recommendations regarding coloring and processing agents. IN this process it is important to adhere to certain proportions when diluting paint materials. In general, restore appearance car at home is not difficult, the main thing is to follow the clear instructions of professional craftsmen.

With the course of operation on the car appear minor defects in the form of scratches and chips. These body damages are not only shortcomings from an aesthetic point of view, but also represent a practical danger to the car. Therefore, it is necessary to eliminate the chips that have appeared as soon as possible. This will protect the body from the harmful effects of corrosion. This article discusses the removal of chips with your own hands.
Relevance
Chips form on any machine, even under careful operating conditions. This is explained by the fact that the principle of their appearance is the impact on the paintwork of small particles like stones. It is impossible to avoid this, you can only try to protect the car. Most often, these minor defects appear on front bumper and car hood.
Not only suffers from the presence of chips appearance car, but also its body, since at the points of chips the metal is open for interaction with environment. So this is where corrosion comes in. In view of this, it is necessary to regularly remove chips or protect the car from their appearance.
Preparation and materials
The peculiarity of chips on a car body is that even at a shallow depth they are large in area. If the depth is really small, that is, part of the paintwork is damaged, it is possible to remove the defect on the body by treating this point with an auto color-enriched polish, applied over it protective polish. First you need to remove all dirt and degrease the work surface.

If the chip on the machine is so deep that it reaches the ground, let alone metal, it is impossible to eliminate it in this way, tinting will be required. It should be borne in mind that the chip removal technology is determined by the type of car paintwork.
Sealing chips involves the use of tools and materials such as a set of polishing pastes, sandpaper for wet grinding with an abrasiveness of P 1500 and P 2000, polishing machine, nitro putty, paint, varnish. If the chip has reached the metal, and corrosion begins to appear on the body, primer is required. Naturally, if we are talking about corrosion, then we are talking about the hood of the car, since the bumpers of most cars are made of plastic. Usually on the hood chips in most appear on the leading edge.
Removal Technology
At the first stage of work, it is necessary to remove all contaminants on the body by washing with detergents. Next, the damaged area of \u200b\u200bthe car is degreased. After that, in good lighting conditions, you need to inspect the car. Can be discovered small chips not noticed initially.
Further, before starting to remove the detected defects, you need to determine what type of paintwork the car has. Allocate acrylic paint, acrylic paint under varnish, metallics. The first type of coverage have Soviet and Russian cars and old foreign cars, the second type was painted by foreign cars of the nineties, it is still relevant to this day, with the exception of those models or trim levels for which metallics are provided.

When it is not known what type of paintwork has this car, you need to polish a small area of \u200b\u200bthe body with a white rag with abrasive paste. If as a result of this the paint was removed, that is, it remained on the rag, then the car has an acrylic coating, otherwise there is a layer of varnish on top. Based on this, they acquire acrylic paint or a pigment with varnish, and after that they begin to remove chips. If corrosion is found at these points on the body, it must be removed with a sharp object.
Then you need to remove some part of the old paintwork material around the detected defects by grinding with P 1500 sandpaper so that the new coating, which will be used for sealing, adheres well to the original one. In addition, this will make the transition zone less noticeable.
Priming and painting
Places where corrosion has been removed on the machine must be covered with a primer. Termination begins with the extraction of an acrylic two-component primer from a can. It will be required for these works a few drops. Then you need to cover them with metal points with a thin brush or a sharpened match. After 10-15 minutes, it is necessary to cover the second layer. After that, they wait about 2 hours for the soil to dry, or accelerate it by warming up.
Next, you need to repair the damaged areas with paint. If the car is covered with acrylic paint, embedding is do-it-yourself. To cover the treated point with paint, they also use a brush or a sharpened match.
Previously, the material must be well mixed and the damaged areas on the machine repaired in several layers, since the paint shrinks strongly when it dries.
Embedding is carried out with interruptions of 10-15 minutes; upon completion of work, a tubercle of paint with a slight influx should be obtained.

The difference between coating with lacquer is that several upper layers are represented by lacquer. Moreover, it is applied 15-25 minutes after the paint, so as not to dissolve it, since the pigment dries slowly. At this point, this stage is considered complete. The next stage is passed after 2-3 days: it consists in grinding the tubercles. Preliminary, a nitro putty is applied around them with a soft spatula and left to dry. It will protect the adjacent paintwork from damage.
Grinding is carried out with P 1500 sandpaper. Its fragment should be stretched onto a wooden block the size of half a matchbox. In the process of work, it is necessary to constantly moisten both the abrasive material and the surface. When erasing putty, you need to apply it again after drying. The final processing is carried out with P 2000 sandpaper. At the end of these works, the hood will be covered with matte dots.
At the last stage, you need to smooth these places by sanding the entire surface of the part with P 2000 sandpaper. This also uses water, the result should be a completely matte surface that needs to be polished.
If the chip does not reach the ground, you just need to repair it with paint, and the shade can be selected according to the code. The paint should be poured from the original container into the lid and applied with a toothpick no higher than the varnish level. After an hour, you need to apply varnish on top of the paint with a brush. This will even out if the paint was applied unevenly. At the end of the work, it is necessary to grind the point using an abrasive ZM.
In order to visually see the implementation of the described work, you should watch the video.
With active use of the car, it is almost impossible to avoid damage. Even with the most careful attitude, various defects appear on the coating of the car body over time. In the event of major damage, such as dents, there is nothing left but to turn to specialists. In the presence of minor defects, including chips and paintwork, you can solve the problem on your own.
Chips on the hood
A chip usually refers to a deep scratch or break formed on the surface of the body.
It would seem that if the damage is barely noticeable and does not spoil the appearance of the car, you can ignore it. But this is fundamentally not true, since paint chips expose the metal of the body and, due to exposure to aggressive environments, make it possible for corrosion to develop. - main function car paint, and only then - providing an attractive appearance.
If not promptly removed deep scratch or chipped, over time they will become a source of corrosion and lead to the destruction of the body material.
The causes of such defects are many factors. And depending on the depth and area, chips can damage the integrity of one or more layers of the protective coating of the car, often even partially damage the metal structure. 
The area most at risk of chipping is the hood. This is due to the fact that this part is "on the edge" of the car and takes on most of the shocks while the car is moving. 
An excellent option for solving problems with chips is to cover the bonnet area with a special anti-gravel film. This protective film in vinyl or polyurethane version, 100-200 microns thick, will create an excellent "shield" from minor damage for your hood. The first option is cheaper and looks more attractive, but the second one is more reliable and therefore more expensive. This protection lasts for about 5-6 years. 
The service is provided by most service stations, but it will not work to perform such an operation on your own. As a result - to install such a film for several years or to carry out painting work - it's up to you.
How to remove chips from a car
The difference between a chip and a scratch is the depth and area of the damage. Otherwise, they are similar, so they are eliminated by similar methods.
Having found a defect on the car body, it is necessary to assess the damage caused by it:
- Did the damage affect only the lacquer, or did it damage all layers, down to the metal?
- How extensive and multiple are the affected areas?
Damage assessment is very important to determine the relevance of home repairs in terms of lost time, cost recovery, etc.
If the choice still fell on the repair with my own hands, it should be understood that, depending on the severity of the damage and personal preferences, you need to choose one of several repair methods and the appropriate set of tools.
How to paint over deep chips on a car
To complete the repair, you will need:
- Grinding machine with abrasive wheels of different hardness.
- Primer for cars and spatula.
- Special desired shade.
- Varnish and degreaser, which can be found with a pencil.
- A set of polishing pastes.
If the damage has affected the soil and the structure of the metal, their elimination requires a serious approach and occurs in stages:
.jpg)
How to repair shallow paint chips on a car
Required tools:
- Scratch pencil.
- Lacquer and degreaser.
- polishing paste.
- Abrasive sanding paper suitable for wet sanding.
If the damage is minimal and does not affect the primer layer, it will not be difficult to restore the car to its original appearance even with your own hands.
Based on the instructions above, we will consider the nuances of processing a shallow chip.
- After washing (point 1), we carefully grind the damaged area to a primer, using an abrasive richly moistened with water (instead of point 2).
- Next, we perform the same actions that are given in the previous example, excluding priming (point 5).
To keep the coating around the treated area intact, you can use polyethylene and masking tape, covering the undamaged area. 
Quality and durability
Despite all the efforts of manufacturers of various "simplified repair" tools, any, even the most thorough, treatment with such paints and primers cannot be compared with high-quality painting in a car dealership. Therefore, it should be understood that such “mini-repairs” are a temporary measure. In addition, the color of the pencil may not match the original body tone and thus spoil the appearance of the car. On the other hand, to perform its main function - to protect the surface of the body from corrosion until a full repair, such a coating will be. In addition, such measures significantly save money.
In this video you will see how to deal with chips and scratches on the surface of the car body.