18 July 2017 13:11
Your path to Prey may be blocked by locked doors that cannot be passed through without a pass or code. In this article, you will find all the information about where to find this or that pass or code, and also learn how you can do without it sometimes. By gaining new skills, which can be read about in a separate article, you expand the list of available features and workarounds.
Department of Neuromods
Simulation Lab Pass
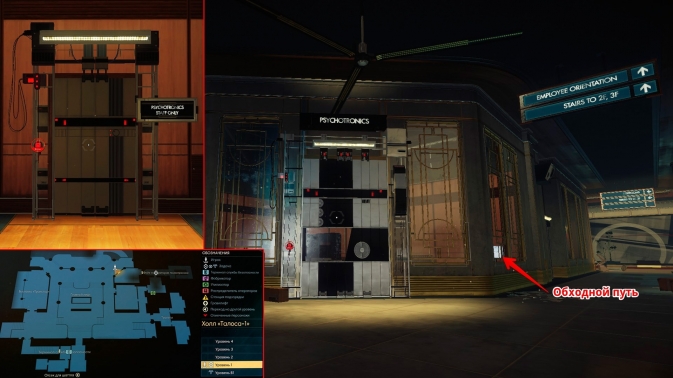
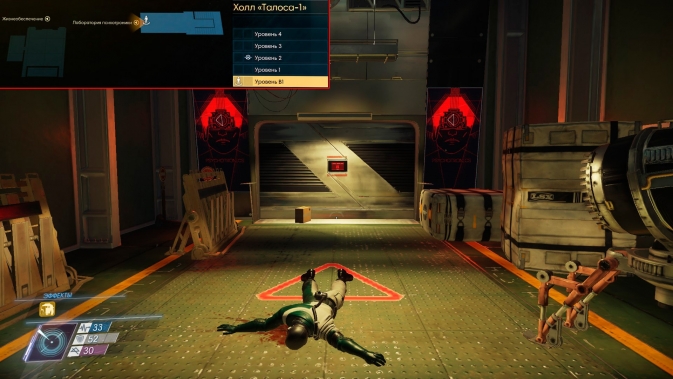
In order to enter the Talos 1 lobby at the start of the game, you need a pass from the simulation lab. In the same office space as the locked door, find Sylvain Bellamy's office and take the pass from his desk.
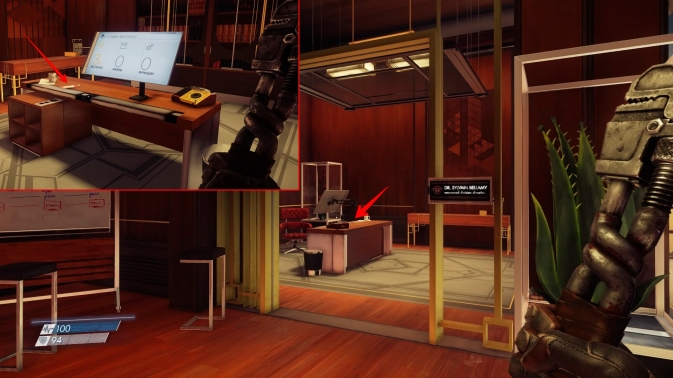
At your disposal there is a second way - to climb through the service hatch, which is located to the right of the door, almost under the ceiling, if you stand facing the door. You will be on the other side and no pass is needed.
Code from the security booth in the neuromod department
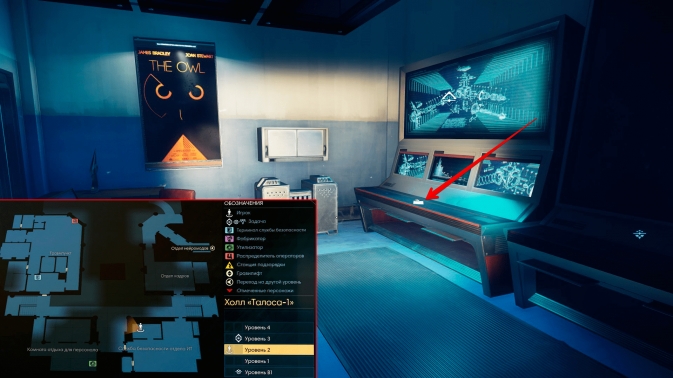
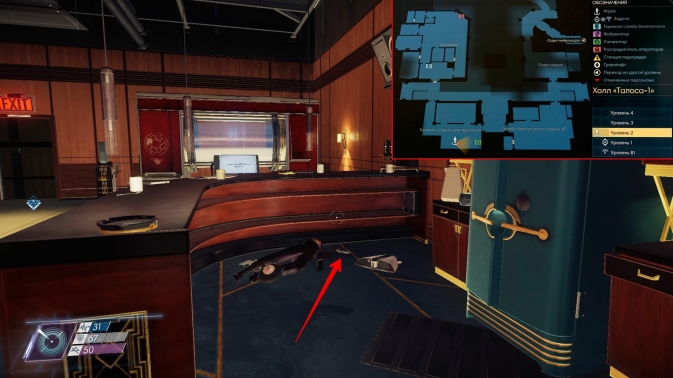
The security booth is located in the lobby of the neuromod department on level 2. You passed it at the beginning of the game, but you could not get there at that time. The same applies to the code from the security booth. You can only find it later, when you return to the Neuromods department with some task. The code is on a note lying near the corpse of Davia Naaz, which hangs on the railing opposite the entrance to the Neuromods department from the Talos-1 lobby.

Volunteer Cabin Code
The Volunteer Quarters is located in the Neuromod Department on Level 3. You can access this level by using the gravity lift in the Neuromod Department Lobby, which is in need of repair, or by constructing a makeshift ladder with a gypsum gun on the wall in the same lobby.

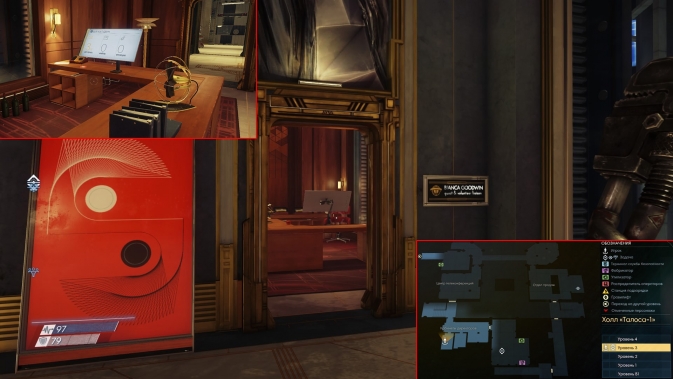
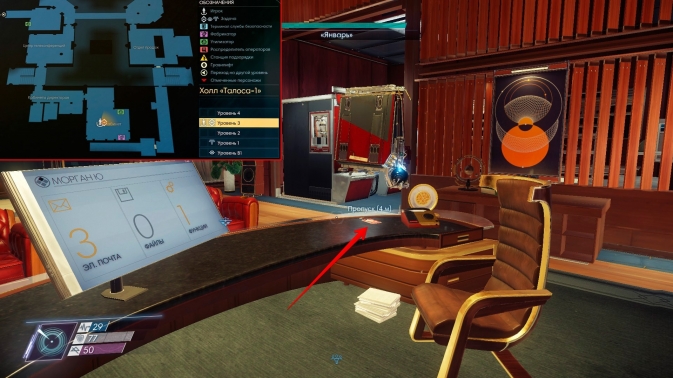
As for the code for the volunteer cabin, you will receive it by reading the first email on Bianca Goodwin's personal terminal. He is in her office, which is next to Morgan Yu's office in the Talos 1 lobby on level 3.
Pass from Holden Graves' office
Holden Graves' office is located on the fourth level of the Neuromod department. There are two ways to get to it. The first one is to hack the main entrance to the production department on level 3, for which you need the Hacker 4 skill, then proceed to the production hall and take the gravity lift to the fourth level. Graves' office will be just opposite the gravity lift. The second way is to get into the production department through the service tunnel, which starts in Haskins' office in the department with volunteer quarters. Climb through the service hatch located behind the Haskins table, climb up the pipes and exit at the fourth level of production. Get out of the room through the window and go to Graves' office on the same floor.

You can find a pass from Holden Graves' office at Frederick Steele, whose corpse lies not far from the gravity lifts on the third level in the production hall.

Hall "Talos-1"
Security pass
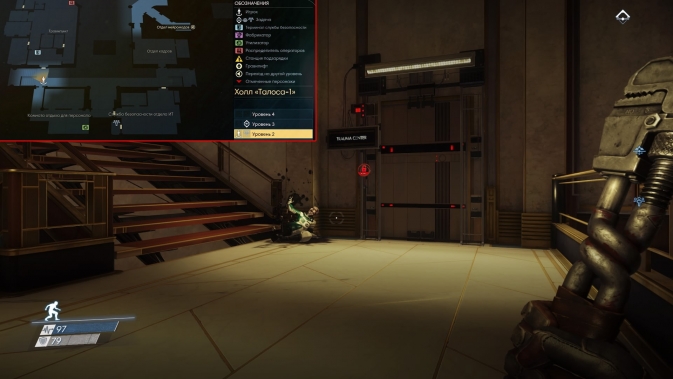
The security office is located on level 1 of the Talos 1 lobby, near the exit to the shuttle bay. More precisely, there are windows from this office for communicating with clients, and the entrance inside is near the stairs leading up, in particular to Morgan Yu's office. You need to follow the passage marked "Security", where later you will run into a locked door, which requires a pass. See below for where to find it, but you can do without it. You can get to the security office through the ventilation, for this you need to climb onto the yellow pipes that go above the door and climb through them to the end.

You can find the security pass at Talos 1 Lobby Level 2 in the IT security department. It lies in the area of the workplace of Steve Folson. And look in the locker on the wall, there is a neuromod and a chip for the suit. Read about other neuromods.
Interrogation room code
There is an interrogation room in the security office that requires a code to enter. The code is written on a sticky note and taped to a table lamp on Sarah Elazar's desk in the same room as the entrance to the interrogation room. Inside you will find the corpse of Demetri Bowser and his note, after reading which you will receive the additional task "Stolen Neuromods". You can read about the location of neuromods.
Pass "General entrance" from the laboratory of psychotronics
The "General Entrance" pass is primarily required to enter the psychotronics laboratory, a new location. However, this pass does not fit one door, but several at once. Let's see which ones.
The pass approaches the door leading, relatively speaking, to the reception room of the psychotronics laboratory. It is located on level 1 of the Talos 1 lobby, not far from the elevator. You can get there without a pass, but for this you need the Huntress Dart Launcher. Break the window near the nearest terminal and shoot the terminal with a dart to unlock the door. And then the pass will go to the next door leading to the foyer of the psychotronics laboratory, with a sign "Laboratory personnel only."
And in the end, a pass is needed for the main door to the psychotronics laboratory, after passing through which you will find yourself in a completely different location.
However, this is not all. The General Entrance Pass also applies to or from the door leading to or from the Sales Department located on Level 3 of the Talos 1 Hall. You could get into the sales department earlier, through a different passage, but with a pass you will have more freedom.

You will also need a pass to get into the office located on the landing with the sales department. It has glass windows in the floor through which you can get inside the security department of the IT department, located on the second level of the Talos-1 lobby.

Obtaining the Common Entrance Pass occurs in the story when you completed the mission Through the Glass Dimly and met January for the first time. He will actually give you this pass.
IT security code
The IT security department is located on level 2 of the Talos-1 lobby. From where to get the code from him, we cannot say, but we know the code itself: 0913. There is also an alternative way inside: through the service room located one level higher. Use the "General Entrance" pass to enter, which you read about above, and break the windows in the floor to jump into the IT security department.

Pass from the emergency room
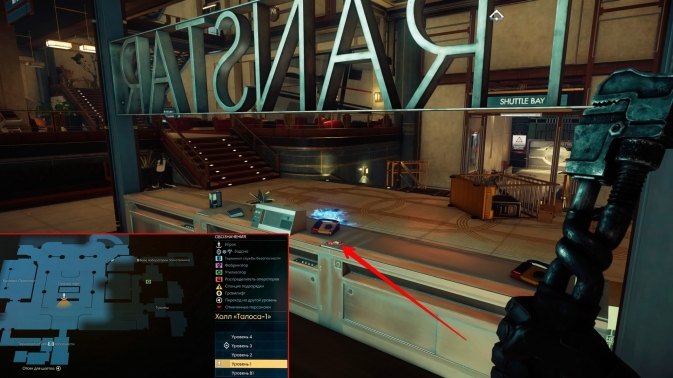
The emergency room is located on level 2 of the Talos-1 main hall. The additional task "The Disappeared Corpse" can lead you there, and there is also a security terminal in the emergency room with a list of all Talos-1 employees, which you may need to find one of the staff.
The emergency room pass is on a counter with a huge inscription "Transtar", located in the center of the main hall of "Talos-1". On the left and on the right side of it are stairs leading to the upper floors.
You will find another emergency room pass in Bianca Goodwin's office, on her desk. This office is located next to Morgan Yu's office on level 3 of Talos 1 Hall.

Quarantine Code
The fact that you managed to get into the emergency room does not mean that you will be able to explore it in its entirety. For example, in order to enter the quarantine zone, you will need a door code.
You can find out the quarantine code by reading the third letter "Subject in Quarantine" at the terminal of Matthias Kohl, whose office is located right there in the emergency room.

Pass from the office of Hendrik Devries in the emergency room
Hendrik Devries' office is located on level 2 of the Talos 1 lobby in the emergency room, and you will need a pass to get there. But that's not all, a pass will also be needed in order to enter the emergency room itself. Read more about where to get it.
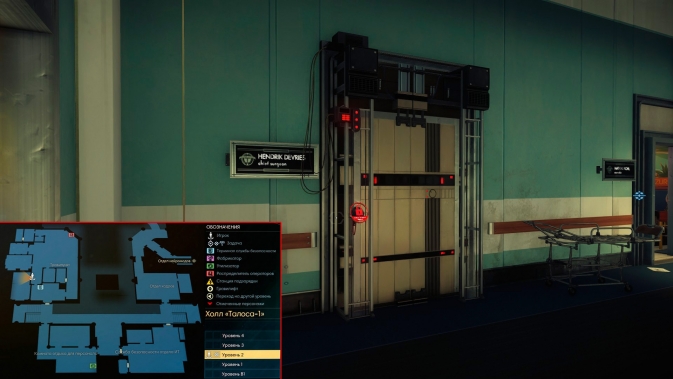
You will find a pass from Hendrik Devries's office from him, or rather from his corpse, which lies at level 4 of the Talos-1 hall near the main elevator, where the transition to the arboretum location is also located.

Restricted drugs room pass
The emergency room, located in the lobby of Talos-1 on level 2, is very large. In it you will find several locked rooms, including the Restricted Drugs warehouse.

You will have to take the pass from the room "Restricted drugs" from Regina Sellers, or rather from the phantom into which she was turned. She roams the living section and you will most likely meet her almost immediately. Kill the phantom and take Regina's pass.

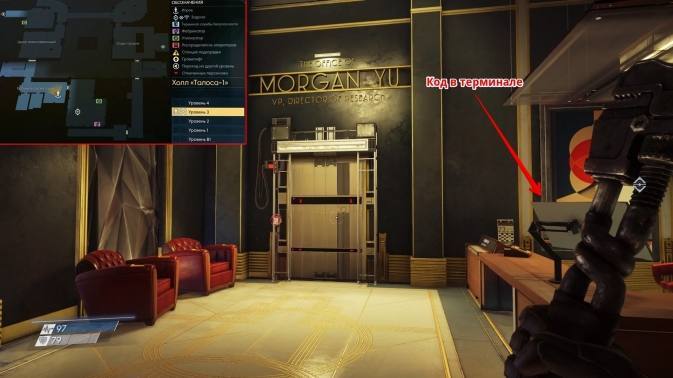
Code from Morgan Yu's office
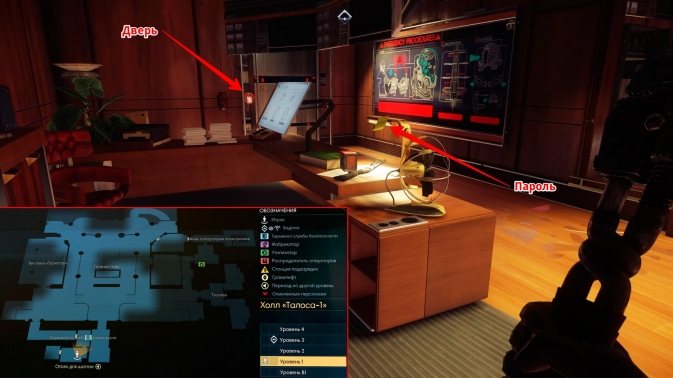
According to the story task "An office with a great view", you need to get to Morgan Yu's office, which is located on level 3 of the Talos-1 hall. A code is required to get inside. It will be given to you by January, or you can learn it from the terminal of Jason Chang, your assistant, whose password is written on a sticky note attached to the monitor. Read about passwords to other terminals.
Teleconference center pass
The entrance to the teleconference center is adjacent to Morgan Yu's office on level 3 of the Talos-1 hall, only located in the other wing, and it cannot be entered without a pass.
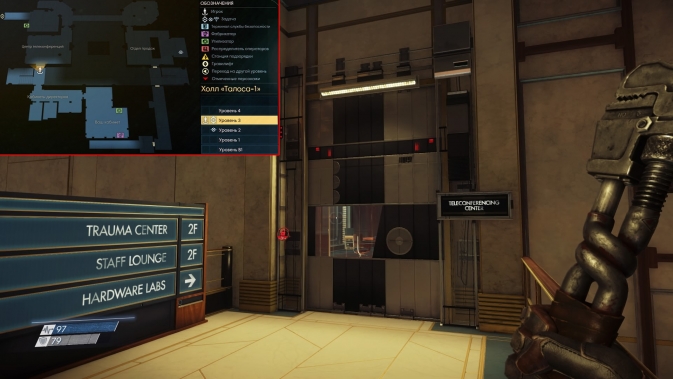
However, it is not difficult to get a pass from the teleconference center. You will find it in Morgan's office on the desk among other useful items.

hardware laboratory
"Staff Entrance" pass from the atrium
To get into the atrium of the hardware lab, where the fun begins, namely the paths to different parts of the location, you will need a "Staff Entrance" pass. It's not hard to find him. You can get it by searching the corpse of Sean Larsen, which lies in the cinema hall among the seats. To do this, before the guard post, turn left into the corridor.

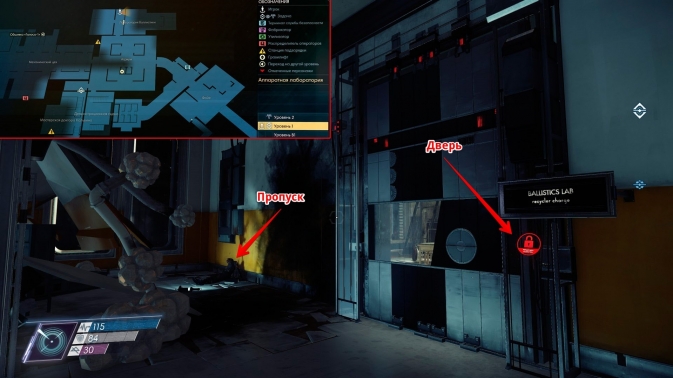
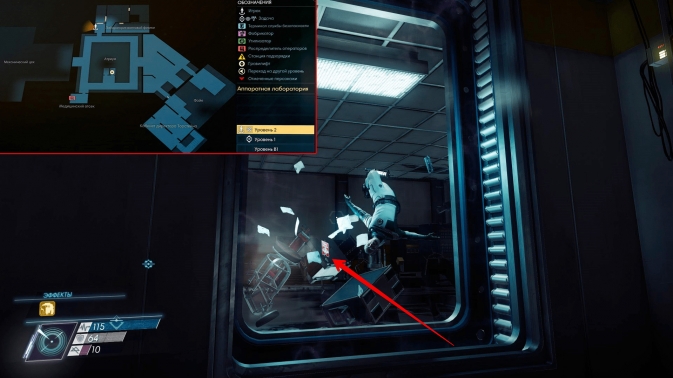
Ballistics Lab Pass
The Ballistics Lab is located on Level 1 of the Hardware Lab. You can get there through the atrium, however you will need a pass. You will find it at the corpse of Eme Schmidt, which lies at the very entrance to the laboratory.
Pass from the workshop of Dr. Calvino
You need to get to the workshop of Dr. Calvino on a story mission. She is in the hardware lab on level 1 next to the demo stage. The way there lies through the atrium, which also requires a pass (read above).

Where to find a pass from the workshop, January will tell you. The pass is located directly with Dr. Lorenzo Calvino. After you find it using the security terminal, it turns out that it is flying in space, and you can only see it through the window. Go to the mechanical workshop of the hardware laboratory, and then, having unlocked the gateway, into space. Following the mark, fly up to Dr. Lorenzo Calvino and take the pass from his workshop from him, do not forget the transcriptor, as the records on it contain the code from the machine shop pantry.
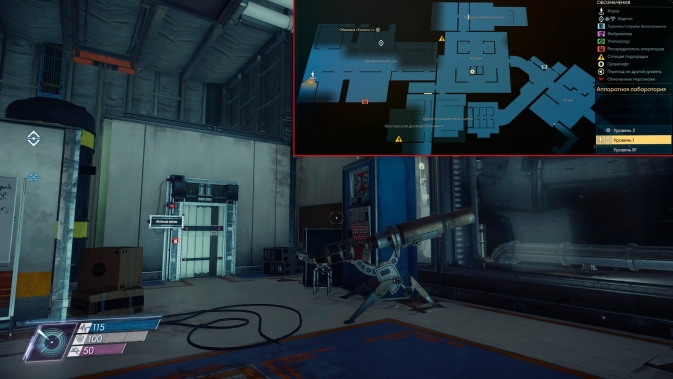
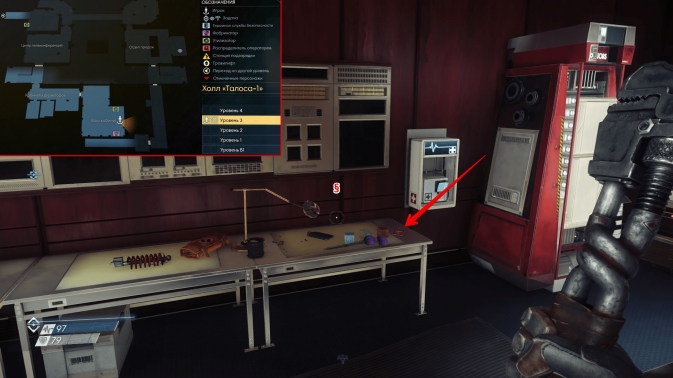
Code from the machine shop pantry
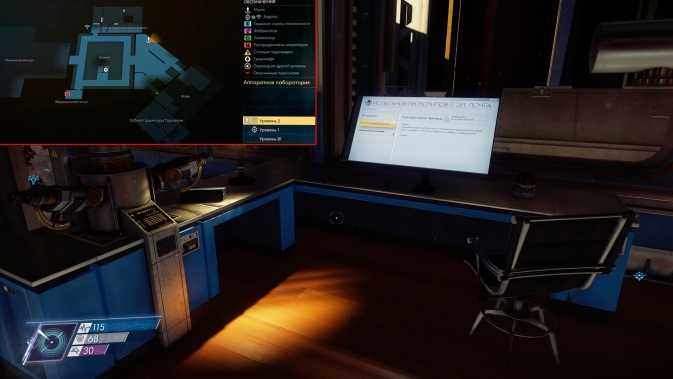
The machine shop is located on level 1 of the hardware lab, its storage room is at the very end near the telescope. To enter it requires a code, but without it you can find yourself inside. You just need to somehow climb to the roof of the pantry and crawl through the hatch. On the side there is already an impromptu lift made by a gypsum gun, but if you choose it, you are guaranteed radiation sickness due to increased radiation.
The code for the machine shop closet can be obtained from an email in the Prototype Testing terminal located on level 2 of the hardware lab in the office building. You will find the password for the terminal in a note lying on the floor near the table.
The code can also be obtained by listening to the audio recording "Tomorrow morning, first thing" on the transcriptor of Dr. Lorenzo Calvino, which flies in space next to the owner's corpse. Calvino ended up in the premises lost during the accident in the hardware laboratory on level 2. You will need to find him in the story task in order to get a pass from his workshop.

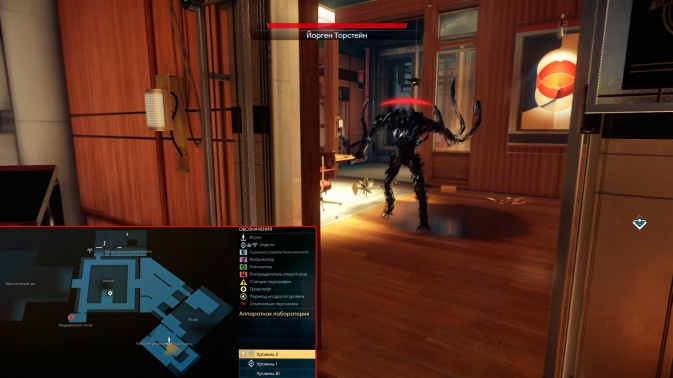
Code from Director Thorstein's office
Principal Jörgen Thorstein's office is located on Level 2 of the Hardware Lab, but can be accessed from two entrances: one is located in the lobby of the Hardware Lab, and the other is located in the office areas on Level 2. You will need a code to enter.
The code to Headmaster Thorstein's office can be obtained from an email in Thaddeus York's terminal. This terminal is located near the entrance to the office on level 2 of the hardware lab.

Blackbox Lab Pass to Wave Physics Lab
The Blackbox Lab is located in the Wave Physics Lab on Level 2 of the Hardware Lab. And getting there is not easy. In addition to the fact that you need a pass to get there, you need to secure access to the wave physics laboratory.

First of all, you need to restore normal gravity in the corridor in which the entrance to the wave physics laboratory is located. Fly into space through the nearest airlock and get to the hole in the hardware lab. The corpse of Dr. Calvino, whom you need to find according to the plot task, can serve as a guide for you. Near it there is a door control panel that you need to repair. Repairing the door will restore the corridor and give you access to the Wave Physics Lab, where the entrance to the Blackbox Lab is located.

Now let's deal with the pass from the Blackbox laboratory. You will find it with Josh Dalton, whose body is floating in SAGITT. First of all, mark his name in the security service terminal. Then go to SAGITT and fly to the cargo tunnel. Where it forms a T-junction with a service tunnel, you need to choose the direction towards the cargo bay (on the sign "Cargo Bay"). When you hit a large metal pipe, fly along it to its first bend. Find an opportunity to fly under it, there you will find Josh Dalton, and therefore a pass from the Blackbox Lab.

Psychotronics Laboratory
Pass from Principal Kelstrup's office
Director Kelstrup's office is located on Level 2 of the Psychotronics Lab, not far from the psychoscope calibration point in the atrium. You will need a pass for two doors: for the main entrance to the office and for the door leading to the Zerkala station and located directly in the office. The latter is hidden, so use Kelstrup's "Allow Conference Room Access" terminal to access it.

You will find a pass from Director Kelstrup's office directly in the office near his corpse, so to get into the office, use one of the windows walled up with a gypsum gun. This way you can bypass the main entrance.
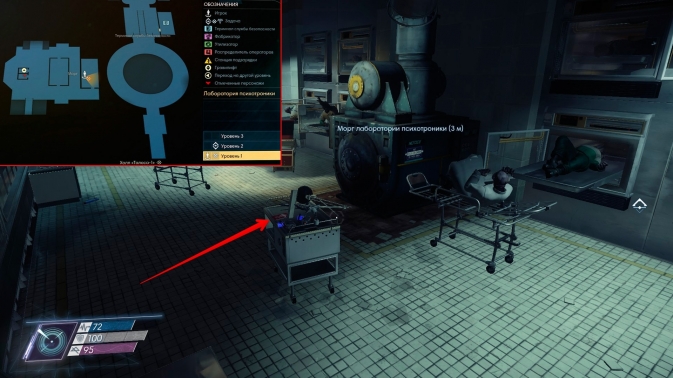
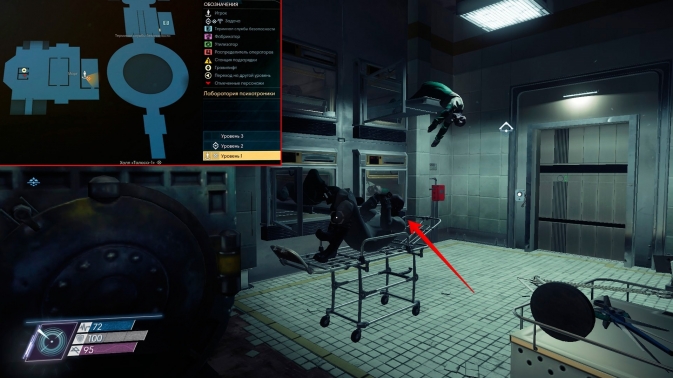
Pass from the mortuary of the laboratory of psychotronics
The morgue of the psychotronics laboratory is located on level 1, and you can go down there by gravity lift from the observation room, where you had to complete the experiment in order to get to SAGITTA.
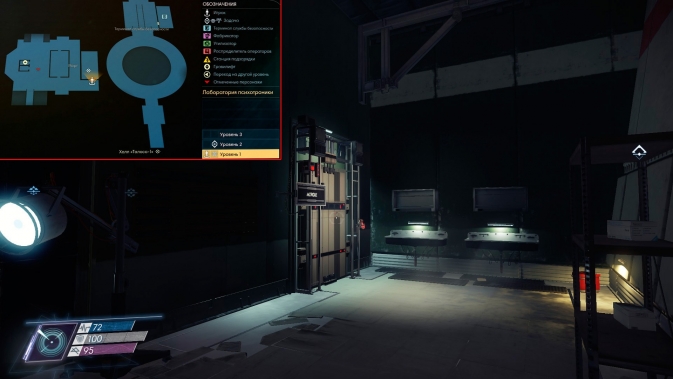
A pass is required to enter the morgue, but one unlucky employee forgot it in the morgue itself, as you can find out from the email in the terminal. Therefore, in order to get into the morgue, you have 2 options. First: wait for the operator-operator who makes a flight according to the schedule every half an hour, which is also written in the terminal. And the second: break the window of the morgue and try to hit the button that unlocks the door with the Huntress dart launcher. Well, the pass itself lies on a gurney in the morgue and is actually useless.
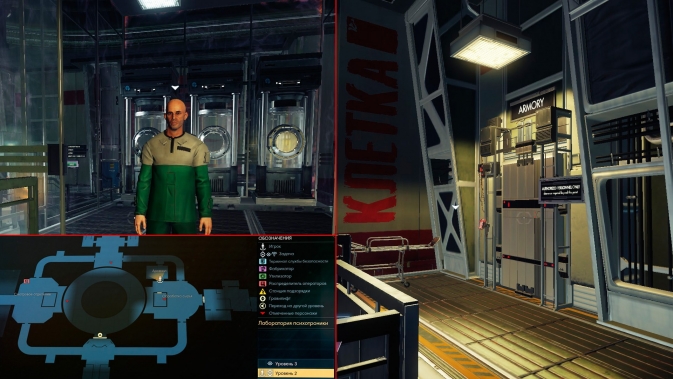
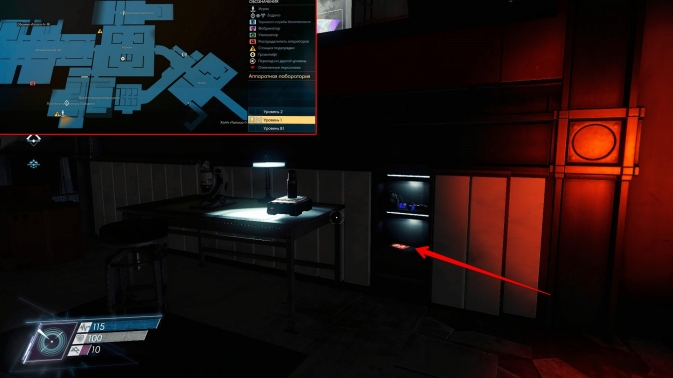
The code from the arsenal in the laboratory of psychoronics
The Psychotronics Lab has an armory on level 2, located in a room called Raw Material Processing. To get inside you will need a code or skill "Hacker 3". You can get the code from a volunteer who is locked in an experimental chamber in the same room. Release him by unlocking the cell door on the terminal, thus you will complete the task "Prisoner in the Psychotronics Lab" and get the code from the arsenal.
SAGITTA
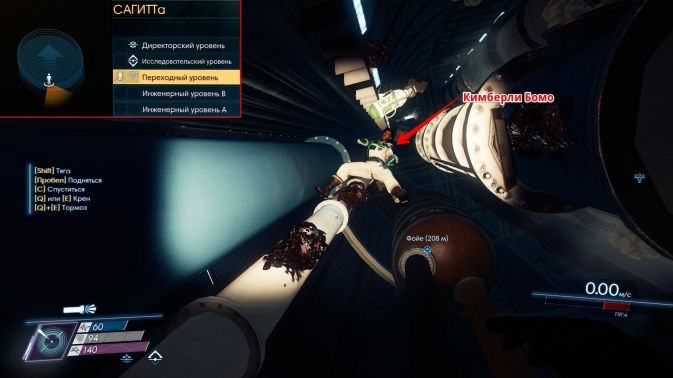
Service tunnel code
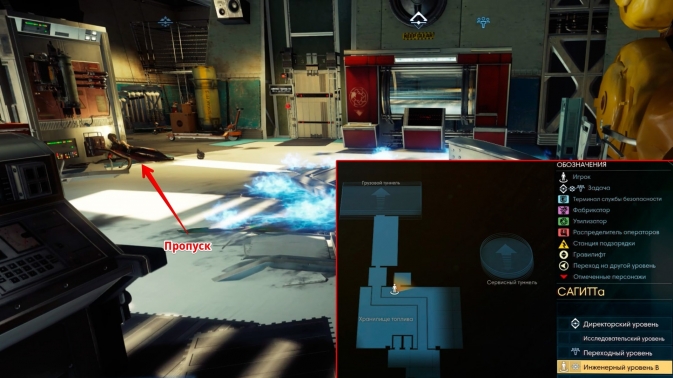
During your journey through SAGITT, in the area of the transitional level, you will come across a door leading to a service tunnel and requiring a code. You can bypass this door through the ventilation shaft. Look around and find a large spinning fan, stop it with a gypsum gun and swim through a small hole, thereby bypassing the door.
However, the code from the service tunnel is not difficult to find. He is with Kimberly Bomo, whose corpse is floating near the door, in the area of the accumulation of cystoid nests.
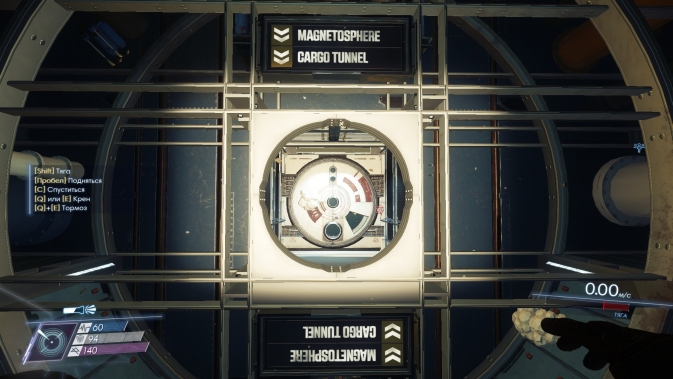
Service Tunnel Pass
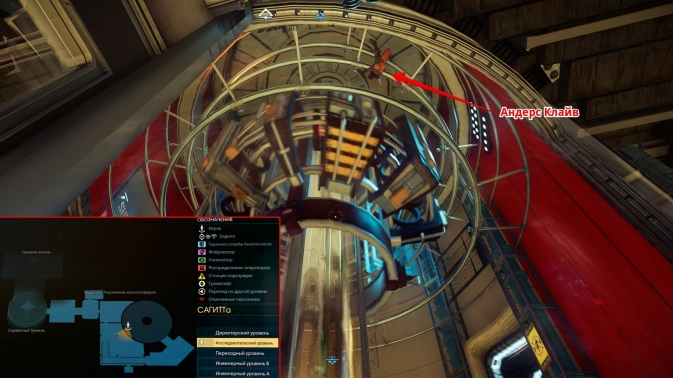
When moving from the service tunnel to the cargo tunnel, you will need a pass, which, according to the note attached near the door, is located by Anders Klein in the magnetosphere control room. This location is located near the locked door.
After you look around the new location for a bit, it will become clear to you that Anders died due to an accident in the magnetic compartment (behind the glass where the magnetosphere is spinning), and now his corpse is floating there. Accordingly, in order to get a pass, you will also have to go to the magnetic compartment. To make it easier for you, you can hack the Laurel Davis terminal if you have the Hacker 3 skill and turn off the magnetosphere for a while. If there is no hacker skill, then just act quickly.
Pass from the fuel storage
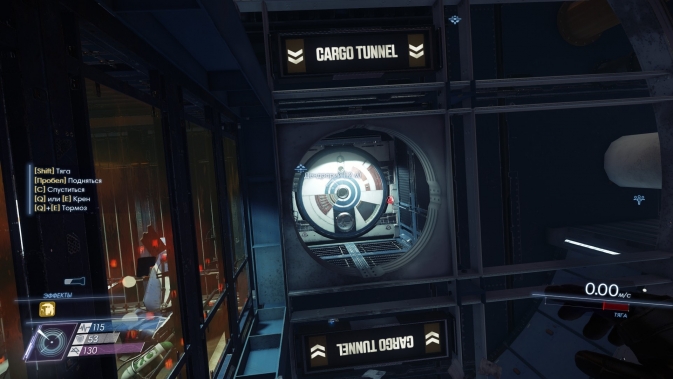
The SAGITTA cargo tunnel forms a T-shaped "crossroad" with the service tunnel. If you fly in one direction, you will fall into the arboretum (Arboretum), and if you fly in the other direction - into the cargo bay (Cargo Bay) and fuel storage. Everything is written on the signs. You don't need a pass to enter the fuel storage, but there is a staff room that requires a pass from the fuel storage. You can find it at the corpse of Brittany Lavelli, who lies nearby.
Arboretum
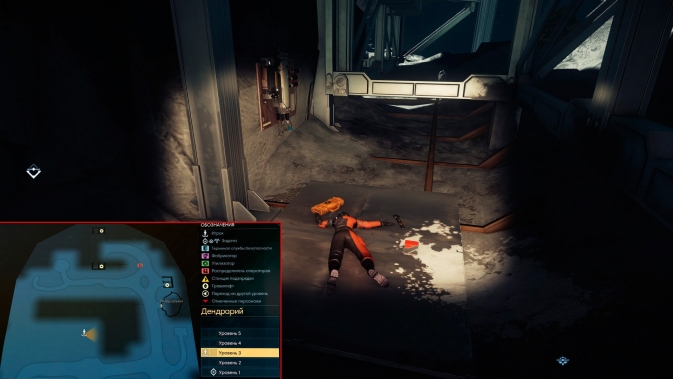
Pass from residential section
The entrance to the living section is in the arboretum on level 1, you can use the security booth as a guide. Go down the stairs from it and you will find yourself in front of the residential section, but you will need a pass to enter it.
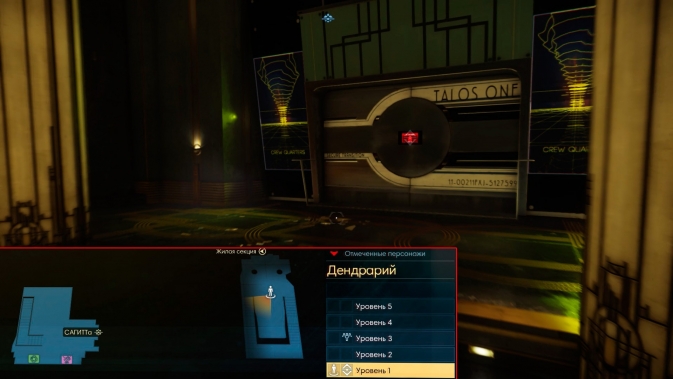
To get to the residential section, you need to find the corpse of Zechariah West, as he has a pass. It lies in the arboretum on level 1, directly opposite the entrance to the data vault, where one of the gravity lifts from level 3 leads. You will also find a valuable note for an additional task on it.
Pass from pantry A2 in the arboretum
Storage room A2 is located on the second level of the arboretum, directly opposite the security booth. You just need to find the passage leading from the arboretum to the residential section, and you will easily find the storage room. With a pass it will be a little more difficult.

Access to the A2 storage room pass in the arboretum will lead you to the additional task "Sweetheart's Gift", which you could activate by listening to the Lawrence Baxter transcriptor found while exploring the residential section. Read about the location of the transcriptor. The pass lies on the territory of the arboretum under a stone near a tree with the initials of lovers carved on it, it is not far from the waterfall. The easiest way to find this stone is to mark the name of your beloved Ellie Gold in the Power Plant tab in the security terminal. You will just find her corpse near the right stone. All you have to do is move the stone using the Climb 2 skill or any other trick, such as a salvaging grenade, and pick up a pass from storage room A2. By the way, the activation of the task is not required, you can just look under the desired stone.

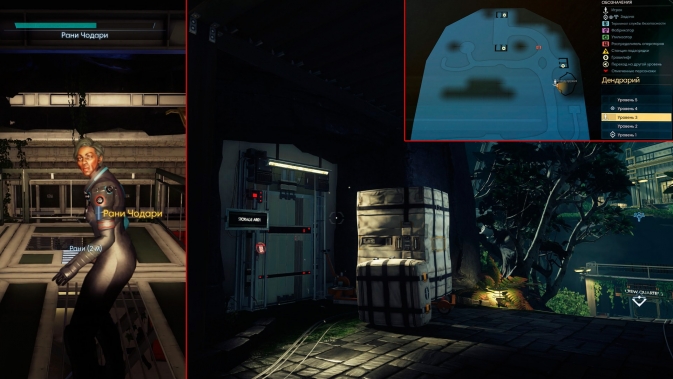
Arms depot code AR01
On the third level of the arboretum, next to the gravity lift leading to the passage to the Talos-1 bridge, there is an AR01 weapon cache that requires an access code. You can get it if you complete the additional task "Save Rani". You need to deal with the telepath in the greenhouse of the arboretum so that none of the people get hurt, or at least Rani Chodari. After that, she will give you the code to the armory, but you may have to wait until she comes to her senses if you hit her with a shocker.
Code from gravilift Alex Yu
In the arboretum, you couldn't help but notice a tall building, on top of which is Alex Yu's office. To climb there, you can use Alex's personal gravity lift, from which you will need a code. Or you can get to Alex's office by climbing the rock where the building's pillars are located. In any case, Alex Yu himself will tell you the code from the gravity lift when he contacts you after completing the "Reboot" story mission and asks you to go to his office for a conversation.

ER101 pass from Alex's escape pod
Alex secured himself in case of an unforeseen situation and prepared a personal escape pod for himself. It is installed on the fifth level of the arboretum, above Alex's office. This escape pod will come in handy if you decide to listen to December and escape the station without dealing with the Typhons. However, in order to extend the bridge to the escape pod, you will need Alex's terminal in his office. You will receive the password for the terminal after the "Reboot" task, when Alex will call you to his office. Otherwise, you will have to hack the terminal ("Hacker 4").

Alex Yu's escape pod pass can be found in his suite, located on level 3 of the residential section. It is hidden under the globe on the left bedside table. To get to Alex's apartments, you will need a pass from them and a code from the gravity lift leading to the directors' apartments. You can read about them below in the "Residential Section" section.

residential section
Code from the post office residential section
There is a post office in the residential section, which is located behind the counter with the concierge terminal in the lobby. You will need a code to get inside.

You can find the code for the Habitat Post Office from the note left for Anders in his Habitat 03. The crew lodging pods are located at the end of Crew Quarters Corridor B on the first level of the Habitat. Capsule number 03 is located in the first row from the entrance to the room.

Pass from Sarah Elazar's cabin
Sarah Elazar's cabin number 101 is located in the crew quarters wing A on the first level of the residential section, in close proximity to the fitness center. It is worth noting that you can get into the cabin without a pass through the service hatch. It is located to the left of the cabin and is blocked by a black box. Remove the boxes with the Lift skill or split them with a salvage grenade.

Sara Elazar's cabin pass can be found on her own, but for this you need to kill her or knock her out with a shocker. You'll meet up with her and a group of mission survivors in the cargo hold after Alex locks down the station.

Jada Marks Cabin Pass
Cabin 102 of Jada Marks is an A-crew cabin and is located to the left of the fitness center on Level 1 of the Habitable Section. The additional task "Golden Gun" could lead you to this cabin, read below how to get it.
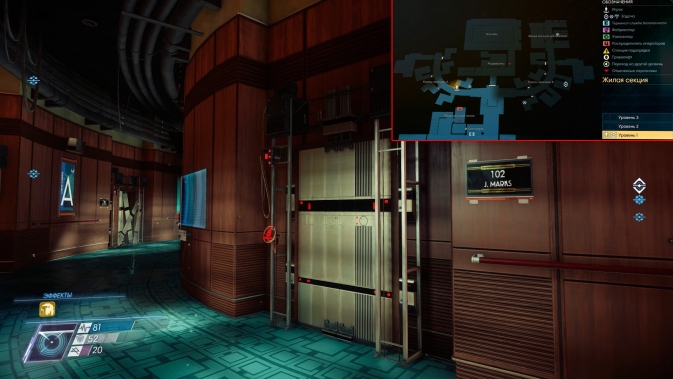
Jada Marks' cabin pass can be found at the corpse of Marietta Kirkos in the arboretum. It lies on level 3 near the pillars on which the office of Alex Yu stands. How to get there is up to you. You can take the gravity lift to level 4, where Alex's office is located, and then go down to the supports or try climbing the rock below. Be sure to listen to the recording on her transcriptor, this will activate the "Golden Gun" quest and get the code for Jada Marks' safe in her cabin, in which this gun is located.
Another pass can be found with Jada Marks herself, whose corpse lies in the captain's cabin, located on the second level of the Talos-1 bridge. And on her transcript there is the same entry with the code from the safe with the Golden Gun.

Pass from Hans Kelstrup's cabin
Dr. Kelstrup's cabin is located in the residential section on level 1 in the area of \u200b\u200bthe crew quarters A and has number 103. It is not difficult to find it, as well as a pass from it.

You can find the pass from Hans Kelstrup's cabin in the psychotronics laboratory on level 2. There, in the office of Director Kelstrup, there is his corpse, after searching it, you will find a pass. For information on how to get into Dr. Kelstrup's office, read above in the "Psychotronics Laboratory" section.
Pass from Will Mitchell's cabin
Will Mitchell's cabin number 106 is located in the living section at the very end of the corridor with cabins for crew A.

Now let's figure out where to get a pass from Will Mitchell's cabin. When you first enter the residential section, a person will speak to you on the speakerphone, and you will activate the additional task "Cook's Request". When you first meet the survivor through the kitchen window after completing a few tasks, he will give you a pass from Mitchell's cabin so that you can bring some item from there. Take the opportunity to explore the cabin.

Pass from Jorgen Thorstein's cabin
Jörgen Thorstein's cabin is located at the very beginning of the crew quarters wing B in the living section on level 1. Her number is 107.

The pass from Thorstein's cabin will have to be taken away from him, or rather from the phantom into which he has turned. This phantom roams Director Thorstein's office, located on Level 2 of the Hardware Lab. For information on where to get the code from the director's office, read above.
Pass from the cabin of Sylvain Ballami
Bellamy's cabin is located in the living section on level 1 in the crew cabins wing B. Cabin number 108. You could have been brought here by the additional task "The Disappeared Corpse", during which you find the pass from the cabin. However, if this is not the case, then read below where to get a pass.

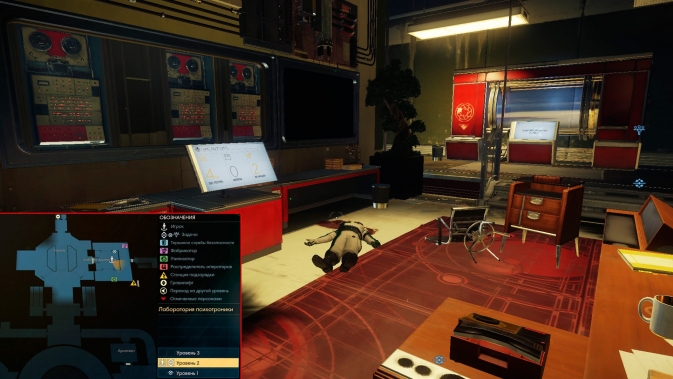
The corpse of Sylvain Bellamy, who was killed by a mimic in front of you at the beginning of the game, is located in the morgue of the psychotronics laboratory, located on level 1. You need to find it on the "Vanished Corpse" task. You will find a pass from his personal cabin with him, the corpse of Sylvain Bellamy lies on a gurney, unlike the others. Read above about how to get to the morgue of the psychotronics laboratory.
Abigail Foy's Cabin Pass
Abigail Foy's cabin number 109 is located in the living section in the corridor with cabins for crew B.
 Abigail Foy's Cabin Pass can be found on the large game table in the Residential Section Recreation Center. Enter it from the foyer on level 1 and go up to level 2. Abigail is at the head of the table and left her cabin pass.

Pass from Lorenzo Calvino's cabin
The Habitable Section on Level 1 in the Crew Quarters Wing B at the very end, next to the Habitat Pods, is Lorenzo Calvino's cabin number 111. And of course, you'll need a pass to enter there.

Code for the fitness center in the residential section
The residential section of Talos-1 has everything for the convenience of space station personnel, even a fitness center. It is located at the fork between crew cabin corridor A and crew cabin corridor B. Due to the fact that the use of the fitness center is paid, the code to enter it is given only to those who ordered this service. But we know where to find it.

You can get the fitness center code from the concierge terminal by reading the "New gym code" email. The concierge terminal is located in the reception foyer, where you enter when you first enter the residential section.

You can also find the code for the fitness center in a note left on a bench in the restroom of the residential section on level 1 in the crew quarters wing B.

Pass from the entrance to the kitchen
When you enter the living section for the first time, you will be contacted by a survivor on the speakerphone. Then you will activate the additional task "Cook's Request". After a small service rendered to Will Mitchell, he will let you into the kitchen, which is located in the cafeteria of the residential section on level 1. You will not receive a pass, but if you need it, then wait until the cook gives you access to the refrigerator and knock it out with a shocker. When you search, you will find a pass from the kitchen on him.

Kitchen fridge code
Cook Will Mitchell will also let you into the refrigerator, or rather into the huge freezer located in the kitchen of the residential section, and even give you a code from him when you perform one more service for him - bring or repair the water regulator. It can be captured in advance from the greenhouse in the arboretum if you do not have the repair skill.

The refrigerator can be accessed without a code through the service hatch, which is located behind the boxes near the entrance to the refrigerator. However, to get through this turn, you will need the Climb skill or a salvage grenade, since at the exit you will run into a huge block of ice. You may also need this service hatch to exit the freezer when you are locked up there. But here you can resort to a trick - shoot at the gas pipe passing to the left of the block of ice, the resulting fire will melt the ice and clear the passage for you without much effort.
Pass from the pantry "Yellow Tulip"
On the second level of the residential section, there is the Yellow Tulip Bar, where Talos 1 staff could have a great evening. The bar has a pantry that requires a pass. Want to drink yourself unconscious? Then look for a pass from the pantry at the destroyed operator named "Hoopy", whose body lies behind the bar.

Code from the gravity lift to the directors' apartments
To get to the third level of the residential section, where the apartments of the directors of Talos-1 are located, you will need to use the gravity lift. It is located in the foyer on level 1, opposite the entrance to the residential section. But even as a director, you have to find a code from him.

The code for the grav lift leading to the level with the directors' apartments can be found on a note in the staff room on level 2 of the residential section, where the utilizer is installed. A sticky note is affixed to the edge of a table littered with junk. The easiest way to find this room is to climb the stairs near the entrance to the living section from the arboretum and enter the first room on the left.

Also, the code from the gravity lift to the directors' apartments can be obtained from an email at the terminal of Will Mitchell in his 106th cabin. It is located opposite the toilet in the corridor with crew cabins A. How to get into it, read above. The terminal requires a password or hacking skill "Hacker 1". Unfortunately, we have not yet found the password, but if you know where to get it, please write in the comments.

Another way to get the code from the gravity lift to the directors' suite is the Emma Beatty terminal on the second level of the fitness room in the residential section. Just read the email on the terminal.

Morgan Yu Apartments Pass
The directors' apartment, and therefore yours, is located in the residential section on level 3. This level can be reached by gravity lift from the lobby, but you will need a code from it. Where to find the code from the gravity lift "Directors' Apartments" read a little higher.

In Morgan Yu's office in the Talos 1 lobby on level 3, there is a small room with a Recycler and a Fabricator. After examining the tables there, you will get a pass from the real Morgan Yu apartments in the residential section, which, by the way, are absolutely identical to the fake ones.
Pass from Alex Yu apartments
The Alex Yu apartments are adjacent to the Morgan Yu apartments on the third level of the residential section. You can go up there on a gravity lift leading to the directors' apartments. For information on where to find the code from the gravity lift, read above.

You can enter Alex's apartment only with a pass. It can be obtained from Alex's safe, which is located behind the service hatch in Alex's office in the arboretum on level 4. December will have the code for the safe when you meet him in the lobby of the neuromod department during the task "Who are you, December?". Read more about the safe.

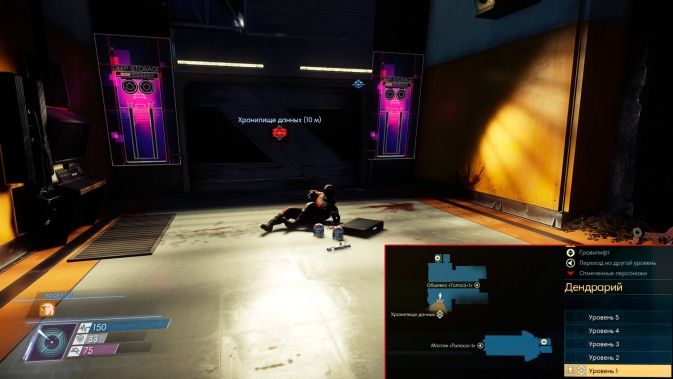
Data store
Code from the exit to the stairs
The exit to the stairs is located on level 1 of the data warehouse. As soon as you pass the first broken doors after entering the location from the arboretum, turn right and see the door to the stairs.

To go up to level 2 of the data warehouse, you will need the code from the exit to the stairs. You can recognize him from the "Novice" note pasted on Zacharias West's terminal, which is installed at the entrance to the Arboretum Data Vault.

Pass from the security booth
The security booth is located on the first level of the data warehouse. It requires a security pass, but you can do without it. You can get into the booth through the side wall, since the glass of which it consists can be easily broken. You can also climb into the security booth through the hatch located under the very ceiling to the right of the round door opposite the booth.

Well, if you still need a security pass, then go to the second level of the data warehouse in the control center. The pass is on the table near the Personnel Tracking terminal. Where to find the code from the exit to the stairs, read above.

cargo compartment
Code from cargo hold B
When you enter the cargo bay through the gap after blocking the station by your brother Alex, you will find out that a group of survivors, led by Sarah Elazar, has already settled there. They locked themselves in Cargo Bay A and blocked the passage to Cargo Bay B because there were too many Typhons. The round door leading to Cargo Bay B is located on the first level of Cargo Bay A. However, you will first have to climb up to the second level to the survivors, and then, after passing through it, go down in a gravity lift to the exit to Cargo Bay B.

You will receive the code from Cargo Bay B from Sara Elazar if you complete the additional task for her "Defending the Cargo Bay" for her or if you kill her or stun her and listen to the transcriptor found during the search.
Pass from the entrance to the loading area No. 1
In the cargo hold, you will meet a group of survivors who have entrenched themselves in a certain area of the location, protecting themselves from the enemy. In particular, they locked the doors leading to cargo compartment B (read about it above) and loading area #1, a room with loading platforms, where you get from the skin of Talos-1 through a cargo container. The large round door leading there is located in the Pickup and Drop area on the first level of the cargo bay, not far from the door to cargo bay B.

You will find a pass from the entrance to the loading zone No. 1 at Austin Cool, but you can pick it up only by killing or knocking out Austin. However, in fact, this pass is not so important, it will only slightly reduce the time it takes to move through the cargo hold.

life support
Pass from the office of the life support security service
The security office in life support is located on the first level near the exit to the Talos-1 lobby. You will need a pass to get inside.

You will find a pass from the security office in the toilet, which is located nearby in the same corridor. Having reached the last booth, look under your feet, you will see a grate and a pass that is lying below. You will have to remove the grate with the Climb 3 skill or a salvage grenade, and after that the pass is completely yours.

Atmosphere control pass
The Atmosphere Control Room is a small room in the Air Filtration Control Room, which is located on the second level of life support.

An Atmospheric Control Pass can be found with Jeanne Fauré. Associated with her search is the "Missing Engineer" side quest, which can be obtained by reading the letter on the security terminal in life support. Zhanna is located in the service room on level B3 of the power plant, the upper level of the room with the reactor. This service hatch can be seen in the wall in the freight elevator shaft. But in order to get to it, you have to go down a level below because of the closed door and get to the hatch through the mine, building a rise with the help of a gypsum gun. All. It remains only to walk through the office to Jeanne Foret and pick up her pass.

Code from the pantry near the gravity lift
Using the gravity lift on the first level of life support, you will go down to level B2. Down in the grav lift area you will find a storage room, to get inside, you will need a code from it.

You will find a note with the code in the oxygen supply control room, which is located on the second level of life support. The note is pasted on the central workplace. You will also need a code for the oxygen supply control room, but if it is not available, use the service hatch around the corner, to the right of the door. The hatch is located above the collapsed passage, to get to it, use the gypsum gun.

Power station
Code from the parts warehouse at the power plant
The Parts Warehouse is located on Level B1 of the Power Plant. This level can be reached by gravity lift from the first level.

You can find out the code from the parts warehouse by listening to the transcription recording of Duncan Krasikov. You'll find him next to Duncan's corpse at the end of the monitoring post hall, which is located on the first level of the power plant. To get to it through the energized floor, use the gypsum gun.

Pass from the chamber with coolant
A large round door requiring a pass from the coolant chamber is located on level B2 of the power plant. According to the plot task, you will definitely have to go through it to get to the reactor control room. You will find a pass from the coolant chamber with Thalia Brooks, whose body hides the fire blazing to the right of the locked door.

The pass from the chamber with the coolant will be useful to you further in order to get into the room with Ekaterina Ilyushina.

Passage to the reactor from the reactor control room
The reactor control room, to which you will need the "Reactor Pass" pass, is located on level B5 of the power plant, the lowest level of the location. It is located opposite the entrance to the reactor itself.

The Pass to the Reactor pass can be found on several people. You will find one at Nicholas Stillwater, whose corpse lies in a broken freight elevator on level B4. The elevator is located on the opposite side of the stairs leading down and the gravity lift.

The second pass from the passage to the reactor is held by Guy Crowl. His corpse also lies on level B4, but in a different part of it. Climb up from the very bottom of the stairs that wrap around the reactor, and go in a circle until you come across Crowl with a pass.

Talos 1 bridge
Meeting Room Pass
The officers' deck of the Talos I's bridge, located on the first level, has a meeting room. A pass is required to enter. However, you can get there without a pass. You just need to break the window next to the door and climb through it inside.

The meeting room pass can be found on several people. The closest one is at Omar Bolivar, whose corpse lies on the officer's deck among the computers. Look for it next to the one that says "Navigation".

Another pass can be taken from Bill Nixon-Green, whose corpse lies on the sofa in the captain's cabin on the second level of the Talos-1 bridge.

Shuttle compartment
Pass from the shuttle control
The shuttle control room is located on the second level of the shuttle bay. If you enter from the lobby of Talos 1, you will almost immediately stumble upon a booth that belongs to it. The entrance is located on the side of the cabin. Of course, you will need a pass - and not for one door, but for several. The first door will take you to the grav lift leading to level 3, and the second door will take you directly to the booth with the security terminal. Both doors can be bypassed without a pass. You can get into the room with the gravity lift through the service hatch above the door in the corner, and into the booth through the missing ceiling.

Also, a pass from the shuttle control room will open the door for you to the tool shop on the first level of the shuttle bay. This is the only locked door on the lower level.

The shuttle control pass can be obtained from the preflight room on the second level of the shuttle bay. It is on one of the tables. And about where to get the code from the preflight room, read the next paragraph.

Another pass can be found with Scott Parker, whose corpse is located on the first level of the shuttle bay. You will run into him in a fenced area in the center that looks like a cage. It will be more convenient to take this pass if you entered the shuttle bay from SAGITTA.

Code from the preflight room
The preflight room is located on the second level of the shuttle bay. You will find it near the grav lifts leading down to the first level.

As for the code, you need to go to the staff lounge located on level 2 of the Talos-1 hall. There you will find the corpse of Octavia Figgs, and next to her is a transcriptor. Listen to it and you will have a new code for the pre-flight room, which was given to Octivia by her colleagues.
Dahl Cargo Bay Pass
In the tail of Dahl's shuttle, which will arrive at a certain point in the story, there is a cargo hold, from which you will need a pass.

You can find a pass from Dahl's cargo hold with him. Your meeting will take place in life support in the oxygen control room. You can get there by cracking the code on the door or slipping through the service hatch in the side wall. Knock out or kill Walter Dahl and take the pass from him. This scenario will happen if you saved all the survivors.

Is it possible to sneak into the subway tunnel unnoticed? - we asked the Moscow expert, historian and digger with many years of experience Daniil Davydov.
It is almost impossible to get into the metro from the street, because the ventilation and cable shafts have long been securely closed to volume sensors, motion sensors, and are also equipped with an alarm system. But a lot of people use penetration into the tunnel through the station portal. That is, behind the tail car they descend onto the rails or climb through the end door, which is not always closed or the “craftsmen” have special master keys. Often this is done right in front of the camera lenses. They climb right along the signaling cables at the UKPT - tunnel penetration control devices, wait for the next train behind the transformer and go further to the service - connecting branches.
- The entrance to the tunnel is controlled, all penetrations are recorded.
If the alarm does not work at the UKPT, then, most likely, no one will look at the monitors. Cunning guys know how to approach, so as not to fall into the zone of the control system. What is regularly used at the central metro stations. Not so long ago, standing on the Chinatown platform, I saw three guys climb out of the tunnel through the end door. They were not workers, because specialists are forbidden to appear in the tunnels during traffic. These were the so-called pseudo-diggers, because a real digger is primarily interested in archeology, Moscow studies, and not some kind of destructive activity.
-How are they not afraid of the contact third rail, which is under high voltage?
The voltage there is 835 volts. The contact rail is covered with an ebonite casing, if you do not touch it, then nothing bad will happen. Deep round stations have an additional space in which transformers are installed, behind which the attackers hide so that the driver does not see them from the cab. There is where to hide, these are inter-tunnel failures, and congress chambers, and service - connecting branches, and ventilation shafts, and cable collectors that go into cable shafts. Hooligans are often caught, but sometimes they are not.
At the train crash site, a branch under construction departed from the main tunnel. In your opinion, an outsider could get through this object?
It is unlikely that now the alarm system is quite cheap, it is everywhere. Metrostroy is a rather closed organization. But, on the other hand, an outsider could put on overalls and mingle with the workers. There are many services running in the tunnels. But earlier, as far as I know, it was quite difficult to leave the Metrostroy sites for the existing lines. The metro is still an object that is guarded and monitored.
-Is it possible to get into the subway tunnel from the open tracks of the depot?
This is unlikely. Usually there are police officers in booths in front of the portal. Pseudo - diggers mostly climb through metro stations. The train comes, the crowd goes out, the crowd comes in. Who in the hustle and bustle will pay attention to two or three hooligans who quickly jumped over the end door and disappeared into the tunnels?
the task is to get into the rockland auto tunnel and the pointer is on the ceiling and when I approach the tunnel the lock is closed and you can’t hack what to do except tcl
Galina) trainers with cheats pump up and everything in a bundle
Sergey damn, I had the same garbage by the way, I went through this mission with tcl
Tags: Automotive, tunnel, Rockland, how to, get into
Subscribe and like :) ❏ And please leave a comment;) Vegas Pro 13.0 Fraps software.
Rockland Car Tunnel is a location in Broken Steel, an addition to... ...southwest of the Capital Wasteland. Only through this tunnel you can get to one of...


Passage of quests Broken Steel | Topic Author: Laurette
MAIN QUESTS
Death from the sky
The quest is done in an elementary way. You wake up in the Citadel, two weeks after the launch of the Purifier. During this time, the Brotherhood managed to torment the “babies of Eden” great, but they do not play honestly - they still keep in touch and act together. Disorder! Elder Lyons and Scribe Rothschild bring you up to speed and send you to meet with the paladin Tristan, the temporary commander of the Brotherhood's strike force. As planned by the command, the mission was supposed to be the simplest - to come to the gathering place, help Liberty Prime defeat the Enclave forces, finish off the survivors, find the source of the radio signal.
When you're ready, hit the road. Your destination is the Rockland Road Tunnel, in the southwest of the Capital Wasteland. At the entrance, a warrior of the brotherhood is already waiting for you and invites you to enter. We pass a small corridor, we speak with Tristan, we listen to his orders on the way to the exit. Going out into the street, we see a touching picture - Prime proudly steps out from behind the hill, incinerating the enclaves with his laser and exploding them with bombs. You and a small band of paladins follow him and provide microscopic support. Having cleared the area, the robot proceeds to the second stage - to penetrate the enemy base. There are no doors, but the thug does not need them, because a bomb explosion and a wall hit work better than any master key. But, in every barrel of honey there is always a fly in the ointment. Prime reports the air attack and orders all personnel to retreat. Better obey, because in the next second our steel giant will take a shower from the most powerful orbital rockets. Everyone is in shock, Tristan is angry, Liberty's head continues to conduct anti-communist propaganda. You and a small detachment are sent inside the base to find the reason for this "failure". Then we simply follow the Brotherhood detachment, occasionally shooting from weapons and picking up the first samples of the Gehenna Power Armor. Your goal is a supercomputer, and, to the greatest joy, an arrow points to it. We approach, download the data, leave the room through the kindly provided exit and return to the Citadel. We listen to the angry and upset Rothschild, we report everything to Lyons. He will direct us to Tristan, but this quest ends successfully. We rejoice at the received EP and prepare for the next mission, which is no longer a “warm-up”.
Pavel (Nitalekshana) High price (Electricity fee)
Description
We speak with Tristan, he already has an assignment for you in reserve. He sends you to Old Olney to find a Tesla transformer. This device is the Brotherhood's only hope of gaining a technical advantage over the Enclave again. If you ask Tristan for help, he will direct you to one of the scribes - she has a control device over the claws of death. It is useless for this task, but having this device in your inventory, all deathclaws with unusual devices on their heads will go over to your side. A trifle, but nice.
Walkthrough
Now preparation - take a stronger armor (the same "Geyena" or other power), or get ready to hide in the shadows and absorb stimulants in batches. Weapons, respectively, are more lethal. In the sewers of Old Olney, you can pick up Prototype Medical Power Armor, so you won't be left naked. Now to business.
You can first test the device on a deathclaw near the city, but the beast dies if it is too far from the Enclave camp, so there is no point in going there. To complete the task, it is better to immediately head to Old Olney. First, we pass the streets, shoot the claws of death and go down into the sewers. Find (if you haven't found yet) the Medical Power Armor Prototype (after going down the sewer, turn left), then follow the marker. We get out of the tunnel and get into the Wilson complex. There we will be met by two optimistic ghouls who will tell their sad story and run away, but we are not up to it. The building is in ruins, it is inhabited by the claws of death, so we save more often, move from floor to floor and look for a large hall with a broken roof. There we hear the sounds of a rotorcraft and see Enclave soldiers entering the light. We remove them and enter the power plant. Here we will be met with a laser show by security robots and turrets. If you see a locked door - keep your eyes on it - it may well open and please you ... Yes, it will not please you with anything, you just get a stab in the back from the turrets. Another trap is the “green” room, where the level of radiation just rolls over. We pass this corridor, we are looking for a hall with electric currents. We jump (or go down) to the source of discharges. Around the coil itself (on the walls) there will be fuses that should be turned off in advance, otherwise you will be hurt by the current. Take a coil (transformer), at the same time you can look for alien energy cells in laboratories. Exit through another door kindly provided by the developers and return to the Citadel to the paladin Tristan.
Pavel (Nitalekshana) Divide and Conquer
Paladin Tristan has the last important task - to deliver the final blow to the Enclave, and for this you need to get to the train that will take the hero to Adams Air Force Base. This is the latest slap in the face from the Brotherhood, so don't worry, bad guys in power armor will continue to terrorize the unfortunate wasteland.
Walkthrough
Enter the Presidential Metro:
The first part of the task is to get to the White House. If you haven't found it yet, then go to Metro (any) => Metro Center => Pennsylvania Avenue => Services. At the White House, we are met by Super Mutants and a detachment of the brotherhood. There are several ways to enter the Presidential Metro:
in the location of Pennsylvania Avenue, the sewer manhole of the Service;
in the location of Pennsylvania Avenue, in a funnel on the site of the White House, the door of the Service; door inside the Capitol building - opens from the Presidential Metro.
Find a way to Adams Air Force Base
In the subway you can find some ammunition for energy weapons and most importantly - EMP grenades. They will help to cope with the robots rampaging in the subway. To stop them being hostile, find MARGO's computer and talk to her. From the dialogue it will become clear that a certain ill-wisher (a crowd of wild ghouls) got into the subway and is resisting.
(Optional) Eliminate hostile elements infiltrating the Presidential Subway
Enter the next room and help the robots fight the ghouls. If you have a ghoul mask, then put it on and fearlessly overcome the subway. Finding the train, you find out that it is out of order. Look around and look for a sparkling fuse box. You need a fuse to fix it.
Option one:
Find the nearest guard robot (large, black and three-legged) and blow his brains out (or whatever he has...). Search the wreckage, take the fuse and repair the shield. Be careful, all robots will take offense at you for the death of their brother and attack! Now get on the train and enjoy the road...
Option two:
Destroy all the ghouls, then MARGO will send a repair robot, he will repair the electrical panel and you can immediately go to the base. In this option, the robots will remain friendly.
Pavel (Nitalekshana) Take orders and equipment from the container marked "Additional support"
Enclave patrol will greet you at the Adams Air Force Base subway exit. After an exchange of courtesies, we go outside and follow the marker to the small box “Additional support”. This is the paladin Tristan sent you as a gift:
Micronuclear battery (50)
Orders - holodisk
Tesla Cannon (Turrets)
Electronic charge (50)
After you get the cannon, the Pip-Boy will glitch for some reason (an obvious bug) and all the markers will go wrong.
Find an access terminal that allows you to lower the ladder of the mobile platform
Go to Adams - control tower (the tall tower that stands in front of the force fields), climb to the top and through the terminal activate the ramp of the Enclave Mobile Base.
If you still want to fight, then you can run across the roofs of buildings in search of artillery consoles (one on the building near the rotorcraft platform, the second on the barrack opposite the exit to the control room), arrange a colorful genocide for the enclaves, and if it’s still relevant to collect loot. In addition, there are several deathclaw cages in the hangars, and you must have a control device. Therefore, you can hack terminals, open cells and watch as the claws of death tear the scientists of the Enclave to shreds.
Log in to the Enclave's mobile base
Under heavy Enclave fire, cross the space to the ramp of the Enclave Mobile Base that you lowered. You've probably already been impressed by this marvel of Enclave engineering, but there's more goodies inside than in the previous three missions! Don't try to clear the whole area, Enclave soldiers respawn indefinitely. Better immediately run to the ladder.
Destroy an Enclave mobile platform with orbital weapon fire
Once on the base, we see stretched force fields. They are removed in three ways: we approach the console, a menu appears where you can hit the console with millet (in this case, you will be hit by an explosion), turn off the field (Science) or blow it up (explosives). This disables all force fields at the base. We go inside, turn right and look for mechanic Stiggs. This is a kind fellow who is ready to hand over the Enclave with all the giblets, just to slip away. We listen to him (especially the part about robots) and release / kill, depending on your character. If we release, then he activates his robots Hoover and Sparky and leaves. There are two ways to go up from the first floor:
North - bedrooms
- South - deathclaw pens
We rise into the next room - the pearl of this base. Now our goal is two officers of the Enclave Security Service (outwardly indistinguishable from the Enclave Officer), from whom we need to take away access cards. The resistance you will have is the most impressive, which is worth the Sigma Squad alone. But, may Science be with you, the ability to release the death claws and reprogram robots. Look for a hall with several supercomputers - on them, having access cards, you can: open the door to the next location (mandatory!), reprogram the robots (turn them off or, if you have the Roboticist perk, make the robots chase the Enclave), as well as open the door to the armory. A good cracker, in addition to the Accurate Gatling laser, can also profit from the Alien Blaster, and also find several alien energy cells for it. But, it's time to get down to business - we go out to the roof (the inscriptions on the walls are diligently leading there to the launch pad), where already, like bees for honey, the rotorcraft flock and the Enclave attack aircraft land. With a sufficiently developed Heavy Weapons skill, the Tesla Cannon will help you get rid of vertibirds with one or two shots. Now you need to enter the Satellite Control Center located at the southern end of the platform and find the terminal. Now here's the fun part...
Pavel (Nitalekshana) Open the terminal and see the targets - Megaton, Rivet City, Project Purity, Citadel, Mobile Base.
Option A - good. We select the Mobile base option, confirm self-destruction. Now we go out to the roof, where we are met (if she survived the mission “Take him!”) Sarah Lyons and invites us to sit in the trophy rotorcraft. We accept the offer, fly off to a safe distance and admire the view of the Mobile Base, which is being sprayed with orbital rockets. We sit down again in the rotorcraft and fly to the Citadel. We are heroes again, everyone loves us, Tristan and Rothschild have an indefinite job for you to collect all kinds of junk and hunt mutants, and also get our premium XP.
Option B is bad. We select the Citadel and shed. We will also be thrown “where we need to be”, but instead of a warm welcome, we will be branded as an enemy of the people, the Brotherhood will turn away from us, only a crater will remain from the Citadel, in which you can find the entrance to the armory, where you can pick up a lot of high-quality loot and you can also find a pistol that is lying right in the center of the crater, which remained from the Brotherhood’s base.
Destroying all five targets will not work (motors and satellite charger are damaged), you have only two options - Mobile Base or Citadel.
Leave the Enclave Mobile Platform
We leave through the upper door.
Climb aboard a captured vertibird
We sit in the rotorcraft. You can't move inside, but you can turn your head. A short flight, we disembark, admire the explosion, climb back. For a change, we are seated on the other side, but you can see even less.
1500 GS
±1000 Karma
Possible bug: in the first part of the task, the marker points to the door to the Presidential Subway inside the Capitol building. The door will open only after electricity is supplied from inside the Presidential Metro. Option - after completing the additional part of the task (Optional) Eliminate hostile elements that have penetrated the Presidential Metro.
Starting from the second part of the task, in the territory of the Wasteland, the marker shows the route as if you were in the territory of Adams Air Force Base. The cure is unknown.
A bug is possible: after taking the Tesla Cannon, the marker will fail and will show incorrectly. It is treated by reboot, but taking into account the aforementioned bug.
Additionally
Alas, you will never return to the Enclave Mobile Platform anyway, so option B is not suitable for those who just want to take out all the treasures in "two passes".
Pavel (Nitalekshana) SIDE QUESTS BROKEN STEEL
Holy water
Description
Scribe Bigsley complains to us that Megaton is constantly running out of water and asks us to find out what the problem is. Before Megaton, we watch a scene of how Rosa gives water to a beggar who always sits in front of the entrance to the city. "Oh, what wonderful fresh water!" - he says and dies ... Rose is at a loss, she says that this holy water was given to her by a man from the Monastery of Eternal Light, he also gave her a leaflet (if you make a quick transition to Megaton itself, then this leaflet can be removed from the main gate of Megaton). A monastery marker appears on the map, located near Springvale.
Walkthrough
Brother Gerard is already waiting for us there, who immediately offers to taste their "miraculous water". We cannot convince him that water is radioactive and dangerous. And in order to get inside, according to him, we must receive a certain dose of radiation. This can be achieved with 200 radiation and a high Speech skill, or 100% at 400. We get the key, go downstairs and watch the picture of how the crazy old woman enlightens the ghouls... Convincing her that all this only harms people is not an easy task even with a high eloquence skill. On the contrary, she wants everyone to turn into ghouls. You can also say that "I am the Prophet of the Atom", to which she will answer that the prophet is brighter than the sun, etc. And here we should visit a crazy idea! Fortunately, another radiation emitter is in the basement along with, oddly enough, friendly wild ghouls (Defender of the Atom is quite tenacious). We turn on the emitter and bring our radiation level to 800 units. Again we go to the crazy old woman, and this time she recognizes us as the Prophet of the Atom, promises to return the water to Megaton and stop all her business.
You can just take the brains out to Brother Gerard, pick up the key, go down to the basement, kill everyone there and return to Scribe Bigsley.
Notes
You can also spoil both emitters of radiation (in the yard and in the basement) and deprive the crazy old woman of the material base.
Pavel (Nitalekshana) Defending caravans
Scribe Bigsley tells us that some "organized bandit group" is robbing water caravans going to Rivet City and directs us to Officer Lepelletier (who can also start the quest), which clears things up a bit. Having received our consent to help, she sends us in pursuit to the departed caravan. Having caught up with him, we find several bodies of bandits, a dead brahmin and battered officers, who immediately run to report what happened to Lepelletier (it may turn out the other way around, the bandits are alive, the officers are dead). In one of the corpses of the bandits we find a holodisk, on which One-Eyed Jack talks about their plans and the meeting place, where we actually go. The meeting point is Wilhelm's Goods Station, where the bandits rest with their leader. After talking with him and giving the correct password, he gives us metal armor and a helmet. For further conversations, we need to put on this armor.
Blow everyone's brains out.
- Say that the water is already free, and no one will pay for its protection (requires a high skill of eloquence). The bandits will leave and you can return to turn in the quest (the bandits can kill Granny Sparkle if she is nearby).
- Challenge One-Eyed Jack to a duel, after the victory the bandits declare that they do not need the boss, but they will agree to guard the caravans for a fee, and they will take us as a share. (before challenging Jack to a duel, take your companions a little further away and order them to wait, if they intervene, then all the bandits will attack. Also, during the duel, you can’t use weapons or equipment, otherwise the bandits will become aggressive).
Having come to Officer Lepelletier, we also have a choice of several options:
- Say that the leader is killed and there will be no more attacks.
- If we defeated One-Eyed Jack, you can offer "roof" on behalf of the gang for 200 caps per week, or say that for 500 caps there will be no more attacks.
In the first option, Lepelletier sends you to Bigsley for a reward. If you choose the second option, you get a reward, bad karma and end the quest.
Pavel (Nitalekshana) Great healing water!
Walkthrough
A certain ghoul Griffon appears in the historical museum, selling medicinal water, and not just selling, but having arranged a whole performance. After the conversation, you can buy this same water from him for 10 caps, or, with the proper level of eloquence, get a bottle for free. With the help of Pip-Boy, we learn that this is the most ordinary radioactive dirty water, which we immediately tell the ghoul about. But this is indifferent to him (with a high level of eloquence, a ghoul can find out the truth). You have to take everything into your own hands and get to the bottom of the truth. We run to Bigsley, drooling on the keyboard in the Jefferson Memorial, after some questions it turns out that he knows nothing about this fraud and only supplies water to the ghoul by the covers (by the way, the quest can also be obtained from Bigsley). Now we have a marker on the map pointing to the museum management building. There are several ghouls in the building that do not pose a particular threat, in the basement we find a holodisk with a recording of Griffon, where he gives instructions to his wards. So, there is evidence, we run back to the historical museum and poke a holodisk in the face of an impudent ghoul ...
You can ask him to sell fresh water, but he will still pass it off as medicinal.
- You can make him confess to the ghouls-spectators that this is all a hoax, then they will kill him and take his place.
- You can take 300 caps and go home.
- You can receive your share of the sold bottles once a week. The more eloquent, the greater the share.
None of the options affect karma.
Pavel (Nitalekshana) UNMARKED QUESTS
Fatal Attraction is an unmarked quest in the Fallout 3 Broken Steel add-on. Translation: "Fatal Attraction".
Holodisk "I'm sorry, my dear"
The quest begins with finding the holodisk Sorry, my dear, in the Presidential subway line. The message asks to be taken to the Hotel Maisons-Beauregard.
The holodisk lies not far from the exit to the Capitol, on a bench.
Hall Maisons Beauregard
In the Maisons-Beauregard hall you will be met by the raider Screw - an aggressive personality with a level one and a half times higher than yours. He can only be killed. On the body, among other things, is Screw's Note - a reference to another unmarked task Grady's Package. According to the text, it becomes clear that this is the second of the nightgowns that disappeared along with the courier's package.
The suitcase is in the hall of the Maisons-Beauregard, on the billiard table. Inside is Candid Pajamas.
Screw Combat Armor, Revealing Pajamas, Screw Goggles
If you have a holotape I'm sorry, my dear, but there are Super Mutants inside the Maisons-Beauregard hotel, load the last save or save before entering the building and load until the Screw Raider appears.
Pavel (Nitalekshana) Super Mutant Blood Samples (Unmarked Quest)
The task becomes available after the completion of the main storyline of the add-on. Paladin Tristan will ask you to kill super mutants and bring him samples of their blood. It's simple - for each sample you get 50 caps and 10 experience points. You can find samples in the super mutants you killed.
Pavel (Nitalekshana) Liberty Prime Repair
The task also becomes available after the completion of the main storyline of the add-on. Scribe Rodschild intends to restore Liberty Prime's robot, which was destroyed by the Enclave's orbital laser. Rodschild will ask you to bring him cameras - to restore Liberty Prime's optics, as well as sensor modules. Prime's remains can also be found in the lab, including his head.
Stanislav (Hariprasada) Pavel, hello) tell me please) I beat the game) came to the purifier with charon jericho and a robot) I was instructed to enter the code) looked at all the endings tried all the options ... and installed Broken Steel. Now, after saving in the cleaner, I gave the password to Charon and he successfully entered it) I wake up after 2 weeks and I can’t walk a pip fight, I’m standing in the citadel with my whole gang and I don’t understand what kind of glitch it is, and how to fix this glitch)
Sergey (Dove) people, what should I do if I wake up 2 weeks later and I have a quest to start the cleanser!
FALLOUT™ 3 Conference Overclockers.ru
PS Near Arefu, the house stands there how to get there, played 2 times, but the key .... And where can I find the key to the Rockland Road Tunnel?
Passage of quests Broken Steel | Fallout 3 and New Vegas ...
4 Apr. 2011 - Your goal is the Rockland Road Tunnel, in the southwest .... And in order to get inside, according to him, we must get ...
Arriving in Paris, after a week-long trip to the northern countries of Europe, I didn’t really walk around the city - I immediately went to the metro. But don't ride in it, no. Run through tunnels between trains :)
The Paris metro is one of the oldest in the world and is unique in its kind. French metro builders, along with the English, were the first pioneers, so in the intricate system of track development you can find many unusual design and engineering solutions. For more than a century of history, a couple of hundred kilometers of tunnels and about 300 stations were built in Paris. Some of the stations, over time, were not in demand and subsequently closed to passengers. Trains rush past these ghostly stations every day without stopping, and their only visitors: street artists and urbex - photographers.
You can get to abandoned stations by running in the intervals between trains or during a night round, mixing with the workers. This is what we did with our friends. For convenience, I divided all stations into sections.
*Unauthorized entry into the subway tunnels is life-threatening and can result in a hefty fine!

1. Croixe rouge (Red Cross)
One of the most famous closed stations of the Paris Metro. From 1923 to 1939, Croixe Rouge was the terminus of line 10. However, after its extension, the use of the station turned out to be unprofitable - it was possible to distribute the entire passenger flow between two neighboring ones, which the Parisian authorities did. The station remains closed to this day.

The location of the station on the metro track development scheme. The full version can be downloaded from trackmap.ru.

Oddly enough, the name of the station is not associated with the International Committee of the Red Cross, but comes from the name of the Carrefour de Croix-Rouge square, which appeared in the 18th century. In 2005, the square was renamed Place Michel Debre.

Colorful graffiti colors rage on the walls. Getting into the subway tunnel unnoticed is not particularly difficult, which is what street artists use.

Some drawings are over 30 years old...

An empty booth in the center of the station.


2. Saint-Martin No. 1
The Saint - Martin station consists of 4 tracks at once and connects the two lines with a cross-platform transfer. In fact, these are two independent stations, separated from each other by a wall. However, in order to get from one station to another, you will have to go through the tunnel until the first hitch to another line - the pedestrian crossings between the platforms are closed with bars.
Station Saint - martin worked only 9 years (from 1931 to 1939) and, like Croix Rouge, was closed at the beginning of the war. And although the station was actively used by passengers before the war, after its end, it was not reopened. The reason was the optimization of traffic and the proximity to two neighboring stations "Strasbourg and Saint-Denis" - the distance between the closest exits to each other was only 100 meters.


Arched openings are made between the two tracks of the station.


Closed passage to the neighboring line.

Desert platform.

Passing train on the next track.

Let's go to the second station Saint Martin.

3. Saint-Martin No. 2
Moving a little away from the station, through a small breakdown in the tunnel we get into a short connecting tunnel. Another 100 meters and we are on another line...

Active path.

Pay attention to the contact rail (bottom right). He is without a jacket. All over the Paris Metro. Therefore, running through the existing tunnels, you need to constantly be on the alert, which adds a lot of adrenaline.

The Saint-Martin station on the neighboring line differs in interior from its neighbor - the track walls here smoothly flow into the ceiling.

In the 1990s, the station was chosen by the Parisian homeless. This forced the RATP service in 1999 to officially declare the station the Solidarity Space (Espace Solidarité Insertion) and give it to the use of the Salvation Army. Part of the platform was fenced with a partition, where a homeless help center was located.

The closed part of the platform.


The adjacent platform is completely open.

Portal to the tunnel.

View of both platforms from the tonneo.

4. Arsenal
The Arsenal station was opened in 1906, and it worked for 33 years. When, in France in 1939, a general mobilization was announced, the members of the Resistance used the station as an ammunition depot. After the Liberation of Paris, the city hall decided not to open the station due to the proximity of neighboring ones, because even during its operation, the flow of passengers here was small.

A significant part of the platform is fenced off from the tracks.


Passing train.

5. Champ de Marc (Field of Mars)
The station was opened in 1913. At the start of World War II, the government implemented a plan to reduce service on the metropolitan network. Only 85 stations remained open to passengers. After the end of the war, most of the stations were reopened, but some, like the Field of Mars, were recognized as unprofitable, therefore unprofitable, and remain abandoned to this day.

The location of the station on the diagram.

A typical design with two platforms and an arch-shaped vault.


Closed exit from the station. Part of the stairs has been converted into a ramp for transporting technical equipment.

The opposite platform, unlike the first one, is half closed by a grate. Behind her, in enclosed spaces, ventilation hums.


A rather "interesting" system of track development has been arranged behind the station.


One of the paths runs into a dead end.

The reason for this is the appearance of a cross-platform transfer at the La Motte-Picquet Grenelle station (see the diagram above).


6. Station Porte des Lilas - Cinema
About the walk to the Porte des lilas station, and Haxo following it, I will even tell a little story:
The time was approaching midnight. On the penultimate train, we hit the road - to the station to Porte des Lilas. The platform was almost empty by this time. Parisian bums slept peacefully on the benches - they are here all night. Nobody kicks them out of the warm subway. After making sure that no one was looking at us, we jumped on the path and quickly walked towards the fork in the road. Having already missed the last train, we dived into a single-track tunnel connecting lines 3 - BIS and 7 - BIS.

After 200 meters, a "closed" station appeared Porte des Lilas, on which the train stood at night.


Having passed the station, and having passed another 300 meters, we found ourselves in a spacious congress chamber. The cul-de-sac on the right connects this tunnel with the return cul-de-sacs of the existing Porte des Lilas station on line 3 - bis.

And this is how everything that I described above in the diagram looks like.

At the end, the exit chamber broke off, and the double-track tunnel turned into two single-track ones. Right - towards Ateliers station, left - towards Place des Fetes.

Since 1956, the second path has not been used. However, it didn’t work out to get there anyway - the tunnel was completely blocked by a massive grate. Therefore, we went to the left, towards the Place des Fêtes station.

After 300 meters, around the corner, an abandoned single-platform "haxo".

7. Station Haxo
Haxo station was built as an intermediate station between lines 3 - BIS and 7 - BIS, but was never used for its intended purpose. The project to connect lines 3 and 7 (then not yet called 3-bis and 7-bis) between the stations of Porte de Lila and Pre Saint-Gervais (Pré Saint-Gervais) was conceived at the beginning of the 20th century and was supported by the municipality that owned the railway network. The Paris Métro railway company, which operated the tracks, opposed the project because of its low profitability. However, two single-track tunnels - the de Fete track from Place des Fetes to Porte des Lilas with an intermediate station Naho, and a "shuttle track" (voie navette) in the opposite direction without an intermediate station - were built. However, it was decided to put into operation only the "shuttle way". Trains ran on it from 1921 to 1939, but after the war it was decided not to resume traffic along the segment, since by that time line 11 had already connected Place de Fetes and Porte des Lilas. In 1952-56. The "shuttle route" became temporarily available to passengers, albeit in a limited mode: the first pneumatic rolling stock MP-51 and the automatic aerobatics system were tested here. It was not uncommon for passengers, especially children, to even be allowed to sit in the driver's cab and "steer" the train. However, the section was not put into regular commercial operation. As for the Akso station, it has never been put into operation and does not even have exits.

There is currently a project to merge line 3bis with line 7 bis into a new line that will connect the stations of Chateau-Landeau line 7 (Chateau-Landon) and Gambetta line 3 (Gambetta). In this case, perhaps, the Akso station will be completed and opened for passengers.

We continue towards the station Place des Fetes.

After 200 meters, behind the next turn, a train standing on a night sludge appeared.

Trains in the Paris metro are much narrower in size than in the subways of the former USSR.
In the photo my friend - to understand the scale.

Having passed the standing train by, we found ourselves at the next fork. Somewhere in the distance could be seen the platform of the station Place des Fêtes...... AND 2 SECURITY STAFF in black vests rushing towards us!!!

There was no point in running back - probably the second group was already coming from Haxo, so we decided to hide between the roof of the train and the arch of the tunnel. The distance is narrow, but still managed to squeeze through, while being invisible from below.

The search continued for a long time, but in the end they were crowned with success, and three diggers from Russia were taken to the station. Having made sure that we did not have paint sprays with us, as well as intentions to paint the train, the RATP employees, having copied the data, soon let us go. And at the station, the homeless continued to sleep harmoniously ...
Bonus #1: Two-level junction between stations Odeon and Cluny - La Sorbonne.
In addition to abandoned stations, I want to talk about other unusual places on the Paris subway. One of them is a huge one-vaulted tunnel with a two-level exit, built in 1925.

Scheme of track development.

In the center of the huge tunnel is a connecting path leading to a dead end located at the Odéon station

For some reason, the first 100 meters of the tunnel are equipped with those. platforms on both sides.

Top view of the intersection.

Bonus #2: Underground Train Wash
In addition to the usual points of sludge and train maintenance, the Paris Metro has real car washes, such as this one - next to the Place d "Italie station.

Diagram view.

This section of the tunnels was built in 1906.

Modern strengthening of the tunnel vault.

Passing train.

Reversal deadlock.

Connecting tunnel.

Docking lines 5 and 6.

The usual rails are duplicated by rails for trains on rubber wheels.

Perhaps the most popular angle in the subway tunnels.

Bonus #3: RER Châtelet les Hales
in the 60s, public transport in Paris was heavily congested, and suburban communication was carried out only through railway stations. An excellent solution to this problem was the creation of a suburban communication system with short transfers to the metro. Huge tunnels for double-decker trains, deep, high speeds and ... unequal traffic schedules. The last point creates some unpredictability for the urban explorer, because the intervals between trains are constantly changing ... Compared to the subway, RER stations are much more spacious; they are called "cathedral stations", these are one of the largest underground railway stations in the world.

The exit cameras in the RER look very large. The height of the tunnel arch can reach 8 meters!

The depth of occurrence varies from 0 to 60 meters. It is also one of the deepest underground facilities in Paris.

The tunnels are built from concrete tubing.

Intertunnel failure.

Almost throughout the haul there is a technical platform designed for the evacuation of passengers in case of an emergency.

Unlike the subway, running in the RER from cover (breakdown) to cover is much longer for an urban explorer. In addition, as I mentioned above, the intervals vary greatly. Without calculating the strength between one of the runs, we, in the end, were seen by the driver one of the passing trains. After some time, the working lights in the tunnel turned on, the intervals of movement greatly increased, and the trains moved very slowly (apparently looking for us). The probability of getting out unnoticed tended to zero ... But suddenly another door in the block gave way, and we found ourselves at the bottom of a deep ventilation shaft. All subsequent doors on the way also easily succumbed, and soon we left the dungeon, remaining unnoticed and unharmed :) This is the beauty of the French fire regulations, which oblige to keep the exits open for evacuation (including the digger one: D).

That's all. As you can see, getting to most places in underground Paris is not very difficult, but you should always remember about safety and caution when crossing a contact rail (it does not have a protective cover)! I hope this review was interesting and informative for you. Abandoned sloping entrance to the station from the street.

In the next review, we will once again descend into the legendary Prizhsky catacombs. Do not miss!
One of the most attractive places in Moscow for urban explorers is the Moscow Metro. The transport artery built under the USSR is shrouded in myths and legends, and not everything in these stories is a figment of the imagination. As you might guess, the most interesting are not modern stations, but those built in the years when the country was led by the most controversial personality in its entire history. I managed to get into the tunnel of one of such stations, built in the 30s of the XX century.
I think I won’t surprise anyone if I say that illegally entering the subway is not an easy task, but still, no matter how hard the security services try, there are loopholes. After all, the Moscow metro is a whole anthill, from hundreds of communication tunnels, dozens of abandoned and unfinished facilities. And, of course, in all this heap there is a place for secret structures, as well as for "holes" through which you can get inside without permission.

This time, the entrance turned out to be a hole, well, or a hole, as you like, and practically on the road in one ordinary Moscow courtyard not far from the metro station. It seemed that you couldn’t imagine easier, but there were some nuances. For example, a hole in the ground led to a very old cable tunnel, along the bottom of which a heating main was laid. The phrase "along the bottom", here for a reason, apparently the heating pipe was the same age as the subway nearby and this had a bad effect on her health, so the tunnel turned out to be partially flooded with boiling water and filled to the top with steam. To avoid hot baths, they had to walk along rusty hooks, holding on to rotten high-voltage wires, in almost no visibility due to steam. In those moments, my thoughts were only that, God forbid, or gnomes, or some other mythical creatures, so that there would be no electricity in the cables.

As we moved through the tunnel, the level of flooding became less and less. And after a couple of hundred meters, it was already possible to walk on solid concrete without hot water on it. Here it became finally clear that the path leads in the right direction. There were protective doors in the openings of the tunnel. All of them were open and led to the mine shaft, but if you closed even one, you would have to go back.

Going down the trunk, you find yourself on the same level with the transport tunnels through which trains run. In fact, I'm already in the subway, it remains only to reach the entrance to the stage and look at the trains passing by. From which every two or three minutes a growing rumble passes through all the tunnels below, turning into a deafening noise.

A couple of tens of meters of wandering and the corridor leads to the stage, illuminated by the headlights of trains, and to the final goal of this short journey.

Here, you can already have a little rest, relax, take a couple of pictures and mentally prepare for the way back, at the end of which there was a small surprise in the form of an exit to the street covered with an iron sheet, on which lay a curb stone. But that is another story.

Thus, having spent only about two hours and with a small risk of being scalded or electrocuted, I once again managed to visit the Moscow subway without paying an entrance fee.
A few days later, this loophole in the Moscow metro was sealed.
Subscribe to my channel -