Currently, among the many existing security car alarms, the BERKUT two-way system has quite worthy characteristics. A stable reception range of 1200 meters with dense urban development cannot be called ideal, however, for this price category, this indicator can be considered quite high. BERKUT also looks good in terms of functionality, since not every alarm system, even from the highest price range, can boast of six additional channels. It is also important that the developers have simplified the installation process of this alarm as much as possible and, if desired, any interested motorist can handle this work.
Installing the main components
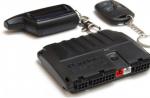
For the main unit, as a rule, they choose a place in the passenger compartment (most conveniently behind or under the dashboard). The unit is fixed with two self-tapping screws or cable ties. Attention is drawn to the fact that it would be a big mistake to place the unit in the engine compartment, since it has practically no protection against moisture ingress. It should not be installed in the vicinity of possible sources of strong electromagnetic radiation that can reduce the range of remote controls or interfere with the operation of the system.
It is more convenient to mount the siren in the engine compartment in a place protected from free access from the bottom or from the front wheel arches. In addition, there should be no moving and hot parts near the signal element. In order to avoid the accumulation of water in the siren's bell, it is directed downwards or to the side. The siren is fixed with screws using a special bracket.
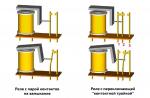
The limit switch used to protect the hood or trunk area (rear door) should be fixed on a metal surface that has reliable electrical contact with the total “mass” of the car, and the switch installation site should be protected from possible accumulation of water. The switch is fixed using a bracket from the system kit, or using an additional drilled hole with a diameter of 6 mm. In any case, when closing the protected surface, the switch must be recessed by at least 6 mm and fully raised when opened.

The red LED indicator must be installed in a place that is clearly visible both from the driver's seat and from outside the vehicle. A hole with a diameter of 6 mm is drilled for its installation, having previously checked the absence of standard wiring at the work site.
The shock sensor, as a rule, is installed on the solid surface of the partition separating the engine compartment and the car interior (from the cabin side). Alternatively, you can mount the sensor on one of the racks that hold the dashboard. Regardless of the location, free access to the sensor sensitivity adjustment potentiometer should be provided.

Wire connection
Main 12-pin connector
- White wire - +12V impulse output for side lights connection. The wire is connected to the positive polarity circuit of the side lights power supply;
- Red wire (through a 15A fuse) - connection of a constant power supply + 12V. This wire is used to power power circuits and control the side light;
- Red wire with a white stripe (through a 5A fuse) - connection of a constant power supply + 12V. Used to power the main circuits;
- White wire with a black stripe - +12V siren power supply, it is connected to the red wire coming directly from the siren, while the black wire is connected to ground;
- The black wire is the total "mass" of the system. The wire must have stable contact with the metal part of the car body;
- Dark blue wire - output of the second channel CH2. Such a wire is connected through a relay, attention is drawn to the fact that connecting a dark blue wire to high-current circuits (trunk locks, doors, etc.) can lead to failure of the main unit;

- Dark green wire - input for connecting limit switches of negative polarity of the hood (trunk);
- Purple wire - input for connecting limit switches of positive polarity of the hood (trunk);
- Brown wire - input for connecting door limit switches of negative polarity;
- Purple wire - input for connecting door limit switches of positive polarity;
- Yellow wire - connection of the + 12V ignition circuit. This wire is connected to the + 12V circuit, on which voltage appears when the key is placed in the “ignition” (“starter” position);
- Orange wire - negative output to the starter control relay;
- Black wire with a white stripe - CH3 channel output.
Purpose of other connectors
- Two-pin blue connector - connection of the Valet switch;
- Two-pin white connector - LED indicator connection;
- Two four-pin white connectors - connection of a shock sensor and an additional sensor (if necessary);
- 6-pin power connector - control of electric door locks.
As for the black wire of the antenna, it is stretched to its full length at the maximum distance from power wires and high-current circuits and assemblies.
The BERKUT alarm connection diagram below gives a general idea of the constituent elements of the system and the order of their connection.
I.W Writing codes of new transmitters (F13 - state "Valet").
Attention!
Remember that each operation must be completed within 5 seconds of the previous operation. If the 5 second interval is exceeded, the system will automatically exit the programming mode, which will be confirmed by one short and one long siren beep. If the ignition was turned off during programming, the system will immediately exit the programming mode, confirming this with one short and one long signal from the siren.
1.
Disarm the system, get into the car and turn on the ignition.
2.
Press the Valet push button switch 3 times. You will hear one siren tone to confirm that the system is ready to program new transmitters. Press and hold the buttonarmingthe first transmitter until you hear a long siren tone confirming that the programming of the first transmitter is finished (the transmitter channels will be programmed automatically). In this case, the LED will begin to blink slowly.
3.
Press and hold the buttonarming the second transmitter until you hear a long siren tone confirming that the programming of the second transmitter is finished. In this case, the LED will begin to blink slowly.
4.
Repeat step 3 for other transmitters.
To write the code of an active anti-theft transponder, turn on (or turn off and then turn on) its power. The system will confirm the entry of the code with a beep.
5.
To exit transmitter programming mode:
-
turn off the ignition or
-
wait 8 seconds without doing anything.
You will hear one short and one long siren tone to confirm you have exited transmitter programming mode, and the system LED will turn off.
II. Writing codes for new transmitters (F13 - Secret code state)
1.
Disarm the system using the key fob or by entering the Secret Code with the "Valet" button, i.e.
a.
turn on, turn off and then turn on the ignition,
b. using the Valet switch, enter the first digit of the code (the number of presses of the Valet button corresponds to one digit of the code),
c.turn off and then turn on the ignition,
d.using the Valet switch, enter the second digit of the code (the number of presses of the Valet button corresponds to the second digit of the code),
e.turn off and then turn on the ignition. The system should confirm with a beep that the correct code has been entered.
2.
Press the Valet push button switch 3 times. You will hear one long siren chirp.
3.
Click the button armingthe first key fob transmitter. The system will confirm the entry of a new key fob code into the memory with a sound signal.
4.
Press the arming button of the second key fob transmitter. The system will confirm the entry of a new key fob code into the memory with a sound signal.
5.
To write the code of an active anti-theft transponder, turn on (or turn off and then turn on) its power. The system will confirm the entry of the code with a beep.
Attention!
Remember that each operation of writing the codes of new key fobs deletes the codes of old key fobs from memory and must be performed for all key fobs at a time. The system maintains up to four keyfob codes in memory, regardless of whether the codes of four different keyfobs or the same code are written to the system four times.
Guards BERKUT
Two way alarm
MODEL FEATURES: The system is equipped with one four-button keyfob-pager with LED indication and one conventional three-button keyfob. The model kit includes a six-tone siren, in addition, you can see that the LED of this model is blue.
If the system is properly installed, it is possible to use the car protection function with the engine running and the turbo timer function with programmable duration without the need to leave the keys in the ignition.
Programming the system allows you to use the functions of passive and active anti-seizure, as well as a passive immobilizer.
The function of limiting the number of alarm outputs for one of the sensors is programmable.
ANTI-THEFT CAPABILITIES: one output for the NO and one for the NC blocking relay, the ability to connect the NO relay to one of the additional channels. One HP interlock relay included. Protection against scanning the key fob-pager code - Super KeeLoq Pro II.
SERVICE FEATURES: it is possible to use the courtesy interior lighting function on command from the key fob and / or when arming / disarming and the regular “comfort” function of the car.
If there is an electronic speed sensor, it is possible to program the locking of the car doors at the beginning of the movement.
Starting from September 2004, the systems are available with a button to call the driver from inside the car - the button is located on the system's transmitter antenna.
ADDITIONAL CHANNELS: the system is equipped with six additional channels: five output channels with reprogrammable logic of operation, as well as one programmable input channel. The first two additional channels can be activated from the key fob, three more when disarming or arming the system, and the last input channel is used as an additional trigger input, or as a speedometer input.
The first and second additional channels can be used to control the trunk lock, remote engine start, power windows, control the car's security mode when the engine is running without an ignition key, polite interior lighting when the system is disarmed.
The third additional channel can be used to turn on the standard function of the car "comfort" when arming and for courteous interior lighting when the system is disarmed.
The fourth additional channel can be used to connect an additional blocking of the engine and to control the shutdown of turbocharged engines.
The fifth additional channel can be used to connect an additional pager or mobile communication device, organize a courtesy backlight function when the system is disarmed, and control the shutdown of turbocharged engines.
TWO-WAY COMMUNICATION KEYFOB OPERATION: the key fob pager is made on LEDs and supports the ability to select a signal - sound, vibration, sound plus vibration, only LEDs, turning off all signals.
The key fob pager constantly checks for connection with the system, and if communication with the system is lost for more than ten seconds, it gives a corresponding signal.
The key fob screen with two-way communication is made in the form of five pictograms, which are illuminated by LEDs and inform about the following events: the ignition is on; one of the door triggers has been triggered; the hood or trunk lock trigger has been triggered; the shock sensor worked; connection with the system; the command transmitted from the key fob-pager has been executed; the battery is empty.
If the system was triggered in the armed mode for one of the zones, then when the system was disarmed, the triggered zone is indicated by the corresponding icon. Also, if one of the sensors or triggers is activated during arming, it will be marked with the corresponding icon on the pager screen.
TEST RESULTS
When tested in rural areas, the system showed a good reception range of the key fob pager - 700 m and a short transmission range - 80 m. When tested in urban conditions, the reception range of the key fob pager was 570 m, and transmission - 60 m.
SUMMARY
ADVANTAGES: key fob pager for this model with permanent radio monitoring. With such a low price of the system, it is worth noting the possibility of using the car security function with the engine running and the turbo timer function without a key in the ignition. In addition, six additional channels of the system attract attention.
FLAWS: key fob pager with LED indication during testing showed a small transmission range.
OVERALL SCORE: inexpensive model with two-way communication, with key fob-pager on LEDs. During testing, the system showed a good reception range and a small transmission range from a key fob-pager.
Car alarm BERKUT S430 installation and operation manual
S430
INSTALLATION AND USE GUIDE
IMPORTANT!
The BERKUT S-430 system provides the ability to reprogram the arming/disarming control mode of the system - function F13.
Factory setting: F13/2 - two-button control for arming/disarming the system. Arming - icon button, disarming - icon button
Status change to F13/1 - one-button control of arming/disarming the system. Icon button
The system kit includes an additional rubber button module with pictograms for one-button control of the system.
Replacement of the rubber button module must be carried out by qualified personnel at the installation site. Contact your installer to change the status of the F13 function and replace the button module. Remember - unskilled disassembly of the two-way communication key fob can damage it or lead to a change in the transmission and reception parameters.
An interactive pager provides real reception of signals confirming the execution of a command by the system.
To provide the highest level of protection for your vehicle, this alarm system has a programmable manual override function. In some cases, such as when the system's remote control transmitter is lost or not working (or perhaps your transmitter is being blocked by a powerful jamming device), you may need to manually arm or manually disarm the system. Read the sections "Manually Arming the System" and "Manually Disarming the Security System" for detailed procedures for arming and disarming the system in this situation. In addition, this manual contains a table in one of the sections of which the system functions used, including the selected method of shutting down the system, and the options installed in the vehicle. Although the "Secret Code" function is not programmed by default (a personal code must be entered to disable the system), the Valet switch can also be selected to disable the system. See which method has been programmed to shut down your system and review it in the appropriate section of this manual.
If the F12 "Secret code" function is programmed, then writing the codes of new key fobs, changing the secret code, changing the status of the programmed functions from F12 to F23, emergency disarming the system, turning off the system when triggered in Anti-Hi-Jack modes are possible only after entering the secret code! Changing function parameters from F1 to F11 does not require entering a secret code and is always available.
The system has six independent (two of them remotely controlled) functionally reprogrammable channels. These are six physical wire lines with a programmable logic of operation, providing a flexible change in the system functions for controlling the shutdown of turbocharged engines (turbotimer), searching for a car in the parking lot, remotely turning off the system siren in the "NIGHT" mode with a control channel for an additional pager or mobile communication device, security service car with a running engine without an ignition key, control of additional devices at specified time intervals.
Standard System Features
- Super KeeLoq Pro II dynamic code.
- One / two-button control of the on / off modes of protection.
- Possibility of programming up to four transmitters.
- One four-button programmable transmitter with built-in interactive pager and LED display.
- One three-button programmable transmitter.
- Valet push button switch.
- Sound confirmation of the Valet mode.
- Two-level magnetic resonance shock sensor.
- Small powerful siren.
- Built-in tail light control relay.
- Built-in universal power output for controlling door locks.
- Controlling the car's central lock in Valet mode and with the engine running.
- Three complementary blocking circuits (requires installation of an additional relay).
- Two connectors for connecting additional sensors (shock, volume).
- Six programmable channels for controlling car service devices (additional blocking, turbo timer, trigger channel, timer channel, power window control, polite backlight output, etc.).
- Two remotely controlled channels by service devices.
- Protection when the engine is running.
- Remote control of the siren channel in armed mode (disable/enable).
- Additional (programmable) channel for controlling an external pager/actuator.
- Additional (programmable) input trigger of negative polarity.
- Manual arming of the system at any time using the Valet button, even in the absence of an ignition key.
- Silent arming and disarming of the system.
- Temporary shutdown of shock sensors.
- Temporarily disable the passive arming function.
- Silence the alarm from the remote control.
- Remote control of the panic function in all modes.
- Sound and light warning about system operation.
- Indication of alarm activation channels.
- Sound and light confirmation of the execution of commands from the two-way communication key fob.
- Limiting false positives.
- Limited time alarm mode.
- Perimeter security.
- Fault zone bypass.
- Multifunctional LED indicator.
- Trip memory.
- Memory of states VALET, DISARM (disarmed), TRIGGERS (state of security inputs) when the system power is turned off.
- Immediate activation of an alarm when the system is powered down/powered on in ARM (armed) mode.
- Disabling the passive engine blocking mode from the key fob transmitter.
- Trunk opening control with temporary shutdown of sensors and hood/trunk protection channel.
Programmable System Functions
- Reprogramming of arming/disarming modes of the system: ONE button, TWO buttons.
- Programmable immobilizer function (passive engine blocking).
- Programmable personal code to disable and control the system.
- Programmable system arming delay: 5/10/35 sec.
- Programmable Comfort function, (close all - impulse to close programmable duration -15/22/30 sec).
- Multi-channel programmable Anti-Hi-Jack function (remote activation / when the ignition is turned on and the DOOR (+) or DOOR (-) limit switches are activated or the car starts to move).
- Programmable duration of an impulse of management of locks of doors: 0,5/1/3,5 sec.
- Double impulse to unlock the doors.
- Programmable re-arming function.
- Programming the central lock control mode when re-arming.
- Passive/active arming of the system.
- Programmable automatic locking of door locks during passive arming.
- Programmable automatic door locking when the ignition is switched on.
- Programmable automatic locking of doors at the beginning of the movement.
- Programmable automatic door unlocking when the ignition is turned off.
- Output CH2 - low-current reprogrammable controlled channel of additional devices: programmable time intervals, service pulses, trunk electric drive control, trigger - output 1, trigger - output 2.
- Output CH3 - relay reprogrammable controlled channel of additional devices: programmable time intervals, service pulses, polite backlight output, trunk electric drive control.
- Output CH4 - low-current reprogrammable channel of additional devices: programmable time intervals, service pulses, power window control, courtesy backlight output.
- Output CH5 - low-current reprogrammable channel of additional devices: HP-type additional blocking output, turbo timer 1, service pulses.
- Output CH6 - relay reprogrammable channel of additional devices: pager or other executive devices control output, polite backlight output, turbo timer 2.
- Programmable function of shutdown of "false" operations of system. Programmable function to activate the pager warning signal about turning on the ignition of the car in any state of the system.
Transmitters with digital code eavesdropping technology (Keeloq)
The key fobs included with this security system use the most advanced and reliable form of radio frequency transmission of any automotive security system currently available. Some of today's sophisticated car thieves use devices known as code grabbers, which allow the signal transmitted by the car's security remote control to be received and stored in memory. After the driver leaves, this code is used by the hijacker to disarm the system.
Unlike the remote control devices described above, the keyfob transmitters included with your security system change the signal code of the transmitted signal each time the button is pressed, so when the hijacker plays the intercepted signal of your keyfob transmitter, the security system simply will not respond to it. If the button on your keyfob transmitter was pressed more than 30 times when it was out of control of the security system (for example, if children played with it), the system will not respond to the call of the keyfob transmitter when you decide to use it again. You need to synchronize your key fob transmitter with the security system receiver. To do this, simply press the system arming/disarming button on the key fob transmitter twice within one second. After that, the system will again respond to all remote control commands.

- Arm/Disarm Button (ARM/DISARM)
- Panic button, system buzzer control
- Button for controlling the programmable channel CH2, controlling the system modes when arming/disarming the system
Commands for controlling the BERKUT S-430 system from key fobs with a combined arming / disarming button (F13 / 1 - enabled)
| FUNCTION | DESCRIPTION OF ACTIONS | ||
|---|---|---|---|
| Arming / disarming |
Press and release button 1(Fig. 1). When arming: The LED indicator on the car's dashboard will flash slowly. When disarming: Note.If the F5-auto-rearming function is enabled, then when the system is disarmed, the LED indicator will begin to flash quickly, indicating that if none of the doors is opened within 20 seconds, the system will arm. If at least one door is opened within 20 seconds, the LED indicator will turn off and the arming mode of the system will be canceled. If the F22 passive arming function is enabled and F5 is disabled, the LED will turn off. The system goes into standby mode for opening/closing any of the doors. If you open and then close any of the vehicle's doors, a 30-second auto-arm timer will start. The LED indicator will start flashing quickly. Note. |
||
| Close / open doors in Valet mode or with the ignition on | Press and release button 1(Fig. 1). | ||
| Press and hold button 1 (Fig. 1) for 3 seconds until a confirmation signal is received. | |||
|
Briefly press and release button 1(Fig. 1). The LED indicator will turn off. If the alarm was triggered while you were away, the LED will flash in code to indicate the protected zone that was triggered while you were away. The vehicle's side lights will flash twice. The siren will give two short beeps. If there is an additional lock/unlock circuit, the car's door locks will be open. |
|||
|
Press and hold button 2 for more than 2 seconds.(See Fig. 1). To turn off the siren, once again briefly press the "Panic" button on your key fob transmitter. If you do not turn off the Panic mode, the system will turn off automatically after 30 seconds. Note. In the "Panic" mode, all the normal functions of the key fob transmitter will work. |
|||
| Long-term turning off / on of the siren for one cycle | Twice | Twice |
Two short presses on button 2 within 1 second in armed mode.(See Fig. 1). Siren activation confirmation: three short flashes of side lights. Disarming the system will automatically resume the siren in normal mode. |
| Channel 2 control (ch2) | Press button 3 and hold for more than 1.2 sec. | ||
| Twice | Twice |
Within 7 seconds after turning off the IGNITION, two short presses on button 3 within 1 second.(See Fig. 1).
If function F16 (passive engine blocking) has been enabled, it will be disabled for one cycle. If the F17 Anti-Hi-Jack function has been enabled, it will be disabled for one cycle. |
|
| Twice | Twice | Two short presses on button 3 within 1 second if the functions F19/2, F20/3 are enabled.(See Fig. 1). Resetting the ACTIVE STATE of the turbo timer using the Valet/Secret code button: | |
| , | , | Briefly press button 2, then within 4 sec. button 1(See Fig. 1). | |
| Arming with warning zones of both sensors disabled | , | , | Briefly press button 1 and within 4 seconds press button 2(See Fig. 1.) |
| , , | , , | Briefly press button 1 and within 4 seconds press button 2, after the confirmation signal press button 2 again (see Fig. 1). | |
| , , | , , | Briefly press button 2, then, within 4 seconds, button 1, then button 2(See Fig. 1). | |
| , , , | , , , | Briefly press button 2, then button 1 and within 4 seconds press button 2, after the confirmation signal press button 2 again (see Fig. 1). | |
| Starting the Anti-Hi-Jack function | + | + |
Press together and hold for more than 3 seconds with the ignition on and the F16 / 2 function on.(See Fig. 1).
|
| Auto Search/ Channel 3 Control (CH3) | then | then | Briefly within 1 second press button 3, then button 2(see Fig. 1). Auto search: if F10/1 or F10/2 or F10/3 is set, the system will confirm the request with five short flashes of the parking lights. SNZ control: if P10/4 or F10/5 are set, then control signals corresponding to the status of F10/4, F10/5 functions will appear on the SNZ channel line. |
| "Speaker+vibrate" by default | + | --- | Simultaneously press buttons 2 and to sequentially change the operating modes of the key fob: "Speaker + vibration alert" - one beep one vibro "Speaker" - one beep "Vibration alert" - one vibro |
| --- |

- Arming Button (ARM)
- Disarm button (DISARM)
- Button for controlling the programmable channel CH2, controlling the system modes when arming/disarming the system
- Button for changing the parameters of pager signals, turning off the sound and light signaling of the pager
- Indication icon when hood or trunk triggers are triggered
- Indication icon when door limit switch triggers are triggered
- Ignition indication icon
- Icon indicating the execution of the command, the presence of communication with the system, low battery indicator
- Indication icon when hit triggered
Commands for controlling the BERKUT S-430 system from remote transmitters with separate arming/disarming buttons (F13/2 - enabled)
| FUNCTION | DESCRIPTION OF ACTIONS | ||
|---|---|---|---|
| Arming | Press and release button 1(See Fig 2)
|
||
| Disarming |
Press and release button 2.(See Fig 2)
If the F5-automatic re-arming function is enabled, then when the system is disarmed, the LED indicator will flash quickly, indicating that if none of the doors is opened within 20 seconds, the system will arm the system. If at least one door is opened within 20 seconds, the LED indicator will turn off and the arming mode of the system will be canceled. If the F22-Passive System Arming function is enabled and F5 is disabled, the LED will turn off. The system goes into standby mode for opening/closing any of the doors. If you open and then close any of the vehicle's doors, a 30-second auto-arm timer will start. The LED indicator will start flashing quickly. Note.Attempting to disarm the system after the system has been triggered (siren sounded) will only silence the alarm. The system will not be disarmed. To disarm the system, press the arm/disarm button on the keyfob transmitter again when the system does not beep. |
||
| Close / open doors in Valet mode or when ON. ignition | / | / | Press and release buttons 1 or 2(See Fig 2) If there is an additional lock/unlock circuit, the vehicle doors will be locked/unlocked. |
| Arming with the engine running | Press and hold button 1 for 3 seconds until a confirmation signal is received(See Fig 2)
|
||
| Disarming with the engine running |
Briefly press and release button 2(See Fig 2) The LED indicator will turn off. |
||
| Panic (on/off) | + | + | Press and hold buttons 1 and 2 simultaneously for more than 2 seconds.
This will cause the system siren to immediately sound and the marker lights to flash. To turn off the siren, once again briefly simultaneously press buttons 1 and 2 (See Fig. 2) on your key fob transmitter. If you do not turn off Panic mode, the system will turn off automatically after 30 seconds. Note. In the "Panic" mode, all the normal functions of the key fob transmitter will work. |
| Long-term turning off / on of the siren for one cycle | Twice + | Twice + |
Two short-term simultaneous pressing of the button 1 and 2 for 1 second in armed mode.(See Fig 2).
|
| Channel 2 control (ch2) | Press and hold for more than 1.2 sec. | ||
| Temporarily disable passive arming | Twice + | Twice + |
Within 7 seconds after turning off the IGNITION, two short simultaneous presses on buttons 1 and 3 for 1 second.(Figure 2).
|
| Emergency shutdown of the TURBOTIMER channel | Twice + | Twice + |
Two short simultaneous presses on buttons 1 and 3 (Fig. 2) for 1 second, if functions F19/2, F20/3 are enabled.
Resetting the ACTIVE STATE of the turbo timer using the transmitter:
Resetting the ACTIVE STATE of the turbo timer using the Valet/Secret code button:
|
| Silent arming | , | , | See Figure 2. |
| Silent disarming | , | , | Briefly press button 3, then within 4 seconds - button 1.(See Fig 2) |
| Arming with disabled zones of warning operation of both sensors | , | , | Briefly press button 1 and within 4 sec. press button 3(see Fig 2). |
| Arming with completely disabled sensors | , , | , , | Briefly press button 1 and within 4 sec. press button 3, after confirmation signal press button 3 again (see Fig. 2). |
| Silent arming with warning zones of both sensors disabled | , | , , | Briefly press button 3, then, within 4 seconds, button 1, then button 3. See Fig. 2. |
| Silent Arming with Fully Disabled Sensors | , , | , , , | Briefly press button 3, then button 1 and within 4 seconds. press button 3, after confirmation signal press button 3 again. (see Fig 2). |
| Starting the Anti-Hi-Jack function | + | + |
Simultaneously press and hold buttons 2 and 3 for more than 3 seconds with the ignition on and the F16 / 2 function on.
|
| Auto Search/Channel Control 3 (CH3) | Twice | Twice | Briefly within 1 sec. press button 3 twice.(Figure 2) Car search: if F10/1 or F10/2 or F10/3 are set, the system will confirm the request with five short flashes of the parking lights. SNS management: if F10/4 or F10/5 are set, then control signals corresponding to the state of functions F10/4, F10/5 will appear on the SNZ channel line. |
| "Speaker + Vibrate" by default | + | --- | Simultaneously press buttons 2 and F to sequentially change the operating modes of the key fob:"Speaker + vibration alert" - one beep and one vibro "Speaker" - one beep "Vibration alert" - one vibro |
| Disabling the sound, vibrating alert and LED indicator when the system is triggered | --- | A single press on the F button turns off the sound and / or vibrating alert. Pressing again turns off the LED indicator |
Two-way communication key fob confirmation signals of the BERKUT S-430 system
| Sound* | Vibrating alert** | LED2 (doors) | LED3 (hood, trunk) | LED1 (TX) (antenna) | LED4 (ignition) | LED5 (sensors) | |
|---|---|---|---|---|---|---|---|
| Arming (by talkback keyfob, conventional keyfob or passive arming) (silent arming, without sensors, arming with engine running) | 1 beep | ||||||
| Locking doors in VALET mode | 1 beep | Green flash when button is pressed | |||||
| Arming with locked door switches | 3 beeps | Three red flashes | Green flash when button is pressed | ||||
| Arming with locked hood/trunk switches | 3 beeps | Three red flashes | Green flash when button is pressed | ||||
| Arming with blocked main zones of both sensors | 3 beeps | Green flash when button is pressed | Three red flashes | ||||
| Disarming (By Talkback Keyfob, Conventional Keyfob, Silent Disarming, Disarming with Engine Running) | 2 beeps | Green flash when button is pressed | |||||
| Unlocking doors in VALET mode | 2 beeps | Green flash when button is pressed | |||||
| Warning about the operation of the system from the door buttons when disarmed | 4 beeps | Four red flashes | Green flash when button is pressed | ||||
| Warning about the operation of the system from the buttons of the hood / trunk when disarming | 4 beeps | Four red flashes | Green flash when button is pressed | ||||
| Warning about the operation of the system from turning on the ignition when disarming | 4 beeps | Green flash when button is pressed | Four red flashes | ||||
| Warning of system operation from 1 shock sensor when disarming | 4 beeps | Green flash when button is pressed | Four red flashes | ||||
| Warning about the system operation from 2 sensors when disarming | 4 beeps | Green flash when button is pressed | Four red flashes | ||||
| Confirmation signal for turning off sound and light alarms when the system is triggered | Beep set 1 | Green flash when button is pressed | |||||
| System actuation from door limit switches | Melody 1x10 sec | x 6 sec | Red flashes 10 sec | ||||
| Operation of the system from the limit switches of the hood / trunk | Melody 2x10 sec | x 6 sec | Red flashes 10 sec | ||||
| Operation of the system when the ignition is turned on | Melody 3x10 sec | x 6 sec | Red flashes 10 sec | ||||
| Activation of the system via the warning channel of external sensors | 2 beeps | Two red flashes | |||||
| System activation on the main channel of the first external sensor | 3 beeps | Three red flashes | |||||
| System activation on the main channel of the second (main) external sensor | Melody 4x10 sec | x 6 sec | Red flashes 10 sec | ||||
| Battery low | --- | red flash | |||||
| No communication signal with the main unit for 3 seconds | Long beep + short beep | 1 long + 1 short | Red flash x1 sec | ||||
| Disarmed Ignition Warning (if F14/2 is enabled) | Beep set 2 | Four red flashes |
* Sound signals can be disabled.
** Vibrating alert can be disabled.
Manual system arming
If for some reason you cannot use the transmitter to arm the system, you can do this using the Valet button at any time, even if the ignition key is not available.
Full arming of the system
- Briefly press, release, and then press and hold (for more than 3 seconds) the VALET button until the arming mode is confirmed by an audible signal.
- The LED indicator will flash rapidly to indicate that the last door is waiting for the door to close:
- if the door was closed, the system will wait for the last door to open and then close.
- if the door was open, the system will wait for the last door to close.
- After the last door is closed and after 3 seconds, the full armed mode will turn on.
Manual arming is only performed for one cycle before the system is disarmed.
Note.
After turning off the ignition, manual arming can only be performed after a five second delay.
Protecting the car when the armed mode is on
- Opening the hood, trunk or door of the vehicle will immediately activate the system and activate the alarm. For 30 seconds, the siren will sound and the parking lights of the car will flash. After that, the sound of the siren and the flashing of the marker lights will stop and the system will continue to monitor all the vehicle's security circuits. If a burglar or thief left the door open, the siren will sound for six 30 second cycles and then turn off; this protection zone will be isolated and the system will continue to monitor the rest of the vehicle's protection circuits.
- Each time the system is armed, the red LED indicator installed in the vehicle's dashboard will flash slowly. The blinking LED indicator serves as a visual warning to potential burglars or thieves. The indicator uses a light emitting diode that consumes a small current, so even if the system is left armed for a long time, the operation of the LED indicator will not drain the car battery.
- Each time the system is triggered, the vehicle's parking lights flash for the entire 30-second alarm cycle to draw attention to the vehicle.
- Additional function: each time the system is armed, the vehicle's starter circuit is blocked. In this case, the car engine cannot be started even with the ignition key.
- When the system is armed, any strong blow to the body or glass of the car will trigger the shock sensor and turn on the alarm.
- Weaker impacts will trigger the shock sensor warning zone, after which the siren will emit several short bursts of warning tones.
Protection of the car when the security mode is on with the engine running
- Opening the hood, trunk or door of the vehicle will immediately activate the system and activate the alarm. All blocking circuits will turn on. For 30 seconds, the siren will sound and the parking lights of the car will flash. After that, the sounding of the siren and the flashing of the side lights will stop, and the system will continue to monitor all security circuits of the car. If a burglar or thief left the door open, the siren will sound for six 30 second cycles and then turn off; this protection zone will be isolated, and the system will continue to monitor the rest of the vehicle's protection circuits.
- The LED indicator will start flashing slowly. Each time the system is triggered, the vehicle's parking lights flash for the entire 30-second alarm cycle to draw attention to the vehicle.
Passive (automatic) system arming
- Turn off the engine, get out of the car, close all doors, hood and trunk.
- The LED indicator will blink rapidly to indicate that the 30 second passive arming timer has started.
- After 30 seconds, the system will arm.
- The vehicle's side lights will flash once.
- The siren will give one short confirmation beep.
If there is an additional circuit for locking/unlocking the door locks and the programmable function F23 (locking the door locks during automatic arming) is enabled, then the car doors will be locked.
Note.
If a door, hood, or trunk of the vehicle is opened while the passive arming timer is running, the system's passive arming timer will be suspended. When all doors, hood, trunk are closed, the system will start the passive arming cycle from the beginning. At the end of the 30-second time interval, the armed mode will turn on.
Vehicle Break-In Warning Signals
If in your absence an attempt was made to break into the car, the security system will inform you about it.
When the system is disarmed, four short beeps will sound and the parking lights or direction indicators will flash four times.
Get in the car and watch the LED on the car dashboard flash before turning the key in the ignition.
- If the LED indicator flashes once after a pause, then the system was triggered by the first shock sensor or by the trigger of an additional device connected to the system.
- If the LED indicator flashes twice after a pause, then the system was triggered by the second shock sensor or by the trigger of an additional device connected to the system.
- If the LED indicator flashes three times with a pause, then the system was triggered by the trunk or hood limit switch (when trying to open the hood or trunk) INSTI(-), INST2(-) = INST1(-) (when INST2J-) is an additional input trigger) .
- If the LED indicator flashes four times after a pause, then the system was triggered by the door limit switch (when trying to open the car doors) DOOR (-), DOOR (+).
Vehicle entry warnings are stored in the system memory and are cleared when the ignition is turned on.
Valet pushbutton switch (VALET mode)
The Valet push button switch allows you to temporarily disable all security functions of this system, eliminating the need to give the transmitter control of your system to a parking attendant or service station mechanic. When the system is in Valet mode, all security functions are disabled, except for the remote control function of the "Panic" mode and the remote control function for locking and unlocking car doors.
Enabling Valet Mode
- Disarm the system using the key fob transmitter or Valet button, or enter your personal code to manually disable the system.
- Turn the ignition ON and OFF.
- The LED indicator will turn on continuously.
- The system is in Valet service mode.
Note. In Valet mode, each ignition off will be accompanied by a short beep.
Don't forget to turn off the Valet service mode when you no longer need this mode. This will provide complete protection for your vehicle.
Turn off Valet mode
- Turn the ignition ON and OFF.
- Within 5 seconds, briefly press and release the Valet button.
- The LED indicator will turn off.
- The system will enter the operating mode.
Manual disabling of the security system using the Valet switch
This security system can be disarmed without using a remote control transmitter. This feature is provided in the event that you need to disarm the system and use the car, but the key fob transmitter is lost or defective. If, when programming the system, the Valet switch is selected for manual shutdown of the system, then to disable the system, do the following: open the car door - the security system will work and the siren will turn on; turn on the ignition; within 10 seconds, briefly press the Valet button.
Please note that the system will not be in Valet mode!
Disabling the system using a personal code
The choice of the coded shutdown mode of the system is carried out by function F12. To do this, contact your master installer or see the "Programmable Features" section and the system installation instructions. Please note that the selection of this function also determines how the Anti-Hi-Jack mode is disabled (Valet or Coded). In case the coded disarming mode is enabled, you can use the factory code (11) or, for maximum protection of your car, you can program your personal disarming code at any time. The code consists of two digits, each of which can be any number from 1 to 9.
To disable the system using a personal code
- Open the door with the key (the system will work and the marker lights will turn on, etc.).
- Switch the ignition off and on again - the alarm mode will turn off and the engine can be started.
Note. If the wrong code was entered 3 times in a row, the system will stop accepting further attempts to enter the code for some time.
Programming a personal system shutdown code
The F12 function must correspond to the SECRET CODE mode.
The factory shutdown code for the system is 11.
To program your personal code
Enter a valid personal code to enable the operation of changing the secret code:
- Disarm the system.
- Switch the ignition on, off and then on again.
- Within 10 seconds, press the Valet pushbutton switch the number of times corresponding to the first digit of your personal code (factory setting - 1 time).
- Switch the ignition off and on again.
- Within 10 seconds, press the Valet pushbutton switch the number of times corresponding to the second digit of your personal code (factory setting - 1 time).
- Switch the ignition off and on again.
- If the entered code is correct, one short siren signal will sound.
- Turn off the ignition within 5 seconds and immediately follow the procedure for writing a new secret code:
- Press the Valet push button switch 5 times. You will hear one short and one long siren tone to confirm that the system is ready to program a new personal code.
- Within 5 seconds after the siren signals, press button 1 (see Fig. 1, Fig. 2) of the transmitter to start entering the first digit of the personal code. You will hear one confirmation siren.
- Within 10 seconds, press the Valet button switch the number of times corresponding to the first digit of your personal code (from 1 to 9). The siren will give the appropriate number of signals, confirming the entry of the first digit of the code.
- Within 10 seconds, press button 2 of the transmitter fig (1, fig 2) to start entering the second digit of the personal code. You will hear two siren beeps for confirmation.
- Within 10 seconds, press the Valet button switch the number of times corresponding to the second digit of your personal code (from 1 to 9). The siren will give the appropriate number of signals, confirming the entry of the second digit of the code.
- Turn on the ignition. You will hear 1 short and 1 long siren tone to confirm that the programming of the new personal code has been completed.
Be sure to write down or memorize your personal code well. Please note that if the F12 function is programmed as a SECRET CODE, a personal code will also be required to disable the Anti-Hi-Jack function.
Anti-Hi-Jack mode (Protection against car theft and capture)
This system allows you to use two independent or simultaneous options for turning on the Anti-Hi-Jack function.
Remote activation of the Anti-Hi-Jack Tx function using the second channel of the transmitter (programmable function F17).
- Turn on the ignition or start the engine.
- Simultaneously press and hold buttons 2 and 3 (see Fig. 1, Fig. 2) until a confirmation signal appears in the form of three flashes of side lights.
- Release the key fob buttons.
- A 20 second delay is enabled.
- During the next 20 seconds, the system will begin to beep shortly and intermittently turn on the blocking circuits.
- Total: after a 40-second delay, the alarm mode is activated (sound and light alarm).
- All blocking circuits are constantly activated, leading to a complete stop of the engine.
The Anti-Hi-Jack IGN function, when the ignition is turned on (programmable function F18) and the door limit switches or the vehicle speed sensor is triggered, works as follows:
- The function is disabled.
- It is activated every time the ignition is turned on and the DOOR(-) door limit switch is actuated in the mode: closed/open/closed or open/closed.
- It is activated every time the ignition is turned on and the door limit switch DOOR (+) is actuated in the mode: closed / open / closed.
- It is activated every time the ignition is switched on and the vehicle is moving.
Note.
After the Anti-Hi-Jack alarm is enabled, the sound and light alarm will work until the car battery is completely discharged. Disabling the system in the Anti-Hi-Jack mode is possible only with the help of the Valet button in the mode of simply pressing the Valet button or by entering a secret code.
Disabling Anti-Hi-Jack Mode
Disabling the Anti-Hi-Jack function within 40 seconds after its activation (i.e., during the warning cycle, before the siren, parking lights, interior lighting and engine blocking circuits turn on) is done by pressing the Valet pushbutton switch once.
- If the F12 function is in Valet mode and an alarm is triggered, turn off the Anti-Hi-Jack as follows: turn the ignition off and then on again and press the Valet button within 10 seconds.
- If the F12 function is in the Secret Code mode: turn the ignition off and on again 2 times, then enter the personal secret code for disabling the system.
Passive engine blocking (immobilizer function F16)
You can program the system so that every 20 seconds after the ignition is turned off, only the engine blocking circuits are activated (similar to an immobilizer). In this case, the system will not be triggered by opening the doors, hood or trunk, or by sensors connected to the system, and the LED will flash slowly.
Disabling the passive engine lock can be done using the transmitter and the VALET/Secret code button or using the VALET/Secret code button, ONLY! The mode is programmable.
If within 20 seconds after turning off the ignition, the ignition is switched on again or the engine is started, the passive blocking function will be canceled. If the passive engine blocking function is activated, then when the ignition is turned on, the siren of the system will begin to give short warning signals for 10 seconds, after which the alarm mode will turn on for 30 seconds. If the ignition is turned off and then turned on again, the process will repeat. If the ignition remains on, the siren will continue to sound for 6 cycles of 30 seconds.
At any time, you can turn on the "full" security mode by pressing the button 1 of the transmitter, (see Fig. 1, Fig. 2) At the same time, you will hear 1 siren signal, the parking lights will flash once.
Disabling the system in case the passive engine blocking function is activated
- If the ignition is on, briefly press the system's arming/disarming (disarming) button - this will cancel the passive engine blocking function, but will not cancel the Anti-Hi-Jack function (if it is enabled).
- If the transmitter is defective or lost, disable the system using the Valet button or by entering a personal code (depending on the status of the F12 function). Please note that if the system is not turned off within 10 seconds after the ignition is turned on, the alarm mode will turn on.
- If the ignition is off, arm the system from the transmitter (You will hear one siren and the parking lights will flash 1 time), and then disarm the system (You will hear 2 siren sounds, the parking lights will flash 2 times).
- If the transmitter is defective or lost, disable the system using the Valet switch or by entering a personal code (depending on the status of the F12 function). Please note that if the system is not turned off within 10 seconds after the ignition is turned on, the alarm mode will turn on. The passive lock function works regardless of whether the passive arming function is enabled and is typically used in the following cases.
- As an additional layer of protection to the passive system arming function. The passive arming function in this case will be "priority". However, if one of the doors, hood, or trunk remains open after the ignition is turned off, or if one of these circuits is faulty, passive arming will not start. Passive blocking of the engine in this case will turn on 20 seconds after the ignition is turned off, regardless of whether one of the doors is open or whether one of the circuits is faulty. In this case, the car engine will be securely blocked.
- If you do not use the passive arming function or do not want to turn on the "full" arming mode in order to avoid possible system triggering (for example, in a parking lot, in the office yard, etc.), the passive engine blocking function in this case will work as an immobilizer and provide the necessary protection for your car. To enable the passive engine blocking function - contact the installer or see the "Programmable functions" section (Function F16).
Note.
If the F17 function (Anti-Hi-Jack function] is enabled and the system has turned on the alarm, then the system is turned off according to the rule for disabling the Anti-Hi-Jack mode.
Automatic door locking when the ignition is switched on (function F3/2)
If your vehicle is equipped with optional power door locks, this system can be programmed to automatically lock the doors when the ignition is turned on. Each time you turn on the ignition, after 3 seconds, the car doors will be locked for your safety. If any of the doors is open at this moment, the doors will not be locked. If you wish to enable this feature, please contact your installer or see Programmable Features.
Automatic locking of the doors when the vehicle starts moving (function F3/3)
If your car has an electronic speed sensor and additional electric door locks, this system can be programmed to automatically lock the doors when the car starts moving - after 3 seconds, the car doors will be locked for your safety. If any of the doors is open at this moment, the doors will not be locked. If you wish to enable this feature, please contact your installer or see Programmable Features.
Automatic unlocking of the doors when the ignition is switched off (function F4)
If your car is equipped with additional electric door locks, then every time you turn off the ignition, the car doors will be automatically unlocked. If you wish to disable this feature, please contact your installer or see Programmable Features.
Remote control of additional devices (channel CH2)
This system has a channel CH2 (dark blue wire) to control various additional devices connected to the system. This channel can be used (programmed) for:
- car window remote control,
- control of the security mode of a car with a running engine without an ignition key,
- static control of trigger type devices. Programmable functions TRIGGER1 (static control of the output at any time and in any state of the system), TRIGGER2 (static switching on of the output at any time with the ignition on and in any state of the system, static switching off of the output at any time and in any state of the system).
To send a control signal to an additional device via the CH2 channel, use keyfobs-transmitters according to Table 1, Table 2 of the system control commands, and also use the table of programmable functions to select the required parameters.
The output of channel CH2 is connected to ground during the activation time of the channel.
Channel output CH2 is a low-current output designed to control the winding of an additional relay or an equivalent low-current load.
Remote control of additional devices (channel CH3)
This system has a CH3 channel (green with red stripe, green with black stripe wire) to control various auxiliary devices connected to the system. This channel can be used (programmed) for:
- remote opening of the trunk of the car,
- car engine remote start,
- remote control of timers,
- device management at specified time intervals,
- guided car search in the parking lot,
- polite backlight output.
The output of channel CH3 is connected to ground during the activation time of the channel.
To send a control signal to an additional device via the CH3 channel, use keyfobs-transmitters according to Table 1, Table 2 of the system control commands, and also use the table of programmable functions to select the required parameters.
The output of channel CH3 is connected to ground during the activation time of the channel. The output of channel CH3 is two outputs of a normally open relay with a load current of not more than 1 A
Note.
If the CH3 channel output was activated while the system was armed, the system will simultaneously disable the shock sensor and the hood/trunk trigger for a while so that opening the trunk does not trigger the system. After the trunk is closed, the system will automatically arm this circuit again.
Remote control of additional devices (channel CH4)
This system has a CH4 channel (green wire with a white stripe) to control various auxiliary devices connected to the system. This channel can be used (programmed) for:
- remote control of timers,
- pulse output of negative polarity for 1/10/20/Z0 sec when the system is armed: (option of use - as an output for controlling power windows, electric sunroof, etc.),
- pulse output of negative polarity for 30 seconds when the system is disarmed (option of use - polite backlight control output). Turning the ignition on will cancel the pulse at any time.
The output of channel CH4 is connected to ground during the activation time of the channel.
Channel output CH4 is a low-current output designed to control the winding of an additional relay or an equivalent low-current load.
Remote control of additional devices (channel CH5)
This system has a channel CH5 (gray wire) to control various additional devices connected to the system. This channel can be used (programmed) for:
- additional blocking output,
- shutdown control of turbocharged engines or other automation,
- double pulse output of negative polarity for 1/0.3/1 sec when the system is armed.
The output of channel CH5 is connected to ground during the activation time of the channel.
Channel output CH5 is a low-current output designed to control the winding of an additional relay or an equivalent low-current load.
Remote control of additional devices (channel CH6)
This system has channel CH6 (blue wire with red stripe, blue wire with black stripe) for controlling various additional devices connected to the system. This channel is programmed as:
- independent channel for controlling the pager and remote shutdown of the system siren, for example, in the "NIGHT" mode,
- pulse output of negative polarity for 20 seconds when the system is disarmed (option of use - polite backlight control output). Turning the ignition on will cancel the pulse at any time,
- control of turning off turbocharged engines or other automation.
The output of channel CH6 is connected to ground during the activation time of the channel.
Channel output CH6 - two outputs of a normally open relay with a load current of not more than 1 A.
Note.
If the CH6 channel output was activated while the system is armed, the system will simultaneously disable the shock sensor and the hood/trunk trigger for a while so that opening the trunk does not trigger the system. After the trunk is closed, the system will automatically arm this circuit again.
Turbo timer function
The turbo timer function can be activated on the physical lines of channels CH5 and CH6 by programming functions F19/2 and F20/3. The lines are activated by turning the ignition key to the "Ignition ON" position and remain in this state indefinitely as long as the ignition is turned on. SWITCHING OFF the IGNITION activates the line deactivation delay timer programmed by function F1 (for 1/2/3/10/30 min). Thus, after the time set in F1, the turbo timer lines will go into an inactive state.
An emergency interruption of the turbo timer operation is possible using a key fob transmitter or a Valet / Secret code pushbutton switch at any time.
Resetting the ACTIVE STATE of the turbo timer using the transmitter
- Remove the key from the car ignition.
- Within 1 second, press button 3 (CH2) of the keyfob-transmitter twice (F13 / 1) or buttons 1 + 3 twice at the same time (Fig. 1, Fig. 2) (F13 / 2 - separate control of arming and disarming ARM / DISARM) .
- The system must acknowledge receipt of the command with two short beeps and one short light and reset the turbo timer channel.
Resetting the ACTIVE STATE of the turbo timer using the Valet/Secret code button
- Insert the key and turn it to the IGNITION position.
- Within 10 seconds, briefly press the Valet/Secret code button.
- The system should reset the turbo timer channel similar to a system crash or Anti-Hi-Jack.
Programming codes for new transmitters
Please note that when programming a new transmitter into the system memory, all previously programmed transmitter codes are erased, therefore, when programming additional transmitters, existing transmitters must be reprogrammed.
Attention!
Since the transmitters use a constantly changing (dynamic) code, in some situations (for example, when the key fob buttons are pressed more than 30 times outside the system coverage area), the key fobs and the system may become out of sync. In this case, approach the car and within one second press button 1 (fig. 1, fig. 2) of the transmitter twice. Synchronization will be restored and the key fob will be able to control the system again.
Transmitter Programming
Recording codes of new transmitters (F12 - state "Valet").
Attention!
Remember that each operation must be completed within 5 seconds of the previous operation. If the 5 second interval is exceeded, the system will automatically exit programming mode, which will be confirmed by one short and one long siren beep. If the ignition was turned off during programming, the system will immediately exit the programming mode, confirming this with one short and one long signal from the siren.
- Disarm the system, get into the car and turn on the ignition.
- Press the Valet push button switch 3 times. You will hear one siren tone to confirm that the system is ready to program new transmitters.
Press and hold button 1 (Fig. 1, Fig. 2) of the first transmitter until you hear a long siren tone confirming that the programming of the first transmitter is finished (the transmitter channels will be programmed automatically). In this case, the LED will begin to blink slowly.
- Press and hold button 1 (fig. 1, fig. 2) of the second transmitter until you hear a long siren tone confirming that the programming of the second transmitter is finished. In this case, the LED will begin to blink slowly.
- Repeat step 3 for other transmitters.
- To exit transmitter programming mode:
- turn off the ignition or
- wait 8 seconds without doing anything.
You will hear one short and one long siren tone to confirm you have exited transmitter programming mode, and the system LED will turn off.
Writing new transmitter codes (F12 - Secret Code state).
- Disarm the system using the key fob or by entering the secret code with the "Valet" button, i.e.
- turn on, turn off and then turn on the ignition.
- using the Valet switch, enter the first digit of the code (the number of presses of the Valet button corresponds to 1 digit of the code).
- turn off and then turn on the ignition.
- using the Valet switch, enter the second digit of the code (the number of presses of the Valet button corresponds to the 2nd digit of the code).
- Press the Valet push button switch 3 times. You will hear 1 long siren tone.
- Press button 1 (Fig. 1, Fig. 2) of the first key fob transmitter. The system will confirm the entry of a new key fob code into the memory with a sound signal.
- Press button 1 (Fig. 1, Fig. 2) of the second key fob transmitter. The system will confirm the entry of a new key fob code into the memory with a sound signal.
Attention!
Remember that each operation of writing the codes of new key fobs deletes the codes of old key fobs from memory and must be performed for all key fobs at a time. The system maintains up to four keyfob codes in memory, regardless of whether the codes of four different keyfobs or the same code are written to the system four times.
Programmable functions of the BERKUTS-430 PAGER SYSTEM
| FN# | 1 tone | 2 tones | 3 tones | 4 tones | 5 tones |
|---|---|---|---|---|---|
| One click on ARM/DISARM | 2 clicks on ARM/DISARM | 3 clicks on ARM/DISARM | 4 clicks on ARM/DISARM | 5 clicks on ARM/DISARM | |
| F1: TURBOTIMER PULSE DURATION | 1 min | 2 minutes | 3 min | 10 min | 30 min |
| F2: Limit False Positives | OFF | ON | |||
| F3: Locking the doors when the ignition is ON | OFF | ON | SPEEDOMETER | ||
| F4: Auto. Unlocking when ignition is OFF | OFF | ON | |||
| F5: Automatic re-arming | OFF | ON | ON with DOOR LOCK | ||
| F6: Arming Delay | 5 sec | 10 sec | 35 sec | ||
| F7: Lock/Unlock Long Pulse | 0.5 sec | 1 sec | 3.5 sec | Two imp. unlocked 1 sec | |
| F8: Guarding when the engine is running | OFF | ON | ON with flashing light | ON with constant light | |
| F9: Controlled CH2 | EXIT (-) as long as the button is held down | OUTPUT PULSE (-) 1 sec | OUTPUT PULSE (-) 30 sec | TRIGGER 1 OUTPUT (-) [always on] | TRIGGER 2 OUTPUT (-) [Only works when the ignition is ON] |
| F10: Controlled CHANNEL SNZ | AUTO SEARCH (button function) 5 short flashes | Double pulse (-) 1/0.5/1 sec (no delay) | Negative imp. 1 sec (no delay) | ||
| Negative imp. 1 sec when disarming the system | Double pulse (-) 0.5/0.5/0.5 sec when disarming | ||||
| F11: Programmable CHANNEL CH4 | Negative imp. 1 sec when arming | Negative imp. 10 sec when arming | Negative imp. 20 sec when arming | Negative imp. 30 sec when arming | Negative imp. 20 seconds when the system is disarmed (polite lighting) |
| F12: System shutdown | Valet | Secret code | |||
| F13: System control mode selection ARM/DISARM | ARM/ DISARM one button | ARM/ DISARM two buttons | |||
| F14: Ignition on warning signal in disarmed state | OFF | ON | |||
| F15: INST2 (-) additional input trigger | INST1 (-) add. input trigger | SPEEDOMETER INPUT | |||
| F16: Passive engine blocking (immobilizer function) | OFF | ON (disable lock by transmitter or Valet/Code button) | ON (disabling the lock ONLY with the Valet/Code button) | ||
| F17: Turning on ANTI-HI-JACK from the key fob transmitter (TX) | OFF | ON | |||
| F18: Activate ANTI-HI-JACK when ignition is turned on | OFF | ON with DOOR(-) | ON with DOOR(+) | SPEEDOMETER | |
| F19: Programmable CHANNEL CH5 | ARM(-) | Output(-) TURBOTIMER | Double pulse (-) 1/0.3/1 sec when arming | ||
| F20: Programmable CHANNEL CH6 | OUTPUT (-) PAGER or other executive device | Negative imp. 20 seconds when the system is disarmed (polite lighting) | Output(-) TURBOTIMER | ||
| F21: Close ALL (comfort function) | OFF | 15 sec | 22 sec | 30 sec | |
| F22: Passive arming | OFF | ON | |||
| F23: Locking doors during passive arming | OFF | ON | |||
Factory settings are highlighted in gray in the table.
Programming system functions
Reprogramming of the function states F1 to F11 is always available regardless of the state of the F14 function, without entering the "Secret Code".
If F12 is set to Valet mode, reprogramming proceeds normally from F1 up to and including F23.
If F12 is set to "Secret code" mode, reprogramming of the states of functions F12 - F23 is possible only after entering the secret code.
- Enter the secret code.
- Program the functions in the sequence F1, F2 - F23.
If the secret code is not entered, it is possible to reprogram functions only from F1 to F11, when you try to go to the F12 function, the system automatically exits the programming mode.
The system automatically exits the reprogramming mode after 14 seconds of waiting or immediately after the ignition is turned off.
1. Entering the programming mode (F12 - Valet state)
- Disarm the system using the key fob or the "Valet" button.
- Turn on the ignition.
- Within 3 seconds after turning on the ignition, press the Valet push button switch 3 times. You will hear 1 long siren tone.
- change the state of this function (by pressing button 1 (Fig. 1, Fig. 2) of the transmitter). At the same time, you will again hear 1 or 2 or 3 or 4 or 5 siren signals according to the new state of the function,
- exit the programming mode (for example, by switching off the ignition),
Note.
Do not allow more than 10 seconds between your actions, otherwise the system will automatically exit the programming mode and you will hear one short and one long siren signal.
2. Entering the programming mode (F12 - "Secret Code" state):
- Disarm the system using the key fob or the Valet button by entering the secret code:
- turn on, turn off then turn on the ignition,
- using the Valet switch, enter the first digit of the code,
- turn off and then turn on the ignition,
- using the Valet switch, enter the second digit of the code,
- turn off and then turn on the ignition. The system should confirm with a beep that the correct code has been entered.
- Press the Valet push button switch 3 times. You will hear 1 long siren tone.
- Within 3 seconds after the siren signal, turn off the ignition. You will hear 1 short and 1 long siren.
- Within 3 seconds after the siren signals, turn on the ignition. You will automatically enter the F1 function programming mode. The LED will start flashing in single flashes.
In the programming mode of a particular function, the number of LED flashes corresponds to the number of the programmable function, and one or two siren sounds indicate the status of this function.
After the siren sounds, you can either
- change the state of this function (by pressing button 1 (Fig. 1, Fig. 2) of the transmitter). At the same time, you will again hear 1 or 2 or 3 or 4 or 5 siren signals, according to the new state of the function,
- move to the next function (by pressing the Valet pushbutton once),
- exit the programming mode (for example, by turning off the ignition).
Note.
Do not allow more than 10 seconds between your actions, otherwise the system will automatically exit the programming mode and you will hear one short and one long siren chirps.
3. Programming the F1 function
- After turning on the ignition, you will hear 1 or 2 siren sounds according to the state of the F1 function (1 beep - passive arming is enabled; 2 beeps - passive arming is disabled).
- To change the state of the F1 function, press button 1 (Fig. 1, Fig. 2) of the transmitter or proceed to programming the F2 function.
4. Programming the F2 function
- Press the Valet push button switch once. You will enter the F2 programming mode. The LED will start flashing in series of two flashes after a pause.
- You will hear 1 or 2 siren signals characterizing the state of the F2 function (1 signal - the car doors will be locked during passive arming, 2 beeps - the car doors will not be locked when passive arming).
- To change the state of the F2 function, press button 1 (Fig. 1, Fig. 2) of the transmitter or proceed to programming the F3 function by briefly pressing the Valet button switch. etc.
Operating modes of the LED indicator of the LED system installed in the car dashboard
Short confirmation signals given by the siren of the system
* These beeps can be disabled.
Modes of operation of the parking lights of the car
Note.
If the alarm was triggered in your absence, then when the system is disarmed, four short beeps will sound and the parking lights or direction indicators will flash four times, and the LED indicator will flash according to the code that corresponds to the zone that was triggered in your absence.
Before starting the car's engine, watch the LED on the car's dashboard flash. The number of flashes of the LED indicator indicates the zone protected by the system that triggered the system in your absence. For more information, see the "Vehicle Intrusion Warning Signals" section of this manual.
Attempting to disarm the system after the system has been triggered (siren sounded) will only silence the alarm. The system will not be disarmed. To disarm the system, press the arm/disarm button on the keyfob transmitter when the system does not beep.
Replacing the Batteries
A small red LED is installed in the transmitter housing, which confirms the pressing of the transmitter buttons and also shows the battery status. As the battery discharges, you may notice a decrease in the range of the transmitter. To replace the battery
- open the cover by unscrewing the small screw on the back of the transmitter housing,
- remove the dead battery, remember the polarity of its installation and dispose of it properly,
- install a new battery (type GP23A), make sure the polarity is correct,
- carefully install the cover without damaging the LED or switches on the circuit board, tighten the small screw on the back of the transmitter housing.
Installing the main system components
System Wiring
ATTENTION!
When connecting additional relays to the outputs of the security system, make sure that there is a damping diode on the relay control contacts. Connect the output of the security system to the additional relay only from the anode side of the damping diode. Make all security system wire connections only with the security system power circuit fuses removed.
Warning.
Direct connection of low-current outputs of the channels to the executive high-current input of the car trunk lock opening circuit, as well as to the input of some devices for remote start of the car engine, will damage the main unit of the security system.
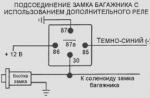
Trunk opening control
Connect the selected control channel wire to the control terminal of the type AS-9256 relay (or equivalent 30A automotive relay). Connect wires to other relay contacts according to your control scheme. An example diagram of using channel 2 to control the trunk opening is shown below.

Standard vehicle lock/unlock configurations
3-wire unlock/lock circuit negative polarity
The orange wire and the blue wire with a white stripe must be connected to ground (a metal part of the car body).
The yellow wire is the negative lock pulse output and must be connected to the control wire of the factory negative lock relay. The white wire is the negative unlock pulse output and should be connected to the control wire of the factory negative unlock relay. The negative trigger central locking channel control circuit is shown below.

3-wire lock/unlock circuit positive polarity
When installing the system in these vehicles, the dark green and dark blue lock/unlock wires of the vehicle are not used.
The orange wire and the blue wire with a white stripe must be connected to a +12V power supply.
The yellow wire is the positive lock pulse output and must be connected to the control wire of the factory positive lock relay. The white wire is the positive unlock pulse output and should be connected to the control wire of the factory positive unlock relay. The control circuit of the central locking channel with a positive trigger is shown below.

5-wire unlock/lock circuit with polarity reversal
When installing the system on such vehicles, it is necessary to cut the standard wires for controlling the electric drives of the car door locks. These wires are routed from the main lock/unlock switch to the secondary lock/unlock switches and from there to the power door locks.
Cut the original lock wire and connect the yellow wire of the system to the end of the cut regular wire that goes to the additional switches (power door locks). Connect the green wire to the end of the cut stock wire that goes to the main switch.
Cut the standard unlock wire and connect the white wire of the system to the end of the cut standard wire that goes to the additional switches (power door locks). Connect the blue wire to the end of the cut stock wire that goes to the main switch.
The orange wire and blue wire with white stripe must be connected to a fused +12V power supply.
Exploitation. The master installer must mark all installed options and programmed settings in the user manual and fully explain to the car owner the rules for operating the security system.