If you look closely at the chimneys and ventilation pipes of residential buildings, then the variety of chimneys on them (deflectors, weather vanes) is amazing. But the main task of the deflector is not to decorate the chimney, but to increase and stabilize the draft depending on the weather, and thereby improve the efficiency of the heater and reduce heating costs. The deflector on the ventilation pipe can provide non-volatile (and free) supply and exhaust ventilation, see below. But at the same time, there are also enough opponents of installing deflectors on the pipes of residential buildings, and they give weighty arguments in their favor. The purpose of this article is to help the reader figure out in which cases it makes sense to put a deflector on a chimney or ventilation, then how to choose the right one or make it yourself.

The most important question
Before choosing or making a deflector for a pipe, you need to decide - is it needed at all? The deflector can freeze, drag on with soot or soot (coke), clog with fallen leaves, wind-blown debris or dust. In any of these cases, if the deflector is on the chimney, the inhabitants of the house risk getting burned. The deflector does not increase the efficiency of the furnace or boiler much, but it requires regular inspection and cleaning. At least once every 3 months for solid fuel stoves and at least once every six months for gas, liquid fuel or pyrolysis stoves and boilers. For more information about the dangers that an unsuitable deflector can entail on a pipe, see the video:
Video: why are deflectors, umbrellas and weathercocks on the chimney dangerous?
Therefore, if you have an old wood or coal stove, but the draft is unimportant and the wind blows into the chimney, instead of a complex deflector, it is better to put a simple chimney, for example. umbrella or tent. And in other cases, you need to carefully figure out which particular deflector is needed for this particular stove / boiler with this particular chimney. It is also important not to confuse a smoke deflector with a ventilation one - small traders and the authors of some popular publications do not see or do not see the difference between them.
deflector evolution
Deflectio in Latin means "I reflect" in the sense of "I discard". Not directed in a certain way, like a reflector, but only to the side. Chimney cap made of skins, large shells, etc. already set by primitive people to avoid wind blowing into the chimney.
The role of the deflector in creating thrust, its stabilization in spite of the vagaries of the weather and the ability of the deflector to increase the efficiency of heat-generating devices were first seriously thought at TsAGI almost 100 years ago on the instructions of the newly hatched Soviet government. Before that, heat engineers tried to improve chimneys for this purpose. Have you seen in old photographs the huge pot-bellied, like an inverted pear, chimneys of American steam locomotives or the long thin ones, with a rosette at the top, of English ones?
At TsAGI, the venerable aircraft designer D. P. Grigorovich took up deflectors in a creative collaboration with A. F. Volpert, who was fluent in mathematical apparatus. The latter is also, and even more, known for his work in the field of radio engineering (Volpert-Smith diagram, etc.). Together and separately, Grigorovich and Volpert developed several types of deflectors for various purposes, therefore, different deflectors of Grigorovich, Volpert and Volpert-Grigorovich are described in the specialized literature.

Grigorovich began by aerodynamically correctly calculating the usual chimney-umbrella, pos. 1 in fig. This has already significantly improved the performance of the device; Grigorovich's cone - remember, it will come in handy. Volpert proposed to equip the deflector-umbrella with an aerodynamic diffuser skirt (pos. 2), but the deflector remained aerodynamically imperfect, see below. It was supplemented with a streamlined body of revolution instead of a cap and a cylindrical body-shell. Finally, after repeated purges in wind tunnel, the TsAGI deflector (pos. 3) was presented to the government commission, which fully met the issued TOR and greatly overlapped it.
The TsAGI deflector is still the most common in the world due to its technical excellence. There are modifications for different purposes, see below. But other developments of Grigorovich and Volpert were not in vain - most of the models of modern smoke deflectors are being developed on their basis. Which of them is more suitable for what, we will talk about this later.
Types and schemes
The whole variety of trade names of smoke deflectors fit into a limited number constructive types and aerodynamic schemes. First of all, according to the interaction with the natural draft of the chimney, the deflectors are divided into:
- Active - with a built-in working smoke exhauster. To ensure the specified characteristics of the deflector, the smoke exhauster must work constantly while it burns in the furnace.
- Active-passive - a low-power smoke exhauster in case of emergency: complete calm, storm, excessively intense firebox, etc. Minimum allowable specifications chimney are provided even when the exhauster is off.
- Passive-active - the deflector creates a small amount of its own thrust in a non-volatile way.
- Passive - there is no deflector own draft.
Active deflectors as volatile and not optimal for house heating appliances low power we do not consider further. Of the active-passive ones, one will be considered, designed for a low-power 12 V fan and suitable for DIY.

According to the aerodynamic design of the chimney deflector, it is possible to perform the following. like this (top of the picture):
- Aerodynamically imperfect (incomplete) - in the space occupied by the deflector there is a "pocket" - a winding area in which accumulation of air, flue gases or their mixtures is possible;
- Aerodynamically full open - there is no wind pocket, but the wind has free access to the deflector working space;
- Aerodynamically perfect closed - there is no wind pocket, the wind does not have free access to the working space;
- Weather vane deflector (see below);
- Vortex deflector.
An aerodynamically perfect closed deflector is the most complex structurally and technologically, but it has a huge advantage: due to the heating of the shell, aerodynamically perfect closed deflectors almost all produce their own non-volatile thrust. This is the only passive type of deflector that can increase the natural draft of the chimney at full calm.
Note: an aerodynamically perfect closed deflector is the TsAGI deflector mentioned above. This aerodynamic scheme was invented in TsAGI.
Vortex deflectors are easily recognizable by their "torn" design with sharp protrusions. In their aerodynamics, as in vortex aerodynamics in general, there is still much that is unclear (the Navier-Stokes equation was solved in general view only 2 years ago). Predict the behavior of the vortex deflector for any external conditions with any chimney is definitely impossible. Therefore, vortex deflectors are not considered further. To believe or not to their manufacturers is your own business.
Aerodynamics
Schemes of flue gas current in deflectors in publicly available sources are sufficient. But from the point of view of the homeowner and the master, the nature of the interaction of the deflector with the natural draft of the chimney and the wind in the wake is more important. aspects:
- Will the deflector worsen the initial draft?
- Is the deflector able to increase the initial draft in calm?
- To what extent and in what way does the deflector increase wind loads on the pipe?
- How prone is the deflector of this scheme to icing / clogging and easy to clean?
The wind is then better considered not on the meteorological scale, but on the basis of a rough gradation of force and the dynamics of the velocity field:
- calm;
- weak / medium (moderate) - up to 6 points on the weather scale;
- strong - 6-8 points;
- very strong - over 8 points;
- gusty - the wind of any strength is really gusty, or sharp (very sloping up or down), or swirling.
Figure 1 gives an idea of the aerodynamic properties of passive smoke deflectors. higher.
simple cap
An ordinary chimney chimney in the form of an umbrella, if it is made in the form of a Grigorovich cone, is not so bad:

- With a massive heat-intensive chimney, it keeps draft within the limits allowed for a wood-burning / coal-burning stove in an even wind up to a violent storm (10 points).
- In any wind up to a hurricane, it does not create destructive loads on the pipe; Rather, he will break and fly away.
- Structurally simple.
- Slightly coking and clogging, easy to clean as part of the annual inspection and maintenance of the chimney.
- Due to imperfect aerodynamics, it is not very sensitive to the configuration of the umbrella. If the house is in the wind, the chimney-umbrella can be made tented (see the figure on the right), which simplifies the work and gives great opportunities for its design.
- With a 2-3 channel chimney (see below), it provides technical indicators (except for an increase in draft in calm weather) no worse than an aerodynamically perfect closed deflector.
The disadvantages of an imperfect chimney deflector are also quite serious:
- In calm weather, it reduces the initial draft the stronger, the more intensively the stove is heated. What is especially dangerous is the harsh quiet winter: the oven may choke and puff with fumes.
- In strong winds, it is able to create excess traction, which dramatically reduces the efficiency of compact channel stoves (for example, Dutch ones by 2.5-3.5 bricks) and fireplaces.
- In very strong / gusty winds, blowing into the pipe and the appearance of reverse thrust are not ruled out.
In general, an imperfect deflector-umbrella is the optimal chimney for a brick chimney of a properly built and well-maintained solid fuel house stove, operated in places where hurricanes and storms are extremely rare. There are ways to make the chimney-umbrella non-inflatable (see below), but they complicate it to the point that most often you have to choose an aerodynamically complete or perfect deflector.
Open
The aerodynamically open deflector does not reduce the initial thrust and in any wind keeps it within the limits permissible for furnaces and boilers for solid, liquid fuel and gas. It freezes quite strongly, cokes and litters, but is easily accessible for cleaning. Its disadvantages are:
- A streamlined body of revolution instead of a cap is a technologically complex assembly.
- The resulting vector of wind loads is such that the aerodynamically open deflector tends to collapse the pipe, while the umbrella tends to fly off it itself.
- In a wind stronger than 8 points, the lateral load on the pipe increases sharply and then grows according to a power law.
- It poorly extinguishes the dynamic load from gusts of wind, therefore, an open deflector cannot be placed on a brick pipe.
- Unsuitable for pyrolysis heat-generating devices: in a strong wind, it immediately sucks out pyrolysis gases and the furnace / boiler goes out.
- Little suitable for design: blotches and figures spoil the overall aerodynamics. The only place where decorations can be placed is the upper pole of the body of rotation and the lower edge of the diffuser (see below).
Note: At one time, we and the USA conducted experiments on the use of open deflectors on steam locomotives to increase efficiency at low speed. The result is deplorable - at the middle stroke, a tongue of flame was shown from the pipe, and none of them could accelerate to design speed.
In general, the aerodynamically open deflector is suitable for all types of heaters, except for pyrolysis ones. Provided that the deflector is inspected and cleaned at least once every 2 months, and the draft is checked before each firebox. It is very well suited for chimneys with insufficient draft and, especially, for sauna stoves: there have been no cases of burning in saunas due to an open deflector. Correctly heating a bathhouse is not an easy task, and checking the deflector will not noticeably complicate it.
Note: there are types of open deflectors that practically do not create side loads on the pipe and are suitable for fragile ceramic and glass chimneys, see fig. on right. However, dust, debris and soot accumulate in the open body of rotation, which spoils the aerodynamics of the device, and it is difficult to clean it. Therefore, manufacturers recommend such products only for gas boilers in places with not very dusty air.
Perfect
The advantages of an aerodynamically perfect closed deflector are partially indicated above. Besides:
- The aerodynamically perfect closed deflector provides draft stability in any external conditions, sufficient for any household stoves and boilers.
- It does not clog and does not freeze inside, and frost and dust from the outside have little effect on its operation.
- With minor modifications, it is suitable for use as both smoke and ventilation non-volatile, see below.
- It perfectly dampens the dynamic load from gusts of wind and is therefore suitable for installation on pipes made of any material.
- 2-3-4 chimneys can converge into one oval, triangular or square shell.
The disadvantages of a closed deflector are not so significant:
- The lateral force on the pipe in the wind up to a strong one gives more than the open one, but then with the strengthening of the wind it grows linearly, i.e. the pipe under the open deflector can always be reinforced or strengthened with braces.
- It is quite complicated structurally and technologically.
- Unsuitable for design: any blotches and figurines spoil the overall aerodynamics, and the coloring only enhances the utilitarian look of the deflector.
Technological tricks

The first rule - do not make chimneys like a gable roof or a cylinder vault (see the figure on the right). Such are suitable for their intended purpose only for mobile devices, when the axis of the umbrella can be arbitrarily oriented along the wind. Or as decorative on a false chimney. There is such a fashion in houses with biofireplaces. And in other cases, the thrust will walk according to the will of the elements up to the reverse.
Further, in order to make a deflector for the chimney with your own hands, you need to master some of the techniques of tin work. First of all - the connection of sheets in a fold (fold), or folding, see fig. below. Most often, the details of the deflectors are connected by a single lying fold, but for the umbrellas of imperfect deflectors, a double standing fold is sometimes used for decorative purposes.

Umbrella round:
Umbrella pyramidal (hipped) with a top in the center:
Umbrella elongated faceted:
Transition from a square to a circle (square inside a circle):
Very important for closed deflectors for small furnaces and boilers, see below.
Moving from circle to circle:
All these patterns can be built using only a ruler and a compass - a goat's leg (into which a pencil is inserted. Well, for those who are prone to in-depth study of the basics, before getting down to business, we give a selection of projections and formulas for accurate construction of sweeps of parts. Pay attention to elongated umbrellas: they are placed on 2-3 flue chimneys.Smoke channels, each of the minimum cross section allowed for a given heater, are placed in a row.The probability of blowing out 2 channels at once is extremely small, and all 3 are practically absent.
Here in fig. - data for constructing a truncated cone, which are more than enough in deflectors. The initial data are the height of the cone H, the radii of the top and bottom R1, R2. Pay also attention to the inset marked in red: this is a development of the same Grigorovich cone. Forming an angle (in this case 30 degrees) is found as φ = arcsin(H/r), where H is the height of the cone and r is the radius of the base. The radius R is defined similarly to L for a truncated cone, but H and r are squared. However, for those who have not forgotten the Pythagorean theorem, this is already clear.

After the cones, it will not be difficult to deal with the development of a single-center tent, see fig. Only one “but”: the allowance on the pattern example (on the right in the figure) is given per single riveting (for strength) of the soldered seam.

To connect metal up to 0.6 mm thick into a single fold, the allowance on one side must be taken 20 mm, and on the other 21 + 2 + 20 mm. If the metal is 0.6-1.5 mm, then 30 and 31.5 + 3 + 30 mm, respectively. But, generally speaking, a seam soldered and riveted at the edge is easier to make, it looks neater and resists corrosion better than a seam. If the roof is covered with iron, then, of course, riveting and soldering the sheets is simply technically impossible. But the deflector umbrella is another matter. Collect it on soldering with riveting as follows:
- Mark and cut out the scan;
- Drill holes for the rivet;
- The sides (wings) of the allowance are bent inward at 90 degrees;
- Rivet the edge;
- Through the wooden lining bars, the sides are compressed with clamps;
- Solder the seam.
In a similar way, a sweep is built and a hip tent (umbrella) of the chimney is assembled, see fig.

And finally the most intricate detail: a diffuser of an aerodynamically perfect closed deflector, it is also an adapter-skirt from a square to a circle (circle inside) for installing a chimney-umbrella on a brick pipe. The construction rules are not complicated (see the figure), but they require accuracy and accuracy in work.

Note: it is possible to additionally equalize the thrust of the open and imperfect deflectors on a round pipe, as well as to reduce the probability of blowing into the latter to an insignificant extent, if the diffuser / skirt generatrix is bent inward, see fig. But the work is so complicated - after assembling the adapter from circle to circle, it must be knocked out on a block of solid wood.

Constructions
Now let's see what is possible and how to make a deflector on the chimney yourself. The easiest way to start is with an imperfect umbrella deflector; its possibilities are much wider than it might seem, and it takes a little material and not very complicated work.
What can an umbrella do?
IN climatic conditions The RF deflector-umbrella on the chimney most often turns out to be enough, especially since the waste through his fault was also not noted. But - if the chimney-umbrella is made correctly. The most common mistake is to raise the cap too high on the racks. It will not help to return 100% of the original thrust, but the likelihood of blowing into the pipe increases dramatically.
The correct dimensions of the deflector-umbrella on the chimney are given on the left in fig. For pipes with a clearance of 100-200 mm, they decrease proportionally, and then the value of H1 increases 1.3 times for pipes 150-200 mm and 1.6 times for pipes 100-150 mm.

On the right in fig. the dimensions of the non-blown deflector-umbrella are given, but in the conditions of the Russian Federation it is better to put this one on the ventilation pipe of natural ventilation, because the grid is quickly overgrown with soot or flue gas condensate, and then dust adheres very well to it.
It also does not blow out, retains the original thrust and even slightly increases its two-story deflector-umbrella. The scheme of its action is given in pos. 1 next rice.:

For chimneys of low-power household stoves / boilers (up to approx. 40 kW), it can be simplified by making the floors the same, pos. 2. Each floor is a Grigorovich cone cut in half in height (see above); the distance between floors is equal to the height of the floor. The upper floor is gable, i.e. the cut top of the cone is closed with a blind lid. A 3-story umbrella for a ventilation pipe (pos. 3) is less likely to freeze over and clog less than an umbrella with a net. For pipes 130-200 mm, the dimensions change proportionally. And, finally, the Kiryushkin deflector (pos. 3; all cones - Grigorovich) is used mainly as an active-passive one - a low-power smoke exhauster for 12 V 100-200 mA is placed under a small cone.
TsAGI
Before taking on an aerodynamically open deflector, let's see how the most advanced TsAGI deflector is modified for a private house. Its original design was designed primarily for industrial facilities and then for apartment buildings.
Drawings of 3 variants of the TsAGI deflector are given in fig. The dimensions of the original industrial version are shown at the top right. Not completely, because it is designed for a strong pipe and certainly not for a sandwich chimney. For the chimney of a private household, the Khanzhenkov deflector operating in the same way is more suitable (on the left in the figure). It gives less horizontal wind load and can be inserted into the pipe as described below.

And on the right in Fig. - dimensions of the TsAGI ventilation deflector. It can be turned from passive into passive-active by painting the shell with black blacksmith's stalemate or other paint that well absorbs the thermal radiation of the earth and the objects surrounding the house. Fans in the vents of the house ventilation system must, of course, be left, but they will have to be turned on occasionally. How to make a TsAGI deflector with your own hands, see video
Video: do-it-yourself TsAGI deflector from metal tiles
Note: a ventilation deflector is not such a luxury as it might seem. When the wind blows into the ventilation, it is cold in the bathroom, and kitchen fumes and toilet smells are carried around the house. Flapper valves do not solve the problem - it slammed shut, it was stuffy in the bathroom and kitchen.
What is obtained from the cones
From deflectors open type most accessible, and, throughout the complex technical indicators, the Volpert-Grigorovich deflector is optimal for private households. Although, only they themselves knew how much it actually contained.
The canonical (original from TsAGI research) proportions of the Volpert-Grigorovich deflector are given in pos. 1 fig.:

On the left - a modification for an asbestos-cement pipe, which holds longitudinal loads well, but is fragile across. The height of the upper cone forming the body of rotation, doubled, gives a large lifting force, tending to rip the deflector off the pipe, but a tight collar will keep it in any wind. For pipes 130-180 mm inside, the dimensions change proportionally.
Note: one more option homemade deflector Volpert-Grigorovich, see next. video clip:
Video: Volpert Grigorovich deflector to increase draft in the furnace
weathercocks
Deflectors for pipes - weathercocks are also called weathercocks. Sometimes all chimneys in general are called that, but this is not true, because. weather vane by definition is a rotary device.
The deflector on the pipe - the weather vane can be made rotary self-orienting and rotating. The latter are also called turbo deflectors, and self-orienting smoke teeth, which is also not true. Smoke tooth - part of the chimney of an English fireplace. Weakness all vane deflectors - bearing. It is very easy to clog and soot, and the seals are subject to increased wear. Therefore, it is necessary to inspect the deflector-weather vane at least once every 2 months. But the deflector-weather vane itself is almost never overgrown with the main enemy of all fixed deflectors - icicles.

Pipe deflectors - weathercocks
A multi-blade deflector-weather vane (pos. 1 and 2 in the figure) gives stable draft in the wind up to 9-10 points with slight loads on the pipe, so it can be placed on sandwich, ceramic and glass chimneys. A single-blade deflector-weather vane in a strong wind heavily loads the pipe, so it must be strong and the house should be located in a place where the storm wind does not clear up. But a single-blade deflector-weather vane is easy to arrange in the form of a bird (pos. 3 and 4).
Turbo deflector (pos. 5) - remember and do not trust anyone - not smoke! It is ventilated or for gas boilers with electric ignition. The turbine is rotated both by the wind and by the air flow in the pipe, and a correctly made turbine, as in some types of wind engines, is self-winding: the weakest initial thrust or a slight breeze is enough for the turbine to spin and draw air, and it will stop only when the thrust and the wind will stop completely. In the ventilation system of a house with turbo deflectors, you have to turn on the fans in the vents, as they say, once a year, not every year. Unfortunately, the turbo deflector is easily drawn in by dust and debris from the air, so it should also be checked at least once every 2 months.
The technical properties of the turbo deflector are the same as those of the multi-bladed self-orienting deflector, but it loads the pipe even less. It is quite possible to make a turbo deflector with your own hands, see the video below.
Video: do-it-yourself turbo deflector
How to install a deflector
It is possible to put a deflector on the pipe only if the chimney is made exactly according to the rules of SNiP 41-01-2003, pos. 1 in fig. below. It is highly desirable that the pipe on which the deflector will be installed is located on the leeward slope of the roof relative to the direction of the prevailing winds. For reference: leeward means opposite to the direction the wind is blowing from.

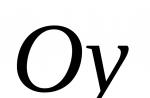
It is certainly possible to attach a deflector to an otter (upper extension of a brick pipe) only if the pipe was originally designed for the deflector. If not, or in the pipe laying there is at least slightest violations, you need to attach the deflector to it as shown in pos. 2 pic:
- A strong sleeve (glass; square-to-circle adapter) C is inserted into the pipe;
- The glasses are fixed with blind anchors A at a level not higher than the bottom row of the otter masonry and with embedded pins Z into the grooves at the mouth of the pipe. Anchors and mortgages are bricked up with cement-sand mortar from M200;
- A diffuser / skirt D with a cornice (shine) K is put on the glass. Mandatory for a deflector of any scheme, incl. imperfect!
- The diffuser is attached only to the masonry with small anchor bolts. Not with self-tapping screws in plastic dowels! The skirt / diffuser is not attached to the glass!
- On the collar (upper edge) skirts / diffuser firmly fix the working structure of the deflector.
Only with this method of fastening, the deflector will never loosen an old and / or brick pipe not designed for it.
home acting force, underlying the operation of the chimney and exhaust ventilation - draft. This is a physical phenomenon based on the pressure difference between the top and bottom of the pipe. With the correct calculation of its length and diameter, the system will always have good traction, which brings out the products of combustion of solid fuel, and also provides fresh air.
But in practice, the chimney / ventilation does not always work efficiently enough. To improve performance and enhance traction, additional devices are used, including deflectors.
This is a galvanized or stainless steel metal cap that fits over the top of a chimney or roof vent.
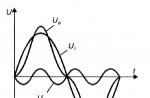
The operation of the deflector is based on the physical law of Bernoulli, according to which, when the lumen of the exhaust pipe narrows, the speed of the air flow increases. With an increase in the flow rate, the exhaust gases are rarefied, creating an area low pressure which generates traction. According to calculations, installing a deflector on the chimney increases efficiency heating system by 20-25%.
The deflector consists of several elements - a metal pipe, which is installed on the chimney, a diffuser, an outer ring and a protective element (umbrella).
Important! The design of the deflector is quite simple, and if necessary, you can make it yourself. This requires a sheet of galvanized or stainless steel and fasteners to connect the components together. But you can buy prefabricated structures according to the diameter and location of the chimney.
What is a deflector for?
The main purpose of the deflector is to strengthen and stabilize the draft in the chimney or exhaust ventilation unit.
Due to the rarefaction of air inside the device, there is always a sufficiently strong draft that brings smoke, ash, carbon dioxide, carbon monoxide and others out. by-products fuel combustion.
In addition to creating draft, the deflector prevents the return of exhaust gases down the chimney into the room. Sometimes the wind on the roof is so strong that the natural draft of the chimney cannot overcome the wind resistance, due to which the exhaust is kept in the pipe or enters the room.
This brilliant invention was invented not long ago. Namely, at the time when cars began to appear, in which the width of the body in the area of \u200b\u200bthe doors was greater than the width of the roof body. This constructiveness made it possible to improve the aerodynamic properties of the vehicle, as well as its stability on a straight road and in corners. But rather, for some drivers, minor difficulties arose. Firstly, in the summer the sun often shone on the side of the salon, since being even in top point, its light calmly fell into the eyes of the drivers. In addition, in rainy weather it was unrealistic to open the window to, for example, have a smoke, as the drops instantly wet the door card and the hand of the driver or passenger.
This was the turning point on the way to the invention of deflectors. Perhaps that is why in the common people they are called "visors", because they, like roof visors, protect from the direct rays of the sun, as well as from rain.

But it is also worth saying that today there are not only deflectors for windows, but also for the hood, roof and other parts of the car. That is, there are several main positive aspects of installing them on a car:
- protective function. When wondering how to glue windshields on a car, you protect yourself from stones flying from under other cars, debris, dust, flying insects and other things. This also includes protection from the rain.
- aesthetic function. It's no secret that the visors on the windows, on the hood or on the roof look very impressive, giving your loved one vehicle new tones and colors.
- Additional layer of tint. By installing deflectors side windows, you can further protect the interior and passengers from direct sunlight.
- In addition to all of the above, it is worth adding that the deflectors are made in such a way as to complement the car with aerodynamic properties.
How to glue the windshields on the car?
Many people make the mistake of thinking that you can glue deflectors without reading the instructions. But few people know that on the market today you can find visors for a variety of ways to attach them. But the main ones are adhesive-based deflectors, which, with the help of a special double-sided adhesive tape, can cling tightly to any car. And so, let's specifically discuss how to stick windshields on a car with your own hands? All work should be divided into several stages.

Stage one: ground preparation
At this stage, you need to clean the attachment site as much as possible. To do this, you must first wash the car so that dust and dirt from neighboring areas of the body do not settle on right place in progress. For this, a simple soapy solution and a rag are quite suitable.
After that, the surface must be degreased. For this purpose, medical alcohol or solvent is excellent. Just do not overdo it so as not to remove the native paint. This is a very important nuance, since degreasing will give the desired adhesive strength to the adhesive tape on the visors.
Stage two: learning how to properly glue windshields on a car

And so, you have come to the main stage of the whole work. First of all, carefully unpack the kit. On expensive models there are protective films that are best removed after installation, as there is a possibility of damaging them in the process.
On the contact side there will be a tape that closes the double tape. All you need to do is peel it off and stick it in place. But it would be more correct, without tearing off this tape, to select the optimal level of the deflector, and mark with a pencil. And only after that, peel off the tape from the adhesive tape.

Plug-in version on glass
There are not only adhesive options on the market, but also plug-in ones. They are designed to be attached to rubber bands on car doors. Many are unhappy with these deflectors, since initially in factories car doors are not calculated for such manipulations, therefore the foreign body becomes redundant, looks bad and even breaks.
But the installation process itself is quite simple. It is enough just to lower the windows and insert the deflectors under the sealing tape. Be careful when closing windows for the first time so as not to break anything.
The question of how to glue windshields on a car requires some knowledge. There are no identical models and similar situations, each installation should be treated as the first one in order to carry out the process with the highest quality, and so that the deflectors serve the car owner for a long time and reliably!
Vladimir Maksimov
1. The main purpose of the hood deflector.
2. Does your car need a hood deflector or not?
3. Deflectors manufacturers EGR and SIM. Two types of deflectors.
4. First type. Attaching the deflector to the inner surface of the hood. Installation order.
5. The second type. Attaching the deflector to the outer surface of the hood. Installation order.
The main purpose of the hood deflector.
The hood deflector is a specially shaped plastic plate that is installed on the front of the hood and is designed to protect the hood and windshield from scratches and chips.
The hood deflector is sometimes called a "fly swatter" by drivers. But the deflector itself does not serve as a shield against the ingress of pebbles, insects and various small debris, since the surface area of \u200b\u200bthis plate is small, although it happens that the pebbles fall on the deflector and ricochet over the roof of the car.
The main purpose of the deflector is to change the movement of the oncoming air flow, which can carry debris and small pebbles flying out from under the wheels of the cars in front.
The shape of the deflector is designed in such a way that the air flow does not flow around the hood and glass, but thanks to the upward curved rear edge of the deflector, it rises and flows around the car along the roof. So the hood and Windshield remain intact and clean.
Comment: the deflector performs its protective function best at a vehicle speed of more than 70 km / h.
In order to prevent dirt from accumulating under the deflector, it is attached to the hood so that a gap of up to 10 millimeters remains between the hood and the deflector, and even if dirt gets under the deflector, it can be easily removed with water during a normal car wash.
So after all - do you need or not need a hood deflector for your car?
If you value the appearance and health of your car, but you often have to operate it on long-distance highways, where there is a lot of small debris (sand, pebbles, etc.), then the hood deflector is a necessary accessory that will protect the paintwork of the hood and windshield from dirt, scratches, chips and cracks.
Some drivers do not want to install a hood deflector, as they are afraid that the appearance of the car will suffer, and in the attachment points, the paintwork of the hood itself will suffer. All fears are in vain and unfounded. The fastenings of modern deflectors from reputable manufacturers are such that the paintwork of the car will not be damaged during the installation and operation of the hood deflectors.
ABOUT appearance: today the shape of the deflectors is developed taking into account not only aerodynamic, but also decorative functions. Deflectors are made of durable acrylic glass in various colors, including colorless transparent. Therefore, you can choose a hood deflector that matches the color of the car, and if there is no suitable one, then install a transparent one.

So, you have decided to protect your car and install a hood deflector.
The question arises: which manufacturer's deflector to choose to protect your car?
Hood deflectors manufacturers EGR and SIM. Two types of deflectors.
In our store we offer hood deflectors from two manufacturers - these are (Australia) and (Russia). The deflectors of these manufacturers are made of acrylic glass. High Quality, they are quite easy to install in car services and on their own. When developing deflectors, the shape of the car's hood and aerodynamic characteristics are taken into account. To install the deflector, no additional holes are drilled, and the fasteners do not damage the paintwork of the hood.
EGR (Australia) is one of the first manufacturers of plexiglass accessories for cars and today it supplies its accessories to assembly lines the most famous American, Korean and European automobile factories.
SIM is a manufacturing company in the city of Barnaul, which develops and manufactures acrylic glass car accessories for domestic and foreign cars.
How to install the hood deflector from these manufacturers yourself?
Installing the EGR and SIM hood deflectors is very easy. Depending on the shape of the hood and the brand of the car, there are two types of hood deflectors. They differ in shape and method of attachment to the hood.

First type. Attaching the deflector to the inner surface of the hood.
The shape of this deflector is such that the deflector is not superimposed on top and is attached different ways, but is put on the lower edge of the hood and fixed with clips and self-tapping screws with reverse side hood at the points of attachment of the sealing rubber tape. Such a deflector is easy to recognize - it has curved ears with rectangular holes in the lower part, and there are no holes on the upper part of the deflector. When installing this type of deflector, no additional holes are drilled, nothing is glued, and standard holes for attaching sealing rubber to the hood are used to fix the deflector. Since the hood deflectors are designed and manufactured strictly for a specific car model, the deflector mounting holes will exactly match the standard mounting holes for the rubber sealing tape.
This hood deflector is easy to install, operate and also easy to remove without damage. paintwork hood.
The delivery set of the first type deflector includes the deflector itself, clips for fastening, self-tapping screws and installation instructions with pictures.

The installation procedure for the first type deflector (fastening under the hood).
1) Before installation, the car must be washed - the hood and all attachment points under the hood must be clean and dry. Manufacturers recommend installing in warm and dry weather or in a warm room at a temperature of +20 to +40 degrees Celsius.
2) Prepare the tools - for installation, you need
a) Flat-bladed screwdriver to remove the clips securing the sealing rubber band.
b) Phillips screwdriver for tightening the screws that secure the deflector to the hood.
3) Open the hood and attach the deflector to it. Determine the places on the inside of the hood, regular holes where the deflector will be attached. The deflector can then be set aside.
4) The sealing rubber band is attached to the hood with clips, which must be removed at the previously determined places. This is done with a flat screwdriver.
5) We take out the clips from the deflector delivery kit and mount them in turn into the vacant holes on the inside of the hood under the rubber band. 
6) We pick up the deflector itself and insert it onto the hood, bending the sealing rubber band in the places where the clips were installed.
7) In the ears of the deflector, which are actually inserted under the hood, there are rectangular holes where you need to fix the installed clips so that they do not spin when twisting.
8) Having determined that the deflector is installed correctly, we fasten the screws through the holes in the sealing tape to the installed clips, thus attaching the rubber sealing tape and the deflector to the hood. 
9) Close the hood, check the installation again. The deflector must not come into contact with the outer surface of the hood. The distance between them can reach 10 mm.
For greater clarity, you can watch the video instruction by searching for it on the Internet. We offer you, in our opinion, the most understandable.
Second type. Attaching the deflector to the outer surface of the hood.
The shape of this deflector is such that it is superimposed on top of the hood and screwed to the mounting clips installed on the hood. In such a deflector at the bottom you will see several holes, but there are no folding ears. When installing this type of deflector, no additional holes are drilled either, but to protect the hood paintwork from abrasion, they are glued under the mounting clips protective film. In some models, the clips in the center of the deflector have been replaced with plastic fasteners that are glued to the hood. The paintwork of the hood during installation and operation of the deflector remains intact, but when removing it, you will have to work hard to remove traces of adhesive tape.
The second type of deflector is supplied with the deflector itself, mounting clips (they can be of several sizes in one set), alcohol cleaning wipes, protective adhesive tape and, if provided, plastic fasteners.

The installation procedure for the hood deflector of the second type (Mounting to the outer surface of the hood).
1. Before installation, the car must be washed - the hood with the outer and inside must be clean and dry. The recommended installation temperature is from +20 to +40 degrees Celsius.
2. Prepare the tool - for installation, you need a Phillips screwdriver to tighten the self-tapping screws to fix the deflector on the hood.
3. Open the hood and attach the deflector to it. Determine the places on the outside of the hood where the deflector will be attached. They should line up with the holes in the deflector. The deflector can then be set aside.
4. Wipe the predetermined deflector attachment points with an alcohol wipe.
5. Seal the cleaned areas with adhesive tape from the kit. It is necessary to seal with tape starting from the outer surface of the hood, moving to the inner surface. This operation is necessary to protect the hood paintwork from abrasion.
6. In accordance with the instructions, install the mounting clips on the sealed places. Be careful - they can be of different heights, so correct installation is especially important.
7. Pick up the deflector, attach it to the hood and check that the mounting clips are installed correctly. The holes in the deflector must match the holes in the clips.
8. If the clips are positioned correctly, then tighten the screws, thus connecting the deflector and the mounting clips. 
9. For some car models, plastic fasteners are provided for fastening in the central part of the deflector instead of holes. Attaching them is also easy. One part of the fastener is already glued to the inner surface of the deflector. Determine the place on the hood where the second part of the fastener should be, wipe this place with an alcohol wipe and glue the second part of the fastener (with some pressure for better adhesion). Tighten the screws on the deflector, where there are mounting clips, and in the center press the deflector at the place of the fasteners to secure.
10. Close the hood, check the installation again. The deflector must not come into contact with the unprotected surface of the hood. The distance between them can reach 10 mm - this is necessary so that dirt does not accumulate under the deflector.
On next video all these steps for installing the deflector are shown very clearly.
There are deflectors that combine the features of the first and second types. Such deflectors are attached to the inner and outer surface of the hood.

As you can see, the installation of the EGR and SIM hood deflector is very simple and can easily be done by yourself at home.
Scientific development of the Central Aerohydrodynamic Institute, the ventilation deflector is a device that uses natural weather at the core of functioning. It is used for both ventilation and heating (in the chimney).
TsAGI deflector: principle of operation
simple laws physics are used when the system starts up. She dissects air flow, forming a zone of low pressure above the pipe. Since the atmospheric pressure is higher, the air is rapidly drawn out. Natural traction is formed.
The design of the device includes:
- Exhaust shaft - a branch pipe attached to the passage node;
- The cone that goes from the nozzle to the top of the deflector is a diffuser;
- Outer part - shell;
- Upper cone that protects the system from precipitation;

Manufacturing features
Our company manufactures a deflector for ventilation from high-quality galvanized steel, the thickness of which can be from 0.5 mm. up to 1.0 mm. In this case, the diameter of the round deflector can be from 100 mm. up to 1250 mm. Mounting can be:
- Nipple;
- Flanged (these are bolts, nuts, washers).
An additional nuance is that this device has standard design parameters that cannot be changed. In order to create the maximum thrust for each section size, the optimal height and diameter of the outer sleeve were calculated. Therefore, it is not advisable to change the accepted figures for greater aesthetics or convenience.
You just need to choose the diameter of the section, based on the measurements of the outlet channel and the volume of the air mass that needs to be removed and order a deflector for the ventilation pipe, starting from these figures. This means that you should specify connection size and fastener type.
Installation
When installing the device, you should choose a place on the roof that is blown by the wind, in whatever direction it blows. At the same time, a shadow should not fall on it (from a tree, another building, etc.). The height of the mounting point should be 1.5-2 meters above the roof level.
The device is designed to extract air masses of a non-aggressive nature.
Order and buy a ventilation deflector in Moscow at the most favorable cost possible in our company. As a manufacturer, we can guarantee the quality and durability of our products.
| Round deflector | Diameter d, mm |
Height H*, mm | Diameter D*, mm | Cylinder height h*, mm | Weight*, kg |
|
100 | 195 | 200 | 120 | 1,60 |
| 125 | 210 | 250 | 150 | 2,20 | |
| 140 | 240 | 280 | 170 | 2,60 | |
| 160 | 250 | 320 | 190 | 3,20 | |
| 180 | 290 | 360 | 215 | 3,80 | |
| 200 | 320 | 400 | 240 | 4,80 | |
| 250 | 390 | 500 | 285 | 6,40 | |
| 280 | 420 | 560 | 320 | 7,50 | |
| 315 | 480 | 630 | 370 | 10,50 | |
| 355 | 520 | 710 | 426 | 17,20 | |
| 400 | 600 | 750 | 450 | 15,50 | |
| 450 | 670 | 900 | 540 | 30,10 | |
| 500 | 800 | 1000 | 575 | 27,70 | |
| 560 | 900 | 1120 | 670 | 51,70 | |
| 630 | 960 | 1200 | 685 | 41,70 | |
| 710 | 1020 | 1320 | 790 | 67,00 | |
| 800 | 1160 | 1550 | 930 | 90,00 | |
| 900 | 1220 | 1750 | 980 | 111,30 | |
| 1000 | 1600 | 2020 | 1230 | 153,60 | |
| *dimensions (not connecting) may differ slightly from the table | |||||


| In addition to deflectors, you can also buy: | |||
 |
 |
 |
|