Anything made of plastic can be soldered. Most often, the repair of plastic parts begins with it, and only then putty, primer and paint are applied. You need to be careful to find all the cracks in the plastic and repair it efficiently.
How to solder a bumper with improvised tools?
Even a bumper that has burst into two halves can be repaired. Moreover, you will need only the most elementary for this: a soldering iron, a mesh (graph paper), scissors, a flat screwdriver and a little patience.
In order to solder the bumper with high quality, it is advisable to remove it from the car and sequentially perform the following steps:
- Turn on the soldering iron (100-watt) so that it heats up to the maximum temperature;
- Put the bumper on a rack or table;
- Connect the broken parts as evenly as possible and solder the plastic on the front side;
- Cut the mesh with scissors (choose the size depending on the damage, you can, for example, cut pieces of 10x10 mm or 10x5 mm);
- Turn the plastic part over (previously it is advisable to lay a soft cloth on the rack so as not to scratch the paint);
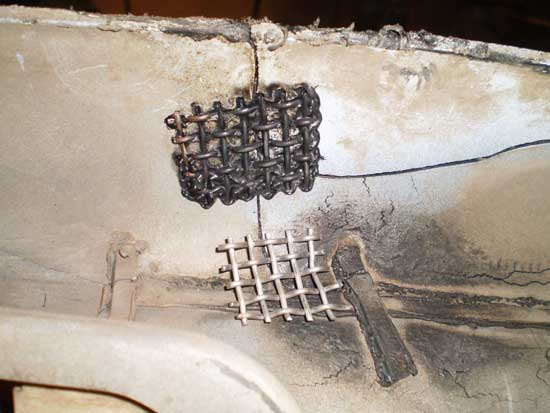
- Attach the mesh to the plastic and heat it with a soldering iron, then drown it with a screwdriver;
- If the damage to the bumper is significant, then solder the front part with a mesh. This will further strengthen the seam;
- Cut off the burrs left after soldering with a blade.
By following the steps in this order, it is easy to solder plastic parts most, and they can be from any car. After soldering, the seam should be leveled with a special putty for plastic, then fill it with primer and.
Soldering should be taken quite seriously, because it is the foundation for future materials. It would be nice not only to know how to solder the bumper yourself, but to be able to do it in practice!
Overview of technologies for soldering plastic bumpers
In addition to the above, there are at least three other ways to repair plastic bumpers. Let's consider each of them separately and in parallel learn about their advantages and disadvantages. Some of the methods are very simple, and some even pull on the title of technological.
The first way is the fastest. It does not require reinforcement at all, while the seam is quite strong. It is suitable primarily for soldering cracks. With a heated soldering iron, you need to make notches, while holding the tip at an angle of 45 °. You need to deepen it by about half the thickness of the plastic.
Having created a small section of the comb, we draw the tip of the soldering iron along the crack until it is smoothed out. Thus, the edges of the crack are soldered together. A similar operation should be performed from the inside of the bumper.
On a note
Before soldering cracks, it is necessary to clean them from paint by 1 cm on each side. This can be done most quickly with an abrasive cylinder or disc.
After the plastic has cooled, the seams should be sanded with sandpaper No. 120-240. If shells remain after that, then they can be melted with the same plastic using a soldering iron. However, you can simply apply a microfiber fiberglass putty.
If the bumper plastic is thin, then you can try to fasten the cracks with stapler brackets. They need to be fused into plastic by pressing with a soldering iron, and the legs should be bent back with groans. The step between the brackets is small - 3-5 mm. The result is something like a surgical suture.
After all the brackets are installed, you need to check if some of them are sticking out, and if necessary, drown them deeper with a heated soldering iron. Further, the seam is processed with sandpaper and puttied. Then come the standard priming and painting procedures.
The next method is sewing with copper wire, which, like brackets, is fused into the body of the bumper with a soldering iron. First, miniature holes must be drilled on both sides of the crack with a thin drill, after which a transformer wire is threaded through them and “laced” is performed. Next comes the turn of the soldering iron, and then they act according to the established scenario - grinding, puttying, priming and painting.
The most technologically advanced method is soldering plastic with solder. As the latter, a strip from a similar bumper or special rods from the same grade of plastic is used. The essence of the method is to connect the edges of the plastic by fusing an additional amount of material.
In order to solder the bumper with plastic solder, it is necessary, first of all, to get the appropriate type of rods. Their markings must match the bumper markings, which are usually embossed with reverse side.
On a note
Plastic solder can be made from an old bumper. To do this, cut strips 1 cm wide from its flat sections with metal scissors.
First you need to fix cracks or patches with small plastic pieces. They are welded using a technical hair dryer with a narrow nozzle. Further, along the course of the crack, a groove is selected, tapering downwards. In depth, this groove should reach half the thickness of the plastic - no more, no less.
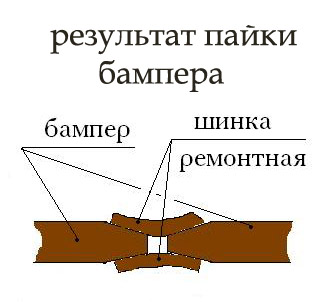
Now, with the help of a hair dryer, a trihedral rod is fused into the groove. Exactly the same groove filled with plastic solder is made on the other side. The result is a strong joint, the structural strength of which can exceed that of a whole plastic.
Interesting video: bumper repair with brackets
The method of car repair and the selection of material depends on the nature and extent of the defect.
cracks
With medium-strength impacts, not only damage to the paint layer occurs, but also plastic breaks. The intensity of operation and the quality of the material can lead to a rapid expansion of the crack in the bumper. Repair plastic bumper with such defects is produced by heat welding or soldering. The main difficulty lies in the correct combination of the two damaged parts. The parts are soldered with a polymer that has a comparable viscosity and melting temperature, similar to the material of a car bumper.scratches
Only the surface was damaged, without violating the integrity of the entire structure. Depending on the depth of the defect, various methods of elimination are used. If the scratch is not deep, the usual painting is carried out at home, with forced drying with a low-temperature lamp (up to 60 ° C). Deep grooves are pre-primed and sanded.dents
This type of deformation comes from mechanical or thermal effects on the car's bumper. Plastic deformation can be in compression or tension. Large defects are accompanied by damage to the paint layer. Repair of plastic bumpers is carried out by heating with a special high-temperature technical dryer. After softening the material, it is given its original shape.Sequencing
Do-it-yourself bumper repair can be divided into several stages:- Restoring integrity. Are used various methods: gluing, welding or soldering.
- Applying putty to the seams, smoothing and grinding the surface.
heating method
Used tools and materials:
- high temperature hair dryer;
- grinder with polishing and grinding wheels;
- degreasing liquid;
- putty;
- paints and varnishes.
Work production technology
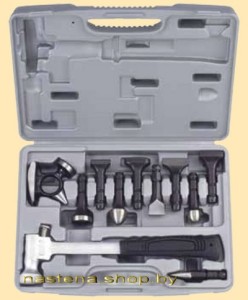 A set of figured gaskets for straightening bumpers
 - The assembly is removed, the repair of the plastic bumper begins with a complete cleaning of this part of the car. All fasteners and foreign objects are removed.
- The boundaries of the defective zone are outlined. damaged working surface degreased and dried.
- The defect is heated from the inside of the part to prevent the paint layer from burning out. The process of softening the polymer should be carried out as quickly as possible so as not to affect neighboring areas.
- After the material acquires elasticity, alignment is performed. Blows should not be applied to the bumper of the car, but to a special figured gasket with rounded edges.
- After giving the site its original shape, it should be cleaned front side working area from dried paint. Grinding is done with a small approach to undamaged areas of the coating, so that the edges do not stand out.
Sizing
If the material for the car bumper is a heat-resistant polymer or fiberglass, then the rear bumper is repaired by gluing with fiberglass.Tools and materials:
- grinder with polishing and grinding wheel;
- fiberglass;
- adhesive compositions based on epoxy or polyester resin;
- degreasing liquid;
- putty.
Repair technology
- The work surface is cleaned.
- When fiberglass breaks at the ends of the cracks, threads are formed that prevent the parts to be glued tightly from being connected tightly, they must be removed.
- The docked elements are fixed on the front side with a special high-strength adhesive tape.
- From the inside, an epoxy resin or polyester adhesive mixture is applied to the previously cleaned and degreased surface. The crack and adjacent 2-5 cm surfaces are processed directly.
- A layer of fiberglass is impregnated with the same composition and applied to the damaged area. The number of layers of fabric should correspond to the thickness of the car bumper in the damaged area.
- After the patch has hardened, remove the adhesive tape from the front side. Along the edge of the fault, the grinder makes a V-shaped file, the flat edge of the groove should converge into the middle of the patch. The resulting recess is filled with impregnated fiberglass in the same way, so as to protrude slightly above the surface.
- After hardening, grinding, cleaning, degreasing and painting are carried out.
Welding and soldering
The most common repair method. There are many special repair kits on the market. The bumper repair kit may include:- special electrodes;
- staples with short legs or mesh for reinforcement;
- strips and plates of fusible polymer.
Use of reinforcement
This method of repair at home is used if there are branched cracks. The edges are tightly reduced and fixed from the outside. The soldering iron should have a tip 1.5–2 cm wide. translational movements we press the sting into the plastic of the car bumper, placing it perpendicular to the crack. Soldering is carried out along the entire length of the damage, the seams are made with a minimum indentation of up to 0.5 cm, metal staples or pieces of mesh are fused into the plastic every 2 cm. The resulting tubercles and recesses are smeared over the surface. The same procedure is performed from the outside, excluding reinforcement. 
Application of plastic electrodes
Repairing a plastic bumper with your own hands using special electrodes is even easier than soldering. This will require a special crevice nozzle on building hair dryer. The edges of the cracks are preliminarily cut in a conical shape. A plastic electrode is placed on top. The flow of hot air is directed to the place of its connection with the treated surface. Video03.09.2016 5242
The bumper is the protection of the car body, so in the event of an accident, this part is the first to take the hit. But even if you have never been in an accident on the road, over time, small scratches or even chips appear on the surface, which leads to the need to repair the bumper.
The bumper on our roads is a consumable
Types of bumper defects
Before starting bumper repair at home, it is necessary to assess the extent of damage to the part, so defects are classified into three groups:
- Single small scratches or "spider line" defects. To remove them, you do not need to remove the part and use soldering tools.
- Dents and chips. Materials will be required to eliminate defects.
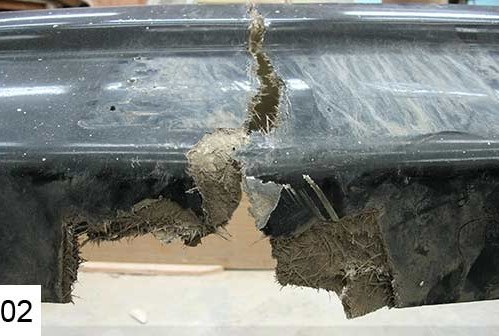
- Split detail. This is the worst damage, to fix it you will need to collect the fragments and solder the bumper.
Contact the workshop, and they will fix the problem. But it is much cheaper and faster to repair the bumper yourself.
Often, during the completion of the repair, it is necessary to paint rear bumper. Painting is carried out in two ways:
- It is necessary to completely paint the part (in this case, you can’t do without dismantling the bumper);
- Only surface areas are required (dismantling is not necessary).
Based on this knowledge, we proceed to direct repair.

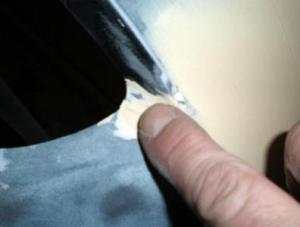
One of the defects is a crack and a piece of plastic fell out.
How to Repair: Removing Minor Scratches and More
Having determined the presence of defects, we proceed to repair.
To repair the bumper yourself you will need:
- (P600, P1000, P2000);
- Car shampoo, microfiber;
- Polish, protective varnish;
- Wax pencil or marker to match the color of the car.
We start with a thorough washing of the car or damaged part. We dry the surface, after which we proceed to the treatment of scratches with P600 sandpaper. After finishing sanding (5 minutes is enough), wipe the surface with microfiber and start sanding the part again, but with P1000 sandpaper, then repeat the process, treating the surface with P2000 paper. Wash the cover and let dry.
Now we have a choice: paint the bumper with a specially selected paint or remove defects with a marker. But if there is no need to repaint the bumper, it is better to simply process the scratches with a pencil, and then proceed to polishing.
Apply polish to the fabric and rub it into the surface. For this use polishing machine or an ordinary drill with special nozzles. takes 5-7 minutes. It remains to cover the bumper with a protective varnish. As a result, you will get a shiny, updated surface, and the repair and local painting of the bumper is completed.
Repair of chips and dents
Far from always car owners are lucky on the road, especially in winter period Therefore, the appearance of dents on the surface of a car is not uncommon. It is not necessary to contact the service, even if this is the first time you encounter such a problem. You can repair the bumper yourself.
Chips are not a terrible problem if you know how to deal with it. For work, we need the same set as for removing scratches and one more detail - a varnish to match the color of the surface of the car.
Rinse the surface, dry and sand. Now you need to tint the bumper at the place of chips, for this we carefully apply varnish (it is sold in vials with a brush, like from nail polish) on damaged places, give time to dry. After a while, apply a few more layers until the chip becomes invisible. Do not be afraid if the varnish goes beyond the edges of the chip. After finishing painting, sand the surface until it becomes smooth. Repair and local painting of the bumper takes 2-2.5 hours.
But with dents, the situation is more complicated. a bumper with deep damage will take more time and money, but do not despair. To start repairing the rear, you need to determine the depth of the dent.
If the damage is shallow, you will need a magnet and a soft cloth. Without dismantling the part, cover the defect with a cloth and attach a magnet. Lead them in the dent in a circular motion. With small defects, the metal returns to its place under the action of a magnet. Painting in this case is not required.
With which the magnet cannot cope, you will need to buy a suction cup in hot melt adhesive. Choose a tool based on the size of the defect. Degrease the surface and place the suction cup on the dent. Give it time to stick. Start slowly pulling out the suction cup and the dent along with it, do not rush, otherwise a crack will appear. After repair, remove the suction cup and clean the surface with a solvent.
Serious dents are more difficult to deal with, but do not assume that repairing bumpers with deep damage impossible.
First you need to dismantle the bumper to access the defect from the inside. Take a hammer and put a rubber nozzle on it. Gently tap the dent from the edge towards the center. Repeat the process until the surface is completely level. You may need to paint the bumper at home.
Thus, dents and chips are repaired.
Split bumper repair
Since the bumper serves to protect the body, it is not surprising that sometimes the surface splits at the slightest collision.
IN best case this is the appearance of a crack, at worst, a split into several parts. For repairs, we need a soldering iron for bumpers.
- We dismantle the bumper for the convenience of welding. It is necessary to glue the plastic bumper with adhesive tape. Collect the broken pieces, place each in its place and glue the outside with tape.
- Clean the inside of the bumper and degrease.
- Take a soldering iron for plastic bumpers and, by adjusting the power, connect the pieces. Try to keep the seam even along the entire length. To prevent cracks from reappearing, it is necessary to solder staples from a stapler for furniture. Choose them so that they match in length. Instead of staples, a mesh for soldering a bumper is suitable.
- Protect seams from corrosion by applying special remedy and melted plastic.
As you can see, gluing a bumper with your own hands is not so difficult. But having completed the repair, let's move on to painting.
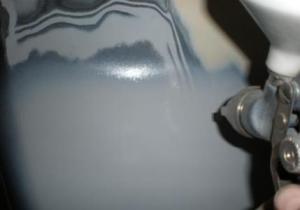
How to paint a bumper with your own hands?
Do-it-yourself painting of a plastic bumper begins with a thorough grinding of the surface, especially if you have soldered individual parts before. Need to achieve complete withdrawal soil. Do not try to remove minor flaws - this will only ruin the surface.
Now you need putty. With it, we align everything small chips and pits. It is necessary to putty in several layers, giving each time for complete drying. After drying the last layer, we level the surface with a grinder.
The next stage is primer treatment. And only after that we move on to the question - how to paint a plastic bumper?
Acrylic primer should be applied in a thin layer and dried for a day.
One of intricate details- Choosing the right paint color. Contact the service station, where they will professionally pick up paint for you, but this is an expensive procedure. It is easier and more economical to try the purchased paint on an unnecessary part.
Having chosen the paint, let's get to work. Degrease the surface for local staining at home. To paint the new bumper evenly, you need to apply the paintwork with a spray gun in several layers.
Finally, the part is varnished and polished with a protective mixture. Thus, do-it-yourself bumper repairs are carried out at home.

Types of defects and how to avoid them
During painting, unpleasant defects often occur that spoil the appearance of the car.
- When choosing a paint, select the appropriate solvent, otherwise flakes will appear on the coating.
- Too liquid or vice versa, thick paint will lead to streaks. The same defect will appear if the paint is sprayed at a low temperature and unacceptably close to the surface to be painted. The defect is eliminated with sandpaper.
- By spraying the paint too far from the vehicle, you risk getting a grainy finish. But even if you followed the spraying rules, and the defect still appeared, it is possible that dust settled on the surface during painting. To avoid this, carry out repairs indoors.
- The main protection of the bumper with your own hands is coating with special polishes and varnish. But if the old paintwork and rust are not completely removed, the varnish will peel off and the coating will have to be re-treated.
- reminiscent of an orange peel) is due to improperly diluted paint, non-observance of the interval between drying layers and operation at temperatures above the permissible. Ideal conditions for work - the temperature is not higher than 20 degrees.
- Uneven use of primer will cause the polish to curl when the top coat dries while the bottom remains wet.
These are the main problems that may appear after staining is completed. Follow these tips and the repair will take place without nasty defects.
Repair cost
After reviewing the stages of bumper repair, the question arises of the cost of the procedures. Compare prices for self-painting and the same procedure in the service.
- Local staining without the cost of paint - 600-700 rubles;
- The price of painting the front bumper is 1200-1500 rubles with paint from a car service;
- Full coloring without paint from 1500 rubles;
- Full coloring with paint from a car service from 3000 rubles.
WATCH THE VIDEO INSTRUCTIONS
Approximately with such prices you will encounter when contacting the service. How much does self-coloring cost?
If you have never repaired a car yourself, then consider the cost of tools, materials and products required for painting. For example, the price of an airbrush is from 1000 to 7000 rubles, and sandpaper costs from 80 rubles per piece. Price additional materials you can find out at the auto shop.
Well, whether to carry out repairs on your own or contact the service station is up to you, do not forget to take care of yours in time - and then the iron "beast" will only please you.
Most often, minor accidents occur, as a result of which bumpers are most often damaged. In doing so, they may suffer damage such as scratches or cracks. Repair of damage of the latter type is carried out using soldering technology. In this article, do-it-yourself soldering of car bumpers is considered.
Sequence of work
Bumper repair includes several stages. The following is the sequence of their execution:
- First of all, you need to dismantle the damaged bumper from the car.
- Next, proceed to preparatory work. They consist in cleaning the part by washing, degreasing, removing paintwork material from the damaged area with a grinder with a P240 wheel.
- If the bumper is split into several fragments, they are combined into the original integral form, joining the edges.
- After that I start soldering. The seams are tightened with staples, placing them at intervals of 1 - 2 cm at a depth of no more than half the thickness of the bumper.
- Then, the plastic layer is deposited with a soldering iron tip to prevent corrosion.
- After cooling, the seams are cleaned with a grinder with a P240 wheel, blown compressed air. To remove lint and hairs, use a tool such as a hair dryer.
- Then putty is applied to the surface of the bumper with a rubber spatula. In hard-to-reach places, application is carried out with a finger or any suitable object. After the material has hardened, the surface is ground with a machine with a P120 wheel.
- Next, the entire part is covered with primer in two layers with an interval between them of 15 minutes.
- A protective layer is applied on top light color using a dark base under it. After drying, the surface is ground with a P800 wheel. The remaining stains are removed with nitro putty. Then wet grout the surface of the bumper with a P1000 circle using grinding equipment.
- After drying, the surface is wiped with napkins and degreased. Paint is applied over the primer in 2-3 layers.
- Finally, the bumper surface is also varnished in 2 - 3 layers.
Tools
To solder the bumper with your own hands, you will need equipment and Consumables. The main ones are epoxy glue and fiberglass, instead of which a metal mesh with 1 mm cells can be used. In this case, the strength of the seam will be significantly higher than when using fiberglass.
Plastic electrodes are also required for soldering. They can be purchased as a set, which includes several options that differ in thickness and material composition.
It should be borne in mind that the required thickness of the electrode is determined by the location of the seam. Thus, the thicker elements of the "B" and "C" series are suitable for filling deep cavities, and for fixing the reinforced mesh and for welding the stitch on the outer part of the bumper, flat gaskets of the "A" series are used.
The heating equipment for soldering the bumper can be represented by a soldering iron. Instead, you can use a tool such as a technical hair dryer. It should be noted that for professional repair V service centers and workshops use other equipment, namely a thermal gun.
Do-it-yourself bumper repair also requires abrasive materials. For rough grinding, sandpaper with a grit of 80 is used, and finishing is carried out with a material with a grit of 180-200. Staples to strengthen the seams are used from a construction stapler. However, you must first shorten the "legs".
Retraction features
First, repairs, including preparation and soldering, are carried out from the inside of the bumper, and then from the outside. Pulling is the first stage of work. It is especially relevant in the case of a serious violation of the structure, since it is very difficult to solder such damage on your own.
First of all, you need to cut the metal fasteners with construction scissors or a metal sheet, depending on the characteristics of the damage. Then you need to make holes for the bolts with a drill. Screws are inserted into them and fastened with nuts on the back of the bumper. If the repair is done by hand for the first time, fasteners should be installed from the inside. It is desirable to do the tightening from the back side in order to preserve the aesthetic properties and shape of the part. The plate is installed and fixed outside the gap. The screws should be as far away from it as possible along the course of the bolt in the fastener. The drill is installed in the far part of the plate. If you install the bolts correctly, the unevenness will be restored without violating the geometry of the bumper.
Next, you need to drown the top of the bolt into the bumper. To do this, around its head, it is necessary to make a hole with a drill of a smaller diameter, observing the angle of the cap. In this case, it is required to create a rim of not too small depth, but also not to drill through the bumper, as this will cause the bolt to fly out. It must enter the recess with some effort, otherwise the crack will open again.
The bolts are installed from the outside, and from the inside - the fastening web, and the nuts are tightened. Remember that if you tighten them too much, the bumper may crack, and if they are too loose, the connection will disengage over time.
If the crack is located in the curved part of the bumper, the plate must be shaped accordingly. Exist various ways, but in any case, the plate should be kept at the same time from the back of the bumper under the defect. In this case, when tightening the bolts, the crack will converge.
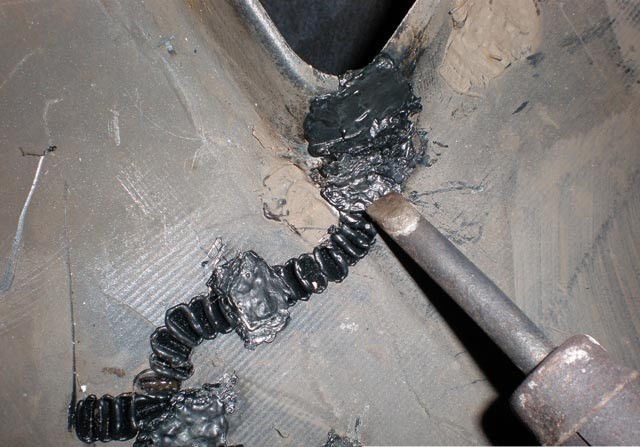
Soldering Features
The first stage of soldering begins with the fact that the electrodes are laid along the seam on the inside of the bumper. After that, one of its ends is fixed and soldering starts from it. The principle of operation is that the thermal energy of the heating device is directed to the electrode.
If the equipment used is a soldering iron, it is simply pressed against the electrode, and the hair dryer is directed at it. Under the influence of high temperature, the electrode melts and fills the recess of the scar. The heat source, that is, the heat flow that creates a hair dryer, or a soldering iron tip is moved from the periphery to the middle line of the stitches perpendicular to the seam. As the work progresses, the free end of the electrode decreases, melting. During the second pass, the side zones are captured.
Along the passage of the entire area, the bubbling cooling material is smoothed with a blunt object. For this, a wooden handle of any tool is quite suitable. Smoothing the material in hard-to-reach places of the bumper is carried out with fingers.
It should be taken into account that the cooling time of the soldering area is about 3-5 minutes, and the seam hardens after a few hours.
Seams reinforce metal gasket for reinforcement. The mesh is well suited for a plastic bumper. In order for the mesh to be well fixed to the part, you need to pass the bumper plastic through its cells. That is, the device must be pressed into it to a depth of at least 1 mm. For heating, use a hair dryer or a soldering iron. After the material has cooled, its excess is removed by grinding.
In the case of do-it-yourself bumper soldering for the first time, it is recommended to do it from the outside, since soldering from the inside requires great skills. In case of illiterate work from the inside, cracking of the primer and violation of the structure of the part is possible. In this case, the repair is carried out without electrodes. Using a hair dryer or soldering iron, heat the edges of the crack. Then the defect is soldered.
If the bumper has changed shape as a result of an accident, its repair is also possible. To do this, it is heated using a hair dryer, and the geometry is aligned with heat-resistant gloves. It should be noted that the equipment in question, such as a hairdryer or a soldering iron, when used according to the described technology, is suitable for restoring only plastic bumpers. And for plastic bumpers this method repair is optimal. This is because repair by gluing is ineffective in this situation.
Adhesives, like most resins, including epoxy, are not suitable for bonding thick plastic. Using a plastic mesh will also not help create a reliable connection.
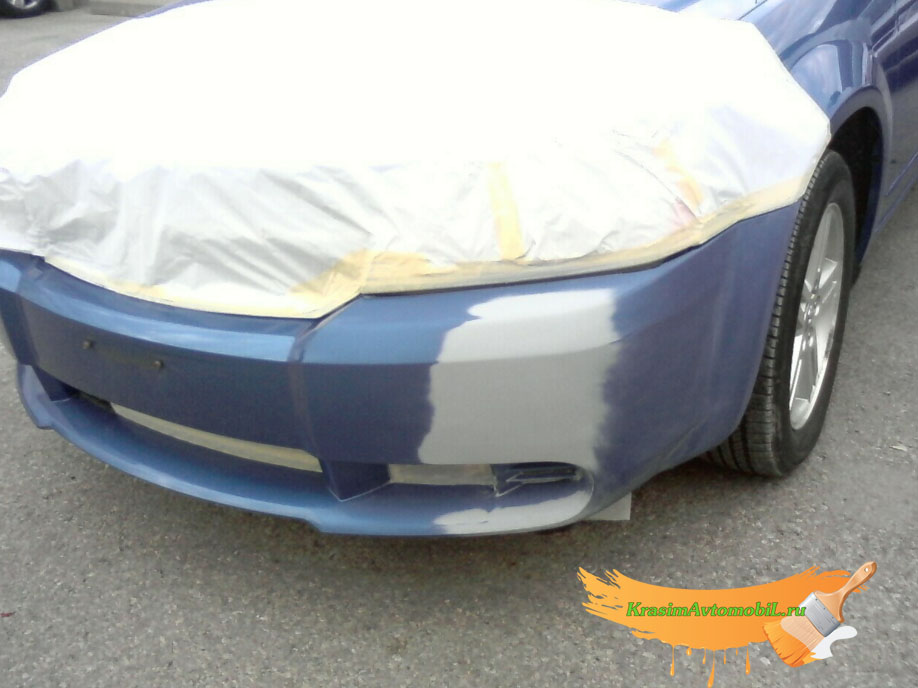
No matter how carefully we try to drive a car, nevertheless, unfortunately, due to our inattention and sluggishness or by the will of fate, there are mechanical damage body parts car. Most often it is a bumper, front or rear. It is worth noting that in most cases a plastic bumper (made of polyurethane or polypropylene) can be restored. If an accident occurs, try, no matter how difficult it is morally and at the moment it does not seem pointless to you, to collect all the details of the bumper, in the future, it will successful pledge bumper repairs. Well, we will try to tell you step by step about how and with what help to solder, paint the plastic bumper of your car.
|
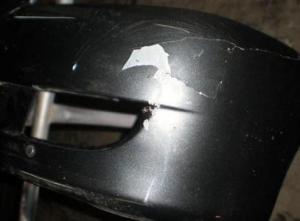
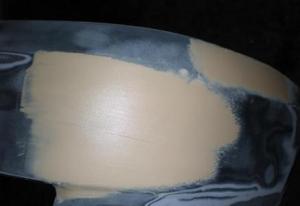
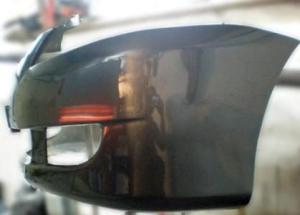
1 The appearance of the bumper to be repaired (soldered), after an ordinary accident |
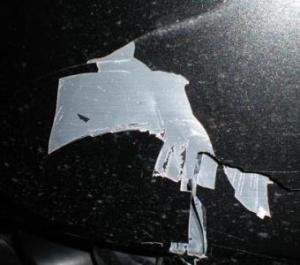
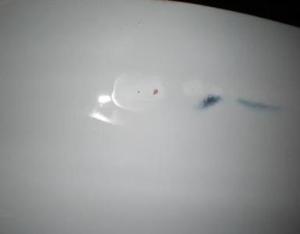
2 Chips of paintwork, soil, slight stretching of plastic on the body of the car bumper |
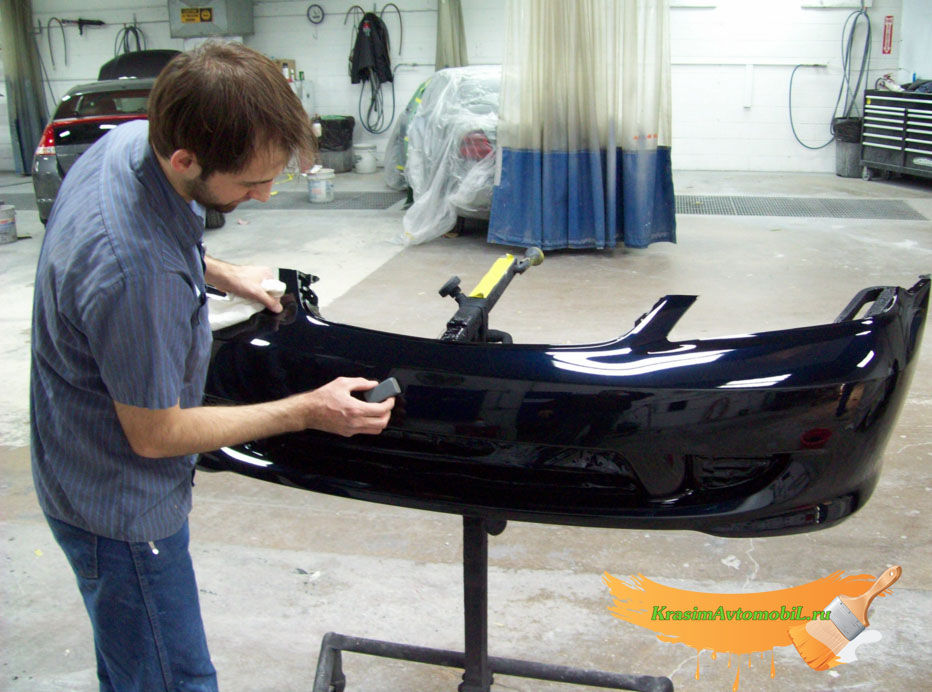
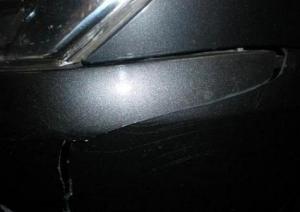 3 Cracks usually come from the bumper mounting elements. The bumper must be removed from the car, this will make it easy to base the bumper in a position convenient for repair - soldering and painting. The bumper must be washed and cleaned of dirt. To solder the bumper plastic, an electric soldering iron or a heated blowtorch can be used. Using burners will require more skill and skill, since plastic can “lead” under the influence of temperatures, if you do not have experience in this matter, then your option is still a soldering iron. |
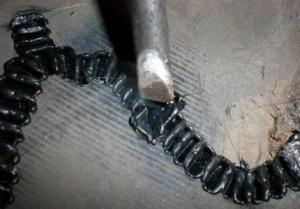
 4 We begin to solder the bumper parts from the inside, this will allow us to understand what properties the material has without significant damage to appearance. Develop certain skills in handling the material. Spike try to carry out evenly along the entire length of the seam. |
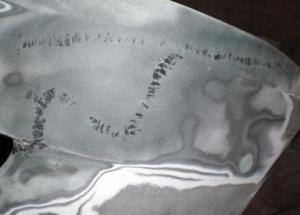
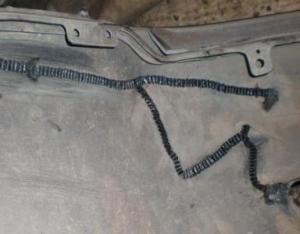 5 As a result, after soldering the cracked bumper seam, it should look something like this. |
 6 Branching cracks are also fused. It is important to fuse all cracks, since dead-end cracks are a source of increased material stress and are potentially dangerous for crack propagation. |
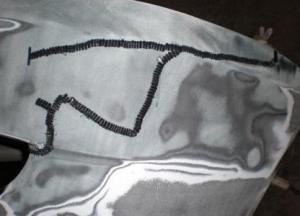
 7 For reliability, we fasten the seam with staples from the stapler, every 2 cm along the entire length of the crack. It is advisable to pre-shorten the legs of the staples so that they do not pierce the bumper and do not go to the front side, it is also convenient to use tweezers when soldering the staples. |
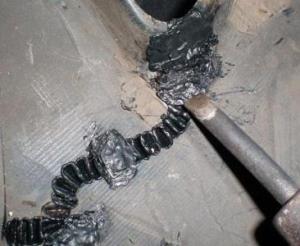 8 As a result, we embed the brackets into the body of the bumper, using the heated plastic material of the bumper around them |
|
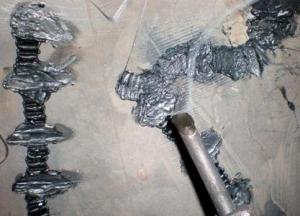
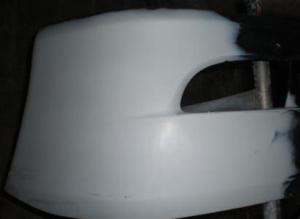
 10 On the front side, the bumper after soldering should restore its shape |
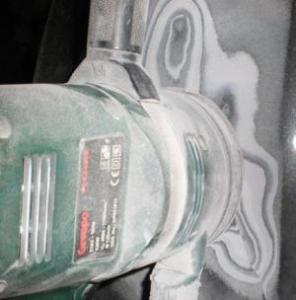 11 We process the front side with a grinder. |
 12 To remove paint, primer, and also to level the surface forms of the bumper, it is recommended to use a wheel with an abrasive grit P 240 |
 13 We start soldering the front surface. All by analogy with internal ones, with the exception of brackets. |
 14 Align the outer cracks by melting the plastic into the recesses of the cracks |
 15 We grind the seams of cracks with the same circle P 240 |
 16 It should look something like this. Do not try to achieve a perfectly flat surface (no carpets), as this can thin the bumper so much that its shape changes. |
 17 A lot of static dust will remain on the surface. We blow off dust and pieces of plastic from the bumper with air compressor or wash off with a damp cloth. |
 18 We burn out with a building hair dryer, fuse the plastic hairs on the surface of the bumper. Don't overdo it with the hair dryer to avoid overheating the plastic. |
 19 For the final leveling after bumper packs, we use putty, a must for plastic! |
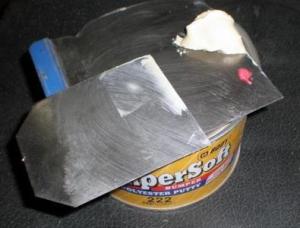
 20 Apply to problem areas putty layer. Pay attention to the layer thickness, it should be minimal. |
 21 Small steps are allowed after applying putty. After they smooth out the sanding. typewriter. |
 22 As a result, the bumper repair will continue after the applied putty has hardened. See bank for recommendations. |
 23 In places where putty cannot be applied with a spatula, use an improvised tool. At least my own fingers. |
24 After hardening, we process the surface, all with the same grinder and the same circle P 240 |
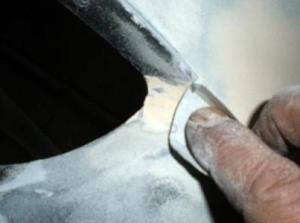 25 Hard to reach places repaired bumper is processed with sandpaper. |
 26 In the end, it should turn out like this |
| 27 Blow dust off the surface of the bumper |
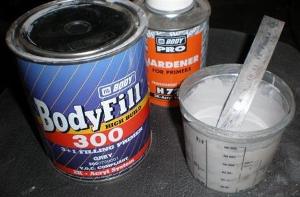 28 We dilute the primer for applying to the bumper, according to the manufacturer's recommendations. |
 29 Priming in 2 layers |
 30 With 15 minutes waiting time between primers |
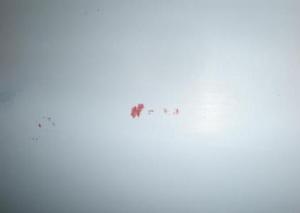
 31 Apply development. Developing is actually a contrast paint or there are specialized aerosols or dry powders. |
 32 As a result of polishing, the development is then erased, and in the recesses, that is, irregularities, it remains and thus indicates problematic places and the need for improvement. |
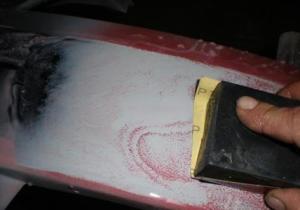 33 We sand the bumper after developing to a layer of soil |
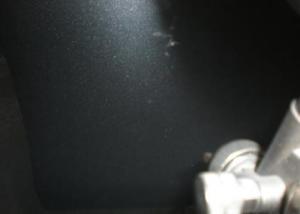
 34 It is necessary to walk on all surfaces of the primed bumper |
 35 This is where pits and scratches will appear |
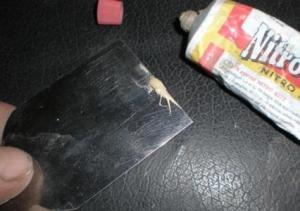 36 For putty on the ground we use nitro putty |
 37 Degrease the surface and apply a thin layer. Looking forward to complete drying. |
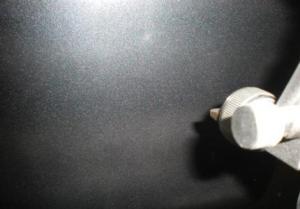
 38 Polishing and rendering the exterior bumper shapes |
|
39 The view will be like this |
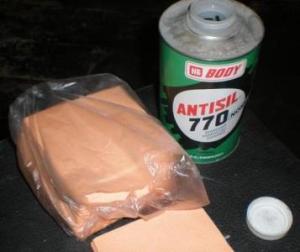 40 We cover the ground of the repaired bumper with the so-called base |
 37 It is the link between the paint and the primer. The base solvent, as it were, melts the transition at the molecular level. |
 38 That is, it must be applied to the paint-primer transition. The base also clogs the soil and its ability to adsorb paint. |
 37 After that we apply paint |
 38 Lacquering |
 37 Polishing the bumper |
 38 Getting the final result |

It is worth noting that for someone who dares to start repairing a plastic bumper by do-it-yourself soldering, which in this case not a simple method of painting was used, that is, the whole part was not painted, but a section with a transition was painted. This method is called local painting. This bumper painting technology is more complex, but less expensive for the master. A more detailed article on painting can be viewed on our website "Painting a car body"
If you are inexperienced, then it is preferable to paint the entire bumper when repairing. That is, first peel off the whole thing, and then paint the whole thing. It is also necessary to say that light shades are much more difficult to "traceless" color selection and transition during coloring.
We hope that this material will help you repair your bumper by soldering the bumper plastic using a conventional soldering iron, primer, paint and your own hands.
In our article, we could not help but talk about another alternative to repairing a plastic bumper, especially since it is even better than the one above in some ways. First of all, the fact that in this technique it is possible to obtain a more uniform and monolithic composition of plastic in the repair area of the bumper, which ultimately affects the strength of the repaired bumper. It is also worth saying that this way used in many repair shops, which also suggests that it has every right to exist, and, accordingly, to ensure that our readers learn about it.
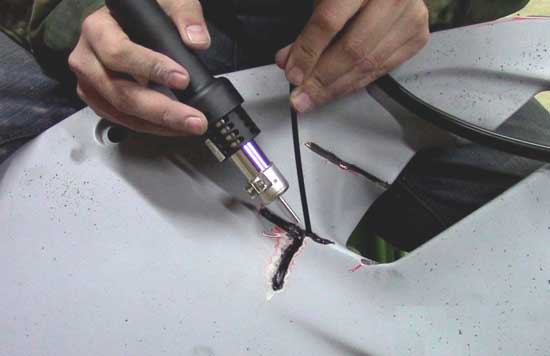
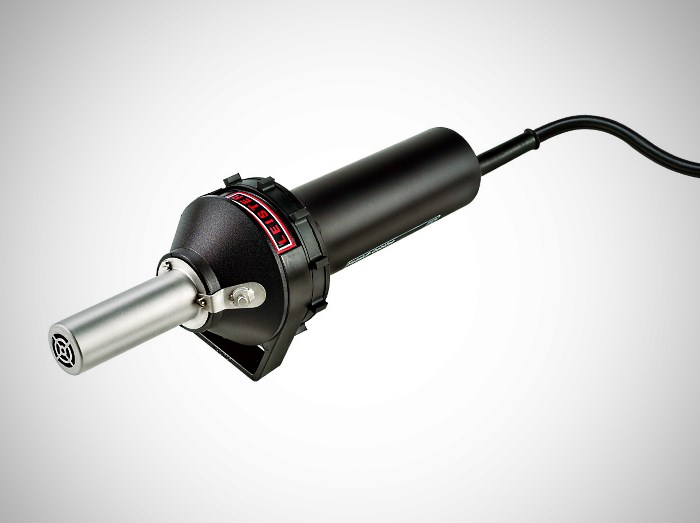
For this method, a building hair dryer is used, which is capable of delivering a stream of air from high temperature, as well as a nozzle for it. The nozzle can be slotted elongated or in the form of a round section, it does not matter, it all depends on your preferences. You can make a hair dryer nozzle yourself or buy it at a hardware store.
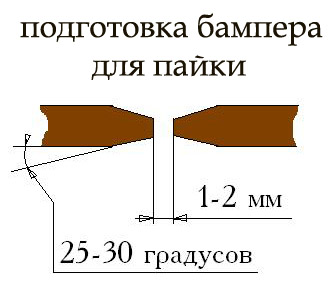
First of all, you need to prepare the bumper for soldering. To do this, using a knife or cutter, you need to select the bumper surfaces suitable for the crack, as shown in the photo.
Next, you need to base the parts of the bumper. A plastic electrode can be used as a fastening bar, but the use of an old donor bumper is even preferable in some ways. From it you can make a shank of the desired length and width.
It should also be noted here that there are many plastic alloys that simply do not fit together. If someone thinks that German plastic is soldered with German, and Japanese, respectively, with Japanese, then one can only laugh about it. Yes, of course, the probability of soldering different types there is plastic, but the strength will not be the same. First of all, you should pay attention to the markings that you can find on inside bumper. (example>pp< или>pp+ep< или что-то в таком духе). В итоге, именно эта маркировка должна совпадать с пластиком от бампера донора, что будет гарантировать high score when soldering the bumper with your own hands.
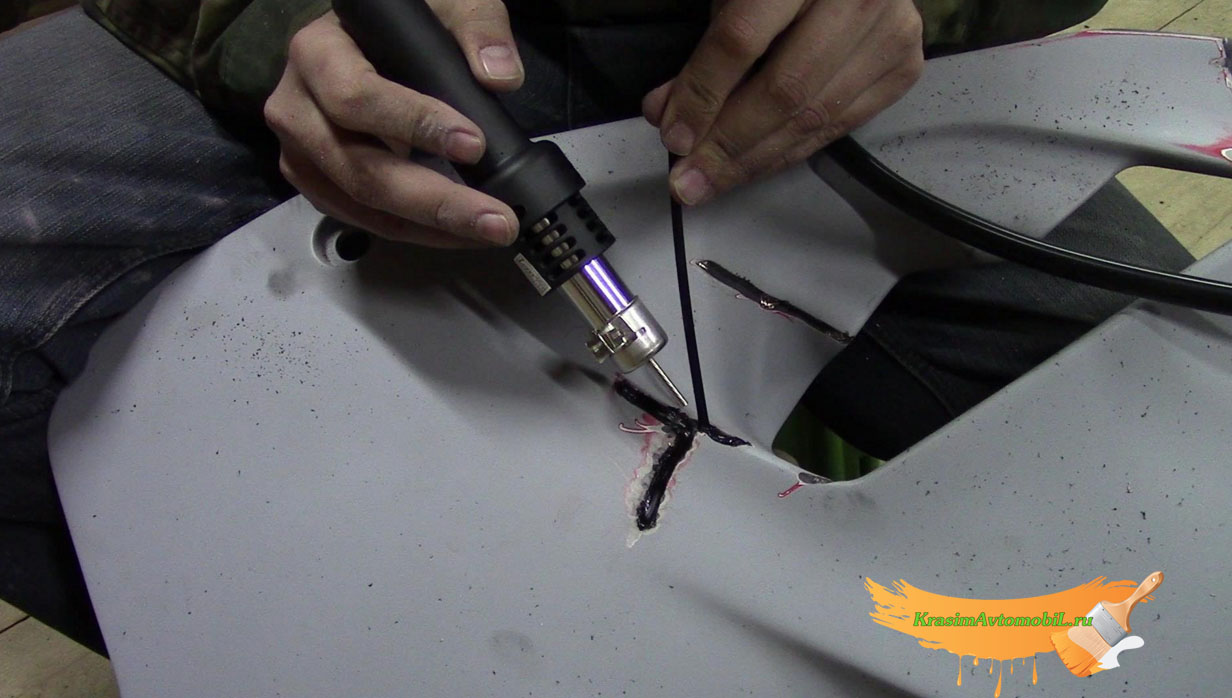
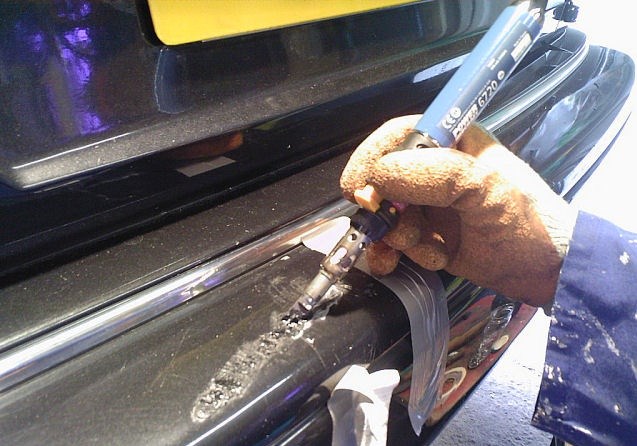
So, we heat up the hair dryer, take a plastic shank and set it perpendicularly at the beginning of the crack. We heat the plastic so that it begins to bend freely and apply further along the crack.
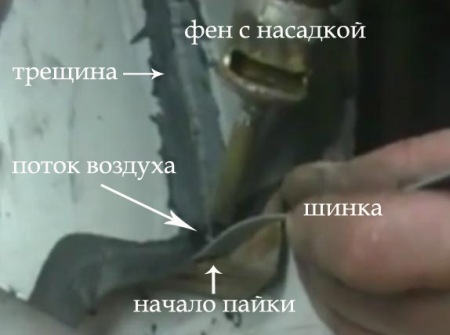
The process has begun .... So we continue, preferably without stopping until the end of the crack. At the end of the crack, cut off the remaining shank with scissors. We do the same with the other side of the crack.

As a result, after hardening of the shank, we get a very strong connection. Let's just say that in some cases such a connection is more durable than the heat-affected solder zone of the bumper plastic. That is, it is easier to tear near than along the resulting seam.
After soldering, cosmetics begin, which we basically already talked about earlier. The seam is cleaned and removed, primed, painted, varnished, polished. In more detail, you can see the information about this starting from paragraph 19 of the chapter above.


