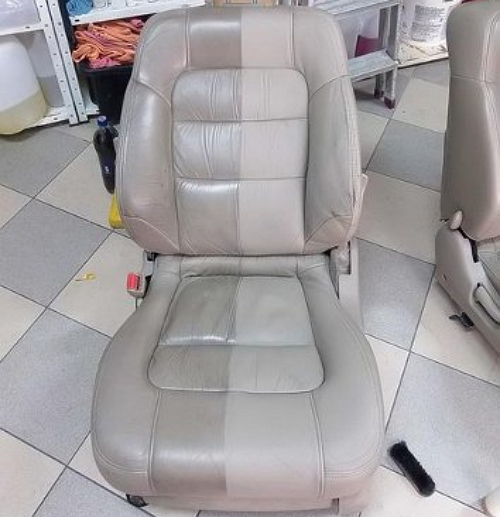
Leather upholstery is considered the most practical of all existing. But even on it various cracks, scuffs and other damage sometimes appear.
What you need to repair a leather interior
No one, perhaps, will argue with the fact that it is not only beautiful, but also practical. He has a high potential for endurance, is able to endure any hardships of life, and steadfastly endure them. But sooner or later, there is a limit to such persistence. good care will extend ideal condition leather interior for more than one year, since not ordinary leather for tailoring is used for upholstery, but special kind, which is able to withstand temperature extremes, is not afraid of a humid environment and welcomes special cleaning products. But, despite such strength and wear resistance of the skin for car showroom there is one enemy. These are the rays of the sun. Under the influence of ultraviolet and high heat upholstery, over time, the integrity of the skin of the seats is violated, and various damages appear. Improper maintenance and use can also be a provoking factor. household chemicals for washing, instead of special means.
Pull the thread to the end and make the next line opposite this point. Press down on the needle with right side and with the thread coming out the wrong side of the skin, tighten the seam tightly and pin the new thread tightly to the old one. This knot is also on the bottom and is now invisible, you can cut off any extra length of the original thread from the sofa so that it does not come back to be visible and now return the needle right side leather, and then sew your next stitch across from the split coming from the right side and from the wrong side, so that the thread always rises and exits on the right side.
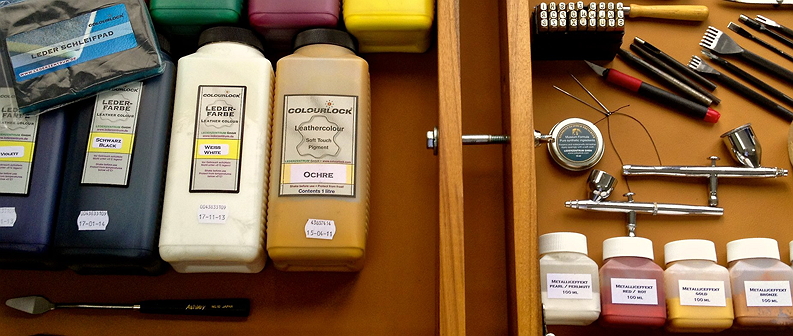
Certainly, qualified assistance they will have it in a car repair shop, but it is really possible to fix minor damage with your own hands. To do this, you only need the following tools:
1. Special paint on the skin of the corresponding color.
2. Medical tweezers.
3. Reinforcing mesh.
4. Cooling pads.
5. Teflon gasket.
6. Airbrush and some other tools and fixtures for repairs.
Split seams are actually a little easier to sew on because they have holes already made for you in the leather! Thus, pushing the needle through is much easier than making new holes, for example, when repairing leather. When you've finished mending the seam, it's best to sew a couple of stitches past the end of the broken thread, tie the original thread onto the new thread, and then tie the new thread on the underside of the leather so it can't be seen.
Start your stitch at one end of the tear, about 5 cm from the raw and torn edge, pushing the needle from the underside so that the thread comes out of the top or right side of the leather. Pull the thread so that it is all the way up and straight, with no residual thread or unevenness in the remaining thread, and that you can only see the knot at the bottom, with no visible thread visible. Now you will make your first stitch across from the first, and on the other side of the tears, starting at the top or right, directly opposite the first stitch.
Restoration of leather car upholstery
To restore the upholstery leather seats was successful, it is recommended to follow next instruction consisting of several steps:
The skin is really thick and it is quite difficult to push this needle through the skin, so be aware that this will require some effort. Be sure to put your thimbles on at least your index fingers, and I like to keep small pliers on hand to help pull the needle out once you reach the other side. Keep your stitches small and tight, always about 5cm wide for each stitch, and make sure each stitch is exactly opposite the last one. After each stitch, take a moment to make sure the thread is pulled out and even that there is no slack or bubbles in the thread pool on one stitch or the other.
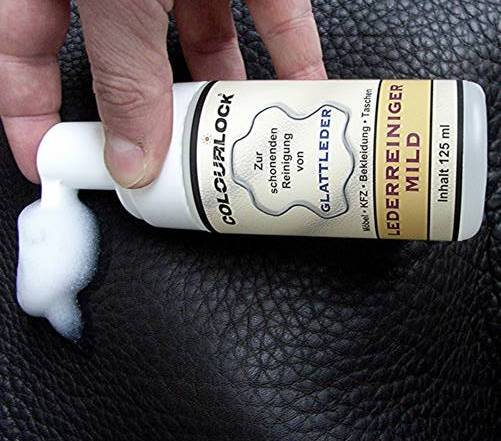
First step. Degrease and free from dirt the entire area around the resulting hole with a tool intended for this. It is freely available at any car market or outlet that sells auto products and accessories for cars. This step is necessary for the subsequent uniform application of paint, it will eliminate possible stains and facilitate the very procedure for applying the coloring pigment.
Storing each stitch pulled tight by the sleeve ensures that the end result is a tight and even seam with minimal gaps. Once you've worked your way down the length of the tear, it's time to bite in and hide the knot! Once the final stitches are complete and you are sure the stitch is nice and tight, with no loose threads or stray thread, it's time to tie it. Press the needle so that it moves from the right side in the middle of the seam. You can tie the thread just as you would for any other sewing project, and for yourself, as long as the knot is as low and deep in the crack as possible!
Second step. Each tear is the owner of protruding edges and tatters. It is necessary to rid her of such possession by means of scissors or a sharp knife.
Third step. To get a guaranteed high-quality result, you need to rid the area of the treated area of gross defects with a thin emery cloth.
Now press the needle back down to crack open and go up the stitch made on the other side, opposite from where you started. Go down and up like a regular stitch, but bring the needle as far back into the crack as you can reach it. Tightly tie it as close to the skin as possible. The trained thread from which you tied it should pull the end of the thread back into the fold, and now you have an invisible knot!
Large and unsightly tears can disappear with a few quick stitches. You can repair your skin too, but never be afraid, even if you think the job is too much, there are leather professionals who can quickly and easily make those tears and tears a thing of the past! When leather furniture suffers cut or scratch damage, it's actually possible to repair it yourself and save money. expensive trip professional as this route is only necessary in case of serious damage.
Fourth step. Now you need to put a reinforcing mesh inside the hole. After that, pour it liquid composition which is an imitation of genuine leather. The reinforcing mesh is needed to prevent liquid from getting inside the seat, and it will also prevent it from falling out.
There are many opportunities to make yourself in terms of repairing leather seats with items you already have around the house. There are even kits. However, you usually get best results using other methods specific to damaging your couch.
Leather furniture gets scratched different reasons and may look unsightly. In most cases, repairing scratches is easy. Some people recommend rubbing orange oil or olive oil on the scratch and its surroundings. Regardless of which substance you choose, rubbing it in with a buffing motion with a damp cloth has the effect of conditioning the skin, which is always a good practice.
Fifth step. A special powder must be applied to the surface of the same reinforcing mesh, which, through the use of a thermal iron, turns into glue.
Sixth step. Working surface covered with a Teflon gasket, it is also carried out several times with a thermal iron for gluing. To quickly reduce the temperature, cooling bags are used, which also smooth the surface. After complete cooling, the gasket is removed.
Another method is to rub a neutral color into the area and follow up with vegetable oil. This method is especially useful when the leather is dark brown, as scratches can be masked by very careful application of dark brown furniture.
Certain skins vary depending on how they are treated and how sensitive they are. If you're concerned or know that your leather furniture is thin enough to cause harm with anything harsher, try using only warm water and a damp cloth to get started. You can also experience an inconspicuous stain so that the oils or polish don't do more harm than good. When you are repairing a cut in the leather, use the circular leather seat repair patch. This makes it easier to slide under the incision.

Seventh step. Next, you need to remove the form, fill it with liquid bigel, and re-heat treat using a Teflon gasket and ironing. Cooling bags are also used to further lower the temperature. The composition cools down, acquiring appearance and skin texture.
Complete degreasing of leather seats
In addition, your job will be made even easier if you use a heat-activated adhesive coated patch on one side. If you are using a low cut leather repair compound, you should smooth it over the cut and use a heat gun on it to cure it. Be sure to keep the heat remote at a sufficient distance from the area you are repairing. This allows the joint to be cured without shrinking or burning the skin.
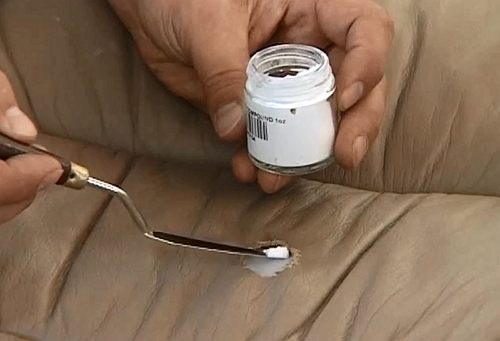
To finish, you need to pick up a skin dye. Apply it over a small amount of gripping base and mix in the dye. Then repair the rest of the place so that it becomes invisible. Both the glue and dyes in question can be dirty or even harmful depending on the substances included by the manufacturer. Always wear protective gloves simply for handling substances and consult product warning labels for any other safety procedures you should follow. Interesting little abrasions.
Eighth step. Direct staining. It is carried out after complete cooling of the treated area using an airbrush and a color scheme identical to the color of the upholstery.
That's all. Do-it-yourself leather upholstery repair done. In this way, holes, cracks. The smallest damage in the form of scuffs and cracks can be easily updated thanks to only one painting special tool for the skin.
If they are indeed small enough, they represent no real damage. Under the right circumstances, they can be removed without any indication that they were there to begin with. Continuous sanding only the area of abrasion until the entire area is smooth. Please note that in some cases, especially large abrasions, the area may need to be repainted.
Restoration of the leather interior of the car
Because the damage is subtle and sandpaper doesn't offer much real resistance in your hands anyway, it can be hard to just feel or intuitively know when it's time to stop sanding. Sand slowly and stop several times to check the surface of the skin frequently. . Over time, leather furniture will crack if it doesn't. The only way to do complete renovation for chapped skin - replace the affected area. However, you can make a cosmetic difference yourself by thoroughly cleaning the leather and recoloring it.
At the moment, most car manufacturers around the world necessarily offer models of cars, the interior upholstery of which is made of leather.
They do this in response to the increasing demand of motorists for this species material. And drivers, in turn, choose leather interiors for their high practicality and ease of use.
This will not fix the cracks, but it will have the effect of hiding them. This is not a long term repair but will be fine for a short period of time before you have to finally replace the skin. You can sew leather seats for your car or for your home, whether new or to repair scratches or tears. By learning a few leather sewing tricks, you can make numerous projects with this durable fabric.
To sew leather, you will need: a sewing machine, leather, measuring tape, marker pen, leather needle, polyester thread, rotary cutter, double-sided leather tape, and a leather presser. Choose a thicker piece of leather as the seats are subject to more wear and tear than other designs may be.
However, in the course of using a car, even the strongest leather options can often suffer.
An accidental cut, a burnt hole from a cigarette, an open seam - all this spoils the interior and makes the owner of the equipment think about how the leather car seats are repaired with their own hands.
Damage to the leather interior is divided into several types:
What materials can be used in the work?
Before you begin, you will need to design the leather seats. You could find patterns in craft books or craft websites. Conclusion end results which you want helps determine how much leather you need to buy. Also, you will know how to measure your leather pieces. Look at other places you want to emulate to see how they are built.
Step 2 - Measure Your Leather Pieces and Cut Them Out
Take a measuring tape and measure the pieces you need. A basic seat cushion will only require two pieces of round leather. To make them even you'll want to have a compass to draw ideal forms circle. Or you can keep track of your measurements by checking the diameter at multiple points for consistency.
- scratches;
- holes and cuts;
- torn seams.
Depending on the nature of the damage, car interior leather repair is somewhat different and even requires different tools. Therefore, further recommendations will be given for each specific case.
Scratch removal
To remove a scratch from the skin in the car interior, special knowledge and skills are not required.
If you have another large round fabric, this can help you measure and mark the leather to cut it out. Cutting the leather may take a rotary cutter if the leather is very thick. But if the skin is thin, scissors or a razor blade will work. Just make sure the blade is very sharp so that the cuts are even and not serrated.
Step 3 - Sew the skin into shape
Taking sewing machine and by inserting the polyester thread into the spool, as well as the needle into the needle, you can start sewing. Take your time and use long stitches to secure the fabric. If you use stitches that are too short, this can loosen the seams and cause the leather to tear. Tie the threads at the beginning and end of sewing, especially when you sewed the pieces by hand. You can sew leather by hand, but it's hard to do it evenly. Zigzag stitches can also be attractive and tough enough to hold the skin together.
This is a fairly minor damage that can be easily repaired on your own. Of course, in the auto shop you will have to purchase some additional funds and tools.
First you need to buy a special coloring pencil for the restoration of leather products.
Moreover, it must be selected in such a way that its color does not differ from the color of the car interior. This is not always possible and sometimes you have to additionally buy a white and black pencil from the same manufacturer in order to disassemble them, mix the paint and get the desired shade.
Step 4 - Finish touches for leather seats
The seat should then be filled with some sort of thick filler or cotton to give it a soft feel. The thicker the material, the better, as it will hold its shape. You can also add trim to the seams if the seat is decorative. Others like to create patchwork seating with various types leather: suede, cowhide and pigskin. Just make sure the pieces are big enough so they can't be pulled too tight in the design.
Leather seats help add springy cushioning to your car or home. With the help of several simple steps you can add skin to your life. Found in homes, cars and offices, leather seats add elegance to any space. Initially, people were wrapped in leather skins made from animals, and when people started using seats, they often covered them with leather. Unfortunately, the skin can fade, tear or stain. Owners can replace seats or renovate them.
It is necessary to check how suitable the paint is in hard-to-reach and inconspicuous places on the skin.
When the desired shade in the pencil is obtained, you can get to work. In order to make it clear how to paint over scratches on the skin of the interior, we will write everything in stages. To be safe, wear clean rubber gloves.
- Carefully clean the scratched area with an alcohol wipe so that no dirt and greasy stains remain there. After processing, we wait about 30 seconds for the alcohol to dry.
- With one smooth movement, draw a pencil along the scratch line. And with a microfiber cloth, with short sharp movements, smear the paint along the scratch.
- Repeat the previous step several times until the damage is not noticeable. (On small scratches, as a rule, 1-3 approaches are required, for larger ones up to 5-6).
- We go through all the scratches on the seat in this way and wait a few minutes.
- We wipe the entire seat with a clean cloth and carefully inspect. Where scratches are still visible, you will have to repeat everything.
- As soon as they disappear visual differences damaged areas and entire seats on the seat, take a clean cloth, apply polish on it and wipe the entire surface.
- On this repair minor damage leather seats finished.
Repair of leather upholstery from holes and cuts
![]()
It's over complex repair, which will require additional tools:
- a set of rubber spatulas;
- tweezers;
- reinforcing mesh;
- fine-grained sandpaper;
- heating iron and special cooling pads.
All work must be done very carefully and carefully, without missing any small details. Otherwise, you will have to redo everything, starting over.
As in the previous case, you need to start by choosing the right shade.
Only now you need to use not a pencil, but a special paint for leather and vinyl.
Step by step renovation this case looks like that:
- Using a special leather cleaner, remove all dirt from the damaged area.
- With sharp scissors, we align the edges of the hole as much as possible. The fact that it will increase a little is not a big deal.
- Around the cut or hole, carefully clean the entire skin with a fine emery cloth.
- Inside the cut, under the skin of the cabin, we lay a reinforcing fabric (fine fine mesh). It should be slightly larger than the damage site.
- We apply the composition of liquid leather (commercially available) to the reinforcing mesh.
- And already on it is a special thermal powder, which is covered with a Teflon gasket.
- With a narrow iron, we pass over the surface of the Teflon so that the thermal powder under it begins to melt and turns into an adhesive mass. The exposure temperature should be about 120 degrees for a period of 10 seconds. (Here you can use an ordinary household iron, but it is very inconvenient to work with it, as it can damage intact areas of the interior leather).
- We immediately apply special cooling bags to the heated place. With a sharp change in temperature, liquid skin becomes smooth and uniform. (Might be fine for cooling. plastic bottle with ice).
- We remove the Teflon and inspect the repair site of the leather seat. If there are voids and pits, then add additional liquid skin to them. Then cover again, iron and cool.
- As soon as the surface at the repair site becomes smooth and beautiful, you can start painting. To do this, you need to use a special paint.
What to do if the seam is torn?

Another nuisance in which leather interior machines may need repair. It happens often enough to warrant attention.
Here you will definitely need the following types of tools: sharp scissors, collet clamp, a special needle with an eye on the tip, a strong thread.
It is worth noting that it is easier to perform this type of work when the seat is dismantled and removed from the passenger compartment.
Because the seams are in hard-to-reach places, to which it is sometimes simply impossible to crawl inside the car!
phased self repair seams of car leather seats looks like this:
1. We place the leather seat in front of us in such a way that we can clearly see the seam itself, as well as its reverse side.
2. In the place where the seam is weakened, we pry off the edge and find a piece of thread. Using tweezers or hands, gently, evenly pull it so as to strengthen the seam in an intact place.
3. We find the old hole in the skin from the seam and collect all the layers of the seat in this place into a single pile. Then we pass the needle through the holes using a collet clamp. We insert a nylon thread into the eye of the needle and remove the needle from the pile, pulling a strong thread through all layers. We now have thread on both sides of the leather upholstery.
4. We find the next hole from the old thread and again thread the needle there, along with the thread. At the output, we get a loop from the thread that is threaded into the needle. It is necessary to insert the second end of the thread into this loop and pull the needle back, having received a knot in this place.
5. We continue in the same way to go through the third, fourth and subsequent holes until we reach the end.
6. Then we bring both ends of the thread to one side, tie it well into a knot and cut off the long ends.
7. Turn the leather part over front side and we see that the seat upholstery repair was successful.
At first glance, everything seems quite complicated. However, if you delve into the process and understand the very essence, it turns out that do-it-yourself leather repair in the cabin is not so problematic. At the same time, savings on services service center turns out to be quite serious.


