Check Status brake pads at every maintenance.
Brake pads must be replaced when the pads are worn (minimum allowable thickness friction linings 2.0 mm), in case of weak connection of the lining with the base, oiling of the working surfaces, the presence of deep grooves or chips.
On inner pads rear brakes wear indicators installed. Upon reaching the minimum allowable thickness of the pads, the wear indicator contacts the brake disc during braking, causing a squeak, signaling the onset of the wear limit of the brake pads.
WARNING
Replace rear brake pads brake mechanisms only as a set of 4 pcs. (two on each side). Before replacing brake pads, check the level brake fluid in the main tank brake cylinder. If the level is close to the upper mark, it is necessary to pump out part of the liquid, since after replacing the worn pads with new ones, the level will rise.
You will need: 14 wrench, flat blade screwdriver.
1. Remove the rear wheel.


3. . .and lift the caliper up together with the outer brake shoe.

4. Remove the outer and inner brake pads from the guide.
HELPFUL ADVICE
Every time the brake pads are replaced in without fail check the condition of the protective rubber covers of the guide pins, as well as the ease of movement of the caliper relative to the guide of the brake pads. If movement is difficult, lubricate grease guide pin and its cover.
5. Using sliding pliers, push down the cylinder piston.
6. Install retaining springs, brake shoes and other removed parts in the reverse order of removal.
7. Similarly replace the brake shoes of the brake mechanism of the right wheel.
8. Check up and if necessary restore level of a brake liquid in a tank of the main brake cylinder.
Hi all. We will perform the procedure for replacing the rear brake pads Kia Sid. pads on Kia Ceed change when the thickness of the friction lining is less than 2 mm. There are still cases when the friction linings come off the pad body. As a rule, when the pads are worn to the limit, you can hear extraneous noise. At the first suspicion, do not hesitate to check the pads.
I advise you to look at the condition when replacing the pads brake discs. The minimum thickness of the brake disc is 8.4 mm. Break the disk into six parts by eye and measure the thickness in each section. The thickness should not fluctuate, the difference is a maximum of 0.01 mm.
Step by step replacement
1. Remove the wheel.
2. With a fourteen-end wrench, unscrew the upper bolt of the caliper bracket.

3. After unscrewing the bolt, lift the bracket up.

4. Remove the old pads.

5. Inspect the caliper guides:
- check the anthers of the guides for breaks
- check for lube
- check the smoothness of movement
6. We flood the device brake piston. The device is very simple. At the base is a threaded screw of about 20 cm and a metal plate. 
We rest the end of the screw on the piston and bring it along the thread so that the metal plate rests on the body of the caliper bracket. Next, we twist and thereby flood the brake piston. I would like to note that during the indentation of the piston, keep an eye on the level of fluid in the tank. Pump out if necessary.

Check the condition of the brake pads at every maintenance
Brake pads must be replaced when the pads are worn ( minimum allowable thickness of friction linings 2.0 mm), with an unstable connection of the lining with the base, oiling of the working surfaces, the presence of deep grooves or chips.
NOTE
Wear indicators are installed on the inner pads of the front brakes. Upon reaching the minimum allowable thickness of the pads, the wear indicator contacts the brake disc during braking, causing a squeak, signaling the onset of the wear limit of the brake pads.
WARNINGS
Replace front brake pads only as a set of 4. (two on each side). Before replacing the brake pads, check the brake fluid level in the master cylinder reservoir. If the level is close to the upper mark, it is necessary to pump out part of the liquid, since after replacing the worn pads with new ones, the level will rise.
You will need a socket wrench "for 12".
1. Remove the relevant front wheel.

2. Turn out the bottom bolt of fastening of the case of a bracket, holding by a key a directing finger of a bracket for a hexagon.

3. Raise the caliper up.

4. Remove the outer and inner brake pads from the guide.

5. Remove the two retaining springs from the shoe guide.

Whenever you replace the brake pads, be sure to check the condition of the rubber protective covers of the guide pins and the movement of the caliper relative to the brake pad guide. If movement is difficult, lubricate the caliper guide pins with grease.
6. Install the fixing springs, brake shoes in the guides and other parts in the reverse order of removal. To prevent self-loosening of the guide pin of the caliper, lubricate its thread with an anaerobic oil before installation. thread lock,
7. Check and, if necessary, restore the brake fluid level in the fluid brake cylinder reservoir.
USEFUL TIPS
After replacing worn out brake pads with new ones, do not rush to immediately go to busy highways. It is possible that at the very first intensive braking you will be unpleasantly surprised by the low efficiency of the brakes despite the fact that branded pads are installed. Brake discs also wear out, and new pads only touch them at the edges, with little to no braking. Choose a quiet street or passage without cars and slow down gently several times so that the pads get used and begin to fit the entire surface. At the same time, evaluate the effectiveness of the brakes. Try not to brake sharply for at least the first 100 km. At strong heat unused pads, the top layer of their linings burns and the brakes will not be as effective as possible for a long time.
Even the most inexperienced car owner should learn how to change brake pads. Replacing the front pads on the Kia Sid is quite easy, you will need standard set tools and new pads.
After the wheel has been removed, unscrew the lower caliper guide and fold the caliper up, take out the pads (pads), take out the springs, clean seat. Then we put new brake pads. All assembly is done in reverse order. How to replace brakes brake pads Ceed look at the video.
To prevent spontaneous unscrewing of the caliper guide pin, lubricate its threads with an anaerobic thread lock before installing.
When assembling and installing new brake pads, it is also worth noting that a block with a squeaker (wear sensor) is placed in the inner groove caliper.
To press the hydraulic piston of the caliper, you can either immediately (before lifting the caliper) spread the pads with a powerful screwdriver, or immediately before installing new pads, drown it by pressing with a hammer handle or any other device.
Catalog numbers and prices of the front brake pads Kia Sid
The part number for these original front pads is 58101-1HA00 or 58101-1HA10. average price such pads is in the region of 3000 rubles. That's why often choose such analogues:
- Brembo P 30 034 - the price is about 1380 rubles;
- Mando MPK36 - the price is about 740 rubles;
- NiBK PN-0373 - the price is about 1000 rubles;
- TRW GDB 3450 - the price is about 1420 rubles;
- Ate 13.0460-5742.2 - the price is about 1900 rubles.
The cost is indicated as of prices for the summer of 2017 for Moscow and the region.
19.07.2018
Brake pads for any car are consumable They need to be replaced as they wear out. Usually a quality part goes up to 50,000 km. Understand that it's time to change, you can visual inspection, or at the signal of the wear sensor - a characteristic screech of metal will be heard. We will help you choose the right spare parts for Kia Ceed, tell you how to replace them yourself.
Kia Ceed SW 2013 (station wagon)
Choice of pads for LED ED, JD
TRW GDB3585, 3582 are suitable for JD, they go about 50-60 thousand km, while they do not crumble, they do not eat the disk. The price is about 2000 rubles. You can purchase an analogue of REMSA, which is produced by the same plant. The price is on average 500 rubles lower. original part is distinguished by the SBK marking and is produced in South Korea, in quality it is not much different from analogues, but the price is usually higher. Original pads for cars 2006-2012 (ED) have the following article numbers:
- 581011HA00 - on cars from 2006 to 2009, after that another article went to the same cars - 581011HA10, in fact the details are the same;
- Also used item 583021HA00 and 583021HA10 (rear);
- For hand brake - 583501HA00.
For cars after restyling, pads with other codes are provided. However, they are all the same size, so the parts can be considered interchangeable.

The block on the left obviously needs to be replaced, the block on the right is new
CEED A2 has been produced since 2012 and has the following part numbers:
- 58101A6A00 - until 2013;
- 58101A6A01 - produced from 2014 and later;
- 58101A2A25 are used for those configurations that are equipped with brake discs size 300 mm.
For cars manufactured in 2015-2017, the following pads are suitable:
- 58101A6A02 - for models that have been restyled since 2016.
- 58101A6A70 - for cars with 300 mm discs.
The rear pads have the following article:
- 58302A2A30 if hand brake mechanical.
- 58302A6A20 - for complete sets with EPB.
If the car is of an old generation, but with R16 wheels and 300 mm discs, the article will be different.
We remind you that there are cases when cars of the same series, year of manufacture and configuration have different parts that differ significantly from each other. Therefore, for an accurate selection of auto parts, it is best to use the VIN number of the car.
Self-replacement process
You can also replace the pads with your own hands: it is not difficult if you have certain skills. On Kia Sid, the hydraulic cylinder is unpaired, with the exception of sports modification- two cylinders per wheel are placed on such a machine. The cylinder is needed in order to act on the inner pad, press it against the disc, and the outer one is pressed by itself. The pads wear out more on the outside, but both need to be changed, and on one axle at once, regardless of the wear on the pads on the second wheel. In addition, you should know that the rear pads go on average one and a half times longer than the front ones, since braking usually occurs first with the front wheels.

Removing the front wheel
When installing pads, keep in mind that the wear sensor must be on inside. The degree of wear still needs to be checked periodically, sometimes the sensors break off. When replacing pads, they must not be lubricated, even if they are installed with great difficulty. A lubricated part will not work, and the brakes can fail at the most inopportune moment.
Before starting work, it is necessary to measure the level of the brake fluid. It is poured into a special tank, which is located under the hood of the car. Make sure that the liquid is not above the mark, the excess will have to be drained. This will be required because after you put in new pads, the fluid level will rise slightly. In addition, you need to check how the caliper moves, which guides the block. If it moves with difficulty, the guide pins need to be lubricated.

Unscrew the two screws reverse side brake caliper
The work is as follows:
- In order to get to the pads, the wheel will need to be removed;
- The caliper must be raised up;
- You will need a 12 wrench, with which you need to unscrew the bolt located on the bottom of the bracket body. In this case, it is advisable to hold the guide finger with a hexagon;
- After that, you will need to remove the guide pads, first the inner one, then the one located outside;
- Remove the springs from the guide;
- The assembly takes place in the reverse order, first of all, fixing springs are installed, then caliper guides. They can be unscrewed, so an anaerobic fixative is applied to the threads for reliability;
- The brake fluid must be checked again, topped up or removed if necessary.

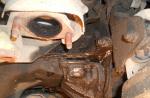
Remove the caliper and old front pads