Unlike Mokvichi, VAZs do not have inherent problems associated with constant boiling in the summer, and Samara even more so. But there is a moment. Even a few. Firstly, now we cannot imagine our life without traffic jams and toffees. Secondly, spare parts for VAZs are cheap, but the quality, alas, corresponds to the price ... In other words, you can boil in a traffic jam because of one small penny detail - a temperature sensor, which turns on the fan when a certain temperature is reached. And even if it does not fail, but simply will not work properly for a long time and the motor will often overheat - you can fly in for a pretty decent engine repair.
It's summer now and so this topic is quite relevant.
But there is a fairly simple option how to protect yourself from overheating the engine in a traffic jam in the hot summer and from cuckooing in the middle of the traffic jam until the engine cools down (if the sensor still closes and the engine starts to boil). It is enough just to make a button for forcibly turning on the cooling fan of the radiator.
All that is needed for this refinement is a wire and a button or toggle switch (anything, any switch that can close the circuit).
The temperature sensor is designed to close the circuit when a certain temperature is reached and thereby turn on the fan on the radiator. All we need is just to send 2 wires from the sensor into the cabin, in parallel, so to speak, and connect them to the switch. If the sensor does not turn on the fan - you can do it!
Instruction
Vehicles use electric fans to blow through the radiator of the cooling system. The fan is an impeller direct current set in a round or square frame. The activation of the electric fan is fully automatic, depending on the temperature of the coolant in the radiator. Fluid temperature data is taken from a sensor installed in the side compartment of the radiator. The sensor is a simple microswitch whose contacts are normally open. They close when a certain temperature is reached.
To connect an electric fan, you can use two schemes: relay and relayless. The difference between these schemes can be seen from the name. Relayless consists of temperature sensor, fan, fuse, connecting wires. The positive output of the electric fan is connected through a fuse to the positive terminal of the battery. The negative output of the fan is connected to any output of the temperature sensor, the polarity of switching on does not matter. The second output of the sensor must be connected to the car body. This is the most simple circuit inclusion, does not require much time to implement.
The relay circuit contains an electromechanical relay. The good thing is that the high current is removed from the sensor to the relay. The positive output of the fan is connected through a fuse to the battery, negative to the body. Negative wire you need to cut and connect the resulting two wires to the normally open relay contacts. By default, the fan is disabled. One output of the relay coil must be powered from the battery plus through a fuse, or from the ignition switch. The second output of the coil should be fed to the first contact of the temperature sensor, and already from the second contact, mount the wire connected to the body. Look in advance to see if the relay has a diode connected in parallel with the coil. If available, it is important to observe the polarity of the winding supply.

Another useful for the fan switching circuit is a button installed in the passenger compartment. The temperature sensor can fail at the most inopportune moment, so for emergencies button will be helpful. Both when using the first circuit, and when using the second, you need to connect the normally open contacts of the button to the temperature sensor. This is easier, but in the case of using the first scheme, it turns out that the button will have high current, and this can cause the button contacts to burn and the case to melt. Therefore, it is best to use the button in a duet with an electromagnetic relay.
Sources:
- Standard Relays and Applications
- Installing the forced fan button on the example of the VAZ-2110
- How the cooling fan works on the VAZ 2105 injector
- The cooling fan on the VAZ 2112 does not turn on
A fan (or cooler) is one of the important components of a computer system unit that provides cooling to the central processor. If the system unit still gets very hot when the fan is running, you can change the initial cooling temperature.

Instruction
Turn on the computer while holding down the Delete key or one of the function keys (F2, F5, or F8). This will launch the motherboard BIOS settings menu. It is here that the initial temperature of the fan is set. To make the appropriate changes, go to the Advanced Configurations or Advanced Setup menu.
Find the item for changing system cooling settings. It is usually called Fan Mode. Turn on the Always On setting to prevent automatic shutdown fan. Go to the Fan Speed item and specify the initial rotation speed of the cooler. To get started, make small changes, and then test the performance of the computer and its temperature regime after
During the active use of laptops, many users quite often encounter extremely strong heating of the device, especially in summer time. Systematic overheating affects not only the performance and speed of work, but also reduces the life of components. In order to reduce the temperature, you need to turn on the fan on the laptop to the maximum, thereby increasing the cooling efficiency.
Solutions
The functioning of the cooling system is fully dependent on the BIOS. It is worth considering the fact that, according to the factory settings, the cooling system does not work on full power, but only by 50% for minimal power consumption and noise reduction. Almost all motherboards have the ability to control coolers using.
In order to forcibly turn on the cooler on a laptop, you can use one of the following methods:
- Through BIOS.
- With the help of software.
Changing the settings may cause additional noise and increase power consumption. That is why, you should first disassemble and thoroughly clean the laptop, including from the accumulated dust, which may be the initial cause of overheating.
All the methods below are equally suitable for laptops of the most different firms(samsung, hp, asus, lenovo, etc.)
Enabling the cooler through BIOS
In order to start the cooler forcibly, it is enough to change some settings in bios.
So what needs to be done:

The appearance of the "Hardware Monitor" section may have slight differences, depending on the BIOS version. But the settings always remain the same, so you can easily turn on the fan on the laptop manually and change its operating mode without much difficulty:

Smart Mode Options:
- Silent - energy saving mode and silent operation.
- Standard - works at half power.
- performance and turbo maximum speed cooler.
Program method
You can also forcibly turn on the fan on the laptop using the Speedfan program. I cannot fail to note the simple and convenient interface, multilingual and free, so I recommend it.
What needs to be done:

Many drew attention to the fact that the temperature at which the radiator fan on the VAZ turns on is too high when compared with operating temperature motor. Manufacturers are trying to reduce harmful emissions, because at high temperature the fuel burns better with the components.
But there is not only positive effect, but also negative. If the engine overheats a little, then destructive processes begin for the metal inside, so wear resistance decreases. If you do not take into account that the electrical components that affect the switched on fan may fail, then the time to notice overheating will be less than at normal temperature.
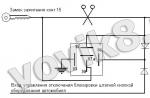
We need to ensure that the operation of the engine is evenly controlled. This can be done by creating parallel circuit turning on the fan. A positive wire must be connected to one contact, and a negative contact is connected to the switch through a parallel wire.

It is worth mentioning additional features that allow you to control normal temperature engine. IN wiring diagram there is no relay as a simple switch is enough to operate.
This method is not a replacement regular scheme fan operation, but only Alternative option unit work on low temperatures. The driver must control the entire process.
If the engine overheats in a car, but this connection scheme is implemented, then it is better to check the cooling system again, ensuring its operability.

As soon as signs of overheating are detected, that is, an arrow has entered the red zone, which indicates the temperature, but there is still no tangle of steam from engine compartment, then turn on the interior heater at full power.
This will help reduce the temperature of the coolant that is in the cooling system. Then you need to turn on the emergency gang, squeeze the clutch pedal and roll to the side of the road. The machine must not be turned off immediately, the engine at normal speed idle move work for about five minutes, and the heater must still operate at full capacity. Only now you can open the hood and inspect the engine compartment.
You need to try to determine where the steam is coming from, see if there is coolant in expansion tank, check the integrity of the thermostat, radiator and rubber hoses.
The engine performance depends on the VAZ 2114 radiator cooling fan when driving in hot weather, with a load and, especially, in traffic jams. Sometimes the fan thermostat does not work and the motor overheats.
It is difficult to fix such a breakdown on the spot, so it is better to install a forced fan button in advance, with which you can turn on the radiator cooling if necessary to prevent the engine from overheating.
What you need to install the VAZ 2114 fan switch button
Before you make a button on the VAZ 2114 fan, you need to prepare the following components:
- four-pin relay;
- button mounted in the dashboard;
- connecting terminal blocks for relays and power buttons;
- 5 meters of wire with a cross section of 0.75 mm2
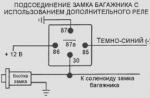
Button wiring diagram
To be able to turn on the fan manually, the VAZ 2114 fan switch button is installed in onboard network in parallel with a thermal switch, which is triggered by an increase in the temperature of the coolant. There are two options for connecting the button: directly or using an electromagnetic relay.

In the first case, the buttons will break too much current through the contacts and quickly fail. That's why correct connection fan must be produced only through a relay. In this case, only a small current will pass through the button, which controls the electromagnet of the relay.
A pair of wires is connected to the outputs of the relay contacts (those that are open when the electromagnet is not powered): one from the output of the thermal relay, the other from the input. In this case, when voltage is applied to the relay solenoid, the radiator fan will turn on. The “ground” of the relay can be connected to the nearest bolt, and the “plus” can be connected from the fuse box. Moreover, it is better to connect it to the fuse outlet, which is de-energized when the ignition is off. For example, to fuse F10. In this case, even if you forget to turn off the fan, it will stop working after the ignition is turned off. Otherwise, there is a risk of putting the battery “to zero”, leaving the car in the parking lot with the fan on.
Installing the forced fan button VAZ 2114
You should start work by disconnecting the “ground” terminal from the battery so that there is no short circuit during the wiring process.
The procedure for installing the button is as follows:
- Prepare a block to which the VAZ 2114 fan force button will be connected. To do this, leave 4 terminals with wires on it: two central ones for button illumination and two corner ones for controlling the power supply circuit of the electromagnetic relay.
- Connect to the electric fan power wires that go to the K1 relay (terminals 30 and 87), two wires with lugs. To do this, it is necessary to strip a part of the insulation on the wires suitable for the relay and fasten the wire segments to them that will go to the relay. Ideally, it is better to solder the connection, but you can get by with just a tight twist. Connection points must be carefully insulated.
- Connect the tips of the connected wires to the relay block to terminals 30 and 87.
- Connect the control wire from the button block to terminal 85 of the relay, and connect terminal 86 with a wire to the car's ground.
Install the fan switch in a free slot on the dashboard after removing the plug. - Set the relay to comfortable spot, for example, under the dashboard of the car, and secure.
- Connect ground to battery.
- Turn on the ignition and press the fan button. The relay should click and the fan motor should turn on.
This completes the installation of the forced fan button on the VAZ 2114.