Without disassembling or dismantling the starter, you can independently check the mechanism of the device. To do this, bridge two contacts on the rear panel of the traction relay (they look like copper bolts). If the device moves (spins), then the problem is in the retractor.
Remember that when self disassembly and repairing the car, you should be careful and accurate. Follow the instructions so as not to aggravate the damage and avoid injury.
Causes and Solutions
All faults can be conditionally divided into two categories:
- the breakdown lies in the starter and the retractor relay;
- the starter anchor turns and the relay clicks;
 The most common reason for the inoperability of the relay is that the soldering of the wire to the terminal has lost contact. Before disassembling the device, just try to solder these places with a soldering iron - the problem is solved. Well, if the starter still does not work, then the relay will have to be disassembled. Sometimes the coil that creates an electromagnetic field burns out. The banal replacement of the old wire with a new one eliminates the problem, for this it is enough just to rewind the coil with your own hands.
Many motorists have found themselves in situations where attempts to start the car ended only with the sounds of the starter relay under the hood. This is especially common in the frosty season. The battery capacity decreases faster and there is not enough charge. The review will make it clear what other causes of problems with the starter retractor relay are, whether it is possible to fix them yourself.
What it looks like, where it is
The solenoid relay controls the clutch freewheel.
Mount an electromagnet with a starter in one block. The part is equipped with a gear that should rotate the flywheel of the motor when it starts. If the flywheel continues to turn further, this will lead to a failure of the starter or the electrical network of the machine. To avoid this, the clutch is pulled out only when the engine is started (after which the relay returns it back).  Outwardly, it looks like an elongated metal cylinder with an armature coil inside, where current is supplied after the circuit is closed. By compressing the return spring, pushing the lever with the movement of the freewheel, the resulting magnetic field causes the armature to move to the coil. The motor starts, the electrical circuit breaks, the magnetic field disappears, and the return spring pushes the armature with the clutch back.
Did you know?Today is the most big car in the world is a German-made dump truck Liebherr T 282B. Its weight is over 220 tons. In order to get into his cabin, you need to overcome as many as 16 steps. The body of this« monster» can freely fit a private house, and its carrying capacity is 363 tons.
How does the starter solenoid relay work?
Turning on the ignition starts the power supply to the winding of the device. As a result -
the formation of a magnetic field in the retracting winding, the retraction of the coil core and the closing of contacts. At the same time, the core pushes the clutch to the crankshaft flywheel, forcing it to scroll.  The retracting winding causes the core connecting the power connectors of the relay through the central contacts to be retracted, transferring energy from the battery to the starter and making it work. The winding holds the core, which guarantees the supply of energy to the starter.
With a lack of battery charge, the retracting winding still works, but for the holding force it is no longer enough. A spring acts on the core and pulls it back, and the retracting winding again tries to return it to the coil.
Important! One of the common problems with the starter return relay is the burning of the power contacts. If this problem occurs, clean the damaged area well with sandpaper, and if the contacts are worn, replace them.
But since the retainer is not able to hold it, the core again goes back. Such attempts to transfer energy from the battery to the winding are characterized by numerous clicks of the core retracting and releasing.
Signs and causes of malfunction
Malfunctions can be noticed by such factors, eliminating which, this device will continue to work:
- the key turns with a click, but without the starter rotating;
- the key starts the rotation of the starter, but it remains idle, not acting on the engine;
- the car starts normally, but instead of turning off the starter continues to rotate quickly and with a bang.
 The reasons why the switch may fail are as follows:
- violation of the integrity of the device due to marriage, mechanical wear or during an accident;
- a short circuit in the turns of the winding due to a long exposure to voltage when trying to start the motor;
- broken or burnt contacts due to poor connection or long work starter to start the engine;
- weakening or breakage of the return spring due to mechanical impact or prolonged voltage supply;
- breakage of the holding winding caused by physical impact when the relay cover is loosely put on;
- loose fastening of the device, which leads to distortion and the inability of the core to fully enter inside to close the contacts.
Important! WITH It is necessary to test the operation of the generator and the battery so that it has enough charge to operate the starter. This must be done periodically.
How to check
To evaluate the operation of the device connected to the starter, you must first check the integrity of the supply wiring. Further, by turning the key, you can check for the presence of a sound of operation.
If there is a click (but no rotation of the starter), the probable cause is the burning of the contact plates. To find out if this is the reason, you should give voltage to the car engine, bypassing the relay. The relay terminal is disconnected from the lock, and two terminals are closed with a screwdriver - from the battery and to the starter. The rotation that has begun indicates a malfunction in the retractor. It is more convenient to check when the starter is disconnected.
 Then you need:
- place the relay near the battery, connect "plus" and "minus" to the relay contacts;
- attach the free end of the “minus” wire to the starter housing (a distinct click will show the normal operation of the relay).
How to disassemble
It should be noted that the starter relay, in which the rear contact covers are factory-rolled, is almost impossible to open. Only those relays where the back cover is fastened with screws are subject to repair. Below is a disassembly of just such a relay.
Required Tools and equipment are:
- drill driver;
- soldering iron 100 watts;
- metal brush;
- copper stranded wire;
- soft wood block.
- Loosen the fixing screws on the rear cover with a screwdriver.
- For better heating with a metal brush, remove the oxidation that has appeared from the ends of the windings.
- With a heated soldering iron, melt the tin at one end of the winding and knock out its remnants on a wooden block.
- Do the same with the other end of the winding.
- Open the back cover by first bending the end of the wire.
Video: disassembling the starter solenoid relay
DIY repair
Having opened access to the inside of the solenoid relay, you can see the two ends of the wire of the soaking winding (thick) and the end of the wire of the holding winding (thin). At the exit point of the thin winding, the wire must be spot welded to the body. One of the frequent problems is a break in the holding winding in this particular place. This can happen if the cover is not screwed up during assembly, or it unscrews itself during operation.
Did you know? legendary soviet car"Victory" could have had a completely different name - "Motherland". However, after the question of Generalissimo Joseph Stalin: “Well, how much will our Motherland be?” the car immediately decided to rename.
As a result, there is a barely perceptible slack: the lid can move a little. When the moving contacts are struck, it bounces and touches the retracting wire. And that, acting on the wire of the holding winding, leads to its breaking off. If possible, then it is necessary to properly weld the end of the wire into place by spot welding. If not, then strip the wire well and, taking it a little to the side, solder it. The relay will be restored.
Also, for prevention, you should clean the contacts on the case with a metal brush or sandpaper and inside covers. It remains to put the cover in place and tighten the screws with a screwdriver.  The hardest thing in this repair- This correct installation covers in place. Do everything in accordance with step by step instructions(see above). As a result, only clean holes should remain.
Peel off the insulation from a piece of copper stranded wire and take two strands from there. In the veins, slightly tin the ends and solder them to the ends of the windings. Next, you need to correctly orient the movable contact, which could move during stripping. It must be in such a position that the distance between the hole with the wires and the contact is the same for both sides of the plate. The distance from the screw hole to the contact must also be the same on both sides.
Next, you should orient the cover itself. The paired wire must pass into the hole where there is a contact. Next, you need to thread the thin wire guides into the corresponding holes and carefully put the cover on, pressing it on the spring. Tighten the screws with a screwdriver and slightly bend the ends of the wires outward, pressing them to the cover as tightly as possible.
Apply some alcohol-based rosin to the ends, remove the guide wires with a soldering iron, and solder the ends. To do this, you can use the same solder that was knocked down when you opened the lid. It remains to walk with a brush, insert an anchor, press and hear how the contacts work. The device has been restored.
Video: do-it-yourself repair of the starter solenoid relay
Now you know that the starter solenoid relay is quite simple, but important device, because its malfunctions prevent it from running car engine. Therefore, it is very useful to know the principle of its operation, to be able to disassemble and independently cope with a simple breakdown. This is quite an affordable task for a driver with minimal plumbing skills. You just need to stock up on time, desire and the appropriate tools.
Subscribe to our feeds
The failure of the car to start after turning the key in the ignition is often due to a faulty retractor relay. In such cases, it is important for the driver to know how to check it, and in the event of a breakdown of the retractor, start the engine. The relay is quite simply arranged, therefore, even an inexperienced motorist can identify a malfunction and fix it on their own.
Purpose and principle of operation of the solenoid relay
On most vehicles, the retractor is mounted with the starter in one unit, and is designed to control the freewheel. At the end of the clutch there is a gear that rotates at the time of start, but during its operation such rotation is not allowed, as it leads to damage to the starter or on-board electrical network if the starter starts to work in generator mode.
To do this, the retractor extends the clutch only when it is necessary to start the engine, after which it returns to its original position, removing the gear from engagement with the flywheel. The peculiarity of the retractor relay is that the starter can only work when it is triggered. This is done to avoid tooth fractures when the rotating gears of the clutch and flywheel meet.
Inside the relay there is a coil with an armature, which is affected by the current after the circuit is closed. The magnetic field that has arisen around the coil moves the armature towards it, compressing the return spring and pushing the lever, which moves the freewheel. When starting the engine electrical circuit the coil opens, the force of the magnetic field disappears, and the return spring pushes the armature with the clutch to its original position.
Symptoms of a failing retractor
The following symptoms may indicate a broken retractor:
- After starting the engine, the starter does not turn off, it rotates with high speed and a characteristic buzzing sound.
- After turning the key in the ignition lock, a click occurs, indicating the operation of the device, but no rotation of the starter is observed. Sometimes, if there is a break in the coil, the armature is stuck in a certain position, or there is no power, there may be no click.
- After turning the key in the lock, the starter starts to rotate idly, without affecting the engine flywheel.
Possible causes of malfunction
The solenoid relay may fail for the following reasons:
- If the hull is damaged.
- If the magnet with windings is damaged.
- When contact is broken.
- By weakening the return spring.
- In case of problems with the anchor.
All relay breakdowns occur due to physical wear, burning of contact plates, destruction of components, burnout of windings.
Checking the solenoid relay

It is possible to determine the operability of the retractor without dismantling it from the car starter in the following way:
- Check the wiring going to the relay for a break.
- If the wiring is OK, the operation of the traction relay is checked. To do this, turn the ignition key and listen for a click, its absence indicates a malfunction of the relay.
- If a click is heard but the starter does not rotate, possible cause malfunction is the burning of the contact plates. To check the assumption on the relay, disconnect the terminal coming from the lock, after which the terminal coming from the battery is closed with a screwdriver with the terminal that goes to the starter. As a result, electricity will be supplied to its engine, bypassing the relay. If rotation starts, the retractor is defective.
- Checking the voltage indicator going to the starter will allow you to determine what the problem is - in the wiring, battery or starter. The multimeter is connected to the positive terminal of the relay, where the battery voltage is suitable, and the minus of the device is connected to ground. When the ignition is turned on at this moment, the voltage should be 12 V. If the indicator is lower, it is enough to start the engine, but enough to activate the relay.
Checking the solenoid relay on the removed starter
It is more convenient to check the operation of the relay on the removed starter. But before dismantling, several operations are performed to identify the problem:
- Check the reliability of fastening the terminals, the condition of the battery, remove oxides from the contacts and battery terminals.
- Make sure that the wiring is securely fastened to the starter with nuts. If corrosion is noticeable, the contacts are cleaned with fine sandpaper.
- Check the condition of the starter relay.
The starter is removed after disconnecting the wires suitable for it and unscrewing the mounting bolts. In some cars, this operation will take a lot of effort, as the unit may be located in a poorly accessible engine compartment.
After removing the starter, it is cleaned of dirt, the oxidized contacts are treated with sandpaper, and the test begins in the following order:

- The unit is placed next to the battery, from the terminals of which there are wires with "crocodiles".
- The positive and negative terminals are connected to the corresponding contacts on the retractor.
- free end negative wire touch the starter housing and observe the result:
- If there is a distinct click in the relay, then it is working;
- If the retractor does not show "signs of life", it needs to be replaced or repaired.
Repair of a collapsible solenoid relay
The manufacturer equips the starters with a non-separable or collapsible retractor. A non-separable relay in the event of a breakdown must be replaced, and a collapsible relay can be repaired. The described method allows you to check the solenoid relay of all VAZ models: 2101, 2102, 2103, 2104, 2105, 2106, 2107, 2108, 2109, 21099, 2110, 2111, 2112, 2113, 2114, Niva, Lada Priora, Kalina, Grant, Vesta and most foreign cars.
Dismantling and repair of the relay is carried out in the following order:
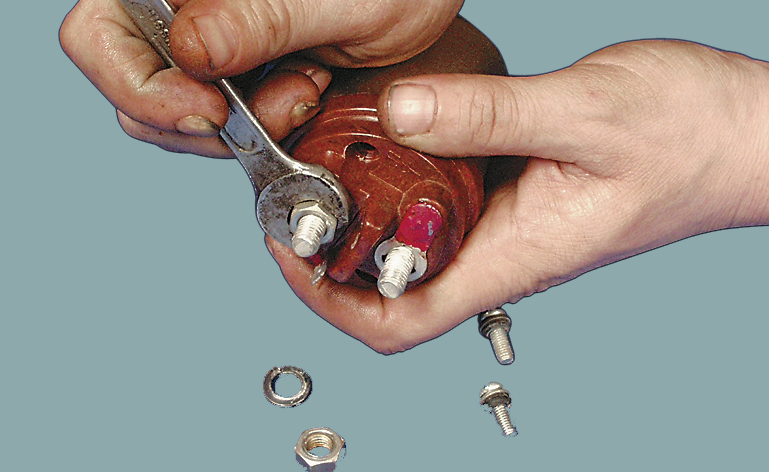
- Unscrew the nuts securing the housing cover.
- If necessary, additionally solder the ends of the windings.
- After removing the cover, inspect the power contacts:
- When they burn, the damaged part is cleaned with sandpaper;
- When worn out, replace.
- The device is assembled in the reverse order and checked for operability.
- The repaired relay is installed back on the starter.
Sometimes vehicle doesn't want to start. And, worst of all, it often happens at the most inopportune and inconvenient moment. This situation is familiar to many motorists. Of course, you have to do something about it. And, if the car power grid in in perfect order, but charged, then the problem may lie in the starter, namely in its peripheral devices. It is likely that the starter traction (retractor) relay is faulty. Here you can not do without repairs, so you have to prepare for it. After all, it will be much easier for a trained person to overcome any difficulties, including repairing the starter solenoid relay.
1. How to check the starter solenoid relay?
The starter, at its core, is very simple in its design. And, if there is an instruction for this automotive component, then even the most inexperienced motorist is able to deal with its repair. It is important to remember that the most difficult thing is to dismantle and then mount it back. Other work is done one or two times. But before you start repairing the starter, you need to figure out what the breakdown is and what place needs to be repaired. The first thing to do is to check the battery charge, as problems can also arise because of it. If you changed the battery and this did not give any results, then you will have to repair the starter.
 It is likely that the ignition switch or the starter relay, located under the car hood on the mudguard, is faulty. You can determine their malfunction by characteristic sounds. If the starter does not make absolutely no sounds, then most likely the ignition switch and the starter enable relay are in order, and the causes of the malfunctions lie in a completely different place. To begin with, let's deal with the principle of operation of the starter.
So, the starter, like its retractor relay, works based on the principles of electromagnetism. When voltage is applied to the windings, it attracts the armature to itself. This anchor moves the bendix gear until it engages with the splines on the crown from the flywheel. In parallel with this, the contacts close, through which voltage is transmitted to the starter winding. After all contacts have closed, the solenoid relay winding ceases to receive power, although the armature will continue to be held inside due to the created magnetic field. When the engine starts, the armature is pulled into place with the help of a return spring, and the bendix disengages.
All the described processes are completely interdependent and occur almost simultaneously. If at least one connection is broken, then the car will not start. So - you have to look for a breakdown and try by all means to eliminate it. Often starter failures are caused by failures of its retractor relay.
The most common causes of breakdowns in the retractor relay of a car starter:
1. Burning of the starter winding or relay.
2. Burning inside the relay of contact plates (popularly referred to as nickels).
3. Gradual destruction of the materials from which the device is made (including from old age).
 Before you start checking the performance of the starter solenoid relay, you should check the starter itself. To do this, just turn the ignition key and listen. If the starter does not work, but some clicks are heard, this means that the starter does not work, but its retractor relay is in order and the cause of the breakdown lies in something else.
Signs of malfunctions of the automobile starter solenoid relay:
1. The starter does not turn off after starting the engine and continues to rotate at a very high speed, as evidenced by the sound of a buzz.
2. After turning the key in the lock, you hear a click, which means the device is turned on, but the starter does not start.
3. When you turn the key in the lock, you hear that the starter is idling, but the engine itself does not start.
How can you know for sure that the cause of the malfunction lies precisely in the solenoid relay?
In fact, you can accurately check the health of the retractor relay even before removing the starter from the car. This is very convenient as it saves a lot of time and resources.
To check the solenoid relay, you must perform the following steps:
 1.
Using a metal object or a piece of wire, close the contact bolts located on the back of the starter. So the voltage will go directly to the starter windings, without passing through the windings of the solenoid relay.
1.
Using a metal object or a piece of wire, close the contact bolts located on the back of the starter. So the voltage will go directly to the starter windings, without passing through the windings of the solenoid relay.
2. If, after turning the ignition key, the starter starts to rotate, then it is working, and the breakdown really lies in the solenoid relay.
3. If, after turning the ignition key, you hear the click of the retractor relay, but the starter itself does not work, then the relay is working properly, and the causes of the malfunctions will need to be looked for elsewhere.
If you did not manage to get to the contacts of the solenoid relay, then you will need to dismantle it. When you check with your own hands or repair any parts of the starter, be extremely careful and attentive, as any incorrect movements can lead not only to breakdowns of automotive components, but also to injuries. Particular care should be taken when checking the dismantled relay (the rotation of the mechanisms is very strong and they can simply break out and injure the motorist)
2. Repair of the starter solenoid relay.
If you have determined that the causes of starter malfunctions lie in its solenoid relay, then you will have to repair the starter solenoid relay. As practice shows, such repairs often end with a complete replacement of the solenoid relay. What is it connected with? The problem is that some manufacturers automotive components they produce solenoid relays completely non-separable, thus trying to achieve greater reliability of this element. And, if you have a non-separable retractor relay installed in your starter, then there is no other way out, except for replacement.
 But it also happens that the retractor is disassembled. In this case, you can try to restore its performance. As already noted, the causes of a malfunction of the retractor relay are the burning of its contacts, short circuits in its winding or in the elementary wear and tear of its constituent components. After disassembling the solenoid relay, there should be no problems with diagnosing the causes of failure, since any breakdown will be visible to the naked eye. But to check the health of the winding, you will need an ohmmeter, which is connected to the starter relay.
If the resistance value is at least 10 ohms, then everything is in order with the winding. And, if this indicator is lower, this indicates a short circuit in the windings and you will have to buy and install a completely new relay, since it is extremely difficult to replace the winding. But to repair the starter solenoid relay, it must first be completely dismantled from the car.
The process of dismantling the starter solenoid relay consists of the following steps:
1. Disable completely battery from the power supply network (otherwise, it is fraught with a short circuit and fire of the entire wiring of the vehicle).
2. Remove the starter from the car.
3. Clean the starter from dirt and dust. This must be done carefully to prevent dirt from entering the unit.
4. Unscrew the appropriate nuts from the brush assembly and remove the contact from the retractor bolt.
5. Unscrew the screws that secure the relay to the ground.
6. Remove the solenoid from the starter.
 After the relay has been dismantled, it is either replaced with a new one or repaired. If you have a collapsible mechanism, and you decide to repair it, then you should perform the following actions:
1. Unscrew the nuts on the ends of the solenoid relay and separate it into parts.
2. Remove the old core and replace it with a new one.
3. Assemble all elements in reverse order.
Install the solenoid relay back into the starter in the reverse order of removing this component. In order not to get confused, we recommend marking the terminals when removing the relay. So there will be no issues with reassembly. It is also important to remember that before reverse installation all contacts should be cleaned and thoroughly degreased. After installation, be sure to check all parts for operability and make sure that the work done is correct.
Subscribe to our feeds
It is difficult to underestimate the importance of the health of the system that starts the engine of our car. After all, it is the performance of all its components that helps to start the engine with guarantee. It is impossible to think of a greater irritant to the driver than a silent starter after the key has been turned in the ignition. If you decide to repair the starter yourself, you need to consider some factors.
There are several reasons why you might not be able to start your car. These can be included as a normal disconnect contact groups, and a direct malfunction in the starter. There are also specific signs of a malfunction of certain nodes when the starter does not turn, helping to significantly reduce the required search area.

A breakdown in the launch system is sometimes noticeable externally, but more often it is found according to certain prerequisites. Clicking under the hood cover when starting the engine is carried out by the starter retractor relay. It controls how the bendix gear and flywheel ring interact. In these cases, novice motorists think that the relay in the starter makes the sound, and they are looking for the cause of the problem in the solenoid relay.
Do-it-yourself repair of a non-separable starter solenoid relay on video:
When clicks occur, but the starter does not turn, it is not necessary to immediately replace the solenoid relay. Indeed, in the absence of current on it, we would not hear any sounds. normal operation the relay in the starter is also accompanied by clicks, but this sound is almost indistinguishable.
Clicks on the retractor relay and on the starter relay
Many electrical appliances click characteristically during operation, it is these sounds that confirm their performance. In any used relays, the connection of contact groups is carried out electromagnetically. When the voltage is on the contact terminals, which are flexible movable brackets, due to the charges of opposite poles, their mutual attraction occurs.
The movement and connection of contacts is accompanied by a characteristic sound that we hear. An experienced driver, after listening to clicks, will be able to determine the source of the sound: the starter or retractor clicks, and whether this device is working.
It is possible to achieve a guaranteed and reliable engine start only by ensuring the operability of all elements and assemblies that make up the necessary chain: battery, ignition switch, starter relay, starter solenoid relay.
Self-repair of the starter bendix on the video:
Relay clicks and starter inactivity
When the engine does not start, but there is still some life left in the system that starts it, the situation is not hopeless. In this case, there are several possible causes of problems:
- discharged battery;
- absence good contact or faulty wiring
- damaged ignition lock;
- a failed starter (voltage does not come to the brushes or the starter bendix slips);
- inoperative relay.
Each of them provides for a certain behavior of the car owner. If the problem is caused by the battery, you just need to charge it or replace it. It is sometimes very difficult to detect damage in the wiring of a car on your own, but it is easy to do at the nearest service station. Worst of all is the starter itself - it must be removed and diagnosed.
The ground is connected to the body of the device, and the positive terminal to the stud behind the relay. With normal scrolling of the device, the cause must be sought in the solenoid relay, with complete inactivity - in itself.
When repairing a starter with your own hands, it must be remembered that it undergoes constant increased wear of the brushes, bendix and retractor relay. Therefore for him uptime these units are subject to periodic monitoring and timely replacement.


