Hyundai Tucson 2006 with a 16-valve G4GC (DOHC, 142 hp) engine. Planned replacement timing belt for 60,000 km. run. Although this engine equipped with a variable valve timing system for intake valves(CVVT) no special tools are required to replace the timing belt. We also change all belts. mounted units, there are three of them, tension and bypass roller.
Because the pump is not driven timing belt we do not change it. The whole procedure took two and a half hours, during which time four cups of coffee were drunk, two sandwiches were eaten and one finger was cut.
And here is the patient.

As we promised, a two-liter in-line engine is under the hood.

Let's get started.

Before removing the accessory drive belts, loosen the four bolts on the ten securing the pump pulleys. If this is not done now, then after removing the belts, it will be very difficult to lock it. We loosen the upper and lower bolts of the hydraulic booster and move it to the engine.

There is a generator under the hydraulic booster, it was not possible to photograph. We loosen the lower mounting bolt and unscrew the adjusting bolt to the maximum.

Remove the alternator and power steering belt. We unscrew the bolts securing the pump pulleys and remove them. We remember that there was a small one below and which side they stood to the pump.

We unscrew the four bolts on the top ten sewn timing cover.

We remove the protection and jack up the engine. We unscrew three nuts and one bolt securing the engine mount.

We remove the cover.


We remove the front right wheel and unscrew the plastic mudguard.

Before us appeared the crankshaft pulley and the air conditioning belt tensioner.

We unscrew the tension bolt until the air conditioner belt is loosened and remove the latter.

And now the most interesting. Set top dead center. For the crankshaft bolt, be sure to turn the crankshaft so that the marks on the pulley and the mark with the letter T on the protective cover coincide. It is very inconvenient to photograph, so we will show on the removed details.

There is a small hole on top of the camshaft pulley, not a cylinder head groove. The hole needs to line up with the groove. Since it is very inconvenient to look there, we check it like this: we insert an even piece of iron of a suitable size into the hole, I use a thin drill. We look from the side and see how accurately we hit the mark. In the photo, the marks are not aligned for clarity.

We unscrew the bolt securing the crankshaft pulley and remove it together with the protective cap. To block the pulley, we use a homemade stopper.

We unscrew the four bolts holding the lower protective cover.

We take it off. The mark on the crankshaft must match.

We unscrew the tension roller and remove it. We remember how he stood.

We remove the timing belt and the bypass roller, which is located on the right in the middle of the cylinder block.
Putting up new videos. The tension roller has tension directions, indicated by an arrow and a mark to which the arrow must reach with the correct tension.

We check the coincidence of milestone marks.
We put new belt Timing, first we put on the crankshaft pulley, bypass pulley, camshaft pulley and tension pulley. The descending branch of the belt must be tensioned, for this we turn the camshaft pulley clockwise by one or two degrees, put on the belt, turn the pulley back. Check all labels again. We turn the tension roller with a hexagon until the arrow coincides with the mark. We tighten the tension roller. We turn the crankshaft two turns and check the coincidence of the marks. We also check the tension of the timing belt in the direction of the arrows on the tension roller. The smart book says that the tension is considered correct if, when a load of two kilograms is applied to the belt, its sag is five millimeters. It is difficult to imagine how to do it, let alone measure it.
If all the marks matched and the tension is normal, proceed to the assembly. I had to suffer with the pump pulleys, although they have a centering groove, but it is very inconvenient to hold them and simultaneously bait the bolts, since the distance to the spar is about five centimeters. Reinstall all parts in the reverse order of removal. Refill all liquids that have been drained. We start the car and with a feeling of deep self-satisfaction we go forward to meet adventures. Here is such a relatively simple procedure for replacing the timing belt on a tusan.
Timing replacement video
Kia shown. But because they have identical engines the video will be very helpful.
Thank you for your attention. Good luck on the roads. Neither a nail nor a wand.
Timing belt replacement for Hyundai Tussan 2.0 is usually carried out after four years of operation vehicle or when about 60 thousand kilometers will be wound on his speedometer. Naturally, this is an average, since given element may fail earlier - it all depends on various factors.
- Clear signs of the presence of oil on the surface of the product;
- Physical damage - cracks, peeling, lack of teeth, and so on;
- Incomprehensible bulges or depressions on the surface.
The belt needs to be replaced. Many motorists try to perform a similar procedure with their own hands. And there are reasons for this. First of all, this is a real reduction in the cost of maintaining your car. The second factor is practical experience, which is simply necessary for every motorist.
This process will be shown on the example of replacing desired element installed on the Hyundai Tussan with an engine capacity of 2.0.
Initially, it is necessary to prepare all the required tools and replaceable elements:
- Ring, hex and conventional open-end wrenches.
- Pliers, flathead screwdriver.

If everything is ready, then you can proceed to the repair procedure:
- First you need to get rid of the protective cover power unit. This is done simply by twisting the four fixing bolts.
- Next, the right front wheel of the car is dismantled and the mudguard is removed from the same side of the vehicle.
- The fixation of the hydraulic booster is weakened, after which this element is shifted towards the power unit.
- Similarly, the fixation of the generator is weakened - fixing bolt is unscrewed (but not completely), the adjusting one is also weakened to the maximum.
- Now you can dismantle the belt from the generator and hydraulic booster.
- The ass is checked and changed if necessary. When installing a new product, it should not be fixed completely.
- The vehicle engine is slightly raised by the jack. Then - the fasteners that fix the support of the power unit are removed.
- The support is finally dismantled.
- The belt tensioner pulley is loosened for climatic equipment. If necessary, the old belt is completely thrown away.
- The crankshaft is rotated in such a way that the corresponding marks behind the protection and the pulley completely coincide.
- Now the crankshaft can be dismantled together with the pulley.
- The lower protective cover on the crankshaft is dismantled. The tensioner is unscrewed, the timing belt itself is removed.


Installation of a new product occurs in the following order:
- Initially, the belt is worn on toothed pulley knee shaft.
- Then to the intermediate roller.
- On the camshaft pulley.
- The last step is on the tension roller.
The assembly of previously removed elements of the car takes place completely in reverse order.
If your Hyundai's speedometer already has 60 thousand kilometers "wound" on it, or you have been driving for more than four years, then it probably needs Tucson timing belt replacement. These are average replacement rates, of course, if you practice an aggressive riding style, you will have to change it much more often.
How to understand what is needed timing belt replacement tucson 2.0
Try to periodically visually check the belt after the first 20 thousand kilometers, for example, every 15 thousand km. run. Although the belt is well protected against corrosion, it is adversely affected by constant friction, it can tear and wear out.
The following features may indicate the need for replacement:
- Cracks, peeling of pieces are noticeable on the belt, even some teeth have fallen off.
- There are oil stains on the belt.
- On the surface, which should be flat, depressions or swellings are visible.
If any of the above is clearly noticeable, you will have to change the part. Don't worry, it's easy enough to DIY, you will get experience in more complex repairs and make sure simple views repairs own car you can do it.
How does it go timing belt replacement hyundai tucson
Prepare hexagons at hand - be sure to 5, box and regular keys for 10, a screwdriver and pliers to unscrew the mount.
- Remove the protective cover, it is quite easy to remove, it is held only by four bolts.
- Remove front wheel(right) and a mudguard from it.
- Move the hydraulic booster (no need to remove it, just slightly loosen its fixation).
- The generator is also quite easy to loosen, it is not necessary to twist the fastener bolt completely.
- When everything is loose, you can remove the alternator belt.
- Check the butt, it may also need to be replaced. Putting a new belt, you do not need to fix it immediately.
- Take a jack and raise the engine to make it easier to remove the mounts from the support.
- Remove the entire power unit support.
- The climate belt is equipped (if worn, it will have to be replaced). Loosen its tensioner pulley.
- Now turn the crankshaft so that the marks on the pulley and protection match one to one. So you can remove the crankshaft as one piece with the pulley.
- Remove the protective cover (rear) from the crankshaft. After removing the tensioner (unscrewing), you can finally remove the belt.

As you can see, no special complex tools are required, everything is removed by unscrewing the bolts. The main thing is to be consistent and not to pull what is not yet fully unscrewed. After you have removed the old part from your Hyundai Tucson 2.0, replacing the timing belt is fairly quick. Need to:
- Slide a new belt onto the crankshaft sprocket. Move counterclockwise.
- The second step is on the intermediate roller.
- Now - on the camshaft pulley.
- The tension roller comes last. You need to loosen the roller bolt on it to press it against the belt and pre-tension it. Then tighten the bolt on the roller.
- The crankshaft must be turned clockwise by two camshaft teeth.
- Turn the tensioner against the arrow to tighten the belt more. Then tighten the bolt to 55Nm.
- To check the quality, the belt should be pressed with a force of two kilograms, which should give a deflection of no more than 6 mm, but not less than 4. If the deflection is stronger, you need to adjust the tightness using a roller.
- Now make two turns of the crankshaft in the direction of the arrow to installation marks aligned.
- All parts removed from the vehicle should be installed in the reverse order that they were removed.
- The bolt on the crankshaft pulley must be tightened to approx. 180 Nm. On the right engine mount by 55 Nm, and on the bracket at least 50 Nm.
At the end of the procedure, do not forget to check the adjustment of other belts - the hydraulic booster, the generator drive, the compressor on the air conditioner, so that no part is loosened.
Don't feel like doing everything yourself or don't have the time or equipment? If you have a Hyundai Tucson car, the timing belt can be replaced at any car service, for example, at https://koreanaparts.ru/autoservice/msk - this is a very common brand that any locksmith can easily figure out.
How much does a service replacement cost?
This type of work can take from three to seven hours, and the work itself can cost from 4,500 to 6,000 rubles per this model(other Hyundai series are usually cheaper). Keep in mind that the price may not include the price for auto parts, a new belt costs up to 2000 rubles. Usually, you can find it at the repair station, but be prepared to pay a service charge, so it's better to bring your own. A big plus of service in the service is the official guarantee for work for a year. If you carry out the replacement yourself, complain badly tensioned belt or loose bolts, there will be no one.
No related posts
The manufacturer Hyundai Tussan 2.0 claims that the timing drive can be replaced not earlier than 60,000 kilometers, which will approximately equal four years of continuous operation. The replacement of this node must be carried out on time, and for this it is necessary to conduct a periodic analysis of its condition. Do this at least every 15,000 kilometers and you will have nothing to worry about. But if the belt is worn, it may break, which will necessarily entail overhaul vehicle.
Consequences of late service
In the event of a transmission break, the valves meet the pistons. The valves in this case are bent, and the pistons can also become unusable. Don't bring it up. But what signs will indicate that the belt needs urgent replacement:
- oil stains are visible on the surface;
- the belt is covered with cracks;
- the ends are very loose and individual threads are visible;
- hollows or bulges are visible.
If oil stains were found on the belt, then the belt must be changed, since the oil has a destructive effect on rubber. By the way, in this case, the seals will have to be replaced. After all, if this is not done, then soon the new product will also be covered with oil stains.
You can easily carry out the procedure for replacing the drive on your own. To do this, you do not need to be a repair guru and have serious knowledge. The average car enthusiast will be able to cope with this procedure. In addition, by doing this work personally, you save family funds, and besides this, you get work experience, which, as you know, more expensive than money. The belt may stretch during use. In this case, it will have to be changed, but loosening of the tension is also possible. Then there is no need to replace, but it will be necessary to make a tightening.
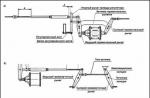
So, in order for everything to be disassembled and assembled correctly, the actions must be performed in the following sequence. First, we prepare all the tools necessary for this. It is better if you make the replacement on a flyover, but it is quite possible to get by with a jack. Look at the auxiliary drive diagram:
Replacement
Now, if all the tools are prepared, and the machine is in a position convenient for us, we begin to carry out the replacement procedure by performing the following steps:
- Remove the cover protecting the power unit. There is nothing complicated about this, you just have to unscrew 4 bolts.
- Now, using a jack, raise the right front of the car and dismantle the wheel. You also need to remove the splash guard.
- We need to loosen the hydraulic booster. There is no need to remove it at all, we simply loosen its fastening and take the hydraulic booster to the side.
- Now you need to loosen the bolt securing the generator. You also need to loosen the adjusting bolt.
- We remove the belt from the hydraulic booster and generator. After all the steps done, it will be quite easy to do.
- If you need to replace the pump, do it. When you install a new one, you should not completely fix it yet.
- Using the second jack, we raise the engine and remove the support of the power unit, after unscrewing its mount.
- We remove the support completely.
- The climate control belt is tensioned with tension roller, and now it will need to be weakened. If it is found that the belt has become unusable, it must be discarded and a new one put in its place.
- Now turn the crankshaft 2 times to the right. This is done so that the marks on the pulley and the mount match.
- We remove the crankshaft and pulley.
- We unscrew the belt tensioner, remove the crankshaft cover, after which the timing gear is directly dismantled.


Now we are preparing a new product and proceed to install it. You need to do this in this order:
- First of all, the belt must be thrown over the crankshaft pulley.
- Then we throw it on the intermediate roller.
- Then onto the camshaft pulley.
- And the final step is throwing the belt on the tension roller.
After that, the remaining nodes are assembled in the reverse order of their disassembly. As you can see, everything is very simple, and anyone can handle it, there would be a desire.
Replacement video