Rear replacement kia brakes sporta 1
Maintenance of drum brakes
To clean components brake mechanisms must be used special means or methyl alcohol. never use oil-based solvents!
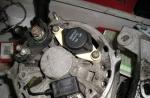
Rear wheel brake system
Rear replacement drum brake pads KIA Sportage
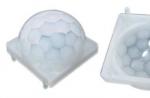
1. Walnut
2. Brake drum
3. Adjusting spring
4. Adjustment lever
5. Upper clutch spring
6. Expansion panel adjustment
7. Orientation spring brake pads
8. Lower compression spring
9. Front shoe
10. Bolt with C-washer
11. Back shoes
12. Cable hand brake
13. Safety lever
14. Bolt
15. Wheel cylinder installation
Loosen the fixing nuts brake drum on the axle flange.
Using a screwdriver, turn the gearbox through the service hole, remove the boots from the walls of the drum, then unscrew the mounting screw and remove the drum.
Using pliers, remove the adjusting lever spring.
Remove the adjusting lever.
Kia Sportage. Removing the drum
8 minutes per wheel, rear brake pad replacement. Enjoy watching. You can sign up for repairs.
Kia Sportage rear pad replacement
Order rear brake replacement discs and pads by car KIA Cerato. Here combined brake.
Remove the top compression spring.
Turn the expansion bar gear clockwise, remove it.
Turn the anchor pin into the groove and remove the shoe support springs.
Remove the lower compression spring.
Use pliers to separate the actuator from the parking brake actuator.
Separate the hydraulic line from the rear brake panel, then unscrew a couple of mounting bolts and remove the wheel cylinder.
If necessary, disassemble the wheel into its components (two boots, two pistons, two piston cups, expansion spring).
Checking the state of a component
Thoroughly clean all dismantled elements and carefully examine them general state. Change defective parts.
Find the amount of wear on the friction lining shoes, if necessary, replace.
Shoes must be changed as a set for both wheels of the rear axle!
Check the working plane of the drums for signs of overheating, cracks, scoring and other mechanical damage. Minor Defects can be eliminated by examining fine abrasive paper or the friction of the surface of an old brake shoe. In case of detection deep damage, let the drums into the groove (within the allowable range) or replace them.
Lubricate the working parts of the wheel as instructed.
Installation is in the reverse order of removal of the components, make sure that the automatic adjustment lever is pressed against the governor gear. Remember to lubricate the spring mounting points, follow the Brake system chapter specifications to tighten the threaded fasteners.
Before installing on the drum area, check outside drum. By subtracting the result of the first measurement, the result of the second determines the size of the shoe gap.
Replacement rear drum brake pads KIA Sportage
Next page
-
1.2.3.4.5.6.7.8.9.10.11.12.13.14.15.16.17.18.19.20.21.
22.23.24.25.26.27.28.29.30.31.32.33.34.35.36.37.38.39.40.
41.42.43.44.45.46.47.48.49.50.51.52.53.54.55.56.57.58.59.60.
GT;
80.81.82.83.84.85.86.87.88.89.90.91.92.93.94.95.96.97.98.99.
100.101.102.103.104.105.106.107.108.109.110.111.112.113.114.
115.116.117.118.119.120.121
.. 231 232 234 ..
Kia Sportage 3. REAR WHEEL BRAKES
Kia Sportage 3. REPLACING THE BRAKE PADS OF THE BRAKE MECHANISM OF THE REAR WHEEL
You will need: 14 wrench, flat blade screwdriver.
Check the condition of the brake pads at every service.
Brake pads require replacement if the pads are worn (permissible thickness friction linings 2.0 mm), loose connection of the linings with the base, oiling of the working surfaces, in the presence of deep grooves or chips.
WARNINGS
Replace the brake pads of the rear brake mechanisms only with a set of -4 pcs. (two on each side).
Before replacing brake pads, check the level brake fluid in the main tank brake cylinder. If the level is close to the “MAX” mark, it is necessary to pump out part of the liquid (for example, with a medical syringe or a rubber bulb), because after replacing the worn pads with new ones, the level will rise.
1. Loosen the nuts of the left rear wheel, place under the front wheels wheel chocks("shoes"). Raise the rear of the vehicle with a jack, secure it on jack stands and remove the left rear wheel.
2. Inserting a large screwdriver between the caliper and brake disc, slide
caliper outward, thereby sinking the piston of the working cylinder into the cylinder to obtain a gap between the pads and the disc.
Replace deformed or badly corroded springs.
USEFUL TIPS
Every time the brake pads are replaced in without fail check the condition of the protective rubber boots of the guide pin and the movement of the caliper relative to the guide of the brake pads. If movement is difficult, lubricate grease caliper guide pins. The operations for lubricating the guide pins are described in detail above for the brakes of the front wheels (see "Replacing the brake pads brake mechanism front wheel", With. 220).
11. Before installing new brake pads, use sliding pliers to push the piston all the way into the bottom of the cylinder.
12. Similarly replace the brake pads of the brake mechanism of the right rear wheel.
13. Check up and if necessary restore level of a brake liquid in a tank of the main brake cylinder.
USEFUL TIPS
After replacing worn out brake pads with new ones, do not rush to immediately go to busy highways. It is possible that at the very first intensive braking you will be unpleasantly surprised by the low efficiency of the brakes, although the pads are branded. Brake discs also wear out, and new pads touch them only at the edges, practically without braking. Choose a quiet street or passage without cars and slow down gently several times so that the pads get used and begin to fit the entire surface. At the same time, evaluate the effectiveness of the brakes.
Try not to brake sharply for at least the first 100 km. At strong heat unused pads, the top layer of their linings burns and the brakes will not be as effective as possible for a long time.
NOTE
Pay attention to the markings on the brake pads. Buy new pads with the same markings. HANKOOK FRIXA rear pads for Kia Sportage II are marked FPHXGR.
The HANKOOK FRIXA rear pads of the S1 tuning series for the Kia Sportage II are marked S1HXGR.
NOTE
On inner brake pads rear wheels wear indicators installed. When the minimum allowable thickness of the pads is reached, the wear indicator contacts the brake disc during braking, causing a squeak, signaling the onset of the wear limit of the brake pads.
WARNINGS
Replace rear brake pads only as a set of 4. (2 on each side). Before replacing the brake pads, check the brake fluid level in the master cylinder reservoir. If the level is close to the upper mark, it is necessary to pump out part of the liquid: after replacing the worn pads with new ones, the level will rise.
You will need: keys "for 14", "for 17", a large screwdriver.
1. Remove the rear wheel from the side to be replaced.
2. Inserting a large screwdriver between the outer brake shoe and caliper, slide the caliper outward, thereby sinking the piston into the slave cylinder.

3. Turn out a bolt of fastening of the bottom directing finger of a support, keeping a finger from turning by the second key …

4. ... and lift the caliper up.

5. Remove the outer from the shoe guide ...

6. …and inner brake pads…

7. ... as well as both fixing springs.
USEFUL TIPS
Every time you replace the brake pads, be sure to check the condition of the protective rubber covers of the guide pins, as well as the ease of movement of the movable caliper relative to the brake pad guide. If movement is difficult, lubricate the guide pin and its boot with grease. For this…

...remove the guide pin...

…remove the protective cover of the finger…

…lubricate the pin with grease and then grease the inside of the pin guard. Lubricate the second finger and its case in the same way. Install the guide pins in the reverse order of removal. Replace the guide pin guards if they are hardened, deformed, or torn.
8. Install the fixing springs, brake shoes in the guides and other parts in the reverse order of removal.
NOTE
To prevent self-retraction of the brake caliper guide pin mounting bolt, lubricate its thread before installing anaerobic fixative threads.
9. After installation of blocks several times press against the stop a brake pedal. This is necessary in order to select the gaps in the brake mechanism that appeared after the pistons were pressed into the cylinders.
10. Replace the second rear wheel brake pads in the same manner.
11. Check up and if necessary restore level of a brake liquid in a tank of the main brake cylinder.
USEFUL TIPS
After replacing worn out brake pads with new ones, do not rush to immediately go to busy highways. It is possible that at the very first intensive braking you will be unpleasantly surprised by the low efficiency of the brakes despite the fact that branded pads are installed. Brake discs also wear out, and new pads only touch them at the edges, with little to no braking. Choose a quiet street or passage without cars and slow down gently several times so that the pads get used and begin to fit the entire surface. At the same time, evaluate the effectiveness of the brakes. Try not to brake sharply for at least the first 100 km. With strong heating of unused pads, the top layer of their linings burns and the brakes will not be as effective as possible for a long time.
Hello. We will replace the rear brake pads on the Kia Sportage 3.
Article of original rear pads— 58302-2SA70. If cheaper, then I recommend TRW - GDB 3421.
Regardless of wear, change the pads only as a set. Also, before replacing the pads, check the fluid level in the reservoir. If the level is at the top mark, pump out some fluid.
After replacing the pads, brake gently several times. Further 50-100 km do not brake sharply.
Tools for work:
- wheel bolt wrench
- key for fourteen
- metal brush
- grease for guide pins
- thread lock blue
- special tool for pressing brake pistons
Step by step replacement
1. Dismantle the wheel.
2. Unscrew and remove the two caliper bolts. Turnkey bolts for fourteen.

3. After unscrewing the bolts, remove the caliper.

The caliper must be tied on a wire to the fist so that brake hose was not tense.
4. We take out the pads from the landing site.

We also remove the anti-creak plate from the right block. But if you bought original pads, it there is a new included.
5. With a brush, we clean the landing brackets of the pads from rust and debris.
6. We take out the guide pins and lubricate them.

Lubricate special grease. Now there are a lot of different ones, so choose according to your pocket.
7. Install the pads in place.

8. We press the piston with the help of large plumbing pliers. You can also do this with a clamp or buy a special tool.