If we make a comparison VAZ models With rear wheel drive and Priors, their big differences immediately become noticeable. One is installed on the "classic", and the ignition distributor gives out high-voltage voltage to the candles. There is a coil on each cylinder, the electronic control unit is responsible for distributing the voltage across the candles.
Device and principle of operation
Probably, all drivers understand that the main purpose of the high-voltage coil was and remains the same, it set fire to air-fuel mixture. For this, a high voltage is generated in it, the value of which is about 40 thousand volts.
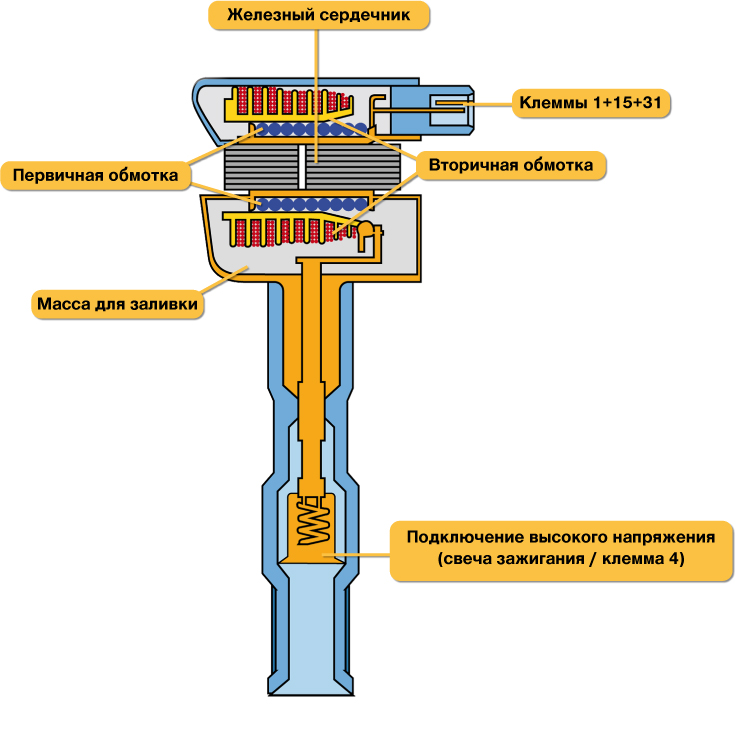
It is a transformer that boosts low voltage battery to high. The transformer consists of two windings, one of them is primary and the other will be secondary, which are wound with copper wire on an iron core.
The primary winding is wound on the core, and the “secondary” is wound on top of it. The whole structure is covered with a casing. If the low-voltage winding has only about 150 turns, then the "secondary" already has several thousand.
There are no high-voltage wires, as it is worn directly on the candle. When in right moment a pulse is sent from the engine control unit to the "primary" coil, a magnetic field is excited around the core, which contributes to the emergence of high voltage in the "secondary". The candle in this case plays the role of a spark gap that ignites working mixture in the engine cylinders. The coil has a protective shell, and inside it is additionally installed a spring and a diode, which is designed to quickly cut off pulses from high voltage.
About the symptoms of bad coils
The ignition coil on the Priore, in the event of a failure, immediately lets the driver know about his “disease”. This will be evidenced by such manifestations:
- The operation of the engine is disrupted, it has vibration, traction is reduced, drivers say that the engine is “troiting”;
- Jerking of the car during acceleration or when driving in low gears;
- There are cracks or breaks in the insulation.
The first point may also indicate broken spark plugs.
How can you test coils?
In any case, checking the ignition coil on the Prior always begins with its external inspection. Even very small cracks or tears in her elastic bands are not allowed. Their presence indicates the replacement of the device. Cracks, chips and other damage to plastic parts indicate that the coil was overheated, and it could simply “burn out”. Next, an inspection of the internal parts is carried out, especially the spiral, its location. If the inspection did not reveal visible defects, proceed to further verification.
There are several ways to check the ignition coil, which will be discussed below. During the operation of the machine infrequently, but it becomes necessary to check it. Do it when not obvious signs failure, not so easy without special equipment such as a spark gap or an oscilloscope. Let's look at an ignition coil without instruments. To begin with, you can simply swap devices and see how the motor will behave after that. If interruptions have moved to the cylinder along with the coil, then it has a malfunction, it must be replaced.
Check high voltage coil ignition can be directly on the machine. To do this, you need to remove it from the motor, insert a working candle into the high-voltage terminal, with the ignition on,. A good coil will show itself as a spark on a candle . In this case, it is necessary to beware of high voltage and use protective equipment.
In vehicles with , the system will report problems in the cylinders with a signal in the form of numbers from 0301 to 0304, where the last digit indicates the number of the "problem" cylinder. It remains only to figure out who is to blame, the coil or the candle.
Instrumental check of the coil
After visual inspection and control, you can start checking with measuring instruments. It is best to use digital multimeters for these purposes, or devices such as MD-1 or AZ-1. They can be, and their price is low. Now let's talk about how to check the ignition coil on the Priore using instruments.
Before checking, the device must be removed from the engine. This can be done in this way:
- Disconnect battery terminals;
- Remove the protective plastic casing from the engine;
- Squeeze the latch with your fingers and disconnect the connector with wires;
- The key to "10" is unscrewed fixing bolt and remove the coil from the mounting socket.

Now you can start checking the devices. First you need to check and calibrate measuring device. To do this, set the measurement switch to the position for measuring resistance at “200 Ohm”, and close the probes together. The reading should be close to "0". These indications must be memorized or recorded. They may come in handy in the future. The device is calibrated, you can start testing. Checking with a multimeter is carried out in this order:
- Both probes of the device are connected to the coil connector (polarity is not necessary) and the resistance of the primary (low-voltage) winding is measured. Pinout of contacts for measurement 1 and 3, the measurement limit of the device is "200 Ohm". It should show approximately 0.8 ohms. The indicator obtained during calibration is subtracted from this value, and the true value of the winding resistance is obtained. If there is no indication, you need to check the reliability of the contact of the probes and the coil leads. If after several attempts the readings do not appear, it means that there is a break in the primary winding, and it must be replaced;
- The next step will be to check the high voltage winding. Set the resistance measurement limit to 2 MΩ. In this case, polarity must be observed, since the high-voltage winding has a diode. Therefore, the red probe is inserted into the output of the coil, and the black one is connected to the output of connector number 2, it is the middle one in the block. The device should show approximately 342 kOhm. It should be taken into account the fact that the readings of the device are highly dependent on the heating of the coil. It is best to test on a cold coil. In this case, you also need to good contact instrument probe with a high-voltage output. If the readings are close to infinity, a replacement part is needed.

Checking with a multimeter
A little about whether it is possible to repair the ignition coil. It will not work to restore the primary or secondary winding, but even novice drivers can replace the tip on it. To do this stock up:
- New tip:
- New sealing ring;
- Degreaser;
- High temperature silicone sealant.
The tip installation site is cleaned and thoroughly degreased. The skirt of the new tip must be turned inside out and a small layer of sealant applied to it. While it dries a little, a new o-ring is installed. Next, you need to install the rubber tip in its place. This will complete the repair.
A few words about the choice of coils
According to experts and owners, the ignition coil is suitable for BOSCH. It costs about 1500 rubles, but it's worth it. These items are sold in individual packaging. yellow color. original coils of this company are able to serve more than 100 thousand kilometers.
Any modern vehicle, and Lada Priora is no exception, it consists of a body part, as the main base, and a large number power units installed on the body, in a complex creating individuality for each model range. Ignition is considered one of these systems. The correctness of its installation, the quality level and compatibility with other objects of the machine will affect the stability of the start and the clarity of the motor.
Symptoms
To know how to check the ignition coil on the Prior, you should be able to establish its failure.
When the engine on the vehicle began to "troit", the first thing to do is to inspect appearance coils.
A characteristic sign that the part has undergone overheating and has lost its functionality is deformation manifestations on the case cover, cracks and uneven areas on the plastic surface.
The procedure for verification work short circuit
So, there are signs of a malfunction, you should check.

First of all, the coil must be dismantled. For this you will need:
- prepare a socket wrench for "ten";
- disconnect the terminals on the battery;
- open the protective cover covering the motor;
- press the plastic locking device, disconnect the wires from the coil terminal;
- remove the fixing bolt;
- pull out the ignition coil.
Now an inspection is underway. It should not show cracks, melting and smudges on the caps and the body part. Only slight smokedness is allowed. Electricity can be checked in several ways.
Having installed a working candle, we check the device for the presence of a “spark” on the car body. If there is no spark from the coil, then it is quite possible that the short circuit has lost its performance. IN similar situation you should check the gap in the spark plugs. All work should be carried out with rubberized gloves to completely exclude contact of the body or tool with car body or engine. The fact is that the coil is capable of generating voltage in the range of 20 - 40 kV.
Another option is to dismantle the coil and install it on a working cylinder of another machine in order to perform a test in motion. If the short circuit is faulty, then this will immediately manifest itself.
The third way is instrumental.
The main reasons why the ignition coil breaks through are considered high temperature conditions or overheating, which contribute to the formation of cracks. There is a high probability of failure of the short circuit due to the accumulation of moisture or the formation of corrosion, frequent switching on of the ignition without subsequent starting the engine, prolonged overloads when an unsuccessful attempt to start the engine is made.
Checking the health of the coil with a multimeter
Before starting work, you should check the device for accuracy. To do this, the resistance is set to two hundred ohms, the probes are connected to each other. If everything is perfect, then zeros will be displayed on the scoreboard.

And if a figure is displayed, it should simply be fixed in memory, so that later it can be taken away from the readings taken as an existing error.
The coil comes out of its seat, cleared of mud accumulations. In this case, it is visually necessary to determine whether there are any damages on the rubber areas. Otherwise, it should be automatically replaced.

The primary winding "rings out". For this purpose, tester probes are connected to the first and third contacts (extreme on the output). In this case, the polarity does not matter. The resistance should be within 0.5 ohms. If there is a break in the wires, then the tester will give a rather large number, close to infinity.
Despite the huge amount of criticism of the Lada Priora, this is one of the most popular cars, which left the AvtoVAZ conveyor for last years. "Priora" is equipped with a fairly successful engine with good dynamics, the interior turned out to be very comfortable. And in maximum trim levels offered useful options. But at the same time, from time to time, the car brings minor problems to the owners. One of the most popular malfunctions is the Priora engine (16 valves). The reasons for this phenomenon are rather unpleasant. And besides, the motor overheats as a result.
When a driver starts his car in the morning, the engine does not run smoothly, as before, but intermittently. From exhaust pipe at this time, muffled sounds are heard. At the same time, a persistent and strong smell of unburned fuel is felt. Vibrations are constantly growing, and this is fraught with cracks in the pillows. So
Troit motor: why is it dangerous?
This is a rather critical phenomenon, especially if the unit begins to vibrate during acceleration. This behavior of the motor is especially dangerous when the driver decides to overtake, but oncoming lane there are cars. In the process, while the engine is troiting, engine power is significantly reduced. The compression ratio is reduced - there may not be enough dynamics to successfully complete the maneuver.
Considering that the Lada Priora has been manufactured since 2007, there are often instances where the engine knocks like on old car 20 years ago. This is a three-cylinder engine. The latest firmware may be installed, however, if the engine is troiting on a Lada Priora car, then such a car does not have much time left.
Typical causes and safety precautions
It is worth considering that there are a lot of possible reasons why one of the cylinders is turned off.  Some faults can be identified and eliminated even without material costs. Others are diagnosable. As a result, it may be necessary to replace the motor or overhaul.
Supply system
If the Priora engine is troiting (16 valves), the reasons may be commonplace. When there is no flash in the cylinder, it is possible that there is simply no fuel there. If it has a normal compression ratio, it is worth diagnosing the power system. Maximum attention should be paid to air filter and on the pipe. It is necessary to make sure that the clamps are securely tightened, that the body of the cleaner itself is intact, and that there is no air leakage from outside. Also pay attention to the tubes. They must be firmly attached to throttle assembly. The fact that some parts are faulty can be reported by fuel smudges, cracks, broken plastic.
Nozzle breakage, clogging
When the Priora engine troit (16 valves), the reasons often lie in the nozzle.
 It may be faulty or simply clogged. Often, beginners and lovers of pouring various cleaning liquids for injectors into the tank face such a problem. All this leads to the fact that the dirt first exfoliates in the tank, then in fuel line. And as a result, it will fall into the nozzles, where it will safely get stuck.
Winding nozzles
It can not only become clogged with dirt - often the windings of the elements burn out on the Priors. IN this case the situation is easily restored by hand. The cover is removed, and then the manifold. Next, the injector windings are checked. Using a multimeter, measure the resistance of the windings. It should be around 11-15 ohms. If the indicators are less, the element should be replaced.
How to troubleshoot injectors?
If the resistance is normal, then it is recommended to completely dismantle the fuel rail and thoroughly rinse every part. Do not perform this operation if there is no experience in this work. For flushing, the nozzle valves must be opened. Then apply an aerosol wash under pressure. It's not difficult, but without experience you can ruin everything.
Poor quality fuel
This is one of the possible reasons why the engine troit on Idling or while moving.  To return to normal operation, you can try changing the gas station. This usually helps to correct a lot of misunderstandings. It is better to fill the 16-valve Priory engine with good 95th gasoline. Pour something with a higher octane rating not worth it. This will only lead to overheating. You can also try replacing the filters - air and fuel. Sometimes this solves the problem.
Ignition system
An experienced car enthusiast who has encountered a three-cylinder engine immediately begins to diagnose candles. "Lada Priora" should cool down well, otherwise there is a risk of getting burned when unscrewing. If after a few seconds you turn off the ignition and check the candles, then one of them will be wet with gasoline. It is also recommended to separately check each part for the presence of a spark.  In the event of a malfunction, the problem is solved. Sometimes it is enough to press down the potentially faulty one with a cap - the machine will resume normal operation. In general, the ignition system this car is the most problematic part. If the Priora engine is troiting (16 valves), the reasons can be looked for for a very long time, and the diagnostics will not give anything, even if it is done correctly. And only by replacing all the elements you can come to a positive result.
Diagnosis of candles on the fly
When the engine is cold or hot, you can check. If the coating is white, then this indicates a lean mixture and engine overheating. A black tint indicates an enriched mixture. Both in the first and in the second case there are problems with the operation of the electronics. This or setup new firmware or replace the ECU. normal candle has a brick color. By the way, the engine can triple at idle if the part is damp. Also because of this, the warm-up time is significantly increased. In addition to candles, the ignition coil can also act up. "Priora" (8 valves) is equipped with distributor ignition. Overheating of the coil is often observed. You can restore the operation of the motor by simply replacing the element.
Checking the ignition coil
There is simply no special method by which you can check the operation of parts. The instructions for the car indicate one of the ways self diagnosis. So, with the ignition off, they check whether the ignition coil (Priora is no exception) is firmly fixed to the motor.  Then they look at the reliability of electrical connections in the low-voltage circuit. If everything is in order, then check for the presence of a spark. For this, they are removed. A test plug is inserted into the tip and pressed against the metal part of the engine. Next, turn the starter. If there is no spark, the coil is changed. If there is a flash, but the engine does not start, change the candle.
Controller
Because of the controller, the engine is also unstable. You can find it right in the car. Often the microcircuit in the device burns out or it is flooded with liquid from the heater. Sometimes water from the street gets into the cabin after a good rain. 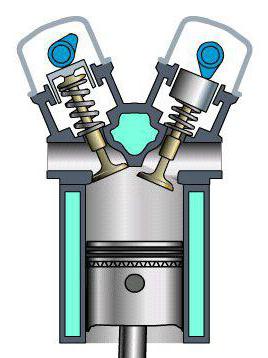 If we talk about recovery, then with certain skills it is possible self repair. It is recommended to contact the service station or buy a new unit. In addition, firmware can only be performed with special equipment.
Summary
So, we examined why the car troit. That's not all possible reasons, but they help to accurately diagnose the operation of the motor and find a malfunction.
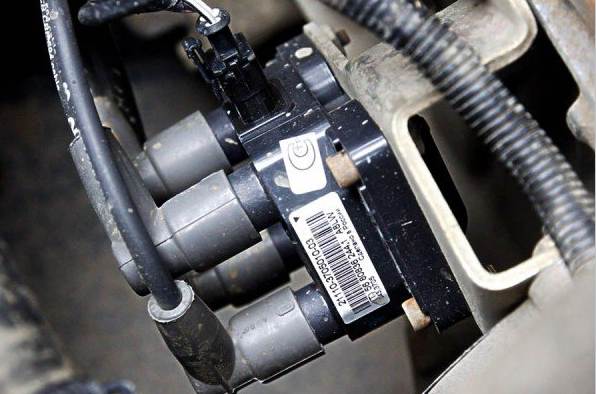
It happens that suddenly the Priora car starts to triple, the reason for this is most often a malfunction of the ignition coil. In general, on this car, the Priora ignition coil is located separately on each cylinder, that is, there are 4 of them in total. As a result, if one fails, one cylinder does not work.
Most often, the electronics itself begins to report in the form of error codes that the ignition system is faulty. It is quite difficult to fix the ignition coil on the Priore on your own, so it is best to contact the service. In addition, to diagnose and troubleshoot, you need to have a multimeter and other tools.
If the attack caught on the road, and there is no way out of the situation, then you can try to check and fix the ignition coil yourself. It is possible that the problem will be that the coil has not burned out, but simply passes current. In this case, it can be saved by well insulating. To do this, heat shrink tubes are purchased at the radio parts store.
Checking the ignition coil
First of all, the coil must be carefully examined, its plastic surfaces must be smooth, without signs of deformation and cracks. Their presence indicates that the coil was very hot and most likely it burned out.
To check the coil on the Prior, you need to take a multimeter and switch it to the resistance test mode. Next, you need to touch the contacts of the multimeter to the 1st and 3rd contacts at the same time, that is, measure the resistance. Ideally, the figure should be about 0.5 ohms, but it happens that the error of the multimeter in the test fails.
After that, you will need to check the secondary wiring, for this, they touch the spring, which is located inside the cap, with a red probe, and connect the black probe to the second contact. In this case, the resistance should be about 340 kOhm. If these numbers do not match, then most likely the coil burned out. However, you can measure the readings on other coils for comparison.
If the ignition coil is checked and found to be working, then it just needs to be reinforced with insulation. This is done using special heat shrink tubing. First you need to cut the tube of the desired size, heat it with a hair dryer or on gas and put it on the coil. Now there should be no leakage and the coil should work normally.
In addition, you can check why there is no spark on the Priore using a special device MD-1, as well as AZ-1. After the devices are inserted into the place of the switch, they will indicate exactly what is out of order. Now you do not need to apply for diagnostics at the service station, everything can be done at home. These devices are not expensive, each about 100-200 rubles.
Coils for Priora
If guarantee period is over, and the native ignition coils fail a lot, then they can be replaced with better ones. Some motorists speak well of Bosh coils. You can replace them yourself, the main thing is to turn off the mass of the car in advance, so as not to damage the electronics. In general, high-quality ignition coils, on average, should serve about 100 thousand kilometers. You should not save on this, because later, because of this thing, the car can fail at the most inopportune moment.
If the ignition coil is installed on the Priora independently, then it is also important to take into account the condition of the candles. It happens that coils quickly fail because candles are used incorrect clearance. Its value should be at least 1 mm. However, it is better not to risk it and change the spark plugs when replacing the coils. That, in fact, is all the basic things that owners of this car need to know about ignition coils.
The ignition system (IS) is one of the weak points in many cars, including domestic frets. In the event of a malfunction, the system needs immediate diagnostics, and first of all, as well as the ignition coil (short circuit), in particular, we are talking about Priora cars. Read more about the device and node diagnostics below.
Description of ignition coil
Let's start with a description of automotive short circuits. First of all, it is necessary to consider the device, as well as the principle of operation of the unit on an 8 or 16 valve engine.
Device and principle of operation
Every motorist knows that the main function of a short circuit on Lada Priora is to ignite combustible mixture what is needed to run power unit. To ensure the ignition of the mixture, a very high voltage of 40 thousand volts is generated in the short circuit. The short circuit itself is a transformer device designed to increase low voltage which is produced by the battery. According to its design, the short circuit of a 16-valve engine consists of two windings - primary and secondary, which are wound with a copper wire on a steel core.
First, the primary device is wound on the core, and the secondary device is wound on top of it. This design is protected by a special case. In the event that the primary winding contains about 150 turns, then there will be more than one thousand of them in the secondary. There are no high-voltage cables in the short circuit design, since they are put on the candle.
When the powertrain control unit sends a signal to the primary, there is a magnetic field around the core. Ultimately, it contributes to the formation of high voltage on the secondary winding. As for the candle, at this moment it ignites the combustible mixture in the cylinders of the 16-valve engine. The short circuit is equipped with a protective case, and inside the structure there is a special spring with a diode. The latter is designed to promptly cut off high-voltage signals (the author of the video about a node malfunction is the IZO))) LENTA channel).
Types of coils
Let's briefly consider the main types of short circuits for cars:
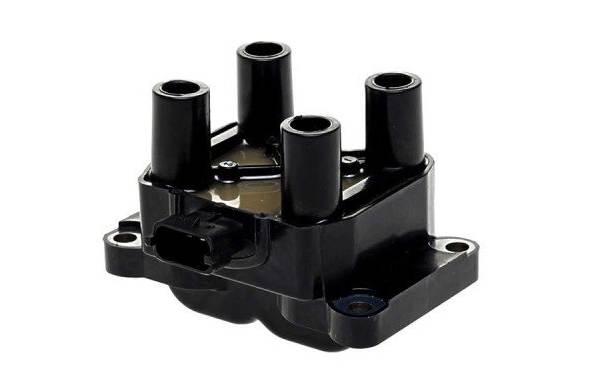
- General short circuit, this type is one of the most common. It can be used in both contact and non-contact, as well as electronic systems with a distributor.
- Individual type of short circuit. Designed for use in electronic systems. By design, this type also consists of primary and secondary windings, only they are located in reverse - first secondary, then primary. Also in such short circuits, electronic components can be used to ignite a combustible mixture.
- Dual type, such short circuits are also often called two-terminal. Such nodes are used in various electronic systems. Key difference design is the presence of two high-voltage cables, designed to ensure the formation of a spark in two cylinders at the same time.
Symptoms
The ignition coil on the Priora on a 16-valve engine, like any other mechanism, sooner or later fails.
The driver will be able to find out that this device needs to be replaced or repaired by the following symptoms:
- The operation of the power unit as a whole is disrupted. The 16-valve engine starts to vibrate, its power drops, it will be difficult to accelerate when you press the gas pedal. In addition, the engine starts to troit. The same signs appear with inoperable candles, so they must be checked first.
- When trying to accelerate, the driver will notice that the vehicle began to twitch. Also, shocks appear while driving at low speeds.
- Another symptom is the presence of cracks or traces of breaks in the insulation.
Health check
How to check the ignition coil on the Priore on your own?
There may be several options:
- visual inspection. If there are even small cracks on the short circuit, this indicates the inoperability of the device. If there are cracks or other damage on the case, most likely the short circuit has blown. It is also necessary to inspect internal components, namely spirals. If there are defects, the assembly is replaced.
- Another way is to check on the car. Short circuit is dismantled from the engine, disconnected fuel pump, a working spark plug is installed in the high-voltage output, then you need to try to start the motor. If the short circuit is working, then you will see a spark (the author of the video is Alexander).
Checking with a multimeter - for this, the short circuit must be dismantled in advance. The multimeter must be set to the resistance measurement mode at 200 ohms, then the probes of the device are closed. The calibration number will appear on the display of the tester, it must be written down.
- The multimeter probes should be connected to the short circuit connector and measure the resistance of the primary element. The tester should show a value of about 0.8 ohms, you need to subtract the calibration number from it - the resulting figure will be the resistance. If there are no values during diagnostics, it can be concluded that the primary winding is faulty.
- Next, it will be necessary to check the secondary element, for this the resistance of the multimeter is set to 2 mΩ. The red probe should be installed in the short circuit output, and the second - black - to the middle connector of the block. Diagnostics should show 342 kOhm. In general, it should be understood that the parameters obtained largely depend on that. As far as the short circuit was heated, therefore, it is better to carry out diagnostics on a cold device.
Video "Replacing short circuit Priors at home"
A step-by-step procedure for replacing a short circuit on a Lada Priora car with your own hands is given in the video instructions below (the author is the IZO))) LENTA channel).


