One of the most unpleasant and dangerous natural phenomena for road users is fog. In conditions of poor visibility, the likelihood of a vehicle collision increases. Equipping the car with fog lights allows you to move in all weather conditions. You can install and connect such lighting devices on the VAZ 2113, 2114, 2115 in a car service, but doing it yourself will be much cheaper.
Why do we need PTF on VAZ 2113, 2114, 2115
Fog is located above the surface of the earth (road) at a certain distance and this gap remains transparent. Thanks to the fog lamps (PTF), a beam of light is formed: wide in the horizontal and narrow in the vertical plane. It is directed parallel to the roadway. When the fog lights are on, the fog is illuminated from below, which improves road illumination. Thanks to the wide beam, the side markings and the shoulder are clearly visible, thereby reducing the risk of leaving the roadway.
Installation of PTF provides better illumination of the roadside and side markings, reducing the risk of exit from the road
Some motorists have the misconception that high efficiency fog lights can only be yellow. In fact, the road is well illuminated by devices with both white and yellow glasses. The indicated colors, compared to green, red or any other, are characterized by the maximum light energy in the spectrum. However, it should be borne in mind that when installing even the highest quality PTF with a strong fog density, visibility will be no more than 10 m. But since the speed of movement is low under such weather conditions, these indicators are quite enough. Sometimes vehicles are equipped with rear fog lights, the work of which is aimed at improving the visibility of the car when driving in fog.
Methods for installing PTF on a VAZ 2113, 2114, 2115
Installation of foglights can be done in several ways. On which of them to stop, each car owner decides for himself, based on his capabilities and preferences. Consider the most common installation options:
- Buying a front bumper with PTF. In this case, the headlights are sold already mounted in the front bumper. As a rule, the part can be purchased without problems at car tuning studios and immediately installed and connected. The disadvantages of this option include high financial costs.
Buying a bumper with PTF installed is the most expensive option for installing foglights on a car.
- Buying a bumper with holes for PTF. With this installation method, you should purchase a bumper with holes for the lights and the lights themselves with all the necessary elements (wires, relays, power button, etc.).
When buying a bumper with holes for fog optics, you will need to purchase the lights themselves and all the necessary accessories for connecting
- Self-installation of PTF is the most common installation method, since it requires minimal financial investments. The car owner only needs to purchase headlights with the necessary installation kit and facing elements.
The most common option for installing PTF is the purchase and subsequent installation of a do-it-yourself fog lamp kit
The layout of the PTF on the car
Before connecting the fog lights, it is important to correctly install the devices on the front of the car. This is done in accordance with certain rules, which clearly stipulate the place of installation of the light source. On modern cars, the installation locations of fog lights are marked from the factory. Basically, such lighting elements are installed on more expensive equipment. If the headlights were not installed from the factory, then the places for their installation are closed with plugs.
Fog lamps on the front of the vehicle must be installed in accordance with established regulations.
Is it possible to install xenon in PTF
Many car owners seek to install xenon in fog lights, arguing their actions by increasing lighting efficiency. Is it true? Let's figure it out. First of all, when installing xenon in regular PTF cases, focusing is disturbed, which is associated with a different principle of operation, unlike conventional lamps. Since regular foglights are designed to work with certain lamps, they simply cannot cope with xenon. The result of such changes will be too strong a reflection in the reflector, the rays are refracted, the light becomes blurry. There is a well-known situation - blinding drivers of oncoming vehicles, which increases the risk of an accident. Installing xenon in PTF is far from the most successful solution, and the effectiveness of such light is doubtful, so it should be abandoned.
When installing xenon light in regular foglights, focusing is disturbed, which leads to blinding oncoming drivers
Video: how to choose fog lights
Installation and connection of front and rear PTF on VAZ 2113, 2114, 2115
Before proceeding with the installation of fog lights, you will need to select a certain list of tools and additional elements. You can purchase both a ready-made kit for connection, and separately select the necessary spare parts. When everything is prepared, you can mark the place on the front bumper for the installation of future headlights. There are regular holes on the VAZ 2115 from the factory, and in the case of the VAZ 2113 and VAZ 2114, you will need to work with a tool (jigsaw or drill). If you do not want to damage the bumper, you can install lighting fixtures on special brackets.
For the installation of fog lights in the front bumper, you need to make holes with a jigsaw or a drill with drills, after marking
Installation Tools
You will need:
- file;
- drill and drills;
- electric jigsaw;
- roulette;
- marker.
Mounting materials
As a rule, a set for installing PTF on a VAZ 2113, 2114, 2115 includes the following elements:
- headlights with bulbs;
- set of wires;
- electromagnetic relay;
- PTF power button;
- ties and clips for fixing wires;
- connection diagram PTF VAZ 2113, 2114, 2115.
The kit for connecting foglights should include wires with terminals and connectors, a relay, a button
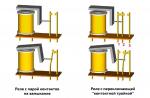
The installation of the considered light sources must necessarily be carried out using a button and an electromagnetic relay. The fact is that fog lights consume a fairly large current and connecting directly to the ignition switch will lead to burning, and subsequently burnout of the contacts. All this can contribute to damage to the insulation of the wires and the occurrence of a short circuit, resulting in possible failure of the electrical wiring.
Step-by-step installation and connection of PTF
To install foglights, the following procedure must be followed:
- Installation of the headlight switch button in the cabin. You can choose any place for the element, as long as the driver can easily control the key. Quite often, the part is installed instead of plugs on the dashboard.
The PTF power button is usually located instead of one of the plugs located on the dashboard
- The grille with the dynamic head is removed from the front panel. Behind it are two pads designed to turn on the headlights, indicate the operation of the PTF and illuminate the button.
- Having located the button in a convenient place, connectors are connected to it. After that, the grid can be put in place.
- The relay is installed under the hood on the partition of the engine compartment near the mounting block. To remove it, you need to unscrew 2 nuts, lift and find 2 pads (numbers 7 and 8).
The relay is fixed near the mounting block, for which it is necessary to unscrew the two fastening nuts
- A block with a bundle of four wires with contacts included in the kit is laid to the relay block.
A wiring harness with four contacts is laid to the mounting block, which is included in the kit.
- The wires that come from the PTF relay are connected according to the diagram in the following order: a wire from the 30th relay contact is connected to the block No. with terminal 17 of block No. 7.
Scheme for switching on fog lights: 1 - fog lights; 2 - relay for turning on fog lights; 3 - mounting block; 4 - fog lamp switch with a control lamp (on the left) and a backlight lamp (on the right); 5 - outdoor lighting switch (detail); A - to power supplies; B - to the instrument lighting control
Fastening the "mass" is carried out to the headlights, the positive wires are connected to the 2nd and 3rd contacts of block No. 8
- After all connections, the connectors are installed in the mounting block and its fastening is carried out.
As for the rear PTFs on the VAZ 2113, 2114, 2115, on these modifications of the car such a light source is installed from the factory, that is, one more light bulb is used in the taillight. Control is also carried out from the passenger compartment using a button, but only without fixation, since a slightly different design of the relay (electronic) is used. It is worth knowing about this and not trying to install a lock key.
Video: installing PTF on a VAZ 2114
Checking the performance of the PTF on the VAZ 2113, 2114, 2115
After the lighting devices are installed and connected, it is necessary to check how everything works correctly. To do this, just turn on the dimensions and press the key that supplies voltage to the PTF relay, after which the lamps of the lamps should light up. When the dimensions turn off, the PTF lamps should also go out, regardless of the position of the foglight button. After checking the operability of the light source, you will need to adjust the luminous flux so that oncoming drivers are not blinded.
After installation and connection, we check the operation of the PTF: when the dimensions are turned on and the button for turning on the fog lights is pressed, the lights should light up, when the dimensions are turned off, the lamps should go out
Fog optics is one of the essential lighting equipment for any car. Such devices greatly facilitate the trip in conditions of poor visibility. If PTFs are not installed on a certain car model from the factory, installation can be done independently. This does not require special tools and special skills and knowledge.
Fog lights, they are also PTF, are the necessary lighting equipment for a car. However, not all factory manufacturers install them regularly, especially on budget models, which include the VAZ 2114. Only for an additional fee in the maximum performance, this car provided for the installation of PTF. The owners of the VAZ 2114 have to decide on their own.
A feature of the regular bumper VAZ 2114 without provision for the installation of headlights is the lack of seats for PTF. And yet, the installation of foglights on this model is quite possible.
You can equip the VAZ-2114 with foglights in several ways:
- Acquisition of a tuning bumper, in which tumanki are already mounted. Such bumpers are usually made in a tuning studio, they are installed and connected there. It's not cheap.
- Installation of a bumper on a car from a VAZ 2115 model with seats for fog lamps, followed by the purchase of a PTF kit and their independent installation on a car.
- Buying a set of foglights and "glasses" - facing elements for these headlights, installing them yourself. Let's dwell on this method in more detail.
Typically, a PTF kit includes: headlights, bulbs for them, a switch-on relay, wiring, a wiring diagram, and a power button. When choosing this kit, you should take into account the shape of the headlights, they should sit well in the "glasses".
For the VAZ 2114, small rectangular headlights manufactured by Kirzhach are considered optimal.
The optics of this manufacturer is used for standard installation of PTF on model 2114.
Fog lights on the VAZ 2114
When choosing another manufacturer, there is a risk of buying low-quality equipment, in particular light bulbs. As a result, the quality of headlight illumination will be low.
Sequence of work
With everything you need, you can get to work. Installation of foglights takes place in several stages:
- Headlight installation;
- Connection to the onboard network;
- Health check;
Headlight mounting
Since the regular bumper does not have seats, they will have to be done on their own. For this you may need:
- Drill with a drill;
- Electric jigsaw;
- File;
- Measuring tools (tape measure, ruler, etc.);
- Marker;
Work on the installation of fog lamps is carried out with the bumper removed. On a bumper cleaned of dirt, markings are first carried out. The optimal place for installation is the level of the lower air intake, but at a certain distance to the side of it. It is desirable that the PTFs be placed strictly under the headlights.
First, we determine the distance at which the fog lights will be removed from the air intake. Then we find out what size holes need to be cut. Decorative "glasses" will help with this. They consist of two halves - external (it is decorative) and internal (fixes the outer part and the headlights themselves).
The outer half of the glasses on the inside has a landing protrusion with which it must go into the hole in the bumper. To determine the dimensions of the hole, the dimensions of this landing ledge are measured. After we apply the markup with the appropriate dimensions on the bumper.
Having completed the markup, we proceed to cut the holes with an electric jigsaw. After this, it is desirable to correct the edges of the hole with a file. It is important to ensure that the outer part of the glasses fits snugly into the hole.
In these holes we fix the fog lights with bolted connections. It remains only to fix the "glasses" over the headlights.
After installing the foglights, we install the bumper on the car. This completes the first stage.
PTF connection and control keys
The wiring diagram that comes with the kit is simple and easy to understand.

Wiring diagram for foglights
First, we cut the wiring of these lighting devices into the mounting block installed under the hood, near the windshield on the right. To do this, unscrew the mounting bolts of this block and lift it up to gain access to the pads, with the designation Ш7 and Ш8.
These blocks provide for the connection of tumanok, although they are not regularly installed. They connect the wiring from the headlights themselves, as well as from the relay that comes with the kit. All this must be connected correctly, and the scheme is as follows:
- The wire coming out of terminal "87" is a ground and we connect it to the body of the car.
- Conclusion "85" leads to block Ш7 (connected to connector 17).
- Conclusions "30" and "86" are connected to block Ш8 (conclusion "30" - to connector 8, and "86" - to connector 1).
From the installed headlights, we lay the “positive” wire through the entire engine compartment, since they are connected to the Ш8 block, but only these wires are inserted into connectors 2 and 3.
Then we connect the pads to the mounting block, install the block itself in place, select a place for mounting the PTF relay not far from the mounting block.
The wiring diagram for the foglight control is also simple - there is a button in the kit, which we install in the seat on the panel.
The factory provided for the possibility of connecting these headlights, so there is a control block under the panel. To make it work, you need to remove the panel, find the required block and connect it to the button. After the panel is put in place.
To check the performance, turn on the parking lights on the car, and then - PTF. When you turn off the dimensions, even when the button for turning on the fogs is pressed, they should go out.
Installing this lighting equipment on the VAZ 2114, with the right approach, should not take much time. But the presence of working PTF on a car will significantly improve the illumination of the road at night.
If your profession is associated with frequent car trips, or you just love to travel, then you probably know that without good optics it is quite difficult to guarantee driving safety. At the moment, even the shortest trip should not be made without good fog equipment. Such optics are now installed on almost every car in the basic configuration.
However, there are cars in which you have to independently connect foglights through a relay. The scheme and installation steps for this optics are further in our article.
What are foglights for?
Before telling you about the features of mounting these elements, a few words about how important they are for a car. The main function is to supply light. The quality and range of illumination of the roadway depend on this characteristic. If the fog lights are well tuned, they are able to illuminate up to 10 meters of asphalt in front of them, which is quite enough for safe movement at a speed of 50-60 kilometers per hour. And it does not matter what weather you are driving in - with a cloudless sky or with thick fog - this optics always copes with its function. So how do you install it in a car?
Connecting foglights through a relay: diagram and instructions
First, prepare the necessary tools and materials. In the course of work, we will need a 15 amp fuse, several meters of wires, insulating tape, a power button, a block and a PTF relay. The wiring diagram for fog lights through a relay is shown in the photo below. We will be guided by it.

This is the same wiring diagram for the fog lamp relay. In principle, it does not present any difficulty, and it is very easy to deal with it.
Where to start installation?
First of all, you need to remove the central panel - 2 backlight lamps for the furnace regulator will be located here. They do not affect the operation of the PTF in any way, but we will need their wires. To feel for the two-pin connector, you should run your hand along the wire to the very end. It is especially important, since this is where the first contact on the relay will be established. Next, the wire is connected to the location of the oven backlight connector, and its second part goes to a separate PTF power button.
We connect contacts

How to connect fog lights through a relay next? In order for the system to have a twelve-volt network of dimensions and 85 contacts, it is necessary to run a wire to the relay. Next, we stretch the 87th contact under the pedals to the battery.
How to make the correct connection of foglights through includes 30, 85, 86 and 87 pins. We connect them, according to the figure. We also install a 15-amp fuse here. And the closer it is to the battery, the better. Next is the 86th contact. Everything is simple here - we connect it with the body.
About wires
Now you need to deal with the foglights themselves. As we know, there are only two wires coming from each headlight (“plus” and “minus”, respectively). We connect the latter with the body, that is, it will be our mass. Next, we raise it to the relay so that the wires are not visible, and connect it to the battery.

This completes the connection of the fog lights through the relay. The connection diagram, as we can see, is very simple, so even a novice motorist can handle this task.
Second installation option
It will be much easier for car owners who already have a place in the bumper for mounting fog lights. Then you don't need to buy fuses. All that is required is a pair of new foglights and up to 100 centimeters of wire (in reserve).

PTFs for foreign cars most often have two wires painted black and red. The latter is connected to the "plus", and the first - to the "minus". Although on some instances (as, for example, on foglights for the Asian-made Daewoo Nexia), it is unimportant which color to connect to. Red may well perform the function of "plus" and "minus". By the way, if you didn’t find wires for connecting optics in the bumper, it doesn’t matter - you can try connecting them directly to the battery. Moreover, it is not necessary to pull the "plus" and "minus" from each lamp separately. The installation order can be as follows - two wires (as we have already said, black and red) are installed to the battery terminals (more precisely, under them), which go first to the left headlight on the driver's side, and then to the right one. If the wires are short, we take longer ones, we clean their contacts at the ends and connect them. You will have to stock up on electrical tape for this. The color of the long wire that will be connected to the PTF and the battery is not critical. The main thing is that you do not get confused in polarity. You should also be vigilant and disconnect the battery before installation. Otherwise, the slightest contact of the wire with the body may cause a short circuit.
Such a PTF installation algorithm is suitable not only for foreign cars, but also for all domestic cars on which the manufacturer provides a place for attaching optics. For example, on VAZ 2110 and 2114 cars, connecting foglights in this way takes no more than 20-40 minutes of time (and this despite the fact that the motorist has no experience in installing such equipment on a vehicle).

What requirements must the PTF meet?
Finally, we note what rules modern fog lights should meet:

Conclusion
As you can see, connecting foglights to the VAZ 2110 and many other domestic cars is a fairly easy task that every motorist can handle. The fog lamp is your reliable assistant, which allows you to distinguish objects on the roadway in time and react to the traffic situation with a large margin of time.
The equipment of the car plays a huge role in the safety of movement, regardless of weather conditions. Thick fog is one of the most unpleasant manifestations of the weather, which can provoke not only a car stop, but also an accident due to poor visibility of the route. Installing fog lights allows you to travel in any climatic conditions. You can connect "foglights" to the VAZ in a car repair shop, but it's much cheaper to install them yourself.
What are "foglights" for?
The main task of the PTF is to illuminate the space in front of the car. Properly adjusted "foglights" are able to illuminate a section of the road 10-15 meters long. This distance is quite enough for safe movement by car in conditions of poor visibility. Switching such lighting devices on and off must be fully controlled by the driver.
The fog lights are adjusted during installation. The procedure does not take much time, but requires care and accuracy. You can independently install the rear and front PTFs.
How can I install PTF on a VAZ 2113, 2114, 2115
Installing fog lights on a car can be done in different ways. The specific option is chosen by the owner of the car, based on their own capabilities, preferences and wishes. There are three main ways to install PTF:
- Purchasing a bumper with pre-installed fog lights. Such details are presented in a wide variety in the tuning studio, where they can be purchased and installed immediately. Service specialists are engaged in adjustment and connection. The disadvantage of this method is that the cost of the work is too high.
- Buying a bumper with holes for the headlights. A bumper model with holes for "foglights" and a set of headlights are purchased. In this case, only the PTF is installed and the bumper is installed.
- Acquisition of a set of "foglights" and facing elements. The most popular and easiest way - installation is easy and fast, does not require large expenditures both financially and in terms of labor costs.
Fog lamp installation diagram
Fog lights are connected according to certain rules. They, first of all, relate to the placement of PTF on the car. Places for installing headlights are strictly defined.
Layout of daytime running lights
Manufacturers of modern car models pre-mark the PTF installation sites on the bumpers. As a rule, such lighting elements are most often available in a luxury car. If the headlights themselves are absent, then their installation sites are closed with special plugs.
How to put PTF: necessary materials and tools
Installing fog lights, regardless of the chosen installation method, requires the presence of certain parts and tools, without which it is impossible.
What is the button and relay for?
A special button and relay must be required - "foglights" are very powerful equipment for the car's electrical wiring. The absence of such parts can provoke high current loads on the terminals and the ignition switch, which will cause the contacts to burn out, damage and overheating of the insulating protection and a short circuit with the failure of the electrical network.
In order to install fog lights on a VAZ, you need to assemble certain parts in advance or purchase a ready-made kit. The cost of such a set rarely exceeds one thousand rubles.
The PTF kit includes:
- wires with pads and terminals for a specific VAZ model. There are three of them as standard: one connects the headlights, the second goes to the relay from the switch, and the third goes from the relay to the fuse box;
- fog lamp relay;
- power button;
- clips and ties that fix the wires;
- fog lights.
What PTF do you prefer? The headlights themselves are chosen by the driver to your taste, but the main thing when choosing is not to make a mistake with the power so as not to overload the generator and the car's electrical wiring. It is better not to purchase xenon headlights: the generator has a certain power reserve, but it is not designed for too high loads. Ordinary light bulbs will be enough.
How to connect "foglights" with your own hands
Before the direct installation of the headlights, their location is determined. In the case of a VAZ 2115 car, there are already regular holes in the bumper for installing additional lighting fixtures. Similar ones can be cut in the bumpers of the VAZ 2113 and VAZ 2114.
It is not necessary to spoil the appearance of the bumper - fog lights are easily installed on special brackets. Many PTF kits contain special decorative caps that give attractiveness and accuracy to the installed headlights and facilitate the process of their installation.
Installation and connection algorithm
- Installation in the passenger compartment of the power button. In the case of the VAZ-2114, the place for the key is on the left side of the driver on the front panel. However, its placement can be arbitrary - the main thing is that it is convenient for the driver to drive a car. Often, PTF power buttons are installed instead of plugs on the control panel.
- The grille with the speaker is removed from the standard front panel. Behind it are two connectors - one is designed to turn on the headlights, the second - to indicate the operation of lighting devices and illuminate the key itself.
- The button is placed in a convenient place, chips are connected to it. The speaker grill can be returned to its place.
- Under the hood there should be a mounting block that combines fuses and relays. The PTF relay will be mounted in the same place, so the block must be removed: for this, the nuts that secure it are unscrewed and lifted.
- On the bottom panel of the mounting block there are two pads - 7 and 8. Each of the pads is signed at the factory, so it is impossible to make mistakes at this stage.
- The PTF kit has a wiring harness with four pins. The mentioned wires are pulled to the fuse box from the fog lamp relay.
- The relay is mounted in the engine compartment of the car.
- The wires coming from the PTF relay are connected to connectors 7 and 8 of the mounting block: in connector 7, terminal 8 is connected to terminal 30 from the relay, terminal 87 to connector 1, terminal 85 to connector 17 on block 7, terminal 86 is connected to ground . From 8 pads 2 and 3, the terminals are sent to the left and right fog lights, respectively.
Earlier we said that fog lights on the VAZ 2114 and on other Samaras are installed from the factory only in the "Luxury" versions. And without - it’s not very comfortable to ride, because. the head light of the "Samara" is very weak, worse than on the "nine". That is why many car owners are wondering how to install foglights on their own?
In fact, the whole process is very simple, but it takes time. You can even get by with an old bumper without holes for PTF - cut it out with a jigsaw and put "glasses".
What is needed to install foglights (PTF)?

- Bumper with cutouts for PTF well, or a jigsaw and "glasses" for PTF.
- Installation kit for PTF (price 240r): wiring, relay, fuse, button.
- The fog lights themselves (PTF) with lamps ().
How to install and connect PTF?
Installation and connection of fog lights is done in 3 stages:
- installation of PTF in the bumper;
- connecting wiring to the mounting block through a relay;
- setting the button in the panel.
Fog lights wiring diagram

Well, I think everything is clear here! The scheme is not complete: the mass of the PTFs themselves on the body is not indicated, which must be done without fail. You need to fix the mass in a safe place, naturally on the metal! Before fastening, be sure to clean the metal from dirt and tighten the mass well so that there are no voltage drops. Otherwise, PTFs will burn dimly, unevenly.
Installation of fog lights in the bumper
As mentioned above, you have two options - either install a new bumper with ready-made cutouts for PTF, or cut it yourself with a jigsaw. To do this, remove the bumper, mark the mounting holes, cut with a jigsaw.
Connecting wiring to the mounting block through a relay

- First of all, we open the hood, find the mounting block and unscrew its two fasteners to the body on the sides, remove the cover from the mounting block.
- From the bottom of the mounting block, unfasten the two outermost wire blocks marked "7" and "8".
- We take the installation kit: we put the wires from the kit on the relay.
- The other ends of the wires are added to the block of wires "7" and "8" according to the diagram.
- We stick the wire blocks back into the mounting block and fasten it back to its native place
- Next, we attach the relay to the car body in any place you like: for example, next to the same mounting block.
- We carry out the length of the wires from the pads of the mounting block (which we have already installed) to the foglights and connect them. We also attach a mass of foglights to the car body.
Installing a Button in a Panel
To install the button (which comes with the mounting kit) - you need to partially disassemble the front panel.
Fortunately, the plant fussed and installed the wiring for the PTF in all Samar configurations, so we just have to remove the center console and find a block for connecting the button in the wiring.
To disassemble the panel, use the article: and remove only the center console:

Do not forget that the fog lights turn on only after the side lights are turned on!
After installing the PTF, they need to be configured and adjusted!