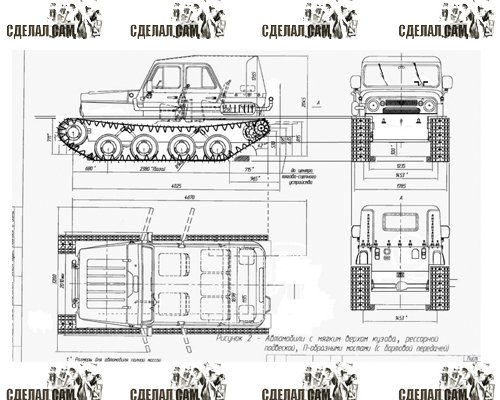
Home-made all-terrain vehicles on tracks: schemes for their construction and the main layout - from the Oka, Zhiguli, Volga, a motorcycle and improvised means. Correct drawings and do-it-yourself construction features, so that the car turns out to be maneuverable and passable, and manufacturing takes a minimum of time. In order to assemble a full-fledged floating tracked all-terrain vehicle in your garage, you don’t need so much - parts of an old car, corners and pipes for the frame, a welding machine, locksmith tools and enthusiasm.
If you want to assemble an all-terrain vehicle based on the UAZ, Volga, Gazelle, VAZ, Moskvich and other cars, then it is not recommended to use the body from them, and even from the Oka it is heavy. The body is convenient in terms of comfort, but the car's cross-country ability is deteriorating, fuel consumption is increasing, and it will be very difficult to make it floating. Therefore, it is advisable to cook the body yourself from light sheet metal, and make a safety cage around it so that if you crash into a tree or roll over, you don’t break your neck.
How to make a rotary mechanism and calculate the patency?
In fact, all homemade all-terrain vehicles on tracks have the simplest device. Behind is a rear axle with a differential from a rear-wheel drive car - usually from a Zhiguli. The drive rollers are driven through this rear axle from the engine through the gearbox. Turns are carried out using separate braking. That is, you need to draw two separate contours on the right and left.

How to make management - here everyone decides for himself. It is possible to build a semblance of control from two brake cylinders and a handle like on a tractor or a tank. You can come up with pedals, and transfer the clutch and gas to your hands. The vacuum for the brake booster is taken from the engine, or a compressor is hung on a separate pulley.
The simplest scheme for building a caterpillar all-terrain vehicle is to take a Zhiguli, lift it onto the frame, hang additional rollers and tracks on it, and make separate braking. And everything will run.
Calculations of the specific pressure on snow are quite simple. For a skier, it is 200 grams per cm2. Very good swamps have about 60 grams. That is, you need to take the total mass of the all-terrain vehicle and the area of \u200b\u200bthe caterpillar, and dance from this. .
The scheme of a floating all-terrain vehicle should imply the presence of an air tank on the frame, or sealed sides. But here you still need to think about stability, for this the engine and heavy units are placed in the center of the all-terrain vehicle.
Drawings and diagrams
It makes no sense to build such a machine according to the drawings. Just because everyone has different requests, everyone has their own details and set of source material. Someone has old Zhiguli gathering dust in the garage, and someone will sculpt an all-terrain vehicle from an old Ural motorcycle. Homemade is what it is and homemade, which is designed from scratch and built from improvised means.
But there are a few important details to consider. First, the frame and frame must be strong.
There is even a lot of rigidity of the car body in the forest, its mass is superfluous, but no one canceled collisions with trees and coups.
Secondly, many homemade all-terrain vehicles on tracks sin with a high center of gravity. The same Zhiguli on caterpillars are frankly dangerous, since any slope or ditch can cause a rollover.

Thirdly, if it is planned to go ice fishing on a home-made all-terrain vehicle, then emergency escape routes should be provided for the car. And this is once again about the fact that a body from an Oka or a passenger car can be dangerous for such purposes. You fell into a hole and you can't get out. In the same GTT, the doors open a little upward, there is an exit hatch on top - all this was not done in vain.
Safety is paramount. In addition, it is worth remembering the fire hazard, do not remove the silencer, be sure to carry a fire extinguisher with you, and so on.
How to make a homemade all-terrain vehicle on tracks extremely cheaply, safely and efficiently? You just need to have a tool and a place to build, and the cost of parts and metal, given the availability of used Zhiguli or OK, can not even be taken into account.
"Parma" cuts through the swamps and impassability of our vast country.
All data is taken from the Lunokhodov.Net website forum, where he shares his experience and skills under the nickname mishanya68.
Tasks originally assigned to the all-terrain vehicle builder.
The technical requirements and wishes include the following points:
1. confident movement on snow of medium depth and density for the Urals.
2. capacity 2 people, plus 50-80 kg of cargo.
3. minimum, must confidently float on the water (the main use is fishing and buoyancy for safety).
4. The main application is snow and ice 90%, the rest is autumn and spring-snow with mud.
5. to the maximum use of ready-made serial parts and assemblies.
In connection with this project, I once again re-read the topics on "Basin", "Luntik", "Barsik" and "Yukon" - these are ready-made all-terrain vehicles described on the website "Lunokhodov.Net". Many thanks to the authors of the projects for sharing their experience, best practices and drawings that they used.
Based on the experience of previous builders, I outlined an approximate design
1. rotation on the differential with a rear axle, but we will put a cylindrical one.
2. The engine is 2-cylinder, made in China, with a cylinder capacity of 690 cubic mm.
3. transmission: belt variator - gearbox from VAZ 5-speed - rear axle from VAZ.
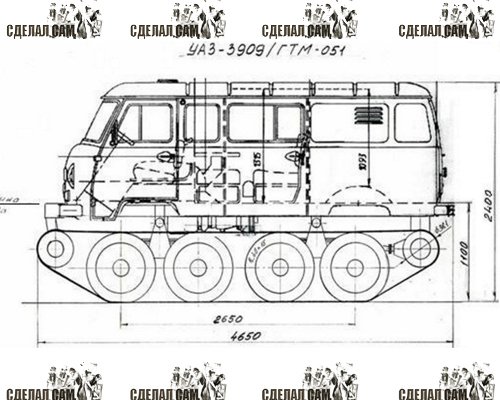
4. dimensions 2500x1750 mm.
The rear axle is taken from the classic Zhiguli. Instead of wheels, sprockets are worn (drive wheels for a caterpillar)
The beam was used. From disassembly, after checking for straightness, I cut off the excess and immediately cleaned it, cleaned it with petal circles with a grain of 40. It turned out pretty quickly, 1.5-2 hours for everything, and cleaning took about 30 minutes. But this time is then saved on welding and painting.
Engine made in China.

Drawings have been developed for the production of guides that are fixed to the inside of the track tape and prevent the tracks from coming off during movement and turns.

Semiaxle factory.

Half shaft purchased, find the differences! Therefore, it was decided to leave the factory half shafts, but with the replacement of bearings.

I bought belts for the production of caterpillars in a rubber goods store at a repair plant in Perm.
Can you be more specific: what is "increased strength"??? In numbers. 4 spacers is good, 12mm is not much?
The strength of the tape is created by the gaskets - the rest is rubber, which in itself does not carry a load, BUT protects the gaskets from damage. For example, I took one so that on one side (outer) it was 3-4 mm, and on the other (inner) - 1 mm. From the inside, damage is practically not expected, and the extra thickness is extra weight and not small! As for the gaskets - they are ALWAYS the same thickness - 1mm., The rest is from their number!
By footage: I took 4 pcs. with a length of 6.5 m, width-150mm, thickness-8mm, ply-7. It turned out for 10 thousand rubles.

He began to cook the frame of the future all-terrain vehicle. Someone calls the frame, someone calls it a boat, someone calls it a skeleton, and the author calls this design a keel, since the all-terrain vehicle is more designed for swimming.

The rounded front of the keel should improve the floating quality of the car.

It was decided to make an all-terrain vehicle without a balancer, as it is intended for trips in winter, the roads are smoother, the weight of the structure is reduced, and it is technically easier to implement.

The frame is assembled with road wheels on both sides, the most common and common wheels are used with R 13 from VAZ, the bottom of the star is raised from the floor level by 350 mm, the wheel is 570 mm in diameter.

Preparation of tracks for the manufacture of caterpillars.

Mounting plates.

Drilling template.

Ready-made holes on the conveyor belts for the manufacture of caterpillars.

Drilling holes according to the template.

Assembly.

A device for drilling holes in rubber using the punch method, but here you don’t need to hit the punch, it is clamped into the drill chuck and the rubber is cut, very good holes are obtained and less effort is needed.

You can watch the video on how it's done.
Photo of a fixture clamped in a drill chuck.

Photo fixture for bending pressure plates and bent plates.

One caterpillar is ready.

Safety engineering. So that it does not hurt to hit the ends of the pipe and not scratch, it is better to protect yourself, at least with gloves.

The caterpillar fits the sprocket, all the tracks are in contact with the teeth.

Front view.

The tension mechanism is designed so that both sloths are tensioned at the same time, there are pros and cons of this method. Plus, the biggest one is the same tension of the tracks, provided that the tracks are the same during manufacture and equally stretched, ease of execution and more reliable fastening of the idler axis. If these conditions are met, driving straightness is guaranteed.
Cons - poor sealing of the boat, since the sloth shaft passes inside the boat, if one caterpillar has flown off, then both sides relax in order to dress. Also to be removed for repairs if necessary.

Plates for fastening tension mechanisms.

Ukosina and amplifiers are welded.

Bridge fastening.

Installing disc brakes on the bridge from the VAZ, due to the braking of the drive wheels, the all-terrain vehicle will turn while driving.

The guides on the inside of the caterpillar, on the upper fold along the edges of the canine, are pressed through by 9 mm, this is with a plate width of 40 mm, steel thickness is 2.5 mm. this is the limit for a press with a force of 10 tons.

Guides, with a plate welded inside for attaching to tracks.

Device for making guide plates using a press.

So the guide will pass along the tension wheel.

The guide plate touches the brake hose from the disc brakes on the sprocket, so you need to change the brake hoses and install from the Niva.

The gaps between the guides for the passage of the caterpillar on the caterpillar sprocket are permissible.

All plates are cut and bent.

The caterpillar is the most time-consuming and labor-intensive part of the all-terrain vehicle.

The caterpillar and the sprocket must interact with each other without jamming at the entrance and exit from the star. Verification completed.

Watch the video.
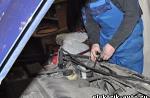
Engine installation.

Installing the clutch and gearbox.

Cardan installation.

Variator on the engine pulley. Transmission - so far, only positive results, the Kayurovsky variator works very well with the Chinese motor. At first, there were problems with releasing the belt at idle, but after adjusting the carb, everything returned to normal. Completely releases at about 1000-1100 rpm of the engine, seizing at about 1500-1700 rpm. Fully compressed at about 2500-2800 rpm.
I couldn’t understand why the maximum speed was less than 3000 rpm by ear, then I saw the gas limit bolt was completely turned on, the Chinese, apparently, turned it on for a quiet break-in, and also completed the control levers.

The first exit took place. First impressions are great.
Everything I said about differential rotation is not entirely true. There are moments about which a little later. The all-terrain vehicle turned out to be quite light and nimble.
He rolls around the garage with his hands into one, unfolds into 2 people. On the video, the surface is packed snow, the gear is first and third of the gas, I press the levers with one finger, there is almost no noise from the stars.
I finished working with the controls (gear shifter and gas drive), and also made a gimbal protection frame. Made a little trip. Now everything works clearly. Tomorrow I'll take everything apart for welding the boat and painting.


Dismantled the all-terrain vehicle for welding and painting.

Flipped over on his back.

I scalded the bottom, the sides remained and can be painted.

The braces are installed.

Pulley shaft inside the casing.


Scalded the sides and painted.

Painted everything inside.

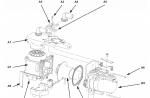
Reducer outside with plug for filling oil and differential.
One of the problems of our country is very bad roads. And so some enthusiasts are trying to solve this problem on their own.
It's just that a huge number of roads connecting various villages and villages are so bad in their condition that it is sometimes problematic to drive along them in an ordinary car.
And when the autumn-winter period comes, moving along them is almost impossible. Of course, you can get out of the situation and order an all-terrain vehicle from abroad, but this is very expensive and therefore you have to make do with what is available.
Homemade caterpillar all-terrain vehicle
This off-road all-terrain vehicle is not an obstacle for it, as well as any water obstacles. The body is made in the form of a box-shaped structure. Caterpillars are the mover.
Traction capacity - pulls a trailer weighing about 900kg.The hood is shaped to move through algae, driftwood and moss. Exhaust gases are directed upwards. Homemade crawler all-terrain vehicle is equipped with a winch located in front. The body bottom is sufficiently sealed, plus pneumatic rollers are located on the sides, which have a positive effect on the buoyancy of the all-terrain vehicle.
Driving an all-terrain vehicle on a caterpillar track
 The control of the all-terrain vehicle is the same as on the tractor, it is carried out by levers. Differentials located on the sides were implemented from VAZ disc brakes.
In the cab, in the middle of the floor, there is a pneumatic lever - a caterpillar tensioner. The ideal option would be to use a mechanical tensioner, as it is more unpretentious to repair, but the author of this all-terrain vehicle decided otherwise and installed a pneumatic tensioner.
Chassis
 The designer created an excellent chassis. You should pay attention to the tracks: they are cast, made independently. The tracks on the outside have lugs made of metal pipes welded to the metal sheet. This played a positive role in terms of patency and traction.
This technology is not used in foreign all-terrain vehicles due to the complexity of execution and increased financial costs. The rollers are made of wheels from a motorized carriage, the rollers are protected by a rubber reflector. Also above the caterpillar mover, there is a “damper” made in the form of a rubberized half-pipe.
Crawler all-terrain vehicle engine
 A VAZ engine with a gearbox was used as a power unit. The connection of the rear axle gearbox is carried out by means of a coupling made of rubber. The gearbox is connected to the side differentials by shafts.
As mentioned above, the differentials are made from VAZ disc brakes with conventional calipers.
The resource of the gearbox does not decrease at all due to the low speed of the all-terrain vehicle. The main advantage of this all-terrain vehicle model is its light weight. When the all-terrain vehicle moves through a swampy area or across a lake, the body sinks 30-40 cm.
Video homemade caterpillar all-terrain vehicle in action.
Tools
When implementing this project of a home-made all-terrain vehicle, the following tools were used: a welding machine, a grinder, various keys. Clamps, a machine for giving one form or another to sheet metal, this is especially true in the manufacture of the cab and the bottom of the all-terrain vehicle. Various bolted connections. Glass cutter for the manufacture of windshields and side windows. Drill for drilling holes.
Since the phrase about the state of Russian roads came out from Gogol's pen, the problem has not become less urgent. As before, in some godforsaken corners of the country, people generally forgot to dream about asphalt pavement. The only way out is to transfer to all-terrain vehicles. Alas, the models offered by car factories are not able to satisfy the needs of motorists from the outback. Ordinary people need a small, economical, and, of course, a cheap off-road vehicle. Only in a home workshop from improvised materials can such a dream come true.
Materials and components for an all-terrain vehicle on tracks
It would be fair to warn in advance that power units removed from cars are the cause of increased fuel consumption. But compared to motorcycle engines, they have a tangible power reserve. The manufacture of caterpillars also entails additional costs.
The body of a homemade all-terrain vehicle is best constructed from aluminum or duralumin sheet. It will be necessary to purchase triplex glass, liquid rubber (can be replaced with silicone grease). The main material for the tracks will be a sheet (or strip) of rubber. One pair of bridges borrowed from Soviet cars - Zaporozhets or Zhiguli.
There are important points that should be taken into account in the process of creating an all-terrain vehicle on tracks.
A self-made body is subject to such requirements as strength, tightness and streamlining with oncoming air flow while driving. As for geometry, the best solution would be a body that resembles a flat-bottomed boat.
In view of the fact that you have to travel around (more precisely, “caterpillar”) wetlands or even overcome shallow water bodies, the body should contain a minimum of seams. In other words, instead of welding, a single sheet must be bent, giving the desired shape. The metal sheet is used to manufacture not only the cabin, but also all compartments, including the one intended for the engine. To exclude the harmful effect of water, moisture-proof material (for example, rubber) reliably covers the joints and fastenings of the nodes. Particular care should be taken to protect the battery and electrical wiring from moisture as much as possible. It is better if special mines are allocated for them.
The rigidity of the design of the cross-country vehicle should be provided by a frame made of steel pipes. Bridges and the engine will be installed and fixed on a frame made of copper pipes.
In the body, make holes designed to bring out the bridges. The joints of the axle shafts and the body (in the holes) should be thoroughly sealed with rubber sleeves.
The highlight of this all-terrain vehicle is the presence of a caterpillar, without which it is difficult to imagine movement on any off-road and even swimming. The treadmill is cut out of sheet rubber and looped. When calculating the dimensions of the caterpillar, the distance between the shafts that are leading is measured. An important element that makes it easy to overcome any dirt is the lugs attached to the outside of the track with rivets. And if they are made in the form of small blades, then the lugs will play the role of blades when the caterpillar is immersed in water. Such an idea is not difficult to implement, having a thick aluminum sheet at hand. Next, you need to measure the width of the wheels. This value will be needed when calculating the distance between adjacent elements of the limiters, which are attached to the inside of the track. The center of each wheel as here http://modelist-konstruktor.com/ must exactly match the center line of the track and thus the wheel will be located between the stops.
The tensioned state of the tracks can be ensured in the following way: fill the space between the bridge wheels with the driven wheels.
The final step is to complete the cabin with laminated glass (triplex or duplex) with rubber mounts. ATVs - homemade tracks, the drawings of which are in this article, are popular with creative people.
"Today we will consider detailed step-by-step instructions for assembling a home-made tracked all-terrain vehicle "Ulan-3" This all-terrain vehicle was assembled by craftsman Alexander Ulanov from the Sverdlovsk region, the village of Novaya Lyalya. This caterpillar all-terrain vehicle is assembled entirely from components and assemblies of domestic production, borrowed from cars and motorcycles, the only engine was bought a new "Lifan" 22 l / s. assembled from a conveyor belt, and metal corners were used as tracks, the caterpillar is connected to each other through a metal loop. Wheels from VAZ are installed as road wheels. Gearbox from a motorcycle « « Cardan shaft from a potato digger with a gear ratio of 1.25. Planetary brake with gear ratio 4 to disc brake. The weight of the machine is about 650 kg.
Main bridge.
 Reducer and planetary gear.
 Installing the engine on the frame of the all-terrain vehicle.
 A flexible coupling will be installed between the gearbox and the rear axle.
 The friction clutch is assembled from the clutch discs of the Ural motorcycle. The torque is transmitted by a chain drive.
 All-terrain vehicle body.

 Device for bending the fangs of the drive sprocket.


 Conveyer belt.
 A caterpillar is being assembled, the master uses a corner as tracks.


 Here is such a wonderful caterpillar all-terrain vehicle turned out, you can go fishing, hunting, in the forest-taiga for mushrooms and berries. Due to the sealed hull-boat, it can float on water. Also, be sure to look at how the friction clutch made of the clutch discs of the Ural motorcycle is arranged. Enjoy watching.