The car's battery supplies it with electricity in splendid isolation only before the engine starts. After starting the engine, a generator helps him. The task of the generator is to ensure continuous recharging of the battery in all operating modes and under any load on it. But breakdowns happen. How to determine that it is the generator that is to blame?
Signs of its malfunction are:
|
Nature of the fault |
Cause of malfunction |
| The battery "boils out" | Large charging current |
| The battery is running low | Charging current is low or absent |
| The "No battery charge" lamp on the instrument panel of the car is on | No charge current |
| The voltage in the on-board network is unstable | There is no stabilization of the charge current or this current does not exist. |
| Extraneous sounds in the generator | Bearings require replacement or the alternator belt is not tensioned. |
But first things first. The generator is not so easy to remove, and to do this, you need a good reason.
Diagnostics of the generator on the car
Checked before checks tension and technical condition of the alternator belt. The belt must not be overtightened, but it must not be loosened either. In the first case, the bearings will wear out prematurely, in the second case, the rotor will slip with an increase in electrical load. Slippage, in addition to reducing the voltage in the network, will also lead to premature wear of the belt. The belt itself should not be worn and there should be no cracks on it.
If, when the engine is running, the smell of burnt rubber is felt from under the hood, the "lack of charge" lamp is on - seized alternator bearings. Increased noise, on the contrary, is caused by increasing the gap in them. This is checked by loosening the belt and shaking the rotor shaft in the radial direction. This determines only the play in the front bearing, but it also suffers in the first place.
If the mechanics are in order, check the electrical characteristics. This will require a device that can accurately measure a constant voltage of 12 - 16 V. Moreover, the scale (or digital indicator) at this measurement limit should show values \u200b\u200bin tenths, otherwise the measurements are meaningless. A pointer tester and a multimeter are also suitable.
The device is connected directly to the battery, observing the polarity. Polarity reversal will not harm digital devices, but for analog devices, the arrow will sharply hit the left limiter. You should not be afraid of this, the device will withstand it, but it is not advisable to stay in this position for a long time.
It is better to fix the measuring probes on the terminals. You can use the services of an assistant, but using crocodile clips is more convenient. The main requirement is that when the motor starts (it twitches at the same time), the clamps do not turn off spontaneously.
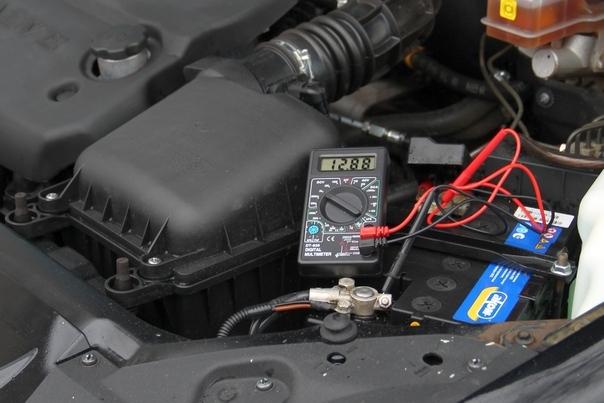
Before engine start fix the voltage of the battery. It should be within 12.5 - 12.7 V, depending on the degree of its charge, and the entire load is turned off. Do not forget that when you open the doors in the cabin, the light comes on, and this is at least a small, but a load. If the voltage is below 12 V, it is better to charge the battery before the test. A working regulator will greatly increase the voltage, trying to correct the situation and quickly charge the battery. And you will draw the wrong conclusions from this about its malfunction.
Now start the engine, warm it up so that the RPM equals the idle RPM for your model (usually within 800). We control the voltage on the battery, you can start looking at the scale of the device even during the warm-up process. The measured value must lie between 13.5 and 14 V. And so - in all modes of operation.
If at idle the voltage is below 13.0 V, then the problems may be as follows:
Faults related to broken contacts
It is necessary to constantly monitor the cleanliness of the battery terminals, but sandpaper cannot be used to clean oxides. It is better to scrape with a knife, and periodically loosen the contacts and grind the surfaces by turning the clamps on the terminal from side to side. And when checking the oil level, apply a couple of drops of it to the battery contacts.
Contact connections worth checking in case of low charge voltage:
- Positive output: from the battery to the generator;
- Negative output: from the battery to the car body; from the body of the car to the body of the engine.
Contact between the bodies of the car and the engine of VAZ models is provided flexible connection under the bottom in the area of the gearbox. The metal leash rots, additional resistance is added to the electrical circuit. And the minus of the generator is connected with the minus of the battery through it. Additional resistance is also introduced by rusty elements of the bodies of old cars.
The way out is to install an additional flexible connection from a 25mm2 conductor connected between any of the suitable bolted connections on the engine and the connection point of the battery negative terminal to the body.
Battery malfunctions
When sulfating the battery plates, depleting its resource charge voltage does not increase. The battery itself works as a limiter. To verify this, try to fully charge the battery. If it doesn't work out, replace it with a new one.
If during the operation of the generator the voltage on the battery is more than 14 V, then either it is very discharged, or the voltage regulator is faulty.
Diagnostics of the voltage regulator
The task of the voltage regulator is maintenance of battery voltage in the range from 13.5 to 14 V in all engine operating modes and under any load. Criteria for its performance:
- When you press the gas pedal and increase the engine speed, the voltage rises slightly, without leaving the permissible limits.
- When consumers are turned on: headlights, car radio, heater, air conditioner, the voltage drops below the permissible value only at idle. If at the same time increase the speed (add gas), then it returns to the operating range.
Check the operation of the regulator with the engine running, changing the number of revolutions by pressing the gas pedal. First, the experiment is carried out without load, then the headlights and the heater are turned on, adding a load. The voltage on the battery should not change significantly.
If this is not the case, the regulator is changed. On some models this is possible without removing the alternator, but it is still recommended to remove it. Purpose: to additionally assess the condition of the brushes, remove dirt accumulated during their operation, check the condition of the bearings.
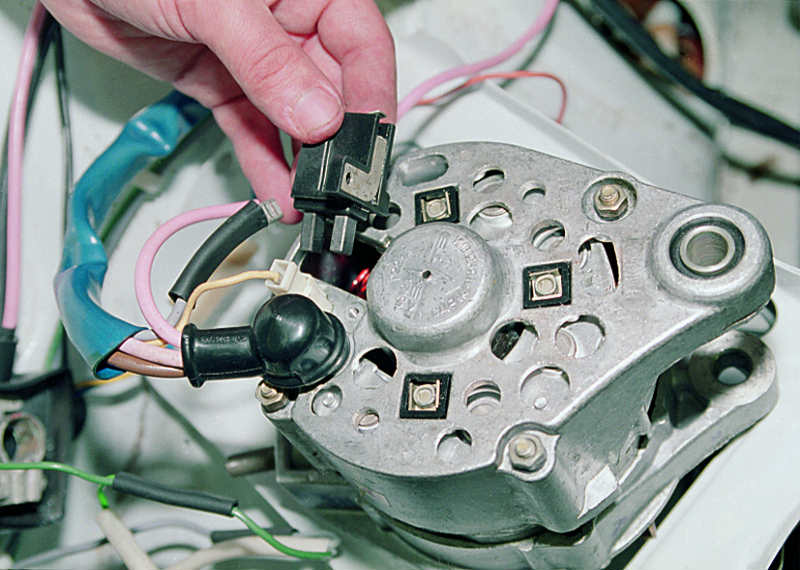
Checking the generator brushes
For a detailed examination of the generator, it is removed from the car. Then it is cleaned of impurities. Remove the brush apparatus, if necessary - the voltage regulator. The brushes must be worn evenly (their length is the same, and the wear from the rotor rings is symmetrical about the longitudinal axis). The remaining length of the brushes should be more than 4.5 mm (8-10 mm is considered the norm). If these parameters are not met, the brushes are changed, even if the fault lies not in them.
Along the way, it will be necessary to remove the coal dust formed during the friction of the brushes on the rotor rings.
To replace the voltage regulator or brushes, further disassembly is not required, but if the fault has not yet been found, open the back cover of the generator. Before this, you will need to unwind the positive output pin.
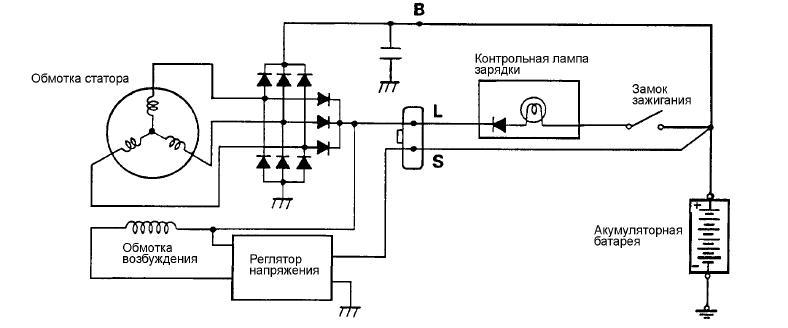
Rectifier test
The generator generates a three-phase voltage rectified by six diodes. The positive and negative terminals of the rectifier are made in the form of aluminum plates, which at the same time are radiators for cooling the diodes.
To check their health, you will again need a multimeter or tester. We transfer the device to the resistance measurement mode. Then we alternately measure the resistance of each diode in the forward and reverse directions. To do this, change the polarity of connecting the probes of the device. In the forward direction, the resistance is small (but not zero). In reverse - equal to infinity. If this is not the case, the diode has failed.

If one diode is damaged, at least two more fail. Accidentally leaving a breakdown unattended will not work. They change the diodes in a group, together with the radiator.
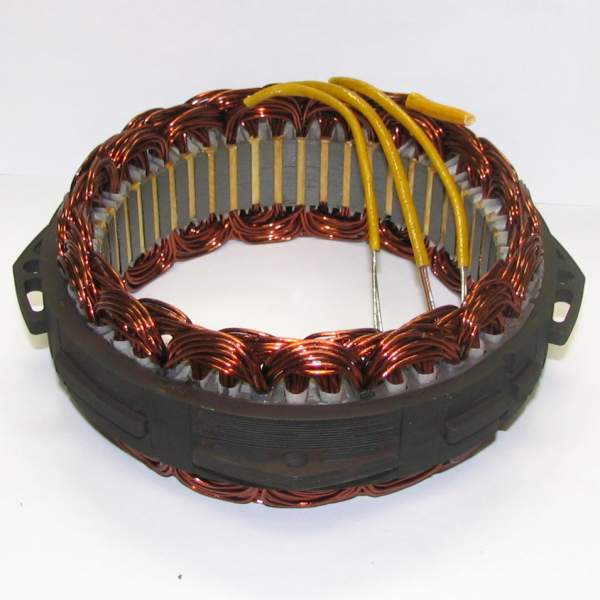
Stator Diagnostics
The stator winding is made with a thick wire, so breaks in it are rare. Unless the contacts are soldered at the points of its attachment to the diodes, which needs to be checked.
Then inspect the winding in search of mechanical damage. They appear if the rotor shaft shifted to the side during operation due to an increase in the output of bearings. At the same time, its impeller touches the turns of the stator winding and damages them. Result: breaks, coil shorts or ground shorts.
The insulation of the stator conductors is restored. To do this, a varnished cloth is laid between the turns. For fixing, the damaged area is coated with bakelite varnish and dried. The use of insulating tape is unacceptable, under the influence of the operating temperature inside the generator, it will melt.
In the absence of visible damage, it is possible that the turns of the winding short circuit between themselves and on the case. A turn short can only be detected by changing the color of a group of winding turns. It will not be possible to detect a defect by measurements, since the cross section of the wire is large, the number of turns, on the contrary, is small. The change in phase resistance is so small that it is comparable to the transition resistance at the point where the probes of the device are connected. But the probability of a turn circuit, fortunately, is small.
But short circuits on the case happen more often. To identify them, measure the resistance between any terminal of the winding and the housing. Use the highest limit of the multimeter to measure resistance. It is better to use a special device - a megohmmeter, but only on condition that the voltage it produces does not exceed 100 V. The operating voltage of the generator is 12-16 V, using a greater voltage to test megohmmeters will damage the insulation.
For any problems with the stator winding, the best way out is to replace it. The stator is sold with a winding wound inside it. And rewinding it yourself, even with the involvement of wrapping specialists, will not justify itself.
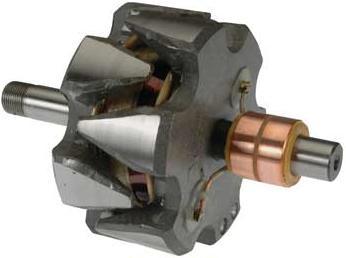
Rotor Diagnostics
When inspecting the rotor, pay attention to:
- development on slip rings: there should be no grooves formed under the brushes;
- winding color: uniform, different from black (black color - the winding burned out).
To level the surfaces of slip rings, they can be ground by clamping the rotor in a lathe, be sure to center it. For grinding, sandpaper is used, the grain of which is reduced as it approaches the desired shape of the rings.
To diagnose the rotor winding, its resistance is measured with a multimeter or tester. For different models of generators, this value varies 2.3 to 5.1 ohms.
Alternator bearings
Pullers are used to remove bearings. The use of improvised means for this purpose is possible only with appropriate experience.
If during the diagnostics of the generator it turns out that more than two of its parts are to be replaced, it is better to purchase it as a whole. And if you are not confident in your abilities, immediately use the services of the specialists of the nearest service station. This will save you time, nerves, and possibly money.