The heating system (CO) of the rear window is now equipped with all cars. Thanks to its correct operation, it is easier for the driver to perform maneuvers, since he will know how the situation is behind the car. What malfunctions can occur in operation and how to repair the heated rear window with your own hands? Find answers to these and other questions below.
Description of the rear window defroster
So, what is the heating device for the windshield (windshield) or rear window and what is the purpose of this system? The device is used to thaw ice at low temperatures, as well as to remove fogging in wet and dry weather in a car. Special threads are applied to the rear window, which allow you to remove ice residues during the car warming up in winter. By the way, it is the heater that is considered one of the most effective ways to combat fogging.
A certain number of special conductive filaments on a special film are installed on the rear window. This film is fixed with glue, and the threads themselves are powered by electricity. Electricity passes through the threads, allowing heat to be generated and, accordingly, to heat the glass itself.
Working principle and functions
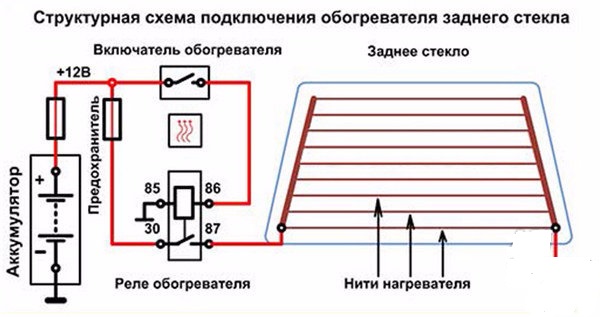
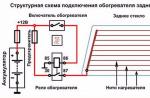
The principle of operation of the car glass defroster is that the driver presses a button located in the vehicle interior and further heats the glass. The power itself to the system comes from the positive terminal of the car battery - the voltage in this case comes through the safety elements and the ignition switch. Ultimately, energy is supplied to the controller of the device, as well as the relay contact. The negative contact of the system is connected to the mass of the car, that is, its body.
When the system is turned on, voltage is supplied to the relay coil. When this element is triggered, the contacts close, and two terminals are connected at the same time, which are marked on the diagram with numbers 30 and 87. Then the energy is transferred to the heating system and fed to the threads, which are fixed on the heated glass with glue. Further, the current again flows through the grounding of the machine and enters the negative output of the video - Sergey Kotov).
Possible malfunctions and their symptoms
As practice shows, often if the heating system does not work, then the owners of the car will find out about it as a result of fogging or the appearance of plaque. A person turns on the heating, while there will either be no result at all, or the surface will warm up, but minimally and unevenly. The power supply scheme of the system may be different - in some cars it is activated without turning on the ignition, in others the key in the lock must be turned.
Before checking and repairing the system, we recommend that you familiarize yourself with the list of faults:
- The device is not activated. As a rule, there is an indicator on the activation button - if the light does not light up when it is turned on, then the problem must be looked for either in the button itself or in the safety device. In the event that the indicator is on, but the device is not functioning, then you can also check the relay.
- In the event that the CO works, but the glass itself warms up too slowly, which is especially important for the frost period, then perhaps the reason should be sought in the connectors. If the contact is bad, then its resistance may be higher, while the voltage value, respectively, will become smaller. As practice shows, often the cause of the malfunction lies in the poor contact of the CO with the on-board network of the vehicle, so the contacts should also be checked.
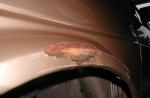
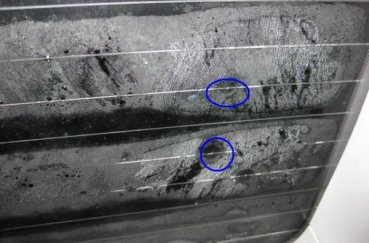
- Another problem is that horizontal traces remain on the surface of auto glass after CO activation. In this case, the reason, apparently, is damage to the threads in certain places. A malfunction of this kind can be determined without testers - just by eye. It should be borne in mind that the threads can be destroyed even with minor impacts, quite often this happens as a result of using a scraper for rubbing.
Photo gallery "Damaged sections of CO tracks"
Diagnostics and repair
Now more about how to diagnose and restore the damaged area. Let's start with a check.
How to find a damaged thread?
To troubleshoot, you can use one of several methods:
- First you need to make a visual diagnosis. If the auto glass is fogged up, then activate the CO. On the damaged area of the surface, fogging will remain after all the other threads have warmed up and the auto glass has fogged up. Such self-checking options are considered one of the simplest.
- Also, health diagnostics can be carried out using a tester - a voltmeter. To do this, you will first need to turn on the ignition and press the CO activation button. Then one tester probe will need to be grounded, that is, connected to the car body, and the other should be wrapped with ordinary food foil, and then brought to the heating track.
When carrying out diagnostics, a voltage value should appear on the display of the voltmeter, which will be no more than five volts (this is ideal). In the event that the voltage value is near zero or increases to twelve volts, this will indicate that a break has occurred on this track. Thus, it will be necessary to diagnose all the tracks. - There is another way to check CO using the same voltmeter. In this case, you will need to connect one tester pin to the positive CO terminal, and the others will need to be moved along the track, only from the negative terminal. In the place where the track is damaged, the voltage value will drop sharply to zero.
- If you do not have a voltmeter, but have an ohmmeter, then with such a device it will also be possible to check the system. In this case, the tester probes will need to be connected to the negative as well as the positive CO contact. Then you need cotton wool - a small piece needs to be moistened with distillate, and then run it along the incandescent path. At the moment when the arrow on the tester starts to move, you will find a cliff (the author of the video is Maria Lezhneva).
How to make repairs with your own hands?
If you are faced with the problem of CO inoperability, then it is not necessary to trust specialists to repair it - you can do everything yourself. There are several methods for recovering CO.
So, how to repair the system:
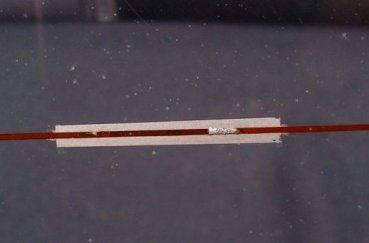
- For repairs, you can purchase a repair kit. As a rule, repair kits for this task have identical parameters and characteristics - they can be used to restore no more than 10 cm of the damaged section of the track. The repair kit includes threads and a polymer resin bottle. In this case, you will first need to accurately determine the damaged area, for this you can resort to one of the methods described above.
When the place of repair is determined, you need to turn off the CO and remove the film from the auto glass. Then the surface is carefully cleaned and degreased, after which a new track is applied to the damaged area. Using a special brush, which should also be included in the kit, it is necessary to apply polymer resin to the surface, and when it dries, repeat this step again. After completing these steps, you will need to wait at least 24 hours, only after that the CO can be turned on. - Alternatively, a special conductive paste can be purchased to restore the CO to working capacity. How to restore CO with paste - one layer of it is applied to the damaged section of the track, but note that in this case it will be necessary to capture the undamaged thread on both sides by about 2-3 cm. In this case, you will also need to wait at least 24 hours before further operation CO. For faster drying of the paste, you can blow the auto glass with a hairdryer.
Video "Visual guide for self-repair of CO"
How to properly repair CO incandescent tracks - a visual repair instruction is given in the video below (the author of the video is the BortJournal Renault Megan channel).