SHRUS- (joint of equal angular velocities) is also called a "grenade" because of its peculiar shape. The task of the CV joint is to transmit torque to the wheels of the car, the CV joint device is nothing complicated, it consists of seven elements:
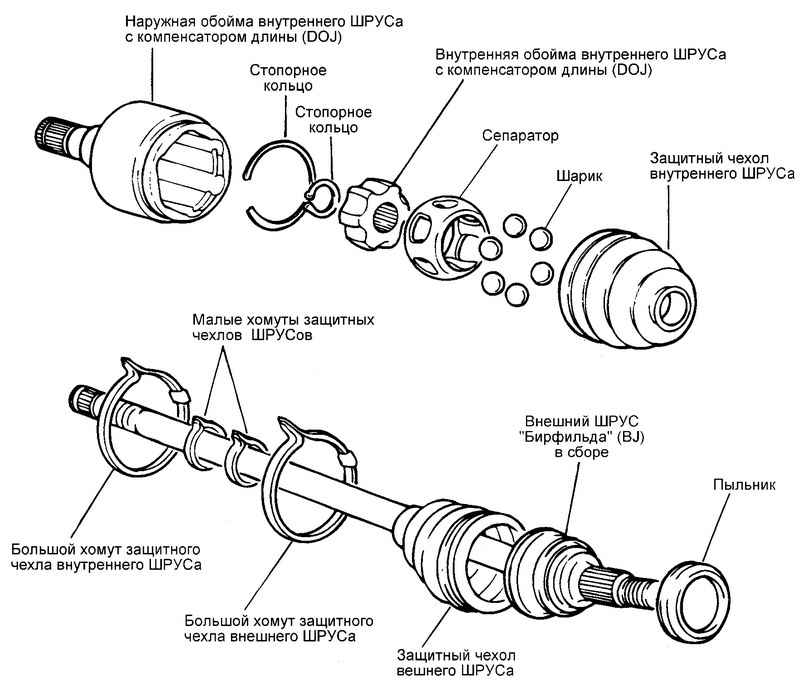
- Casing with outer casing.
- Separator.
- Balloons.
- Inner rim.
- Drive shaft.
- Corrugated cover (anther).
- Retaining ring.
The need to replace the CV joint occurs when there is a backlash in the connections of the device, as well as a characteristic crunch and crack when turning the wheels. The replacement of the CV joint, as a rule, occurs after the version of the CV joint malfunction is confirmed, for this it is necessary to diagnose it and make sure that the problem is really in it.
Before proceeding with the replacement CV joint VAZ 2110 I propose to make a simple diagnosis, first of all, check for play in the drive shaft. All that is needed for this is hands and an understanding of what backlash is.
First way . Grasp the drive shaft with your hand and shake it, if you feel a lot of travel or play - you need to CV joint replacement.
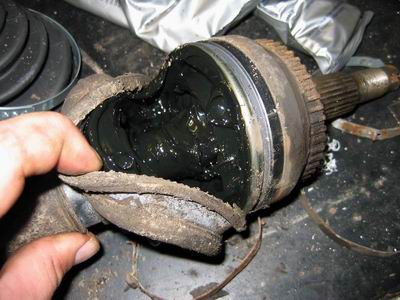
Second way . Drive into the inspection hole and turn the steering wheel as far as possible to the right or left, then take a closer look at the “grenade”, if there are numerous cracks or visible tears with traces of grease on the boot, then you need to replace the CV joint cover, otherwise after a while you will have to replace the entire CV joint.
- step-by-step instruction
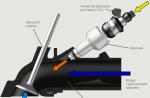
Before starting work on the replacement, you need to prepare everything. To do this, fix the car by turning on the fourth speed and tightening the handbrake. Install wheel chocks under the rear wheels, if not available, use blocks of a similar shape. Remove the protective cap and unscrew the hub nut, for this use the "shoulder" (extension) in the form of a pipe or mount, so it will be easier for you to unscrew. After you "break off" the hub nut, proceed to unscrew the wheel bolts.
- Using a jack, hang out the wheel on which you need to replace SHRUS.
- In order to get the thrust washer of the hub nut, unscrew the bolts.
- After that, unscrew the two bolts securing the lower ball joint of the steering knuckle.
- Turn the steering wheel as far as possible in the direction opposite to the replacement.
- Try to pull the steering knuckle with the rack, then remove the splined end of the outer CV joint from the hub. Remove the inner CV joint from using a pry bar.
- Fix the drive shaft in a vise, then remove the clamps from the outer and inner CV joints. Turn the anthers inside out, if you notice gaps or cracks, then do not stand on ceremony with their removal - just cut them off with a knife.
- Now try to knock the CV joint 2110 off the shaft, for this a hammer and an adapter and a wooden or bronze adapter are suitable.
The CV joint is assembled in the reverse order, during assembly it is recommended to replace the old hub nut, and after tightening, do not forget to lock its edge to prevent untwisting.
- When installing the inner CV joint, remember the plastic plug, it is installed on the end of the shaft.
- Before installing the CV joint VAZ 2110, take care of the required amount of lubricant. Install a new retaining ring on the inner CV joint before you install the assembled mechanism on the car.
- After installing the drive in the box, it must be planted in the side gear until it is fully fixed, for this, use light tapping with a hammer on a wooden guide, along the perimeter of the shaft axis.
Now you can wash your hands and safely say that the replacement of the VAZ 2110 CV joint with your own hands is completed! Follow the instructions and your repair will pass - "like clockwork." Self-replacement of the CV joint VAZ- this is real, so gather your thoughts and get to work! Good luck!