The wheel bearing, the brake drum and the wheel disk, there is a translational movement, braking, steering of the car wheels, ensuring the safety of the driver and passengers. Replacing the hub of the VAZ 2109 is quite possible with your own hands, if you have all the necessary materials and tools at your disposal.
The time for replacing the hub, according to the technical data for the VAZ 2109, is 27 minutes with the wheel removed. To change the rear hub, this instruction with a photo will help.
How to determine the failure of the suspension and hub
A sign of replacing a hub on a VAZ 2109 may be a loud noise or knocking while driving. But this is an unreliable source, since there can be several reasons for the occurrence of a knock: the handbrake strips, brake pads, silent blocks of the rear pillars can also knock. It's hard to guess.
To be more precise, you need to take a jack, lift, twist, sway and check. The wheel bearing usually does not knock, but it can give a buzz and vibration to the body. A knock, and a rather strong one, will only be emitted by a bearing requiring replacement.
Check bearing condition it’s not difficult - we raise the necessary side with a jack, twist and shake the wheel, if there is a hum - the bearing needs to be replaced. If there is play, check the tightness of the hub nut and wheel bolts.
It is not allowed to eliminate the play in the wheel bearings by overtightening the nuts. The tightening torque of the front and rear hub nuts should be: rear wheel hub bearing nut 186.3-225.6 (19-23) N*m (kgf*m), front wheel hub bearing nut 225.6-247.2 (23-25.2) N*m (kgf*m).
When replacing a wheel bearing, be sure to inspect the hub, if a new bearing is installed on it very easily, then such a hub must be replaced with a new one otherwise it will hang out. And, despite the replacement of the bearing, provoke vibration and knocking.
In the hubs of the front and rear wheels, double-row ball bearings with seals are used, which do not require relubrication and adjustment during operation.
When the wheel hubs are pressed out, the bearings are destroyed. Therefore, it is necessary to press out the hubs only in cases of increased bearing noise or a significant increase in the clearance in them: more than 0.015 mm in the front and more than 0.030 in the rear.
When choosing a wheel bearing, you should know its dimensions:
- rear hub bearing size VAZ 2109 - 60 mm (outer diameter), 30 mm (inner diameter), 37 mm (width), catalog number 6256706E1C17;
- the size of the front hub bearing VAZ 2109 is 64 mm (outer diameter), 34 mm (inner diameter), 37 mm (width), catalog number 2108310302001.
The price of a VAZ 2109 bearing is 600 rubles, relevant for Moscow and the region (spring 2017).
To replace the hub VAZ 2109 need this tool:
- jack and wheel wrench;
- socket wrench 30 mm and a long pipe on it;
- pliers for removing retaining rings;
- simple pliers or a 12 spanner wrench (for unscrewing the guide pins of the rear brake drum);
- wooden block and hammer;
- chisel and mount;
- universal puller for pressing out the hub or reverse hammer;
- new hub for VAZ 2109 with article 21083104014 or 21103104014.
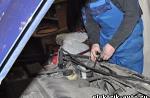
First, with a chisel or screwdriver, it is necessary to unfasten the shoulder of the hub bearing nut.

Then we take the head "at 30" ...

... and loosen the hub bearing nut.

Loosen the wheel bolts.

We jack up the car. We tighten the hand brake, turn on the first gear and substitute the shoes under the wheels. Unscrew the 4 wheel bolts and remove it.

Using the “12” key, unscrew the two guides.

If the guide does not unscrew, use a hammer to “shake” it by lightly tapping it.

Remove the brake drum.


We install a reverse hammer on the hub ...

... and remove the hub.

We take a new hub assembly.
The ease of rotation of the wheels on the car is ensured by the presence of rolling bearings installed in the hub. But these elements experience heavy loads during operation, since they must not only ensure high-speed rotation of the hub and the wheel attached to it. Both the hub and the bearing must also take on the weight of the car, since only this bearing is located in the connection between the hub and the axle, so it takes on the entire load.
The front hubs of front-wheel drive vehicles usually use a bearing designed for significant loads. But the rear one is somewhat inferior in this indicator, moreover, in the front of the car, the load on this element is almost always the same, since this bearing takes only the weight of the front of the car along with the engine and gearbox.
But the rear hub bearing often has to work with a changing load, which depends on the workload of the passenger compartment, as well as the luggage compartment, so the rear wheel bearings fail much more often.
Signs of bearing wear
Signs of worn rear wheel bearings are very easy to recognize. When driving in the cabin, a hum appears in the rear of the car. At low speeds, a creak can be clearly heard.
In cases where the bearing has begun to break down, a crunch may appear as the wheel rotates, indicating that the broken pieces have begun to fall between the rollers.
Checking the status of this element is also not difficult. It is enough to hang the rear wheel with a jack, check for the presence of axial play by rocking the wheel.
Then the wheel should be rotated, listening for the presence of squeaks. If the destruction of the bearing has begun, most likely the wheel will bite during rotation.
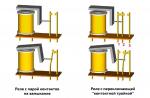
The next steps depend on the element you are using. On different cars, the bearing design may vary. For example, on the VAZ-2110, an angular contact double-row ball bearing of a closed type is used on the rear hub, outwardly it looks like a front hub bearing. But Daewoo Lanos uses a tapered roller bearing, consisting of two halves. Further, we will consider everything on the example of these two cars.
So, if there are signs of wear on the wheel bearing of the VAZ-2110, it is simply replaced.
In Lanos, you can try to eliminate hum, squeaks and play by tightening the hub nut. Often it is enough to carry out this operation to eliminate backlash and rumble.
But if a crunch is heard during the rotation of the wheel or tightening the hub nut does not work, the rear hub bearing is replaced.
Replacing a bearing using the VAZ-2110 as an example

First, consider the replacement of this element with the "Ten". The tools that will be needed are not so many, but specific ones will also be required. In total, you will need to have:
- Jack;
- Supports for cars;
- balloon key;
- Socket wrench "30" or a head with a knob of the same size;
- Pliers for removing retaining rings;
- Key for 12;
- Special puller for pressing out the bearing;
- Hammer;
- Chisel;
- mount;
With all this, you can begin to replace. The car is placed on a flat surface, 1st gear is switched on at the checkpoint. While the car is on wheels, it is better to immediately loosen the hub nut. Often this nut is tightly tightened, so it may be necessary to extend the key with a pipe.
Then the wheel bolts are loosened, the wheel is jacked up, and the car itself is put on supports. Next, the wheel is removed from the car.
Before removing the hub, you will need to remove the brake drum. To do this, you first need to unscrew the guide pins. After that, the drum is removed from the hub. Sometimes it can only be removed by knocking down the drum with a hammer and a wooden tip.
Next, the hub nut is completely unscrewed to allow the hub to be dismantled from the axle. Since the bearing sits tightly on the axle, a hammer and a wooden tip are indispensable. It is necessary to knock down carefully, constantly turning the hub for its uniform descent from the axis.
In this scenario, you will have to additionally remove the brake pads in order to “tear” the inner clip from its place, and then pull it off with a puller or with a chisel and a hammer. The method of tightening the inner race is not important, the main thing is to remove it without damaging the axle surface. If the bearing has come off the axis completely assembled, you can proceed to further work.
From the removed hub, you need to press the bearing. To do this, the retaining rings are first removed. Then with the help of a special puller. If there is none, you can simply knock it out.
But it is strictly forbidden to put a new element in place by clogging. It should be pressed in either with the same puller, or use a powerful vice, using the outer race of the worn bearing as a dressing.
After landing a new element, its retaining rings are installed, and this replacement of the rear hub bearing is completed and you can proceed with the assembly, which is performed in the reverse order.
Replacing the rear hub bearing on the example of Daewoo Lanos
On Lanos, this operation is performed somewhat differently, and you need less tools:
- Jack;
- Supports for cars;
- balloon key;
- Open-end wrench on "24-27";
- pliers;
- Screwdriver;
- Puller for bearing;
- Hammer;
- Chisel;
- mount;
The initial stage of work is almost the same as described above - the car is jacked up and the wheel is removed.
Video: Lanos, change rear hub bearings and rear pads

Then the hub nut is unscrewed with a wrench and the support washer is removed. After that, it will be possible to remove the brake drum along with the bearings. Often the inner race of the inner bearing remains on the axle. To remove it, you will have to use a puller or a hammer with a chisel.
Next, you need to press the outer race of the inner bearing and the outer bearing from the drum. For the convenience of work, special recesses have been made inside the drum, making it easy to knock out the outer races of the bearings with a hammer and a chisel.
After that, you need to press the outer races of the new bearings into the seats of the drum. It is better to do this with a vise and old clips as guides.

Then the inner race of the inner bearing is put on the axle and carefully stuffed with a hammer and a pipe equal in diameter to this race. The main thing is that she sits on the axis until it stops.
The next step is to install the drum in place, and after that the inner race of the outer bearing is already installed. It remains only to replace the thrust washer and tighten the hub nut. It must be tightened to the stop, and then unscrewed a third of a turn to ensure the rotation of the wheel. Before installing the protective cap, the nut must be secured with a cotter pin.
After complete assembly, you should drive a car a little, and then make sure that the bearing is not heated. If it heats up, you need to remove the cap again, pull out the cotter pin and loosen the nut a little more.
We continue to study the design of the car. Today is the rear wheel hub. A hub is a round piece with a hole in the center for connecting to a shaft or axle, and with a keyway or splines for torque transmission.
Hub functions
The main part of the vehicle undercarriage assembly, which experiences the greatest loads, is the hub, both front and rear. Because it is an intermediate part that connects the wheels and suspension of the car. If this important part breaks down, there is a threat to all road users.
Each wheel has its own hub. The wheel is rigidly attached to the hub and rotates around its axis, while the hub is rigidly attached to the suspension of the machine.
Depending on which drive the car has, the functions of the hub are different. If the car has rear-wheel drive wheels, then the rear wheel hubs perform an additional function - this is the redistribution of torque from the crankshaft to the wheel. It turns out that the rear hub of such cars is an element of the transmission, and not just a running gear.
Such parts are attached to the wheel hub - brake discs or drums. Drums are installed on inexpensive machines.
Therefore, another function of the rear wheel hub is to provide braking. In addition, the hub serves as an installation site for various sensors (speed, ABS, control and other technical indicators) that are stuffed with modern cars.
Here are the functions of the rear hub:
- Ensuring rigid reliable fixation of the wheel to the suspension.
- Ensuring the rotation of the wheel around its axis.
- Holds anti-lock and brake systems.
- Serves as a mounting location for various sensors.
Rear hub device
The design of the rear hubs is different whether the car is front wheel drive or rear wheel drive. The hub is a rounded metal part with an outer rim with many small holes and one large inner hole. The outer rim with holes is needed to mount the wheel. Guide bolts and studs are screwed into the holes, on which the wheel axle is fixed. The wheels are mounted, basically, either on 4 bolts, or on 5, but there are also up to 8 bolts.
The inner hole of the hub is designed to fit on the bearing. is installed in the hole in it. Some hubs have multiple locations for electronic sensors for ABS, speed, etc.
All hubs are attached with two bolts and one washer. The hub sits through the bearing on the trunnion. The trunnion is also a very important part in the chassis of a car. Bearings are used rolling roller or conical.
Rear wheel hub failure
To avoid serious breakdowns allows timely diagnosis and, if signs of a malfunction are detected, their quick elimination.
What breaks hubs:
- A sporty driving style, that is, with jerks, with, with turns at high speeds, as well as fast driving over bumps.
- Vehicle overload.
- Getting stuck in the mud and snow when the car sat on the bottom.
During such operation of the car, the hub housing may crack and the bearing may jam.
Symptoms
Options for self-diagnosis:
- When cornering, it is especially audible if the hub bearing begins to fail.
- Push the rubber of the wheel across with your foot to determine if there is any play. If there is play (free play), then it's time to change the hub.
- If there is a rumble in the area of \u200b\u200bthe wheel. In this case, it is necessary to raise the car with a jack and check the wheel for play. In this case, the sounds of a crunch, a creak are possible. When such a hum appears, it is impossible to operate the car further, because the hub or bearing has already worn out to the maximum and at any moment the wheel can jam.
When changing a wheel, check the hub at the same time. If it is replaced, care must be taken not to break the thread when tightening the rear wheel hub bolt.
Rear hub replacement tools
To remove the hub, you will need the following tools:

Hub replacement procedure:
- Loosen wheel nuts.
- Raise the car with a jack. Place supports for insurance. Place recoil devices (shoes).
- Remove the decorative cap (wheel center).
- Unscrew the wheel nuts.
- Remove the brake drum from the hub or remove the disc brake caliper.
- Unscrew the bolts securing the hub to the bracket. The bolt is unscrewed through a special hole in the hub itself. To gain access, turn the flange until the holes line up with the bolts. These nuts are tightened with a high torque, so it is not so easy to unscrew them.
- Unscrew the caliper mounting bolts, the steering knuckle mounting bolts and the brake shoe guides.
- Pull out the hub. The rear hub is removed from the bearing. Need a special puller to press the hub from the bearing.
Video
How to replace a Nissan X-Tail wheel bearing (Nissan Ixtrail).
How to change rear hub.
Replacement of the rear hub for VAZ 2108, 2109, 2110, 2110, 2112, 2113, 2114, 2115, 2170, 2172, KALINA, PRIORA, GRANT.
How to repair a VAZ hub.
Replacing the rear wheel hub on Skoda A5 (Skoda A5).
As you know, the wheel hub is the most important part where double sealed ball bearings are used. On the VAZ 2110, replacing the rear hub is a difficult and responsible matter.
Although, replacing the rear hub of the VAZ 2110 can be done calmly with your own hands, which will be discussed in this article.
Removing and replacing the hub

To get started, arm yourself with the necessary tools:
- Heads for 36, 15 and 13;
- Internal bat;
- A metal washer having a diameter of 8 cm;
- A large hammer or even a sledgehammer (you can also use an oil-powered or mechanical press);
- Five bolts.
If you need to replace the hub or remove it for any reason, you should first unscrew the nuts that fix the wheel.
We continue:
- after turning out the bolts with a T-50 bit and a head / 36, the wheel is removed, and the car is placed on supports.

Note.
The car must be braked with a handbrake and it is imperative to install wheel chocks, called shoes. We put the car on stops like this: jack the rear of the car and install the support under the car.
- we lower the lever all the way down, since the car is already disengaged;
- Next you need to remove the brake disc.
Note. Do not forget to disconnect the handbrake cable from the brake caliper. We free the caliper itself from the guides.
- we fix the caliper (for example, it can be tied to the rear suspension spring or completely turned out using the 15 head).

Note. Remember that during operation it is impossible to twist or pull the brake hose.
If the VAZ 2110 is a new modification, then there may be various sensors on the rear wheel. They should also be dismantled.
We continue:
- take out ;

- we pull the hub off the shaft (for this we take it with both hands and pull it);
- instead of the five removed hub bolts, five M10 bolts should be screwed in, having a length of 9 or 10 cm (it should be screwed in correctly so that the bolt captures all the threads on the brake disc);

- we put the hub with the heads of the screwed bolts on some hard surface;
- a metal washer is placed on top;
- a large hammer or sledgehammer is taken;

- we beat with a tool or press the puck with a press (as a rule, the hub moves after the tenth blow with a sledgehammer);
- disconnect the brake disc and hub;
- we collect everything in the reverse order (already when assembling a new hub, there is no need to use a sledgehammer, since everything is pulled together with threads).
Note. The new rear wheel hub in the VAZ 2110 must be lubricated with oil.
At this stage of work, the replacement of the rear hub can be considered completed. In many cases, when replacing the rear hub with a VAZ 2110, the bearing is also changed at the same time.
You can learn how to do this from other articles, we will not dwell on this in detail here.
I would just like to point out the following:
- Bearings with a double-sided seal in the hub of the VAZ 2110 have a split ring in their design. These bearings do not require any adjustment or even lubrication for a long time (while in service), because grease is put into the rear hub before the bearing is installed.
- The hub itself, both front and rear, is made of chromium steel and has three holes. It is these very holes that help to remove the bearings, if anything.
- The rear hub bearings have an axial clearance of 0.06-0.085 mm, which is felt when the wheel is rocking perpendicular to the wheel rotation. Such a backlash should not be considered an increased clearance, since the reason may not be in the bearing, but in other elements and connections;
- It is not recommended to tighten the hub nuts with a torque greater than that specified by the manufacturer. On the VAZ 2110, the torque is 15 / 0.15 kgf.
When replacing the rear wheel hub, it is advisable to use video and photo materials. When you work with your own hands, detailed instructions with pictures and diagrams are what you need.
Self-replacement of the hub and repair of other parts of the car will enable the motorist to save a lot of money, because the price of a service in car services is very high today.
When moving, different parts of the car experience certain loads. They can be from road roughness, its slope, wind resistance and others. In order for people in the car to feel comfortable, all these loads must be balanced. Wheel bearings are one of such elements for balancing loads.
Rear wheel hub assembly.
They are nodes that work to maintain the supporting parts of the transport.
The bearing allows the car to roll freely on the road. It also participates in the transmission and reduction of the load on the rest of the machine. The bearings allow the wheels to rotate freely.
These bearings are front and rear. During their entire service life, they bear heavy loads, and therefore often fail and require replacement. Bearings can experience stress not only when driving on a bad road, but also when starting or stopping a car, and therefore the risk of wear is quite high.
When should you change?

During the operation of the car in the bearing, a natural process of wear of parts and aging of the lubricant occurs.
Bearing failure is not a serious problem. But this gives a lot of trouble to the owner of the car. When driving, a car with a bad bearing will make noise.
The main causes of bearing failure are:
- Incorrect bearing installation and unadjusted clearance.
- Movement damage.
- Insufficient bearing lubrication.
Checking the operation of the bearing
If it happens that the bearing began to make unpleasant sounds, it is worth checking the part before replacing it. After a thorough diagnosis, a decision can be made on the need for repair.
It's easy to check: you need to raise the car and spin the wheel. If there is no noise, then the part is OK. When there is noise when the wheel rotates, the bearing needs to be changed.
Tools and working materials
To carry out the work you will need:

Replacement algorithm
Such work can be done on your own, but here you have to work hard.

Before you lift the wheel, you need to “break off” the hub nut - this is easy to do with a 30 head, a powerful wrench and a pipe. Do not forget to straighten the jammed side of the nut first!
Process:
- The car is jacked up and the wheel is removed from it from the right side.

In addition to the jack, be sure to substitute a reliable support.
- The brake drum is dismantled.

We unscrew the studs and remove the drum.
- The hub is unscrewed with a key. Here you need to use a puller, but you can work without it.
- The retaining ring that holds the bearing in its seat is removed and the bearing itself is knocked out.
- Then a new part is put in and lubricated. Pressing is carried out with a puller or a hammer with a wooden lining.

In order not to damage the bearing during pressing, only the outer race should be acted upon. Don't forget the retaining ring!
- Next is assembly.

After the hub nut is completely tightened, we jam the side with a wrench.
It is worth noting that for the durability of the bearing, all work must be done carefully. If you make a mistake, it can cause serious consequences.
If you do not follow the installation rules, the life of the bearing can be halved.
Conclusion
As can be seen from the above, such work can be done on your own. But in this work you need to be careful. That is why, if there are no skills in this matter, it is worth contacting the service station so as not to waste your money on the purchase of a new part and the time spent on work.