Preparing the Loaf (UAZ 452,2206,3741) , body lift - stages of construction smirnoffroad style .
What we had in the source is a 2005 UAZ, in average condition, that is, corrosion is everywhere, but there is no rotten iron.
First of all, the passenger compartment was dismantled, since the floor was covered with plywood and otherwise it was impossible to get close to the bolts of the frame to the body. Advice for owners of Loaves - if you want to save the body, then treat it inside with anti-corrosion mastic and make a couple, three holes for drain-ventilation in the floor. We, having removed the plywood, raked out 7-10 kg from there! wet sand and earth. The state of the floor is sad, but this is a topic for a separate discussion.
So let's get started. The body is attached to the frame with ten "furniture bolts" and this is no joke. Six of them are in the passenger compartment, two behind the front wheel arches, two at the feet of the driver and passenger. From below, the bolts are locked with second nuts.
Before starting the dismantling of the bolts, we disconnect the battery, disconnect the ground from the engine - behind the hood compartment and raise the car on a lift.

Next, we disconnect - the radiator mounts from below or from above (we disconnected from below, but then during installation we left the standard lower fasteners, and the upper one was slightly modified in place)

We disconnect - the drive rods of the gear lever and the brake booster rods.


Then, drain the coolant (do not forget to open the radiator cap), and remove the hose from the heater.


We unscrew the support for fastening the transfer levers and the fasteners for the filter of the sump of the transfer line between the tanks.


After that, completely unscrew the nuts from the six rear body bolts and loosen the front nuts. At the same time, since the fasteners are old and rusty, and I remind you of the “furniture” bolts with a square under the hat, you need to act carefully, if the bolt turns in the body, then there will be nothing to hold it with, and this is extra work, by welding a nut or bolt to it etc. Therefore, holding one nut with a wrench, unscrew the lock nut with the head, and only then the main nut.
There is nothing more to do under the car yet, we lower the car onto the wheels and disconnect the steering column and unscrew the boot on the floor.

Actually, when all this is done, you can begin to lift the body above the frame. We do the operation by placing stops under the wheels so that the car does not move. We start lifting from the rear of the car, keep in mind that when removing the load from the frame, it rises on the springs and if you raise the body with jacks, then you need a good margin in height. We lifted the lift and we did not have this problem.
So, we tear off the body from the frame by about ten cm and be sure to put a safety wide wooden beam between the frame and the body. Next, we take out the standard bolts and drill holes with a diameter of 12 mm. Stock bolts 10mm.
Needs some tweaking of the spacers. In our case, these were welded barrels 6.5 cm high. On the last and middle spacers, you need to cut off a small sector at an angle of 45 degrees, because there are protrusions on the frame. And the rear "barrels" should be 1 cm higher than all the others, but we had all the same ones, so we had to put 5 wide washers.
Next, we insert the four rear spacers, insert the bolts and bait the nuts on two bolts closer to the middle of the body. We also raise the body and insert the middle spacers. At the same time, we increase the size of the safety lining with the help of boards up to about 150 mm. Remove the nuts from the front bolts. We remove the insurance, lower the body.
We roll the car, fix it, remove the standard bolts and start lifting the body from the front. First, insert spacers and front bolts, bait nuts on them. The front bolts should be 180-200mm. The remaining 150 mm.
Next, still raise the body and insert the second pair of spacers and bolts. We drop the body. We tighten all fasteners from the center to the stern and then in front. We used wide washers and self-locking nuts, but you can also use lock washers and regular nuts if you like. Bolts with a strength of at least 8.8, and preferably more. And preferably with a fine thread.
Now the most interesting thing, you need to fix everything that we unscrewed, but the body has risen by 6.5 cm.
We do the following, we lengthen the rods by welding inserts (do not forget to paint them or treat them with anticorrosive)


Put the rods in place and secure them with cotter pins.
Next, we make a support for attaching the transfer case control lever


We put it in place and fasten it with long (90mm) M8 bolts


We make a filter support and also put it in place


Now the most difficult thing, after lifting the body, the steering wheel began to lie on the eggs ... oh, sorry, on the stomach. It is necessary to make an adapter bracket for the steering gear, like this.

Trying on...


Please note that the caps of the lower bolts must be cut off so that the rod does not touch them. After that, the steering column and its anther were fixed.
We put a new, longer hose on the heater, tighten the clamps, fill in the antifreeze.

Well, in fact, it remains to fasten a new elongated ground wire and a radiator, connect the battery, put big wheels (in fact, everything was started for them) and you can go free - TO PAMPAS.
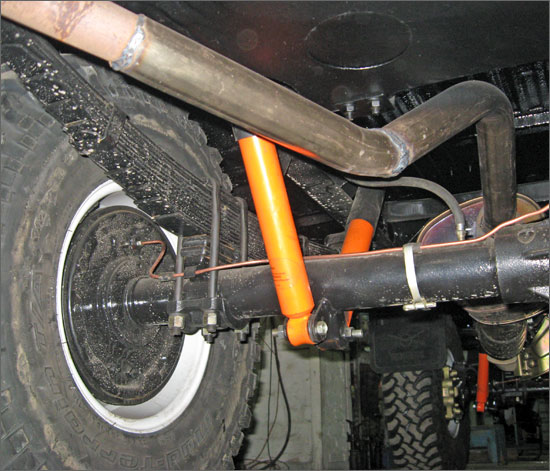
Finally, photos of spacers between the body and frame. They fastened it rigidly, without any rubber bands, since both the frame and the body of the loaf are not too strong, and so some reinforcement appeared. Although, if wisely, it is better to strengthen the frame with additional spacers and scarves.


The car factory was originally intended for military and national economic needs, so the chassis, frame and chassis were made from high-strength materials. After the collapse of the Union, many cars from state ownership migrated to the private sector, continuing to serve faithfully. True, it requires some attention, a layer and removal of corrosion.
UAZs are quite maintainable and hardy cars
We solve cosmetic problems of the body
Before you begin, determine the extent of the damage. Sometimes corrosion starts from the inside of the body, although the outer paint layer looks intact.
Wash and dry your vehicle thoroughly before scheduling repairs. Inspect the bodywork for damage. Depending on the amount and size of corrosion, you will decide whether it will be a do-it-yourself repair or send the car to a car service. It is necessary to do a major overhaul, or medium.
So, you have decided on your own.
- Clean problem areas to a metallic sheen.
- If rust has eaten through the metal, you will have to put patches, weld them from the inside. level with an emery disc;
- First straighten the dents on the metal;
- Before wipe from dust, dry particles of old paint and then degrease.
- Treat the car body with phosphating primer. This measure localizes the centers of corrosion, even if islands of rust remain, and will protect the metal from further oxidation. The protective primer is diluted with a solvent and applied in a thin layer from the spray gun. .
 The body of the UAZ has to be patched with metal, you can’t do without a welding machine
 After the phosphating primer, so that the phosphate does not enter into a chemical reaction with the putty.
- Now start sanding. Apply putty in thin layers, smoothing out the unevenness of the metal left after mechanical repairs. Putty is applied at least three times with intermediate drying and grinding of each layer.
- The putty surface is primed in one or two layers before painting. For priming, use an airbrush. The dried primer layer is sanded to form a smooth surface, removing possible streaks.
- Then 2-3 layers of car enamel of the corresponding color are applied alternately on the surface to be treated. Each layer is aged in accordance with the time indicated on the bank. Keep in mind that the drying time on the jar is for room temperature. If the room temperature is lower, the drying time of the paint increases. Air humidity also affects the drying of the paint no less than temperature. Sand each dried layer and wipe off the dust with a sticky cloth.
Repair without a welding machine
 Instead of welding for patches, UAZ uses tin
 In this chapter, you will learn an interesting way how to repair UAZ with your own hands. , without using a welding machine. There will not be a word about fiberglass and epoxy here - we will leave them for plastic, and for those unfortunate craftsmen who work not in good conscience, but only to close the eyes of the customer. An owner who respects himself and his car will not stick fiberglass with epoxy on a rusted body. Because corrosion under such a patch will continue its destructive effect, and as a result, in a couple of months you will get an enlarged hole in this place.
On a metal body, especially if it is a UAZ loaf body, the patches must be made of metal. Find scraps of steel sheet close to the thickness of the body. With a grinder, or a hacksaw for metal, cut out patches from it to size, blocking the holes on the machine body. Turn the cut out parts so that the cuts do not stick out at the edges, try them on, and grind them to the attachment points. Remove the joints with a strong soldering iron. Warm up the patch and put it on the tinned place, solder it, while leveling the molten tin so that no protrusions form. Tap gently with a hammer.
Let the patch cool down. Check for strength. If everything is done correctly, then strength and durability are guaranteed. Sand down your patch. So, with the help of a soldering iron and tin, you can solder small patches on the body, on the door, process the rest of the body parts. Tin, in addition to connecting, also protects the metal from corrosion.
This method is no more expensive than fiberglass patches, but more reliable. This method allows you to perform any fine Ulyanovsk machine.
Lifting
Increasingly, the owners of the UAZ 452 model, popularly nicknamed the loaf, come to the need to modernize this car. The body of the UAZ loaf is lifted, lifted to increase cross-country ability. There are 2 types of lifting.
Body lifting.
This option is easier to perform and gives the machine more stability in off-road conditions and cornering due to the fact that the center of gravity does not shift. The lifting of the body is carried out thanks to spacers that are inserted between the frame and the body and provide a rigid bundle of these elements. Spacers raise the body by 8 cm, and if you install large wheels, the car will become 15 cm higher. In this case, it is necessary to trim the wheel arches and wings so that the wheels do not cling to them when turning, and be sure to hang the mudguards.
Suspension lifting
 Suspension lift will return the car to adaptability to our roads
 Increases the ability of UAZ to pass obstacles. True, in this case, there is a risk of a shift in the center of gravity, the car will lose controllability and stability. Only a comprehensive repair of the body of the UAZ loaf can save the situation.
- To begin with, we determine the optimal suspension height;
- Please note that lifting is limited by cardan shafts;
- You can reduce the chance of the machine tipping over by expanding the wheelbase.
To do this, take wide wheels, larger wheels. The rear axles are changed to Bars or Spacer. Replacing the brakes with disc brakes will help increase the wheelbase. Disc brakes with no fitting.
Body reinforcement
During the operation of the loaf, the rear doors are skewed, which begin to open spontaneously.
 Frame reinforcement of the body - a cure for deformations and divergence of joints
 We start strengthening the UAZ body with our own hands from the floor. To this end, we raise the floor and inspect the condition of the bottom of the body. The body is reinforced with a profile pipe 20x40. The lower profile is welded to the waves of the bottom. The first pipe is laid along the edge of the body, so that the rear door rests against it. The second - in parallel, at a distance of half a meter. Stiffeners from the same profile are also welded along the side wall of the body. Profiles are installed along the ceiling, parallel to the floor pipes. Thus, the profile pipes form a frame against the body walls. Between the upper and lower pipes, spacers are installed at a distance of 50 cm. The resulting frame by welding attracts the sagging corners of the body, so that the rear doors are aligned. If a sheet of steel is welded to the profiles welded to the side walls of the body and the spacers, you get a convenient cabinet for fishing rods and guns. On top, a shelf is also formed for various little things. In the same way, by installing stiffeners, the side wall and the doorway of the side door are reinforced.
Strengthening the body, increasing rigidity, is also provided by "kerchiefs" welded at the junction of the body panels. Only scarves should be welded at a distance not exceeding 15 cm from each other.
 After repair, UAZ looks very attractive
 Before closing the floor, inspect the bottom for rust, sand, repair if necessary by welding and treat with anti-rust mastic. While the mastic dries, cut out the details of the floor from plywood, cover them with drying oil 2-3 times, let the drying oil dry and lay the plywood on the floor. Then roll out the polyethylene foam. On top is another layer of plywood covered with drying oil. Lay the top floor on top of the drying oil. It can be linoleum, or sheet steel, depending on what is planned to be transported on the UAZ.
The side walls inside also need reconstruction. Rip off the old panels, clean the side walls of the body from corrosion, treat with mastic. When the mastic dries, roll out glass wool for thermal insulation, glue polyethylene foam on it and sheathe the panels on top with the selected material. It can be plywood, and hardboard, and hardboard with leatherette. You decide.
tuning
There are two requirements for a car bumper:
- Reliability and safety;
- External attractiveness, aesthetics.
Ulyanovsk cars are no exception. Car owners of these cars install bumpers with kengurins on the body of the UAZ 469 or "loaf", which, on the one hand, add solidity to the car, and on the other hand, protect the headlights and radiator from damage.
WATCH THE VIDEO INSTRUCTIONS
Requirements are imposed on bumpers and kengurins in that they must comply with safety standards, therefore, in order to avoid problems with a valiant traffic police, we purchase suspensions from a trusted manufacturer.
One of the most pleasant properties of both the entire UAZ model range and specifically the loaf is that they provide almost unlimited possibilities for transforming the car. Thanks to a very successful platform and low cost, very successful experiments can be put on the car, which contribute to improving their driving performance and the ability to boldly experiment with the design and tuning of the cabin. You can make sure of the different variations of tuning made by craftsmen with your own hands by watching the video:
Important! Although tuning can be stylish for trips around cities, in most cases a loaf is used precisely as a car for outdoor activities on off-road, fishing, hunting. Therefore, the article will consider the variations and main problems when tuning for the wild.
What can be used as tuning for a loaf? It all depends on the personal imagination of each person, but there are the most popular loaf options. There will be a review about them:
- tuning the onboard parts of the machine;
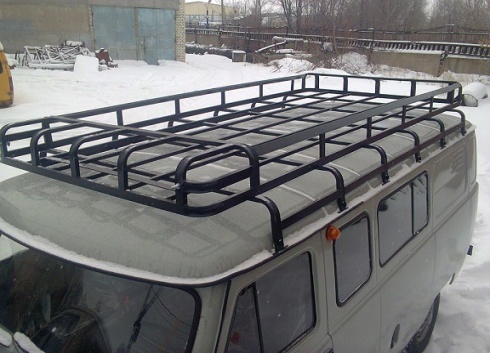
- trunk for transporting things;
- installation of a crane and additional means of loading / unloading;
- means of lighting;
- reinforced suspension and shock absorbers;
- winches;
- bumpers and kenguryatnik;
- reworking the filling.
Machine Board
What is tuning without changing the standard factory paint and sides? To further increase the strength, as well as counteract the negative influences of nature, which are inevitable when traveling off-road or when looking for fishing spots, side parts are reinforced with stainless aluminum, followed by painting in the color of the environment or military camouflage. When covering the loaf on their own, the design of the sides of the machine with an aluminum profile from the bottom to the door handle is used. What the primary result looks like, on which some craftsmen stop, can be seen in this photo:
Trunk
Like every machine that is used to travel in difficult conditions, as well as for hunting and fishing, a significant amount of free space is needed in which to carry the necessary gear. UAZ loaf thanks to its own factory parameters in the cabin can provide the necessary space. For many this is enough, but not for everyone. There are people who just like to carry a lot of things with them, and there are those who do it in reserve. Such people decide to protect themselves from lack of space by establishing during tuning a trunk that is significant in its area. It must be said that he fully justifies the tasks assigned to him regarding the provision of additional space.

The trunk itself has a number of other properties, in addition to providing usable space. It is primarily used to protect the roof of a car from tree branches that can easily scratch it and peel off the paint, reducing its visual appeal. In addition to clearly useful qualities, such an addition, in combination with enlarged wheels, also pleases with a more respectful appearance of the car. Here is a photo of a good UAZ Loaf trunk:

Warning! The trunk during tuning shifts the center of gravity up, so before installing it, you need to calculate whether it will harm the car. Also, due to the shifted center of gravity, it is necessary to be careful when cornering, since with a strong skid, the chances of the car turning over increase.
Mini crane for trunk
The car itself is quite high, and throwing things on the upper trunk, and especially heavy things, is very difficult purely physically. To simplify this task, either manual means of lifting heavy things are used, in the form of a manual lever system, or a manually assembled mini-crane, which help to do the job with less effort. For those who do not want to work on creating their own crane for the UAZ Bukhanka car, mini-cranes have been developed and are being sold, most of the modifications of which can easily load a load weighing up to 50 kilograms onto the trunk. They can pull even more, but at the same time, safety precautions should be observed and ensure that the weight of the load being lifted does not tear off the trunk or cause the car to roll over. The cranes after tuning look like this:

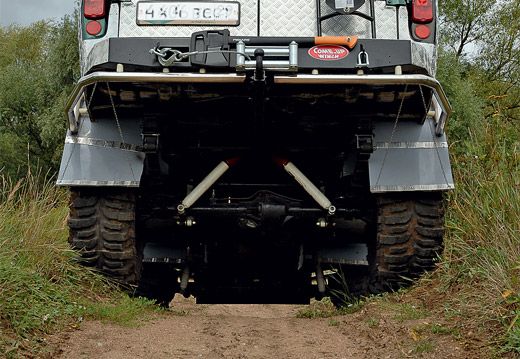
Suspension and shock absorbers
It is clear that when adding additional parts that will make the car heavier, it cannot do without increasing the margin of safety - after all, it will be very unfortunate if shock absorbers fail tens or hundreds of kilometers from civilization. And this is at best, the most harmless. Therefore, the suspension and shock absorber should be monitored separately so that they are very well made if they were not made in specialized tuning centers for UAZ Bukhanok, but with their own hands. After improvement, motorists share their experiences, one of the best looks like this:
Many car owners are unhappy with their native bridge, and replace it. It is often replaced by an extended one, which is removed from Bars. This is such a popular tuning action that it deserves a separate mention in the article. The differentials are also being replaced with ones that have increased friction to avoid situations where the car gets stuck in the mud and slip, and also favors the long life of the transmission. After all, a broken transmission disrupted more than one plan even for trained off-road travelers.
Lighting aids
For those vehicles that are planned to be used at night or on long journeys, at least for several days, you can install additional lighting, in addition to conventional car headlights. The structural strength of the loaf is so great that even small spotlights can be installed during tuning. The main question that the craftsman needs to solve is how to provide him with electricity in off-road conditions and in the absence of human settlements. But, given that most people put them on the trunk, then the power supply may be in the same place. In addition, the installation of additional equipment allows you to illuminate the road not only in front of you, but also shine on the sides so as not to miss a standing sign or other mark for travelers in the domestic UAZ Bukhanka car. An example of such an implementation is shown in the photo below:

Winches
Since such machines as a loaf are used in their mass off-road, and often as part of a group, it will be useful to equip them during tuning with winches, with which you can pull the car out of the quagmire or simply drag it if it stalls. For practical use, winches are installed in 2 places: in front or behind. What are the differences in their practical use? Front winches are very valuable if you need to pull the car, but there is no way to turn the car around. This is perhaps the only advantage. If you put a rear winch, then such a machine can not only pull out, but also drag it in tow, if there is no special towing channel. At the same time, the possibility of using it on the ground with difficult passage conditions is very difficult - after all, they will turn around, say, in a swamp and not also fall into a quagmire - it is not an easy task. However, they can also add aesthetic beauty if done carefully with your own hands when tuning a loaf.

Bumpers and bumpers
Reinforced bumpers can only be installed on a car that has a frame structure, and UAZ Loaf not only has it, but has been tested by time and various conditions. Reinforced bumpers are usually made of steel, which can effectively protect the car from meeting with fallen trees, stumps or from light collisions with other cars.

Reinforced bumpers are of two types: front and rear. They protect, respectively, the front and rear of the car body. Due to their relative cheapness, they are more valuable to reduce costs, as they allow you to spend less money than on car body repairs. Individual craftsmen do not buy power bumpers, but create them for tuning the loaf with their own hands. In such cases, they usually keep silent about aesthetic qualities, but some works are really worthy of praise.

Also, for additional protection of the bumper and loaf engine, kenguryatniks are used. Due to their simplicity in design and manufacture, they can be made for tuning with the help of a few stainless pipes and the ability to solder. In addition, it is much easier to remake them, in the case of an unsuccessful execution design. Kenguryatniki can be used not only as additional protection, but also as a place for a spare wheel, which can be seen in the photo above.

Changing car stuffing
No matter how good the car is, you can always find what to improve in it during tuning. You should start from the automotive heart of the loaf - the engine. The loaves are equipped with injection engines of the old design. They satisfy many in terms of their driving performance, which is beyond praise, but there are individuals who believe that there is no limit to perfection. Whether to replace the engine during tuning or not is up to the owner himself, but for our off-road it is enough for him.

If the engine is replaced only at will, then there are separate tuning fads that almost everyone performs. Among them are the installation of wider rims along with wide loaf tires to reduce pressure on the road (or off-road, this is already a service to look at) and avoid the situation when the car “sits its belly on the road”.

Conclusion
Of course, there are a lot of all kinds of options and variations for tuning this wonderful and truly universal car, and the description given in the article is just one of them. But that was not the point of the article at all. The main thing was to convey the idea that the UAZ Loaf is a simple car, and any person who is friends with tools and is not afraid of work can significantly improve its cross-country ability and quality during tuning. What kind of loaf will turn out is up to those who are working on improving it, on its appearance and technical characteristics, but one thing can be said - with straight hands during tuning, you will get an excellent car that can easily run more than one thousand kilometers without problems. And finally, a video that will show and tell about one of these loaves, which was described in the article, and which is designed for fishing and off-road:
The body of the UAZ loaf and its reinforcement ">
The UAZ body called a loaf is indexed with marks 452 or 3741. In addition, these modifications of the UAZ are usually called 2206 and 39625. The side versions of this body, which have the unofficial nickname "tadpole", stand apart. Like all models produced by the automobile plant in Ulyanovsk, a loaf or a loaf is distinguished by improved cross-country ability, a body frame, all-wheel drive and the presence of a classic “four” engine.
The production of cars and trucks of small type UAZ begins in the 50s. By the end of the fifth decade of the last century, the domestic auto industry produces the UAZ 450. A model was created as a replacement for the obsolete Gaz-69.
Seven years later, the universal modification 452 appears with improved power plants that consume much less fuel. So, the motor was already installed from the Volga, and not from the Pobeda, as before. Checkpoint - from Gas-24. Body length has also changed.
The next reform was carried out by the manufacturer in 1985. UAZ received new indices, although there were no cardinal changes, and as they say, restyling did not happen.
As for the design features of the body:
- Bus-type body, accommodating up to ten passengers;
- Van cargo-passenger type, capable of accommodating six riders and 450 kg of cargo;
- A van that easily transfers 800 kg of cargo, equipped with new seats.
UAZ loaf has a rather warm body, which is easily explained by the presence of 2 heaters.
We also note that UAZ bodies can have a wooden or metal platform. In addition, from the features of the UAZ, one can single out the ascetic interior of the booth, a large number of painted body parts, devices with the simplest equipment, etc.
Some drastic changes have only been made since the 1990s. Since that time, the engine, gearbox and chassis have been upgraded. Naturally, the interior components were improved in some way.
Passable SUV
UAZ loaf has always been distinguished by excellent cross-country ability. This was facilitated by a reliable frame structure, high ground clearance, the presence of all-wheel drive and a razdatka with a demultiplier. The suspension of the UAZ loaf is dependent, there are semi-elliptical springs, two shock absorbers on each side - all this makes it possible to carry out a convenient lift gain.
As for the brake system, UAZ has a 2-circuit type with hydraulics and vacuum for models up to the 90th year of production, and a “drum” for models after the 90s of production.
The very layout of the body of the loaf is made in terms of safety at the proper level. On the other hand, it is impossible to ignore the characteristic “jamb” of engineers who did not provide for a sufficient supply of free space in the cockpit. Frontal collisions increase the risk of injury.
Note. By the way, UAZs began to equip RB only in 2000. Interestingly, UAZ models until 2003 were equipped with static belt clips, and for models manufactured after 2003, inertial fasteners were provided.
Tuning and modernization
Tuning UAZ loaves is carried out quite often. We are talking about altering the body, either for purely male pleasures - going fishing, hunting, etc., or for practical purposes: strengthening, increasing technical parameters. Improvements, in particular, relate to achieving maximum cross-country ability and increased comfort. Work in the course of modernization is carried out both on running elements and on the body itself.
Elevator
Modernization of the 452nd
The body lift is carried out by installing steel 50 mm spacers. The track is also widened. Power bumpers are installed in front and behind, a winch is added to the front bumper.
There is also a roof rack with a ladder and space for fixing a spare wheel. Mandatory protection of steering rods, installation of gas shock absorbers Plaza, installation of a new fuel tank with the protection provided.
The elevator should also include the following procedures: the bottom of the body must be thoroughly treated with anticorrosive, and the standard steering wheel removed and replaced with a “luxury” model, supplemented by power steering.
Nowadays, the elevator can be carried out in 3 ways:
- Installing more enlarged spring earrings. In this case, the rule of the golden mean is most welcome. No matter how tempting the tuning ideas are, you need to be able to stop in time, because all this can eventually affect handling. In addition, when installing large earrings, one must adhere to the method of screeding as strong as possible;
- Installation of various spacers. Most tuners use a bridge-spring spacer. This method has many advantages: simplicity, minimal financial and time costs, and the possibility of carrying out the operation in your own garage. On the other hand, this technology also has a drawback regarding the inconspicuousness of the alteration;
- Another type of lift involves springing springs. For some reason, ordinary motorists placed this technology on the shoulders of professionals, considering the manipulation to be extremely complex, although in reality it is not. The principle of the operation is to put additional pillows under the springs. It doesn't matter if they are metal, rubber or polyurethane - the main thing is that they can last long enough.
There is such a thing as internal tuning of the cabin. This includes operations of the following property:
- Torpedo replacement;
- Installation of the top shelf;
- Sizing Shvi materials;
- Installation of soft folding seats.
There is also such a type of tuning as cropping. This procedure gives the opportunity to strengthen the bottom and better protection against rust. In addition to this, the UAZ loaf gets a thoroughbred exterior by increasing the wheel arches.
Cropping is done as follows:
- A thin disk of 0.8-1.0 mm is taken;
- Cutting is carried out carefully, strictly along the intended line (you must not forget to take measurements).
During the cutting process, unevenness is not allowed. It must be remembered that a profile pipe will be welded onto the prepared surface.
We continue:
- All parts are tacked with stitches (put a 5- or 10-mm seam every 100 mm).
Note. Later, when the final welding is carried out, the seams can be increased up to 30 mm, placing them every 60 mm, gradually creating a continuous welded line.
The profile is also welded from the inside. In this case, it is customary to put 10 mm stitches every 80-100 mm.
Learn more about body repair methods by reading interesting publications on our website. Study photos - materials, diagrams and instructions, see tables, where you can learn a lot of new things.


