Good afternoon/evening/morning/night everyone!
Here recently, the topic of the frequency of changing the oil in the engine was raised several times, and each time I read the pros and cons of changing the oil in the intervals between the "official" maintenance, I began to think about my particular case.
So what do we have:
1) gasoline engine, atmospheric, not low-volume, and even designed for the North American and Australian markets, known for their indifferent peculiar attitude to the quality of refueling fuel and periodic maintenance;
2) the manufacturer declares a maintenance interval of 15 thousand km or 12 months plus "zero" maintenance for 5 thousand km or 3 months. At the same time, slightly different numbers are indicated for the American market: 7.5 thousand miles or every 7.5 months, and “zero” maintenance for 3 thousand miles (i.e. 12 thousand km instead of our 15 thousand km);
3) again, like most other manufacturers, it is indicated the need to reduce the interval between maintenance by half under "heavy operating conditions", under which almost all urban residents fall;
4) I covered the first 15 thousand km in 10 months, and about half of this run was on the highway, and the second - in the city. Moreover, my average speed in the city by b / k is 15-20 km / h, and most of the distances are from 1-2-3 km to 5-10 km. Accordingly, for these 15 thousand km, the engine has worked for approximately 500 hours, which is twice the base engine oil resource (the figure of 250 hours is found everywhere);
5) fortunately, my first 15 thousand km included "zero" maintenance for 5000 km (3 thousand km of which were highway), i.e. at the moment (24 thousand km) there were three oil changes:
Factory passed 5000 km break-in;
Fresh oil after "zero" TO - 10 thousand km;
And oil after TO-15000 - another 9 thousand km.
And now, having compared all these data, as well as planning to fly by plane for a summer vacation, and not drive by car (i.e. the next 6 thousand km to TO-30000 will be mainly in urban mode, and this is about 250-300 engine hours), I still decided to do an intermediate maintenance, and in the future to stick to an oil change every 7-8 thousand km, while maintaining the "official" maintenance.
I decided to go to the officials to change it: firstly, so that there would be no problems with the guarantee, and secondly, it’s easier and faster, besides, an entry in the service book about the additional maintenance carried out will not hurt me in the future.
And as it turned out - not in vain I went! The oil was at a minimum, i.e. its engine still eats up a little: (Although, to tell the truth, for the 9 thousand km covered since the previous maintenance, I drove a couple of thousand km along the highway at a speed of about 130 km / h, and also tried the "maximum speed" - 200 km / h on the speedometer (no more than 190 km / h according to GPS), plus sometimes he "dabbled" with a "slipper on the floor" .... so he didn’t gobble up the oil from scratch :)
The oil in the 2.5l engine is included "according to the passport" 5.1l, but because not everything drains when replacing - they poured somewhere 4.9l, and left me a bit "for topping up" (in fact, there will just be a tin lying around in the garage :)).

By the way, the only place where this liter can of oil got in the car is a niche in the back door :)

At the same time, he asked me to look at the cabin filter and the air vent - they turned out to be very dirty (not fatal, but noticeably gray), so I decided to replace them, especially since the price is more than humane (I paid the same amount for the Goetz salon, but then the dollar exchange rate was 3 times lower!).
As a result, all this intermediate maintenance cost me 3200 UAH (that's about $125), and the work there is already $7.5. And the most interesting - I looked at the prices for these consumables on the Internet, and there they are even higher!

Thank you for reading to the end! :)
P.S. just re-reading what I wrote, I noticed in the photo that a liter bottle of oil is marked 5w30, while a 4-liter canister is 0w20! And in the account - only 0w20, and so it should be correct IMHO. Apparently, the warehouse worker who gave out the consumables didn’t notice a bit: (I don’t know now - to go back to them and demand that all the oil be replaced with 0w20 at their expense, or is it not important?
The choice of lubricant must be made taking into account the requirements of the vehicle manufacturer. Using the wrong engine oil for the Subaru Forester can lead to engine failure. The article provides data on oil tolerances from the manufacturer's operating instructions for the Subaru Forester.
Engine oil recommended by the car manufacturer ensures stable operation of the engine, extends the life of the power unit. After looking at the instructions for the Subaru Forester, we found not only the recommended SAE viscosity grade, but also the necessary API and ACEA classifications, as well as the type of fluids that should be used under loaded vehicle operating conditions and in case of topping up lubricant.
When choosing an oil, keep in mind: an increase in oil viscosity leads to an increase in fuel consumption. Thinner lubricants provide better fuel consumption at low temperatures, but in hot weather it is better to use thicker lubricants, they thin more slowly and protect the engine from overheating. Pay attention to tolerances, it is recommended to use original SUBARU oils.
Watch a video about the selection of engine oils for Subaru:
Lineup 2005
The Subaru Forester manufacturer recommends using motor oils with the inscription "ENERGY CONSERVING" corresponding to the SL, SJ group according to the API standard (in the absence of these liquids, SH grade motor oils are allowed), as well as A1, A2 or A3 according to ACEA classification. Oils with the ILSAC certification mark (multi-pointed star mark) are also suitable. Scheme 1 sets out recommendations regarding the required brand of oil, depending on the temperature regime outside the machine.
The required volume of engine oil for replacement is 4 liters.
Non-turbo engines
 Scheme 1. Viscosity classification and optimal temperature for their use for 2005 models without turbocharging.
Nessesary to use:
0w - 20 in the temperature range from +28°C to -30°C and below;
5w - 30 at temperatures from +40°C to -30°C and below;
10w - 30, 10w - 40 in the range from -25°C to +40°C and above.
Turbocharged
 Scheme 2. Specification of fluids by viscosity, the optimum temperature for their use for 2005 models with a turbocharger.
It is recommended to use motor oils:
5w - 30 at temperatures ranging from +40°C to -30°C and below;
10w - 30, 10w - 40 at a temperature regime of -18 ° C to + 40 ° C and above.
The car manufacturer indicates that it is preferable to use 5w - 30 oil for models equipped with a turbocharger.
If the machine is operated in very hot climates or under heavy load, for example, while towing a trailer, it is recommended to use motor oils of the SL or SJ grades according to the API standard with a viscosity of 30, 40, 10W-50, 20W-40, 20W-50.
Lineup 2007
 The factory indicated that it is necessary to use lubricants marked SM or SL according to API, bearing the inscription "ENERGY CONSERVING", it is allowed to use motor oils with the designation A1, A2 or A3 according to the ACEA standard, or with the ILSAC certification mark. In the absence of these liquids, according to the API standard, you can fill in the SJ brand class.
The volume of oil to replace is 4 liters.
 Scheme 3. The viscosity of the engine lubricant recommended by the factory and the operating temperature range for its use.
A suitable engine fluid is 5w - 30, it is used for engines with the designation DOHC (Double Overhead Camshaft) - the drive is equipped with two overhead camshafts in each cylinder head, as well as SOHC (Single Overhead Camshaft) - the design of the power unit has one overhead camshaft in each head cylinder block.
If the machine will work in extreme conditions, for example, a too hot climate or towing a trailer, then it is better to use more viscous oils: SM or SL according to the API standard with a viscosity of 30, 40, 10W-50, 20W-40, 20W-50.
Lineup 2011
aspirated
In the specified model without turbocharging, according to the instructions pr  manufacturer, it is necessary to use motor oils:
according to API - SN, SM with the inscription "ENERGY CONSERVING" or "RESOURCE CONSERVING"
according to the ILSAC standard - GF-4 or GF-5;
in accordance with ACEA - A3 or A5.
To achieve optimal engine performance, original SUBARU 0w - 20 engine oil is recommended. For topping up, traditional oils 5w - 30 or 5w - 4 are used, which must be replaced with SUBARU 0w - 20 during subsequent replacement.
Oil addition from level L to level F: 1.0 l. Oil change and oil-
th filter volume 5.2 l.
 Scheme 4. Recommended oil viscosity for 2011 models without turbocharging.
petrol turbo
In machines equipped with a turbocharged gasoline drive, the manufacturer recommends using:
SN or SM classes according to API labeled "ENERGY CONSERVING" or "RESOURCE CONSERVING";
grade GF-4 or GF-5 according to ILSAC;
A3 or A5 according to ACEA.
For optimal performance of the power unit, genuine SUBARU 5W-30 engine oil is recommended. For topping up, you can use standard motor oils with a viscosity of 5w - 30 or 5w - 40, with a subsequent replacement, the motor lubricant must be replaced with SUBARU 0w - 20.
Oil addition from level L to level F volume: 1.0l. Oil and oil filter change: volume 4.2 liters.
 Scheme 5. Recommended engine fluid viscosity for 2011 vehicles equipped with a turbocharged gasoline drive.
Diesel
For models powered by diesel engines, classes C2 or C3 according to ACEA are suitable. To ensure optimal performance during the operation of the drive, it is necessary to use synthetic motor oil 0w - 30. When topping up, you can use standard lubricating fluid 5w - 30, which is recommended to be replaced with 0w - 30 during subsequent replacement.
Adding oil from level L to level F: volume 1.0l. Oil and oil filter change: volume 5.5 l.
 Scheme 6. Engine oil viscosity and operating temperature for vehicles equipped with a diesel drive.
Lineup 2012

The manufacturer prescribes the use of engine oil approved by SUBARU, in the absence of such, an alternative oil can be used, the requirements for which are described below.
Non-turbo engines
Recommended classes of motor oils: 
A3 or A5 according to ACEA.
For non-turbocharged cars, the original SUBARU 0w - 20 engine oil is required. For topping up, use 5w - 30 or 5w - 40.
Adding oil from level L to level F: volume 1.0l. Complete replacement of oil and oil filter: volume 5.2 liters.
 Scheme 7. Temperature conditions and viscosity of the recommended motor lubricant for non-turbo vehicles. *recommended viscosity
Turbo Models
Recommended classes of motor oils:
SN or SM according to API standard. The canister must have the inscription "ENERGY CONSERVING" or "RESOURCE CONSERVING";
GF-4 or GF-5 according to ILSAC (there must be a sign of a multi-pointed star on the package);
A3 or A5 according to ACEA.
In turbocharged cars, use original SUBARU 5w - 30 engine oil. 5w - 40 can be used for topping up.
Adding oil from level L to level F: volume 1.0l. Complete replacement of oil and oil filter: volume 4.2 liters.
 Scheme 8. Viscosity and temperature parameters of liquids for turbocharged models.
Diesel
 Scheme 9. Recommended oil viscosity and temperature for diesel-powered machines.
Adding oil from level L to level F: volume 1.0l. Complete replacement of oil and oil filter: volume 5.5 liters.
Lineup 2013
 Be sure to use SUBARU approved engine oil. If it is not available, you can use a liquid that meets the requirements described below.
aspirated
Classes SN, SM according to API;
GF-4 or GF-5 according to ILSAC;
A3, A5 according to ACEA.
For non-turbocharged cars, optimal engine performance is achieved with car oil with a viscosity of 0w - 20; liquids 5w - 30 and 5w - 40 are also suitable for topping up.
Difference from level L to level F: oil volume 1.0l. Complete replacement of oil and oil filter: volume 4.8 liters.
 Scheme 10. Operating temperature range and viscosity for cars without turbocharging.
Turbo
For turbocharged models, the manufacturer recommends:
classes SN, SM according to API;
GF-4 or GF-5 according to ILSAC;
A3, A5 according to ACEA.
Viscosity 5w - 30, topping up is possible 5w - 40.
 Diagram 11. Operating temperatures and viscosity for turbocharged gasoline drives.
Diesel
 Scheme 12. Viscosity and operating temperature recommendations for diesel engines.
Lineup 2014

Be sure to use SUBARU approved engine oil. If an approved engine oil is not available, use the alternative engine oil described on this page.
aspirated
ACEA system - A3, A5.
In models without turbocharging, it is recommended to use oils with a viscosity of 0w - 20, and for topping up it is possible 5w - 30 or 5w - 40.
The difference in volume from level L to level F is 1.0 liters. Complete oil change including filter: volume 4.8 l.
 Scheme 13. Viscosity and temperature conditions for cars without turbocharging.
Turbo
API system - marking SN, SM;
ILSAC standard - GF-4 and GF-5;
ACEA system - A3, A5.
In turbocharged units, 5w - 30 car oil is required, 5w - 40 is possible for topping up.
Difference from level L to level F: oil volume 1.0l. Complete replacement of oil and oil filter: volume 5.1 l.
 Figure 14 Recommended SAE markings and temperature range for turbocharged gasoline powered vehicles. *recommended viscosity
Diesel

Difference from level L to level F: oil volume 1.0l. Complete replacement of oil and oil filter: volume 5.9 liters.
Conclusion
According to the instructions for the Subaru Forester, the car owner will find the necessary information not only about the type of lubricant, but also the fuel requirements for the normal operation of the engine. The use of inappropriate gasoline or diesel fuel will reduce the life of the engine.
Consider the year of manufacture of the car, the type of engine, the temperature outside the car, the operating conditions of the vehicle. According to these parameters, using the operating instructions for the machine, you can easily select the optimal brand of car oil. The use of high-quality lubricants and timely replacement of engine lubricants increase the engine life, ensure its reliable, stable operation.
:idea: The oil change interval in the Subaru Forester engine is 12,000 km, provided that your car has already been run-in. We will need: a set of tools, a 5l bowl, a funnel, oil, a filter and an oil scraper. We start the engine, warm it up to operating temperature for several minutes, turn it off, open the hood:
We find spare part 710, unscrew:

We climb under the bottom, look for the crankcase drain bolt (approximately in the middle, closer to the box):

We need a basin, a 17 open-end wrench, strong hands and good spatial imagination in order to generally understand in which direction to unscrew the drain bolt (hint - counterclockwise):

If the bolt does not go, I advise you to open yourself up: we hook the towing hook with our left hand, and push the key away from us with our right hand. Tip #2: Tap the key with a rubber mallet. Unscrew the last few turns by hand:
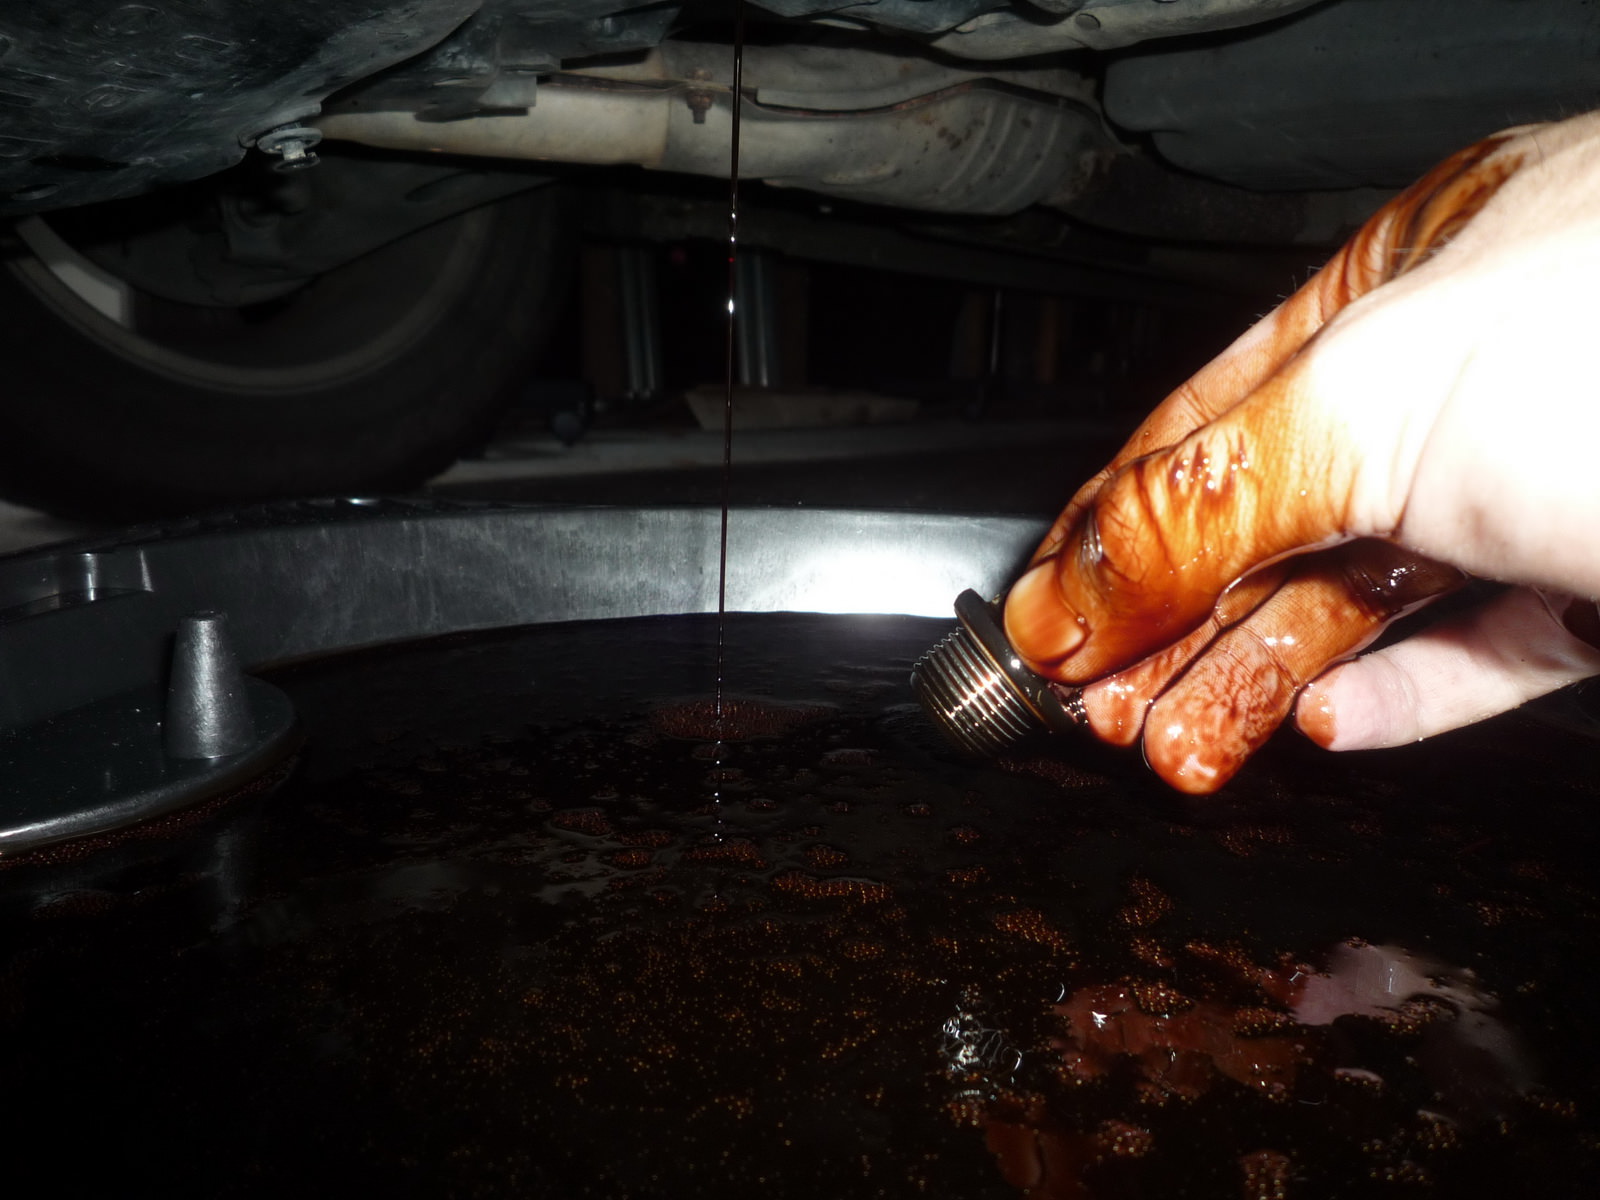
We let the oil drain into a bowl, wipe the crankcase and bolt dry, and screw it back.
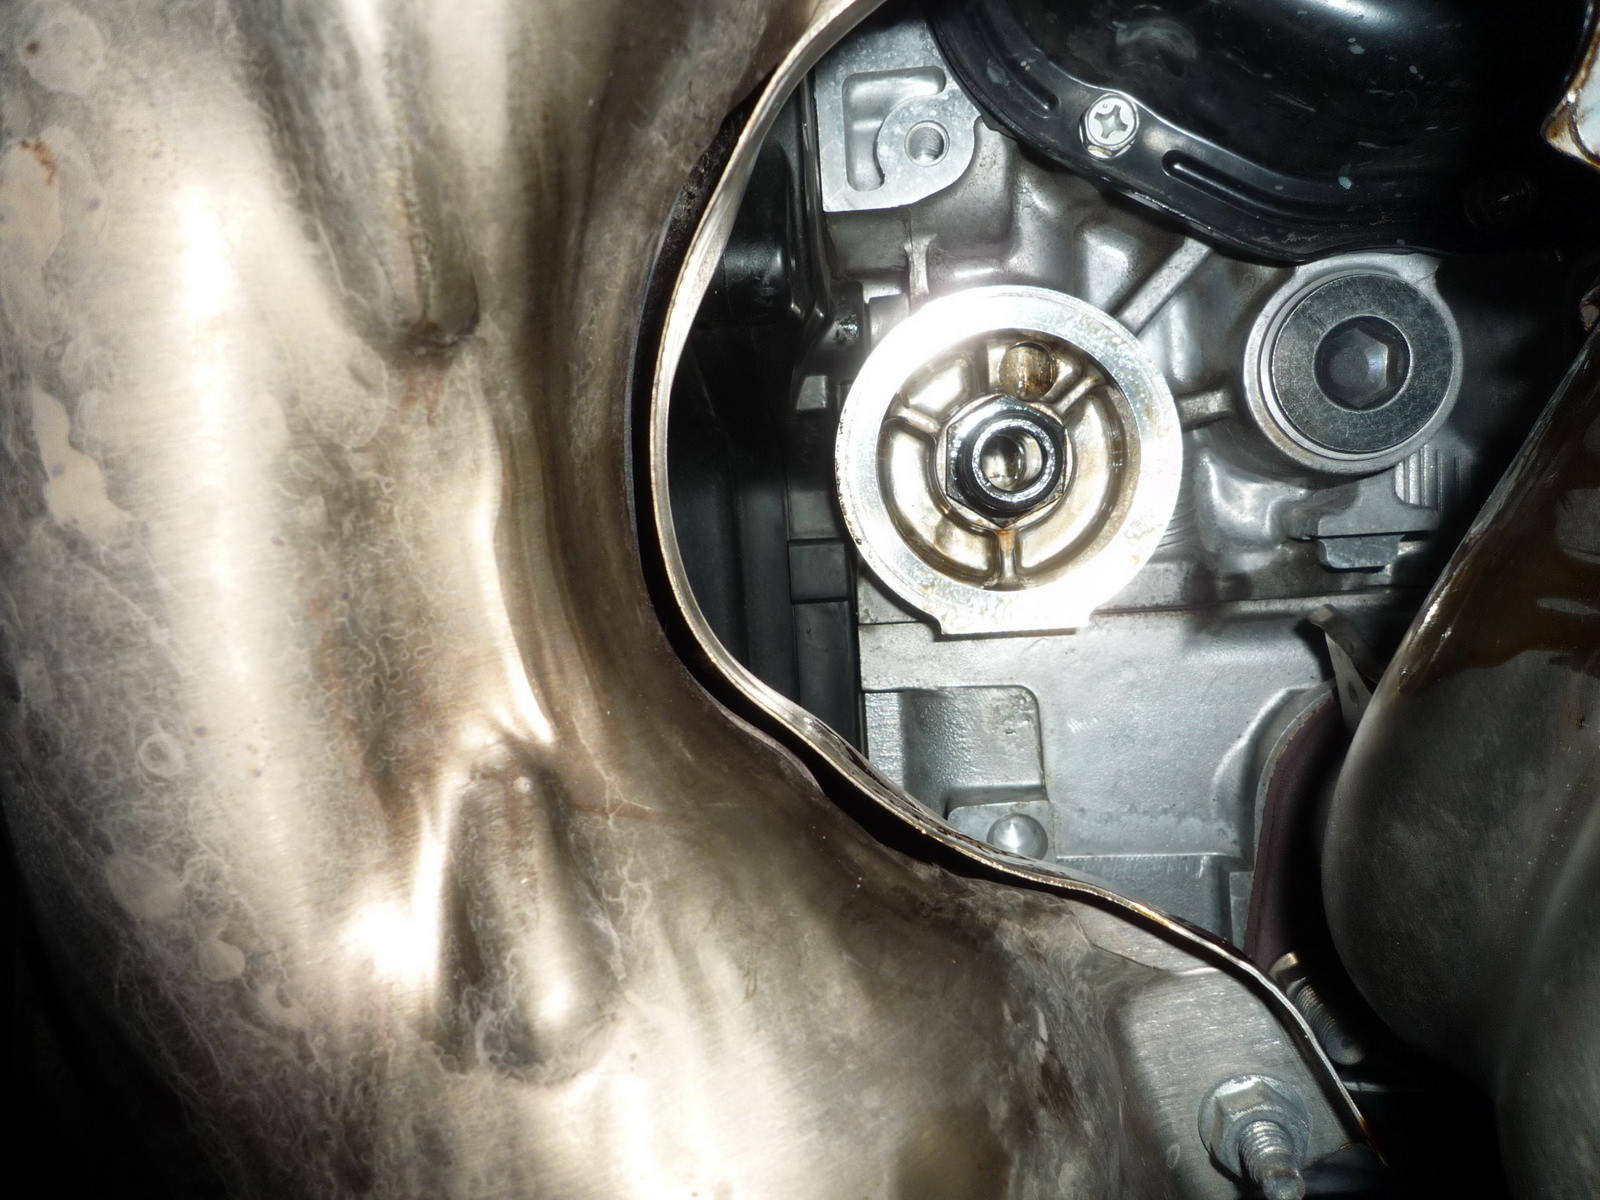
Then, a little to the left we find the plastic cover Engine Oil filter & drain, unscrew the bolts with a Phillips screwdriver and turn the cover to the side:

Oil filter, surrounded by exhaust manifold:

In my case, it was not possible to unscrew the filter with my hands, I tried as best I could - the car went back and forth from my attempts, all to no avail. 💡 You will need an oil scraper:

We unscrew the filter with the help of an oil scraper, counterclockwise, unscrew the last few turns by hand:

Dry the crankcase and exhaust manifold from oil:
We impregnate the new filter with new oil (fill in about 50-100 ml inside):

We put the new filter in place, tightly twist it with our hands, then wrap the plastic cover in place; get out from under the car.
Changing the engine oil and oil filter
Changing the engine oil and oil filter (every 12,000 km or every 6 months)A set of tools needed to change the engine oil and oil filter
|
1 —
Drainage tank- should be shallow and wide enough to minimize the chance of oil spilling onto the ground |
|
Regular and fairly frequent replacement of engine oil is one of the main preventive maintenance procedures for a car that lies within the skill of the average amateur mechanic. Over time, motor oil is subject to aging, which is manifested in its gradual dilution and pollution, leading to premature wear of internal engine components. Despite the fact that some sources recommend replacing the oil filter only every second engine oil change, the compilers of this Guide believe that due to the relative insignificance of the cost of the replacement component and the importance of its condition on the proper functioning of the engine and the efficiency of its output, it makes sense to change the filter every time you change the oil.
|
PROCEDURE |
||||||||||||||||||
|
||||||||||||||||||


:idea: The oil change interval in the Subaru Forester engine is 12,000 km, provided that your car has already been run-in. We will need: a set of tools, a 5l bowl, a funnel, oil, a filter and an oil scraper. We start the engine, warm it up to operating temperature for several minutes, turn it off, open the hood:
We find spare part 710, unscrew:
We climb under the bottom, look for the crankcase drain bolt (approximately in the middle, closer to the box):
We need a basin, a 17 open-end wrench, strong hands and good spatial imagination in order to generally understand in which direction to unscrew the drain bolt (hint - counterclockwise):
If the bolt does not go, I advise you to open yourself up: we hook the towing hook with our left hand, and push the key away from us with our right hand. Tip #2: Tap the key with a rubber mallet. Unscrew the last few turns by hand:
We let the oil drain into a bowl, wipe the crankcase and bolt dry, and screw it back.
Then, a little to the left we find the plastic cover Engine Oil filter & drain, unscrew the bolts with a Phillips screwdriver and turn the cover to the side:
Oil filter, surrounded by exhaust manifold:
In my case, it was not possible to unscrew the filter with my hands, I tried as best I could - the car went back and forth from my attempts, all to no avail. 💡 You will need an oil scraper:
We unscrew the filter with the help of an oil scraper, counterclockwise, unscrew the last few turns by hand:
Dry the crankcase and exhaust manifold from oil:
We impregnate the new filter with new oil (fill in about 50-100 ml inside):
We put the new filter in place, tightly twist it with our hands, then wrap the plastic cover in place; get out from under the car.


