For some reason, the cigarette lighter fuse burnout on the Opel Astra H is a frequent occurrence. We have prepared a step by step guide on how to replace it.
Step 1. We are looking for a hatch in the trunk
First you need to find the fuse box hatch in the trunk. It usually looks like this:
The fuse box in the Opel Astra H sedan usually looks like this:

If your hatch looks different from the one shown in the picture, then you have a rare equipment, this happens, it's okay, no need to panic.
Step 2. Determine the type of fuse box
Now we need to understand which fuse box your Astra is equipped with. The fact is that most of the cars of this brand were equipped with a “full mounting block”, but some cars, especially the basic configuration, were equipped with a “simple mounting block”. A simple mounting block is much smaller and very rare. But everything happens.
This is what the “complete mounting block” of fuses looks like: 
This is what a “simple mounting block” of fuses looks like: 
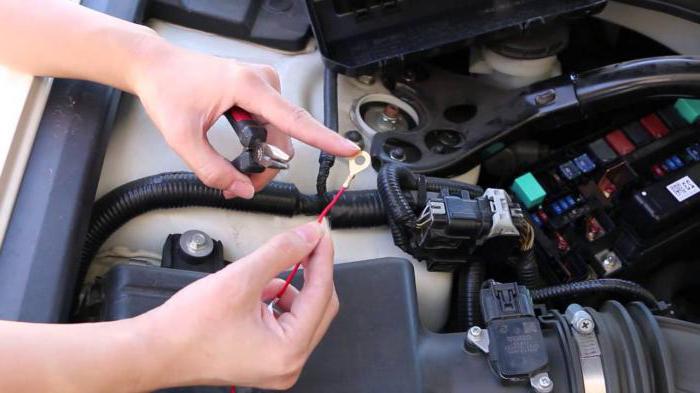
Step 3: Replacing the cigarette lighter fuse
If you have a simple mounting block (this happens VERY RARE), then you can safely close the trunk, there is no fuse you need in it. Open the hood and change the FЕ36 fuse, rated 7.5A (if the cigarette lighter backlight is covered, you can also change it - FЕ33, 5A). But, as we wrote above, this is a rarity.
If you have a traditional full mounting block in the trunk, then you need to change the FR29 fuse, rated 15A (FR18, 5A - backlight): 
What to do if the cigarette lighter is stuck?
Most often this is due to a blown fuse. Just replace it and the fuse will blow back.
What should I do if the charger plug does not stay in the cigarette lighter and falls out?
Instead of changing the whole cigarette lighter, buy a 2-way splitter and plug it into the cigarette lighter.
What is the breakdown if the fuse blows immediately after turning on the device (for example, a navigator) in the cigarette lighter?
Try plugging the cigarette lighter into the cigarette lighter socket and see what happens. If the fuse blows again, then the problem is in the car's electrical circuit, if the fuse does not blow, then the problem is in the connected device.
After replacing the cigarette lighter fuse, the central locking stopped working, what should I do?
We have already written a separate one with a detailed manual on what to do in this case.
What should I do if the wheel pump is too powerful and blows the fuse?
Instead of buying a new pump, it's better to cut off the cigarette lighter plug and solder a couple of crocodiles for the battery. Connect the pump directly to the battery.
Which inverter is suitable for Opel Astra H?
Choose an inverter with a maximum power of 120 watts. If you buy a more powerful one, the fuses will fly out.
Where is the socket in the trunk of the Opel Astra H?
The socket in the trunk is located on the right wall of the trunk, but not all trim levels have it. Those who have it are lucky - you can connect a vacuum cleaner to it while cleaning the trunk or a car refrigerator on long trips. 
Most of the power circuits for electrical equipment in the Opel Astra are closed by fuses. In this article, we will describe in detail the fuse box Opel Astra N (diagram), its location, as well as the process of replacing the element.
[ Hide ]
What is it and why are you needed
A fuse is a device that protects consumers of electricity and electrical circuits from short circuits and system overloads. It contains an insulating case, fusible links, as well as a special terminal that connects the fuse links and the electrical circuit. In order to avoid overheating, quartz sand is also included in some parts.
The fuse block is needed in order to protect the system and prevent a fire with a sharp increase in the current level. This happens due to the fact that they burn out first. Basically, such an element is disposable.
Location and scheme
The most popular location for the fuses is in the passenger compartment or under the hood (they are located near the washer). Each car has its own layout, depending on the location (near the cigarette lighter or washer). The scheme is necessary in order to better understand the ongoing processes, as well as the principle of operation. In some types of cars (for example, trucks) there may be more than one fuse box, and even 4 or 5. They can also be scattered around the car, but this rarely happens.
Fuse box in the engine compartment
In the Opel Astra car, the block is not one, but two. Their location in the engine compartment and cabin (not far from the cigarette lighter). The scheme of working processes in the Opel Astra and the elements protected by fuses is just below.
Removal and replacement process
The block described in this article has the properties to burn out, or individual parts require replacement. How to determine what needs to be removed and what to put in a new one?
Car enthusiasts often use such a simple method as simply pulling out the object, viewing it in the light, and if there is no significant damage, replacing it. In no case should parts be checked by this method, both in the Opel Astra H car and in all others! This method is very unreliable and doubtful! After all, processes such as a burned-out jumper or an oxidized part cannot be detected by eye.
Fuse box in the cabin
There is a method by which you need to check the integrity of a part in an Opel Astra car. Nothing needs to be taken out. Turn on the circuits that do not work (it can be a stove, and a light, or a tape recorder or dimensions). Next, check the voltage with a probe, first at one end, then at the other. Suppose there is voltage at one end (output), but not at the other. In this case, the spare part is damaged. This check in the car is carried out very quickly - within one minute.
You need to replace the burnt part with the same one at face value. The rating increases only when you add something else to the circuit that burned out. How to properly install a new part in the block? They are installed by analogy with the old ones. The only thing is that it is advisable to check new parts before replacing them. There is a way that is suitable for any system, it does not matter if they are located in the engine compartment or near the cigarette lighter. Thanks to him, you will quickly check the quality of the element so that your Opel Astra H car is not damaged.
So, wind the wires to the ends of the new part and one to the plus, the other to the minus.
Thus, a short circuit will occur. If the part is completely burned out, then the batch is really of high quality and you can continue the installation. And if the element began to melt, then this batch is undesirable to install. In situations of overvoltage inside the car, they will also melt, and this promises that electrical wiring will melt along with them, which will lead to serious consequences. So choose fuses carefully, check in time and take care of your Opel Astra H.
Video "Replacing the fuse"
We bring to your attention a video showing how to replace the washer motor fuse in an Opel Astra car.
On Opel Astra N cars, fuse boxes play a very important role in protecting the vehicle from fire due to a sharp increase in voltage. Therefore, some information about their location, functioning and device will be very useful for a motorist.
Fuse box "Opel Astra N": purpose and device
The electrical equipment of the car plays a rather important role in the functioning of the entire vehicle. The operation of the headlights, ignition system, instrument panel illumination, car cigarette lighter and radio depends on the health of the car's electrical wiring.
As noted earlier, the fuse box is designed to protect the car from fire during a sharp increase in voltage. Fuses take a hit and are disposable. must be replaced immediately. Fuse blocks can be installed in the cabin or under the hood of the vehicle.
It should be understood that each car manufacturer installs fuse blocks individually: on the Opel Astra N model, for example, they are located under the hood and in the cabin (next to the car cigarette lighter). However, this element can be installed in absolutely any part of the car: trunk, hood or interior. Trucks have about four to five fuse boxes.
On each car, the location of the safety blocks is individual: in order to find the safety blocks on a particular car model, you must refer to the vehicle's operational documentation.
The Opel Astra N fuse box consists of a variety of relays and fuses directly. Each element is responsible for protecting a particular component of the vehicle.
On many models of the Opel Astra N car, two safety blocks are usually installed: one under the hood (driver's side), the other is located in the luggage compartment and is located under the outer skin cover, also on the driver's side. The location of the components of the blocks, as well as the diagram, differs depending on the vehicle configuration. This arrangement is typical for the fuse box "Opel Astra N" 2011 and 2010 release.
Therefore, for owners of these car models, the process of replacing parts will be approximately the same. After all, the 2010 Opel Astra N fuse blocks were transferred without changes to the latest car model.
Preparing to "intervention" in the safety block
Before you start searching for the fuse box, you must turn off the power unit and turn off the ignition by turning the key to the OFF position. This must be done to prevent electric shock or shorting of the Opel Astra N fuse box 2008, 2010, 2011, 2007, 2006. Well, avoiding these consequences will save the vehicle from fire.
Since when disassembling the fuse box there is a risk of closing the contacts with a screwdriver, safety precautions must be strictly observed. Also, do not engage in disassembly of the part, if before that there was no experience with similar car breakdowns. It is cheaper and easier to drive a car to specialists for a complete and thorough inspection.
How to open the fuse box?
It is convenient to open the lid with a screwdriver. On the left side there are clips in the amount of two pieces. The process of opening the cover of the fuse box "Opel Astra N" in 2007 and cars of other years of manufacture is as follows:
- a screwdriver is inserted into the slot, which is located between the clamp and the cover;
- the clamp is slightly bent, then the cover should be lifted;
- a similar operation is carried out with the second clamp;
- the cover is placed vertically.
If you do all these operations, you will be able to remove the cover without any problems, it remains only to slightly pull it up.
The 2006 Opel Astra N fuse box consists of two parts. Therefore, the disassembly process looks slightly different. The cover is removed from the block for mounting relays and fuses. To dismantle it, press on the internal clamps. After that, in a similar way (pulling up), the cover is removed, thereby opening access to the main fuses, which are placed in a row.

It is worth noting that the fuse box for the 2007 Opel Astra N also consists of two parts. Moreover, this car model is the last one on which a similar part was installed. The fuse box "Opel Astra N" in 2008 and subsequent years of production is one-piece, not divided into parts.
Fuse block decoding
After the cover has been dismantled, the “bonnet” fuse box of the Opel Astra N 2008 and other years of manufacture, on which an integral part is installed, opens up. An open fuse box is an ordered arrangement of fuses and relays. Each element is able to withstand a certain amount of electricity, and is also responsible for the devices of the car.
For ease of identification, each fuse has its own color, depending on how much current it can handle. Based on this, the pinout of the Opel Astra N fuse box is formed.
The arrangement of relays and fuses in different car models with different trim levels will be different. Therefore, before intervening, you need to make sure that the existing scheme fits your Opel Astra N car.

"Distribution" of relays and fuses: the first type of configuration
The fuse box installed on the Opel Astra N, with the basic configuration of the car, protects a number of important elements from failure as a result of a sudden power surge.
Anti-lock braking system fuses are capable of withstanding 20 to 30 amperes; climate control, as well as the system responsible for heating and ventilation of the passenger compartment of the car, can withstand about 30 amperes. The fan operating in the complex of parts of the cooling system is protected by a fuse that can withstand from 30 to 40 amperes. The central lock withstands 20 amperes.
It is worth noting that the above list does not fully reflect all vehicle systems that are protected by fuses. In order to find out the complete list, you must carefully study the technical documentation of the car.
Rear fuse box "Opel Astra N"
As mentioned earlier, the Opel Astra N has two safety blocks: in the front, in the engine compartment of the car, and in the trunk. There are some designations on the fuses and trunk relay that require decoding:
- Heated rear window - KZ X131.
- Terminal 15a - K2 X131.
- Terminal 15 - K1 X131.
A complete decoding of the Opel Astra N fuse box is located in the technical documentation of the vehicle.

Fuse box in trunk
The fuse box in the trunk of the Opel Astra N is located on its left side. In a car with a hatchback body type, you can get to the block by doing the following: the round-shaped locking elements are unscrewed, then the casing cover is lowered. The sedan also has a small cover equipped with two handles. You need to pull on them, disconnect the clamps, and lift the cover up.
As with the hood fuse box, the fully equipped vehicle has the largest and most complex fuse box.
How to diagnose fuse performance?
Often in a car, problems begin with electrical equipment, as well as with ignition. One of the causes of the malfunctions is the failure of the fuses. However, before climbing into the safety block and checking the fuses for the fact of operability, it is necessary to check other possible malfunctions: perhaps the problem is a dead battery or a burnt out light bulb.
Currently, fuses with a transparent body are used. Thanks to him, you can immediately determine whether the work item or not. If the fusible part of the fuse is melted, then such a device must be replaced immediately. However, on some fuses, this is quite difficult to see, so you should also use a device that will allow you to accurately determine whether the fuse has failed or not.
When checking the performance of fuses, it is necessary to follow a certain algorithm that will significantly save time and effort:
- Visual inspection of the fuse.
- Using a tester and indicator to determine if a fuse is working.
- If the indicator lamp is activated and a short circuit is indicated, the fuse should be replaced: it is in good condition.
- If nothing happened during the check, then the fuse must be replaced.
Checking by the indicator and tester is also carried out in a certain sequence:
- Pull the fuse out of its socket and clean its contacts.
- Study the instructions of the indicator and tester before checking, in accordance with the instructions, connect the fuse contacts. When an indicator appears that reports a short circuit, we can conclude that the fuse is working. When checking the working fuse with an indicator on the device, the light should light up.
- Install a new fuse in place of the blown one. The main condition for replacement is the fact that the characteristics of the new fuse must comply with the recommendations of the automaker.
If there is no special device at hand, then you can always drive the car for an unscheduled inspection. Experts will be able to say with confidence whether replacement of old fuses is really necessary.
What if the problem is not the fuses?
If the checks have shown that the fuses are operational, and the performance of the automotive systems has not been restored, then a complete diagnosis of the vehicle should be carried out at a specialized service center.

Independent intervention in other car systems can lead to quite serious breakdowns: it is then that a serious overhaul will be needed. Many motorists, wanting to save on service inspection and maintenance, trying to figure out a car breakdown on their own, only lose a huge amount of time, and also face huge cash costs.
Precautions when replacing fuses
When there is everything you need to independently find out the cause of a car malfunction, you need to be extremely careful when intervening in the fuse box. After all, their replacement implies the observance of a number of precautions:
- Before opening the cover of the safety block, turn off the engine and turn off the ignition.
- All operations should be carried out carefully.
- Fuses are removed carefully.
- It is not necessary to rely only on a visual inspection of the fuse, it must also be checked with instruments.
- Before you engage in self-diagnosis and replacement of fuses, you should carefully study the information about which fuse is responsible for what.
- The new fuse must comply with the requirements and recommendations of the car manufacturer, which apply to the technical parameters of the device.
The above precautions will allow not only to “bloodlessly” repair the car and replace failed fuses, but also protect the repairer from electric shock, and the car from fire. Ignoring the above recommendations can cause a fire in the vehicle's wiring, as well as quite serious damage from electricity.
At the same time, do not disregard and postpone the replacement of blown fuses. If you drive with defective fuses, then at the next power surge, there is a high risk that the car's systems that were left without protection will fail. And replacing them is much more expensive than replacing fuses.
Conclusion
Summing up the above, it is worth noting that replacing fuses is a rather important operation. After all, the performance of all vehicle systems that are “powered” by electricity depends on their performance.
The main reason for the failure of the fuses is a sharp increase in the voltage of the electric current. The fuse blows. Fuses are "consumables", they cannot be repaired, they are replaced.

You can visually diagnose a fuse failure by the fusible element: if it is melted, then a replacement should be made. But visual inspection is best confirmed by using a tester and an indicator. Some fuse models simply cannot be diagnosed by visual inspection alone.
The replacement of fuses is carried out only when it is known which system each fuse is responsible for. This information is in the technical documentation for the vehicle.
Fuses are replaced with care. Failure to do so may result in a fire in the vehicle or severe electric shock.
Do not delay replacing a blown fuse. The next sudden increase in voltage can cause a short circuit and fire the vehicle. The cost of fuses is not particularly high, so you should not save on this small, but quite important part in the vehicle's electrical system.
J. Components such as headlights, electric fan motors, electric pumps and other more powerful consumers of electricity are connected via a relay. All electrical protection elements are located in special blocks located in the luggage compartment of the Opel Astra on the left, in the engine compartment next to the battery and under the dashboard on the left.
Any motorist should be able not only to independently understand the electrical circuit, but also, if necessary, to replace the fuse on their own.
[ Hide ]
Location and wiring diagram
It must be said that the developers made sure that the car owner could check and, if necessary, replace a blown fuse or relay without any problems. To do this, all relays and fuses are located in three easily accessible blocks.
In the luggage compartment
Fuses in the luggage compartment of the Opel Astra and the units they protect:
- 1 - trailer;
- 2 - trailer socket;
- 3 - parking sensors;
- 8 - alarm;
- 11 - trailer connector;
- 19 — steering wheel heater;
- 20 - hatch;
- 21 — ;
- 31 - sound system;
- 32 - a system that warns of crossing the dividing lane.
Engine compartment

Opel Astra engine compartment fuses and the nodes they protect:
- 1 - motor control;
- 2 — ;
- 3 - fuel injection, ignition;
- 4 - fuel injection, ignition;
- 6 — ;
- 7 - electric fan controller;
- 8 - oxygen sensor;
- 9 - rear window;
- 10 - battery;
- 11 — handle for opening the luggage compartment;
- 12 — ;
- 14 - rear wiper;
- 15 - motor;
- 16 - starter;
- 17 — checkpoint control;
- 18 - rear window heater;
- 19 - window regulator of the front windows;
- 20 — power window rear windows;
- 21 - ABS;
- 22 - high beam of the left headlight;
- 23 - headlight washer;
- 24 - right xenon dipped beam;
- 25 - left xenon dipped beam;
- 26 - foglights;
- 27 - heating diesel fuel;
- 29 — parking electric brake;
- 30 - ABS;
- 32 — ;
- 33 — adaptive headlights;
- 35 — power windows;
- 37 - electric magnetic valve slip adsorber;
- 38 - pump (vacuum);
- 39 - control device for the fuel supply system;
- 40 - front and rear window washer;
- 41 - high beam of the left headlight;
- 42 - electric fan of the radiator of the cooling system of the motor;
- 43 - electric windshield wiper;
- 45 - motor cooling fan;
- 47 - sound signal;
- 48 - motor radiator fan;
- 49 - auto fuel pump;
- 50 - auto-corrector headlights;
- 51 - chokes;
- 52 - crankcase gas heating;
- 53 — gearbox and motor control;
- 54 - control of electrical wiring;
Under the dashboard

Block fuses in the Opel Astra cabin and the nodes they protect:
- 1 - monitor;
- 2 - outdoor light;
- 3 - outdoor light;
- 4 - audio system;
- 5 - information system;
- 6 - front electrical outlet;
- 7 - rear power outlet;
- 8 - dipped beam of the left headlight (halogen);
- 9 - dipped beam of the right headlight (halogen);
- 10 - locks;
- 11 - heating, fan and air conditioning units;
- 14 - diagnostic connector;
- 15 - airbag;
- 17 - electric air conditioner;
- 19 - feet, reversing light, interior lighting;
- 21 - equipment;
- 22 - ignition switch;
- 23 - control of the electrical equipment of the body;
- 24 - control of the electrical equipment of the body.
Removal and replacement process
luggage compartment
The Opel Astra mounting block, located in the trunk, is located in an easily accessible place, and in order to get to it, you do not need to dismantle any components or parts. To open it, you need to turn the hatch latch 90 degrees and fold it down. Next, according to the scheme, we find the electrical fuse we need and replace it. Close the hatch and fix it with a latch.
Engine compartment
The compartment with electrical fuses located in the compartment where the Opel Astra engine is located is in a prominent place, and in order to gain access to the electrical fuses that are in it, you need to press the latches with a screwdriver and remove the cover. Find and replace the burnt one, close the lid and snap the latches.
Under the dashboard

To get to the node located in the instrument panel of the Opel Astra, you need to remove the drawer for things.
Block dismantling:
- Press the latch with your finger.
- Move the harness retainer.
- Disconnect it.
- Disconnect the other harness block in the same way.
- Attention! Mark the pads and retainers with different colors.
- Push down on the latch.
- Disconnect the small block of the block harness.
- Loosen the nut securing the mounting block.
- Press out the latch.
- Remove the block.
- Do the necessary work.
- Installation is in reverse order.
Opel Astra N. Location of fuses, fuses and relays and their replacement
Most vehicle electrical power circuits are protected by fuses. Headlights, fan motors, fuel pump and other powerful current consumers are connected via relays. Fuses and relays are installed in mounting blocks, which are located in the trunk of the car under the sidewall lining on the left side and in the engine compartment next to the battery.
The designations of the fuses and relays of the mounting block installed in the trunk under the lining of the left sidewall are shown in fig. 10.1.
In table. 10.1 indicates the purpose of these fuses, fuses and relays, but on a particular car model, some of the circuits indicated in the table may not be available.
The designations of the fuses and relays of the mounting block installed in the engine compartment on the right in the direction of travel are shown in fig. 10.2.
In table. 10.2 indicates the purpose of these fuses, fuses and relays, but on a particular car model, some of the circuits indicated in the table may not be available.


1. To gain access to the fuse mounting block located in the trunk, turn 90 ° two hatch cover latches in the left side trim ...

2….and flip down the cover.

3. To gain access to the mounting block located in the engine compartment, press the two latches with a screwdriver ...

4….and remove its cover.
Note.

Spare fuses B and tweezers A are fixed in special sockets of the body of the mounting block located in the trunk to remove the fuses from the mounting blocks.
5. Before replacing a blown fuse or fuse, find out the cause of the blown and fix it. When looking for a malfunction, look at the ones listed in Table. 10.1 and 10.2 circuits that this fuse or fuse protects.
Warning.
Do not replace fuses with fuses of a different amperage or homemade jumpers, as this may damage electrical appliances and even cause a fire.

6. Remove the tweezers from the base of the mounting block located in the trunk.

7. Grab the fuse with tweezers ...

8….and remove it from the connector.
Note.

This is how a blown fuse looks like (the jumper shown by the arrow inside the holder has blown and opened). To replace a fuse, use a spare fuse of the same rating (and color).

9. Install a fuse of the same rating as the removed one into the connector.

10. If replacement is necessary, remove the relay from the mounting block by rocking it from side to side ...

11….and install a new relay.


