Do-it-yourself buggy is a dream from my childhood. I remember how we, yard boys of 5-7 years old, were fond of technology. They collected some pieces of iron, argued about cars and motorcycles. We often approached drivers who drove into our yard and asked them how much the car “takes”, that is, to what speed it can accelerate. The uncles usually answered, who was serious, who was joking. We could watch for hours how a neighbor was repairing his iron horse, and then we would fight for oily, worn-out parts that belonged in the garbage heap.
Many people had bicycles then, older guys could even fix minor breakdowns, tighten the chain, pump up the wheels. But only one, my friend and peer, had a four-wheeled pedal Moskvich. Green in color, with a bibika and headlights, it has always been a source of controversy and even fights for a place behind the wheel of the boys. The only drawback of Moskvich was low speed, cyclists easily overtook. How cool it would be to put a real engine in Moskvich!
There were even legends among us about seeing such a miracle personally. I often dreamed about how I would drive along the paths and paths in such a little car.
Time passed, I grew up, learned to handle a wrench, a drill and a soldering iron. Of course, I had already grown out of the dimensions of the Moskvich, and it was not suitable for the motor at all. But the desire to build something of my own, with wheels and a motor, did not leave me.
An electric bike is a dress rehearsal on the way to "do-it-yourself buggy".
The first self-propelled self-propelled assembly was an electric bicycle.
He is on the right in the photo. Of course, buying a battery and a wheel with a motor, and then screwing it all on a bike turned out to be a simple matter. But I was pleased with the result. I will never forget the first trip to the city at night. The bike rides by itself! Silently! No need to pedal! At that time, electric bikes were still a rarity in our city, and often overtaken cycling colleagues saw me off with puzzled looks. The lack of a garage prevented me from creating a homemade car, because even a bicycle with an electric motor occupied a significant place in the corridor. And only after moving out of town, to a private house, where there was a place where to turn around, I began to think in detail - how exactly to assemble a buggy with my own hands.
So what to build?

Collect DIY buggy from the products of the Soviet auto industry that have served their purpose?

Or build four wheeled velomobile, by installing a motor like the Soviet D6 there

Can collect Cyclecar? A small car on moped wheels with an engine from a walk-behind tractor?

Or will it be trike with a streamlined aluminum body, a powerful electric motor and a bunch of lithium batteries?
I thought for a long time. All options had their pros and cons:
- I didn’t really want to find the Oka and, with the help of a grinder and a sledgehammer, unscrew the stuck bolts, and then constantly mess with the motor.
- The velomobile would have been flimsy for country roads, the cyclecar had no suspension and no gearbox.
- The electric trike turned out to be too expensive and tied to an outlet.
But you had to start somewhere. You need to know in advance what the future homemade product will be intended for. This is either a walking option for trips around the neighborhood, or an au pair - a mini tractor, or maybe a buggy assembled with your own hands will be used as a sports equipment - to drive along the intersection.
Despite the presence of a garden and the unambiguous hints of my wife and mother-in-law, I still needed a walking car that would not give in to forest paths, mud and puddles. Of course, the buggy must be equipped with suspension, reliable steering and headlights.
Buying an engine - the 1st step to "do-it-yourself buggy"
I started by buying an engine. I did not need high speed, therefore, I did not need a powerful motor. The choice was between moped engines and stationary motors from walk-behind tractors.
In favor of the first - the presence of a gearbox, generator, electric starter and clutch, and the latter were distinguished by high traction at low speeds, the presence of a gas tank and a long service life.

Moped engine.

Stationary motor from walk-behind tractor
I stopped my choice on the Lifan 168 engine, with a capacity of 5.5 horsepower. It was also equipped with a generator and an electric starter, and unlike moped engines, it did not require a separate purchase of a muffler, tank and other small things.
As a gearbox - an absolutely necessary thing for any car, I purchased a Dnepr motorcycle gearbox. Of course, I had to tinker with it a bit, change the oil and seals.
Buying wheels is the second step to assembling a buggy with your own hands
With wheels, too, were the flour of choice. Mopeds did not fit, because they did not hold side loads well, I did not take car wheels because of the cost and weight, the wheels from wheelbarrows could not withstand the loads. As a result, I bought wheels from a walk-behind tractor.
Oh, and a bunch of other little things. Chains, sprockets, a voltage regulator for a generator, shock absorbers, bearings, bolts and nuts, a stainless steel pipe for the rear axle, a brake disc from a scooter and a machine from it.
We buy a welding machine and learn how to cook iron
At the same time, an inexpensive welding inverter was bought, Resanta 140., a pack of electrodes, a mask and leggings. Having spoiled several meters of scrap metal and having spent half of the electrodes, I more or less learned how to cook.


At first, I decided to do the clutch in the same way as on walk-behind tractors - a belt with a preload roller. Well, the steering is from the Oka car. For everything - about everything it took me about 25,000 rubles. Well, it started. I was too lazy to make even a simple sketch, not to mention the drawings. For which he later paid with time, metal and money. Something had to be adjusted, cut, welded on.
The frame was shortened, the shock absorbers were swapped, the steering and suspension were redesigned.
And I generally found the part that connects the input shaft of the gearbox and the flywheel when disassembling the barn. Finally, the frame was welded, the engine and gearbox were fixed. The very first road test of the buggy, assembled by hand, passed even without steering. I installed the front wheels on the axle shafts in the holes of the front suspension arms, turned on the reverse gear, started the engine and manually tightened the tension roller. The car is running!!!
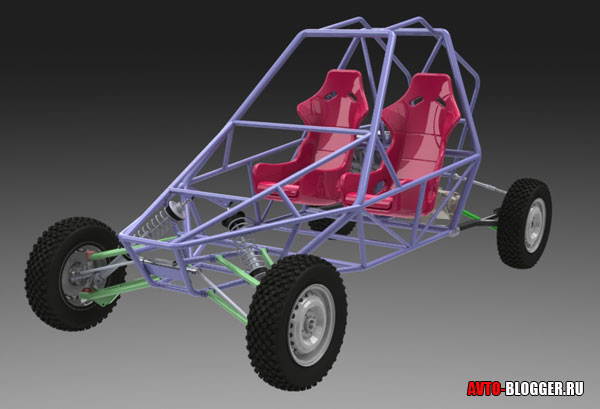
The device of my buggy
In general, the design is very simple. Frame made of profiled steel pipes of various sections. The front wheels from the walk-behind tractor are connected to the hubs from the moped with three bolts. Bearings were replaced in the hubs, 6202 were installed under the 15 mm axle. As the axles of the front wheel, I used the bolts of the front wheel of the Voskhod motorcycle. The steering knuckles are homemade, made from a 40 mm angle, as a kingpin, an M 16 bolt, which rotates in a union nut, which, in turn, is turned and pressed into a pipe.
Castor, Ackerman's angle are installed on the peephole. The front axle beam is connected to the frame by jet rods. Shock absorbers are attached to the frame and beam with welded corners.
Steering - from the car Oka. Steering rods and shaft shortened.
Homemade pedals - gas, brake and clutch (will be removed as unnecessary) Cable gas drive and hydraulic brakes. The rear axle is a hollow steel pipe with a diameter of 30 mm. Wheel hubs from a walk-behind tractor are fixed on it. A brake disc and a driven gear are attached to the hubs with M 10 bolts. Chain drive, motorcycle chain 428 step. A centrifugal clutch is installed on the engine, a chain 420 goes from it to a driven sprocket located on the input shaft of the gearbox. Gear ratios - Engine - gearbox 3.6, gearbox - axle - 3.2, plus four gears.
Wheels 4.00-10 with developed lugs. The muffler exhaust pipe was lengthened, the engine began to run quieter.
How to make a buggy with your own hands. Design Description
Now a home-made car drives, causing surprise and smiles of passers-by. Of course, he is not allowed to drive on public roads. The project is not finished, it is necessary to improve the gearshift drive, install a protective frame, more comfortable seats, lighting equipment with a battery. But along the paths and country paths, my homemade product rides quite well. Thanks to the gearbox, you can crawl at a minimum speed through the mud or accelerate to 30 kilometers per hour on a flat road. And the pleasure of walking, the delight of the son who nicknamed the homemade Dynamite, the consciousness that he was able to assemble the car himself, is worth both the money and the time spent !!!
January 14, 2018 article
Do-it-yourself buggy from NIVA
I really wanted to do do-it-yourself buggy from the field on all-wheel drive, moreover, as planned, it should be lighter than the standard and on a fully independent suspension. There are several buggies where both front suspensions from Niva are used as suspension. I consider this a half measure, since the entire front suspension assembly weighs as much as 130 kg. My fist after weighing - 2.4 kg, the fields - 6! The only thing that needs to be done is to keep the layout of the units from the donor - the most standard spare parts.
Everything else is my fantasy at someone else's expense. the main purpose of the car is fishing and a trip to the forest. UAZ tires, Cordiant Off Road on overcooked Niva wheels. Engine 1.7, 4-speed gearbox, cardan shafts, RPM — all standard.
After agreeing with the client on the general concept of the machine, I had to make several sketches on paper and transfer everything to the computer. I'm working in AutoCAD and a state-of-the-art paper-and-pencil system:
A few pieces of iron:
Since there was no welding table, I had to make a base from what was at hand - a movable table and two channels that were brought out into the plane and made it possible to make an even frame. The difference in suspension attachment points (when measuring the diagonals) is 2-3 mm, although in fact it was not necessary to bother.
Welded base:
So, the base is ready. Now you need to cook the main arcs and pipes for the suspension:
I welded this car in the workshop of familiar restorers, so I had to drag the frame several times and re-level everything. With a constant measurement of all sizes, the roof moved to the right by 5 mm, but these are trifles:
I decided to lengthen the suspension arms as much as possible to increase wheel travel. To do this, it was necessary to reduce the distance between the pipes on which the levers are attached and increased the track to 1550 mm. The CV shafts had to be made to order. So that the suspension attachment points do not go away, I made the brackets for attaching the levers so that at the same time they were conductors for fixing the frame pipes:
The tunnel was made with the units installed, while I had to think about how to properly place the tubes so that they do not interfere with the unscrewing of the nuts. All units are removed quite simply.
The total weight of the frame is 156 kg, cooked from the pipe, which was a lot. What does not apply to the power frame could be welded from a pipe of a smaller section, so after welding I sat down and figured out how much the frame could lose weight - I gained 51 kg:
The gas tank is from the classics. This will allow you to make the dashboard entirely from VAZ devices:
Body kit sheet, extremely simple:
Mounting the RPM on the cross - as our buggy drivers do on all-wheel drive buggies. Since the nivovods have a wrong understanding of physics and they are closed to a standard body, the bodies break quite often. If you make a metal case as described, then the gearbox housing can easily withstand 400 forces!
When using parts cut on a CNC plasma cutter, there is no need for a milling machine. Such a fist can be made quite inexpensively and with any configuration. This is a rear fist, the base is a piece of a DN100 water pipe and a plate from a plasma cutter:
Using two shock absorbers at different distances from the swing point of the lever itself, we get different forces on the piston, different displacements and slightly different characteristics of the shock absorbers. It turns out that the characteristic of one shock absorber is slightly shifted in relation to the other:
Suspension:
Conductor for welding the front fist:
The fist itself:
Rear suspension assembly:
Finished chassis
Collapse can also be done on the knee. All it takes is a piece of string and a rubber band from a handcart, and she pulls on the string:
Dashboard:
As R. Kolesnikov (a former pilot from the Gazprom team) always says, if an all-wheel drive buggy rides easily by hand, then the wheel alignment angles are correct. We managed to get within the required limits, and even taking into account the fact that the wheel alignment is done on the knee, the chassis rides quite easily. It remains to make a body kit, connect an electrician and start.
Craftsman: Andrey "Nitro" Anikin
Especially for jeepstroy!
www.izikastom.info
www.ska-buggy.ru
+7-926-181-56-08
Skype-Nitro_LAB
ICQ - 422-527-340
ATTENTION! I am on this site, you can ask your questions directly in the comments to this article.
Registration is not required!
Every child dreams of riding a go-kart, a scooter, a moped, a motorcycle, but when it comes to a real buggy, there is practically no limit to his delight. Making this type of transport is not difficult, you just need a little desire. You just need to successfully purchase an engine from a 125 cm3 scooter.
Materials and tools for homemade
engine 125 cm3;
old metal water pipes;
electric welding;
wheels 10 inches;
steering rods from VAZ 2101;
shock absorbers from a scooter;
brake pads.
The process of making a buggy
Step 1. Making the frame and steering
With the help of ordinary water pipes of different sections and profiles, a frame is made for the future buggy. Metal parts must be connected using conventional electric welding.

It is optimal to take the usual 10 inch wheels from a scooter. Suspension independent pendulum, done with shock absorbers in both directions. In a regular kart, control is done through the steering rack, in a homemade buggy it will not be. It is only necessary to find steering rods from the Zhiguli "Kopeyka". Driving a buggy will be more difficult than a regular go-kart.
Step 2. Differential
For the existence of a reverse gear and a differential in a buggy, it is necessary to use a gear bridge from the Ant scooter, it has everything we need. To reduce the vibration of the engine, it must be fixedly bolted to the frame. The drive must be located in accordance with the center of the pendulum mount, thus, it becomes possible to adjust the chain tension.


Step 3. Installing the brakes
Brakes are installed only on the rear wheels. Brake drums are on each axle shaft, they stop the buggy very well. It is necessary to get the cables from the hand brakes of the Zhiguli. When you press the pedal, they actuate the brake pads on each of the drums.


Step 4: Final Build Steps
The fuel tank is also taken from any scooter. The seat from Zaporozhets is ideal for a mini-buggy, it can be easily adjusted to any height. We put everything in its place and enjoy using this homemade product.
Since today is a day off, I will try to write an easy article, you know, I have had a topic for this for a long time. For example, several of my readers, after a post about "", asked me this question - what is BUGGY? Others asked the question - is it possible to assemble them with your own hands? Today I decided to collect everything in one article, and dot the i's. Here we go …
buggy - These are light cars, often made by hand, used mainly for driving on rough terrain, or for off-roading. Often used in autocross. They are distinguished by high cross-country ability and a durable chassis, they often have a motorcycle engine.

As you understand, these are also “spontaneous” (not assembly line) variations of cars that were made mainly for cross-country motorsport. Now there are specialized companies that are engaged in their production. However, there are also craftsmen who produce with their own hands.
History of appearance
The first such cars appeared in the United States, around 1950. If you try to translate the word "BUGGY", then the literal translation will mean - "carriage", "convertible", "small trolley". However, the car did not get its name from this!
The thing is that in 1950, the United States simply filled the “trophy” VOLKSWAGEN “BUG” (or, as we all know it now, “BEETLE”). Of course, working cars were used for their intended purpose, they were simply driven. However, there were also a lot of faulty cars, for example, with a padded body, but serviceable “insides”. It was these cars that were dismantled, instead of a mangled body, they installed a self-made frame, into which, as you understand, they mounted the engine, chassis, seats, etc. The cars turned out to be very light, and “transparent” precisely because of this lightness they were nicknamed “BUGGY”, this is a diminutive of the word “BUG” - meaning “BUG”.
![]()
A little later, after a couple of decades, buggies evolve, they begin to install turbocharged engines that develop power up to 200 hp, special bodies are made, this allows you to reach very high speeds, which involuntarily attracted many spectators, often just unfolded entire auto shows. Popularity grew in a simple quadratic progression around the world.

This is how another generation of lightweight cars was born, which are now competing racers in autocross, in general, this is a whole industry.
Structure
As before now, buggies also have a light frame body, in fact, these are strong pipes that are welded in a certain sequence. However, in fairness, it should be noted that now even lighter structures are coming to the place of metal - made of carbon. The frame must be as strong as possible to withstand all other loads. On the body as on the main part, the rest of the nodes are hung. Namely - the engine, transmission, suspension, and of course the interior.
Now, by the way, there are options for closed cars, sides are made of carbon fiber that cover either the driver or the necessary parts (for example, the engine), so you can move on dirty roads, and not just dry ones.
The layout of the buggy is also specific and remains so almost to this day. It was the Volkswagen Beetle that, with its structure, determined the design for many years to come.
As we know the engine is located behind it, there is also no cooling radiator, which turned out to be very popular for such motocross machines.
But the most important component is the suspension, it is in the buggy that it is considered the most passable and the most durable. Moreover, the clearance can reach as much as 500 mm, which is just a lot!

As you understand, such vehicles can be made with your own hands, in principle, there is nothing difficult for a knowledgeable person.
Now such cars are assembled even with motorcycle engines. Of course, without special training, you are unlikely to do it yourself, specialists are required, but if you connect them, something like this can happen, watch the video.
buggies leaving...?
Now, however, the era of these light SUVs is slowly fading away. And all the fault here is the appearance of ATVs. It is on them that the attention of many autocross spectators is now concentrated.

However, buggies have not died, they are now being modified, so other engines (already water-cooled) began to be used. Many suspension parts have migrated from SUVs, improvised cabins, bumpers and other fiberglass body elements also appear.
Competitions are also collected, now they can be divided into several types:
Beach

Rally raids
Crawlers
There is no longer the same structure here, buggies can be both front-wheel drive and rear-wheel drive. Now there are competitions in "climbing" on stones, for example, a route is chosen in which there are a lot of large stones, the car must pass along it without falling off, and also not getting stuck. Very spectacular! A small example of competition.
It should be noted that for their ease of construction, and high cross-country ability gained popularity in many armies of the world. Even in Russia there are such developments, the main task is to transfer troops over long distances over rough terrain (especially deserts).
It is also used to patrol the captured perimeter, sometimes a light machine gun is installed.
![]()
Here is such an interesting car, I think you liked the article, read our AUTOBLOG.
The word buggy hides a wide variety of car models that are very different from each other. When designing, it is important to adhere to certain proportions so that the parts match each other: in weight, size, maximum load capacity, etc. Let's look at different designs as power increases.
How to make a buggy with your own hands:
- From a motorcycle
- From OKI
- From the Cossack
From a motorcycle
A light little buggy can be assembled on the basis of an IZH or Ural motorcycle engine. It will weigh 300 kilograms, reach speeds of up to 80 km / h. In this design, motorcycle parts and small cars are used to the maximum.
From OKI

An excellent budget donor for a buggy is OKA. The hubs are light weight. The liquid-cooled engine is protected from overheating and is not as noisy as a motorcycle. The steering rack has a sufficient margin of safety for its class. The OKI-based buggy has more cross-country ability than a production car.
From the Cossack

Zaporozhets, having a rear-engine layout, is, in fact, a ready-made version of the buggy. When creating frame drawings, it is desirable to provide for mounting the engine backwards, for better cooling and weight distribution along the axles. In this case, it is necessary to turn the main pair (differential) over, changing the right and left sides in places. And to make a special gearshift drive, since the gearbox stem turns from the driver to the rear bumper, and this complicates the backstage system.
Video of the process of building a buggy from Zaporozhets
Shock absorbers, as well as hubs for buggies, can be left "native". But the suspension arms will have to be made by yourself, more on that below.

For simplicity, it is better to take a carburetor model so that there are no unnecessary problems with electronics. Although this is a matter of personal preference, the design does not change from this. The engine is usually installed behind the driver. To drive the rear wheels, the front axle shafts and hubs of the VAZ 2108, 09, etc. are used. To increase the rigidity of the rear suspension, you can use the front struts with springs from the 41st Moskvich, because each one holds more than 300 kg on the car.
For the all-wheel drive version, all four hubs are front, from the VAZ 2108. The axle shafts are connected to a cropped bridge from the "classic", for example, the VAZ 2106. On the rear axle, the trunnions are fixed without the ability to turn. And the front, like on a car. The differential of the power unit, for uniform transmission of torque to the axles, is better to block.
With this arrangement, it is worth considering that the maximum speed will decrease by the amount of the gear ratio of the axles used, since now the engine axle shafts do not transmit rotation to the wheels directly, but through one more differential. This makes it possible to use large diameter wheels without overloading the motor.
Homemade cars imply a homemade frame. For the supporting frame of the buggy, ordinary water pipes can be used, but it is better if they are seamless, round or square 30 - 50 mm in diameter. The upper part of the frame is welded from thin pipes. It is important to consider that during a rollover, the frame must withstand the weight of the car and the force of impact. This applies to buggies of any class.
For design, you must have:
- pipe bender
- Bulgarian
- Welding machine
- Drill
It is advisable to keep trimmings of boards and bars at hand, because there is always a need to lift some frame elements and fix them in this position.
Start making the frame on a flat area. Pipes bent according to the drawings are first seized by welding, checked, and only after that they are finally welded. It is important to be careful that the frame does not lead, as metal stress occurs during welding. For the same reason, it is advisable not to join, but to use solid pipes.
Front suspension

The long wishbone suspension in the form of the letter A has proven itself well, it provides a large wheel travel. Another plus is that it allows you to change the angle of the shock absorber with the spring, thereby adjusting the stiffness of the suspension.
The pendulum arm is subjected to heavy loads during operation, so it is important to pay special attention to the materials and quality of the welds when assembling this part.
To reduce the wear of silent blocks and extend their service life, the levers must be designed as wide as possible. That is, the bases of the letter A, into which the silent blocks are pressed, should be as far apart as possible, but so that the width of the lever does not interfere with the rotation of the wheel.
A nuance that can later upset is the limited travel of the lower ball joint pin in its socket. In other words, the pin may be limiting suspension travel up or down in a different place than expected. This needs to be checked at the design stage.
Rear suspension
If you decide to use a bridge, then the design task is simplified. But for a buggy, independent suspension is better. The levers can be longitudinal and transverse.
Wishbone
You can take as a model the front suspension, which is used on many Japanese cars. This is a triangular lever, one side of which is located across the car and is attached through one silent block, and the second shoulder goes forward to the center and serves as a strut that takes on the load when the car jerks.
trailing arm
To successfully use the trailing arms, a transverse reaction rod is necessary, otherwise the buggy will not hold the road well. The silent blocks of the trailing arms last longer than on the transverse rods of the "classic".
If you decide to design a buggy at home, time will not be wasted. Even if nothing comes of it, this is a great opportunity to get acquainted with the work of the main components of the car. And if it works out, you will have a unique car.
- News
- Workshop
The media learned the details about the new BMW X4
For the first time, the concept of a small off-road coupe was shown in 2013 at the Shanghai Motor Show. Not much time has passed since then, but the Bavarians are already ready to present the second generation BMW X4. According to Auto Bild, the model will receive a number of important changes. First of all, BMW will develop absolutely...
OSAGO: insurers continue to cheat
The Arkhangelsk department of the Federal Antimonopoly Service fined the Rosgosstrakh insurance company 12 million 777 thousand rubles for imposing services on motorists who initially came only for OSAGO policies, TASS reports citing an uninvited employee of the press service of the antimonopoly department. Violation of the law by the insurer was established by a joint commission of the regional administration of the FAS and the Central Bank last summer ...
Nissan accused of KoreagateNissan accused of Koreagate
Nissan was accused of manipulating data on the level of harmful emissions of cars by the South Korean authorities. The Japanese automaker used a device that would disable the car's exhaust filtration system at certain temperatures and help pass environmental tests, Automotive News reported, according to the local environment ministry. ...
The Ministry of Defense will be able to take away private car services
Such information follows from the package of documents of the "Defense Plan of the Russian Federation for 2016-2020" (PO RF), which describes the procedure for mobilizing enterprises, Izvestia reports. As a representative of the Ministry of Defense, who is familiar with the situation, said, the new scheme was tested during the Kavkaz-2016 exercises. In general, the experiment on the mobilization of enterprises in the Crimea, ...
Mitsubishi underestimated the passport fuel consumption
In 2014, US authorities proved that some Hyundai and Kia models consume more fuel than stated in the passport data. After that, legal proceedings were initiated against the Korean automaker, and as a result, the company had to pay $ 395 million in compensation. Now the Japanese from ...
Foton Tunland - a new competitor to the UAZ Pickup
The 2012 Foton Tunland is a 5.3m frame pickup truck. The rear suspension is spring, the drive is a hard-wired full, the gearbox is a 5-speed manual from the famous Getrag company. The only version will be available on the Russian market - with a 2.8-liter Cummins ISF turbodiesel with a capacity of 163 ...
The project of merging MAZ and KamAZ has been suspended for the time being
Recall that in February 2011, the state corporation Rostec proposed to the leadership of Belarus to merge the Belarusian MAZ and the Russian KamAZ, as a result of which KAMAZ would become the owner of 100% of the shares of MAZ, and the Belarusian authorities would receive a stake in KamAZ. In turn, the official Minsk insisted on the merger exclusively on a parity basis (50% to 50%). However...
New Lifan turned out to be cheaper than Lada Vesta
In Russia, a non-alternative 1.5-liter engine with a capacity of 100 hp will be available for the sedan, which for the first time will be paired exclusively with a 5-speed manual. However, if the public asks for a two-pedal version, Lifan Motor Rus promises to study the possibility of starting sales of cars equipped with a CVT. The most affordable Lifan Solano II will be...
The driver in Moscow was fined for the shadow of the car
As one of the drivers on the Drive2.ru form said, he received a fine receipt with a photograph, which shows that the shadow of his car crosses a solid line and moves along the roadside! According to the man, the incident occurred at the intersection of Lipetskaya Street and the Moscow Ring Road last Thursday. The man has already written a complaint to the traffic police and is waiting for a response. Remember, traffic fines...
The cheapest cars in the world
The cheapest cars in the world
Low cost cars have always been in high demand among people with low incomes. But this contingent is always much larger than that which can afford exclusive, expensive cars. Forbes: cheap cars of 2016 A few years ago, the whole world thought ...
Rating of the most expensive carsThroughout the history of the automotive industry, designers have always liked to single out a few unique in terms of characteristics and capabilities from the general mass of production models. At the present time, this approach to the design of cars has been preserved. To this day, many global auto giants and small companies strive to ...
HOW to exchange an old car for a new one, Buying and selling.HOW to exchange an old car for a new one, Buying and selling.
How to exchange an old car for a new one In March 2010, a program for the recycling of old cars was launched in our country, according to which any car owner can change his old car for a new one, having received financial assistance in the amount of 50 ...
Which car is the most expensive jeep in the worldWhich car is the most expensive jeep in the world
All cars in the world can be divided into categories in which there will be an indispensable leader. So you can select the fastest, most powerful, economical car. There are a huge number of such classifications, but one is always of particular interest - the most expensive car in the world. In this article...
The most stolen car brands in St. PetersburgThe most stolen car brands in St. Petersburg
Car theft is an age-old confrontation between car owners and thieves. However, as noted by law enforcement agencies, every year the demand for stolen cars changes markedly. Even 20 years ago, the bulk of thefts accounted for the products of the domestic auto industry, and in particular the VAZ. But...
The most expensive car in the worldThe most expensive car in the world
There are a huge number of cars in the world: beautiful and not very, expensive and cheap, powerful and weak, our own and others. However, there is only one most expensive car in the world - this is the Ferrari 250 GTO, it was produced in 1963 and only this car is considered ...
HOW to choose your first car, choose your first car.HOW to choose your first car, choose your first car.
How to choose your first car Buying a car is a big deal for the future owner. But usually the purchase is preceded by at least a couple of months of choosing a car. Now the car market is filled with many brands, in which it is quite difficult for an ordinary consumer to navigate. Oil additives for...
Reliability of cars by ratingWhat are reliability ratings for? Let's be honest with each other, almost every car enthusiast often thinks: the most reliable car is mine, and it doesn't give me much trouble with various breakdowns. However, this is just a subjective opinion of each car owner. When buying a car, we...
HOW to choose and buy a car, Buying and selling.HOW to choose and buy a car, Buying and selling.
How to choose and buy a car The choice of cars, both new and used, on the market is huge. And not to get lost in this abundance will help common sense and a practical approach to choosing a car. Do not give in to the first desire to buy the car you like, carefully study everything ...
Choice of affordable sedan: Zaz Change, Lada Granta and Renault LoganChoice of affordable sedan: Zaz Change, Lada Granta and Renault Logan
Some 2-3 years ago it was considered a priori that an affordable car should have a manual transmission. Their destiny was considered a five-speed mechanics. However, things have now changed drastically. First, they installed a machine gun on the Logan, a little later - on the Ukrainian Chance, and ...
- Discussion
- In contact with
What material is suitable for use in a homemade buggy or ATV? What if you want to compete?
Thanks for the material Nitro
Can square pipes be used?
- what section of pipes should be?
- Is it possible to use seam pipes from the regular building materials market?
- how to bend the frame pipes?
- is it possible to make a frame without using a pipe bender - just weld the frame from pipe segments?
the answers are as follows:
The frame must be built from seamless cold-formed seamless tubes. The material must have certain strength characteristics.
In the "bible" of the buggy builder (Nazarov M. M. "Special cross-country cars - buggies", Moscow, DOSAAF 1980) it is written - "The main safety arcs are made of steel cold-drawn seamless pipes. Their minimum dimensions depend on the class and weight of the vehicle. For the 0th and 1st classes with an engine displacement of up to 350 and 500 cm3 - 35x2 mm; for grades 2-15: with a mass of up to 700 kg - 42x2.5 mm; from 700 to 1,200 kg - 48x2.5 mm; over 1,200 - 57x3 mm.
Taking into account the fact that pipes made of this material are expensive and have limited weldability, other pipes can be taken. The most suitable are seamless seamless cold-drawn pipes made of steel 20. You can buy such pipes at large metal depots, in Moscow you can buy pipes at Metal-Service. They have almost everything and sell at retail.
For buggies such as "Hurricane", ST2, such classes as minibuggies, go karts, it is allowed to use shaped electric-welded pipes of square or rectangular section. It is convenient to process them in a garage, but you need to remember that a square pipe works differently for torsion, compression and bending, unlike a round pipe (sopromat is not such a complicated thing). But, as a rule, you want to ride and not achieve any records, so such pipes are actively used for buggies - especially abroad. Oddly enough, but a DIY class buggy - (do it yorself - do it yourself).
As for seam pipes, I know some people use them. In large cities it is possible to buy what you need, but outside these cities it is quite problematic - you need to buy a large batch. If there is nothing other than seam pipes, you can choose a pipe with a thicker wall. By the way, there were cases when, in off-road racing, individual athletes built frames from an ordinary thick-walled water pipe in order to pass the minimum weight requirements. The main bars for the buggy should be solid - after all, they affect the safety of the pilot (and passengers). the remaining sections of the frame can be welded from pieces of pipes. With proper welding, strength will be sufficient.
In any construction market, there are now many Chinese pipe benders. they are all designed for water pipes (their dimensions depend on the remote control - the nominal diameter). the second feature of such pipe benders is that the ovality of the pipe in the center of the bend will be greater than that required by the sports regulations - if the regulations do not restrain you, you can take it and bend it.
Buggy is a rather unusual vehicle. In fact, a buggy is a car from which all parts of the load-bearing body were removed, and then transferred to an open chassis and equipped with large wheels. All this is required in order to prepare the car for off-road driving, in particular on sand dunes.
The first buggies were assembled in the USA (under the name “Dune Buggy”) and the UK (the British called this proud car “Beach Buggy”, that is, “beach bug”). In general, the word "buggy", that is, "bug", came from there - the first models were made from obsolete Volkswagen Beetle cars (that is, the Volkswagen Beetle), and since the new models were less lighter, the sharp-tongued Americans called the results bugs .
Since then, buggies have been used almost everywhere where there is no road - in deserts, where they have become practically hits, both in sandy and icy ones; on remote farms where they provide a cheap alternative to traditional heavy pickups…
Even the US Army uses buggies based on light jeeps - when equipped with such a clumsy-looking machine gun, you can get a highly mobile firing point that will pass even where an armored personnel carrier cannot pass.
In this article, we will consider the process of building our own buggy based on an old Soviet car that was undeservedly forgotten and sent to the dustbin of history - ZAZ 968, that is, the classic forty-powered Zaporozhets.
Part 1. Design

You will need blueprints. This is an axiom. Of course, you won’t be able to comply with them 100% - after all, you don’t work at a factory, but in a garage, but the drawings will still be needed. The basis of the buggy body is metal pipes, which should form the most rigid structure, which must be calculated in advance.
However, if you are too lazy to do it yourself, or you don’t have enough knowledge, then there is always the opportunity to assemble a buggy according to the drawings that can be found on the Internet - there are many sites of fans of such cars and most of them share their experience quite freely. We used drawings from the Soviet magazine Modelist-Constructor, and the buggy itself is called AB-82 in it.
Part 2. Building the base

It’s worth starting with the assembly of the frame, on which other parts of the car will then be installed. The material from which you will perform this can be an ordinary iron profile pipe, it is also an “iron profile”.
In most cases, it is enough to support the weight of the engine, the rest of the car body, as well as the rider with the load. However, if you want to "show off" - you can use stronger and more expensive materials.

Worth thinking about suspension. In our case, we used a VAZ-based front suspension - it is relatively cheap and at the same time quite reliable. Here is what has changed in the process of its processing and fitting to the buggy:

The lever pipes are from the rear suspension of the VAZ Classic. The one with silent blocks. Or silent brooks, as old motorists aptly call parts of this quality abroad.
The ears for installing the blocks had to be made independently from metal 2 mm thick.
Fastening the ball joint from below is a piece of the VAZ front lever.
Above - the VAZ relay tip, which replaced the ball tip.
The camber adjustment bushing is welded to the upper arm (I had to turn to a turner, but such a strengthening of the structure was worth it). The same turner helped to adapt the upper ball joint to the tip - they have different cones.
IZHP-4 shock absorbers were used ... but they should not be used - they are too weak. Later they were replaced with paired shock absorbers. A little advice - when building the suspension, try to make sure that the kinematics of the levers make the contact patch of the tire with the road maximum. 
The rear suspension was made according to the method of a combined hodgepodge of several VAZ ones with a belt limiting its travel.

The front wheels were originally VAZ, but the rear ones were planned to be used from Zaporozhets. However, later it turned out that the ZAZ drum brakes were to hell and the turner ordered bushings for VAZ wheels and VAZ disk brakes, respectively.
Part 3. Installing the engine

If you continue to follow the instructions and drawings in this article - it's time to try to install the engine and gearbox. In our case, we used "native" mounts with a little "finishing with a file."
Since the drawings were not followed perfectly. Ideally, they should also stand on their relatives. A native generator relied on the motor, but it did not justify itself and was later replaced by VAZ products. Pedals are original.

An important point is that in the vase the motor is reversed, so in order to have four gears forward and one reverse, it is worth deploying the differential gear. This trick is only possible on forty-horsepower motors, so be careful. Carburetor - VAZ through an adapter.

Part 4. Making the bucket seat

The tank was installed in the form of an old five-liter canister. Later, he acquired various sensors, a beautiful hatch and other amenities.
Ready. Key to start!

It is worth noting that this design turned out to be a purely test one - the Zaporozhets engine died rather quickly and ingloriously, after which it was replaced by a VAZ with frame alterations. But the gearbox through the transition frame still feels fine ... but it was replaced by AZLK 2141 due to the higher reliability of the latter.
The seat was also replaced with an ordinary, soft RECARO GT1, and a full-fledged upper body with a dashboard was also made.
After these improvements, tests were carried out that showed an average off-road speed of 53 km / h, and a maximum recorded speed of 146.7 km / h.
We make buggy drawings on our own
Before proceeding with the assembly, you need to make a sketch, or even better a full-fledged drawing, it depends on the level of training. The most important thing is to understand in what conditions you will operate buggy, By public roads or exclusively for off-road? The geometry of the chassis and the type of suspension primarily depend on the operating conditions. After that, you can start making a sketch or searching the Internet.
1. Overall width 2. Overall length 3. Overall height 4. Front wheel track 5. Wheelbase 6. Rear wheel track 7. Departure angle 8. Approach angle 9. Mirror width 10, 11. Obstacle radii
Ground clearance is usually set at 250 - 300 mm, which allows you to overcome significant bumps at speed. Depending on the proportions of the frame and layout, the wheelbase is approximately 2500 - 2900 mm. The track gauge is usually taken as 1.4 m - 1.5 m. The dimensions of the undercarriage are borrowed from the donor or the following dimensions are used:


These dimensions are taken from the showroom. AZLK-2141. This buggy built for amateur riding, not sports riding, which is why the emphasis is on comfort and safety, not power. Height of 1.2 m allows the use of conventional car seats. If possible, it is better to purchase "sports" anatomical type seats. It is also recommended to replace the conventional seat belts with 4-point ones, as conventional belts to ensure full safety in this case is not enough.
Buggy layout
So, consider the features of the following donors: - M-2141
VAZ-2108 and its modifications (VAZ-2110 in terms of units is no different for us)
VAZ-2101 and its modifications
Each donor has its own characteristics, its own layout. Usually, the interior layout is chosen, and then the units are placed taking it into account. Some inventors, on the contrary, start the layout with aggregates. The algorithm still turns out to be the same, no matter from which side we approach the motor shield.
Drawings bugs, algorithm of work 1. You need to start with a large number of printed pictures of buggy, from different angles. It is important that the eye is not blurred during the design process, you need to give your eyes time to rest and look at the drawings in a new way.
2. For the manufacture of drawings, we need: a protractor, two triangles, a ruler. According to the printed drawings, it is better to draw with slate pencils or a gel pen, because. an ordinary ballpoint pen quickly becomes clogged with powder applied to a sheet of paper if the printer is laser.
3. Find a complete technical characteristics of the buggy, so that you can bind any size to your drawing using these parameters.
4. Set the point, the origin of the coordinate system. If you start the layout from the passenger compartment, then it is advisable to take the front mount of the driver's seat slide as the starting point. Some use the axis of the front wheel or the position of the engine compartment as the origin.
5. Given buggy parameters with which we copy the proportions, we determine the main parameters of our model.
VAZ 2101 is used as a donor
Those who leave the base from donor, it is recommended to move the engine inside the base for better weight distribution. The middle of the unit in this case is above the front axle. To avoid costly alterations, it is recommended to use a cardan shaft from Niva 2121 or, given that the native shaft is two-link, remove one link and balance. According to the unit, it is necessary to carry out the movement of the passenger and the driver. The degree depends on the cardan shafts. At the back, they usually use a gearbox from a foreign car, made of cast iron.
Taking a look at the engine compartment, we pay attention to the fact that the gearbox is located between the pilot and the passenger, this allows us to slightly push the seats. Wheel outer diameter VAZ 2101 is 580 mm. To improve the appearance, many put wheels from the Volga, with a diameter of 640 mm. The difference of 60 mm is not very big, but it has a positive effect on the appearance. After we got the length of the driveshaft, clarified the layout, we can start drawing the frame. Let's start with the ground clearance and drawing the lower pipes. Display the position of the wheels. We take the axis of the front wheel as the starting point. Above the pipes of the first row we place seats, units and a mannequin. Considering the prototype, we determine the position of the guide tubes of the frame. You need to draw in layers - if on a drawing board, then using a drawing film, if on a computer, then using engineering graphics programs. On a computer, it is very convenient to highlight layers with different colors, this allows you to visually see the overall picture. Below are some of the design steps for a buggy:


Buggy from VAZ-2108
The most common model buggy from VAZ 2108, this is sandrail. Very light, manoeuvrable and simple in design machine. Compared to the previous layout, the frame will turn out to be more elegant. To fully imagine the shape of the future buggy, we measure the entire interior of the donor with a tape measure, write down all the data, where and how the seats, controls, radio, armrests are located. We take the 1st bolt of the driver's seat sled as the starting point. We choose ground clearance a little more than that of the donor, since the buggy involves the use not only on public roads, but also off-road. We start by drawing the pipes of the first row. Taking into account the position of the dimension of the engine compartment (the front plane of the radiator) from the wheel axis, we transfer the corresponding dimensions to the drawing. Next, we place the mannequin and seats. In order to save money, wheels can be taken from donor, also the steering rack, seat. I and part of the electrics are taken from the donor. Further steps buggy design repeat the previous layout:

After that, we indicate on the diagram the location of the dashboard and controls. The track of the rear and front wheels should be the same, so feel free to use the track of the front wheels from our donor. The distance between the wings can be taken as the width of the engine compartment. The height of the cabin can be taken, either as a donor or slightly increased, because. VAZ 2108 is not very convenient for tall drivers. Also, the place allows you to slightly move the driver's seat back. We measure the place for the battery, gas tank and audio speakers. Next, you need to determine the angles of rotation of the wheels so that there is no contact with the wings and frame.

Now that the main elements are thought out, you can begin to draw the tubes of the frame. The middle row of tubes is located at a level where it is comfortable to hold the hand, while providing maximum protection.


For the manufacture of these drawings, engineering experience should be minimal, since such work does not require any calculations, the process is more creative than engineering. The result should be the following drawing. If you fail to bring the drawing to a similar view, do not despair and try to redraw it again, this is a matter of practice.


