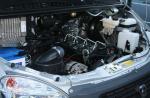
There is a huge selection of turntables available today, varying in both price and class. In addition to the remake, there are many proven vintage equipment. Vintage often means Japanese, German and other helicopters of foreign origin. Soviet audio equipment, on the other hand, is remembered by dry electrolytes, factory defects and compared with entry-level foreign ones. However, this is not always true.
In this review, using the example of the joint activities of the Berd Radio Plant and the Polish association Unitra, under the name Arcturus 006, we will make sure that in the Soviet Union, in addition to any junk, serious audio equipment was also produced, which today can compete with foreign analogues. By the way, the Poles borrowed the design features of the EPU and the tonearm of this player from Fisher players. 
Historical digression and technical characteristics
At the beginning of 1983, the Berdsk Radio Plant produced the Arktur-006-stereo network transistor electric player. It was intended to work with a Hi-Fi complex of sound reproducing radio equipment. The turntable is made on the basis of a two-speed EPU G-2021, with an ultra-low-speed electric motor and direct drive. The EP has a clamping force regulator and a rolling force compensator, adjusting the disc rotation speed using a stroboscope, auto-stop, micro-lift, speed switch and auto return of the tonearm at the end of the record. Disc speed 33, 45 rpm. Operating frequency range - 20 Hz–20 kHz. Detonation coefficient - 0.1%. Relative rumble level -66 dB. Background level -63 dB. The dimensions of the electric player are 460x200x375 mm. Weight - 12 kg.
Let's take a closer look
The device that I recently purchased from my hands was made in 1985. According to the previous owner, the player had all the preventive maintenance necessary for normal operation. As it turned out, there are Soviet electrolytes inside, but their capacities correspond to the nominal value. Everything in the player is factory, except for the hinges-holders of the lid (the factory ones are rather fragile). There were no interventions other than replacing the cartridge, although there are many ways to get a significantly better sound from it and ways to refine it. But personally, I don’t see any point in this: in stock, the player sounds pretty decent, and if you want a better sound, there’s no need to disfigure equipment that is no longer being produced, there isn’t much of it left, it’s easier to immediately buy a device of a higher class.

Appearance
The turntable has a plastic case, in which a Polish direct-drive EPU with an S-shaped tonearm and a heavy platter is installed. The turntable has non-adjustable rubber feet.
 Quite a typical appearance for direct-drive turntables of those years, solid construction and the presence of all necessary controls
 At the back of the player there are two outputs: one from the built-in phono stage, the second bypass, for connecting to an external one. When using the built-in phono stage, a jumper is installed in the second output.
 Connectors type SG-5, also known as DIN 5
 The player has a heavy platter, which at the same time is the rotor of the electric motor, a magnetic plate is glued on its inner part. 
Under it is the stator of the electric motor.
 motor stator
 The tonearm is made entirely of metal, there is not the slightest backlash in its design. The only thing that raises questions is the counterweight, which does not sit tight enough, and it is graduated in 0.5 g increments, which greatly complicates the process of fine-tuning downforce without weights. The shell does not have slots for more precise setting of the angle of entry, however, it is removable and can be replaced with any other.

Player in action
The player turns on with one click of the toggle switch, when the pickup head is brought to the beginning of the plate, the disk starts to rotate, it remains only to select the desired track and lower the microlift. Rotation speed adjustment and player control are carried out from the corresponding panel. When you press the "stop" key or at the end of the side, auto-stop and auto return of the tonearm to its original position are triggered.

A huge plus is two trimmers for 33 and 45 speeds, for fine tuning the rotation speed. No need to climb with a screwdriver under the bottom of the player, as in most new-made devices. Among the shortcomings is the need to slightly adjust the speed after warming up the motor control chip. Also, when buying this player “from hand”, check that the speed does not float. This model has a common problem. Buying vintage audio equipment is always a lottery, but in this case it is better to overpay a little than to buy a non-working device for a penny.
 Stroboscope, as all direct-drive turntables should
 Listening
We will listen to the player with a Shure M97xE head (we will set aside the complete Unitra MF102 for children's fairy tales), a built-in phono stage on the K157UD2 chip, a Pioneer a-30 amplifier and Amfiton 25 AC-227 speaker systems. With a better phono stage, a more detailed and deep sound picture could have been achieved, but the built-in microcircuit performed surprisingly well. With the only clarification that this player does not claim to be a High End class sound - it is quite a normal, solid Hi-Fi of the middle price category, nothing more.
Pink Floyd - "Wish You Were Here" (25 AP 1258)
The central composition of the album played with a sufficient amount of detail, the depth of the sound stage, the sound of each string of the guitar and David Gilmour's vocals was well conveyed.

Kiss - "Asylum" (826 099-1)
The combination of the player and the pickup head once again showed itself well: the absence of any porridge in the sound, the whole drive and emotional component of the album is perfectly conveyed.

Boney M. - "Love For Sale" (65 359 2)
In the test of the Soviet vinyl player, it is simply impossible to do without the "first group of all pioneer camps." The bass was deep enough, it sounded with the inherent softness of this carrier.

Forum - "White Night" (C60 25779 005)
The sound literally takes you back to the times of the USSR - it is so soft, detailed and lively. 
conclusions
Arcturus 006 is undoubtedly one of the most worthy turntables produced during the Soviet Union, and to this day remains an excellent choice for music lovers, vinyl growers and audiophiles who do not really want to spend money on a simple turntable made of sawdust and with a motor from a cassette player. The turntable showed itself well with the American head, we can safely say that this is an excellent bundle for playing rock and its varieties, including heavy metal. If we compare the Arcturus 006 with modern competitors, there are simply none in the price range up to 30, or even up to 50 thousand rubles. However, with the only condition that this player is in a fully functional and working condition. 
Advantages: Direct drive, heavy disc, S-shaped tonearm without any play in the design, hitchhiking, huge opportunities for improvement and all sorts of improvements
Flaws: Plastic case, lack of high-quality vibration decoupling, Polish EPU control microcircuits and related malfunctions, when interacting with some individual instances, direct hands may be required to bring them back to life
Special thanks for the help in editing and designing this review.
First of all, it should be noted that if you want to purchase a Soviet-made vinyl player and do not want to do any modifications, except for replacing the pickup, I DO NOT RECOMMEND taking Arcturus in any case. Of the players of Soviet production, which practically do not need modifications, I will note the Electronics EP-017, B1-01 and Corvette 003/038.
All Arcturas are assembled with "legs" (I'm not afraid of this word). This is especially true of the tonearm - the most important part of any player.
The presence of a built-in phono stage, rumble filter, unimportant wires in the tonearm and the deadliest MF-101 pickup make it completely unsuitable for listening.
So improvement.
I will not tell you how he understands, because. there are no special tricks there.
Things to do:
1) Completely turn off the phono stage - you can not remove it, it is fixed well.
2) Disable the rumble filter. It is not difficult to find it - the wires from the tonearm lead directly to it. You can also leave it in place if you wish.
The device consists of two halves and at the bottom it is necessary to "embed" 2 "tulip" connectors and a screw terminal for "ground". After that, I recommend checking whether the power supply and the "legs" of the device are well fixed.
3) The body of the Arcturus is made of plastic, so its damping must be taken seriously
What can be done. I had two ideas - either plasticine or paraffin. As a result, almost the entire bottom is filled with paraffin, but some places, for example, the phono stage and the area around the power supply, are smeared with plasticine (Thanks to the Steppe Wolf for the provided plasticine)
The top is more difficult. First of all, you need to check the quality of fastening the EPU itself to the case. If you wish (I did not do this), you can use the idea of the Steppenwolf, namely, screw everything through rubber plumbing gaskets. Further, everything is the same as with the lower part, except that it is better to put the paraffin here after assembling the player directly on the metal EPU after removing the disc.
4) Replacing the wiring in the tonearm.
The wire is sold in the Nota + store and costs around 450 rubles for 4 wires of 0.5 m each. This is quite enough.
For Arcturus, I recommend this option, because. it is very easy to break the wire due to the design of the tonearm. I’ll make a reservation right away that it’s impossible to change the wiring without removing and completely disassembling the tonearm. But in any case, the tonearm is assembled so carelessly that it is simply impossible not to do this.
5) Removing and disassembling the tonearm is relatively easy, the main thing is not to forget about the 5th wire that goes to the body of the player and do not overdo it with tightening the bearings. Remember that the tone arm must move absolutely smoothly and freely in all directions. Use lithol to lubricate bearings.
I don’t see the point in eliminating the contacts in the shell, but I recommend changing the wires from the shell to the pickup as well.
Exactly 5 wires should come out of the tonearm. 4 of them are soldered to the tulips according to the polarity, and the fifth to the player body and to the ground terminal for subsequent connection to the phono stage.
Assemble carefully, being careful not to knock off the auto-return setting of the tonearm.
7) Particular attention (it takes me about 40 minutes to do this) must be devoted to the correct installation of the pickup. This template is suitable for this (you need to log in to view the link)
About long conversations about which Soviet player is better. Such tests are complicated by the fact that they must be carried out on the same pickup, which must be removed, installed and accurately aligned on each turntable.
Elektronika EP-017 was compared with the very first issue (not Kazan, but Fryazinsky) and Arcturus only with a damped body. The comparison was made on a pickup that I still have to this day - Shure 75ecs. Tube phono stage ZKI.
Electronics is somewhat inferior at medium frequencies. Arcturus played at a higher resolution. After rebuilding the tonearm and replacing the wiring, due to clearly audible improvements, another comparison of these players does not make any sense.
Dear Stepnoy Volk brought his modified B1-01 Electronics with an Audiotechnika-110 pickup. They did not change the pickups, they just compared it as is. The comparison is incorrect, because B1-01 is much inferior to Arcturus, but the reason for this is the pickup.
By this I want to say that if desired, even a mediocre device can be improved to a serious level.
________________________________________ ________________________________________ ____
How to see needle wear -
Instructions: How to see needle wear.
We take the head with the needle away from us, under a long lamp or chandelier (the more light the better), we catch a glare on the diamond cone from the side (working) side, in a strong magnifying glass (10-20x) or a microscope (manual 30-50x is enough), we catch the needle in a magnifier / microscope, and we begin to slowly turn the head with the needle towards ourselves, and if we see a bright point on the tip of the needle (or a plane in the microscope ) - then it's time for her to go to the trash / to the retype.
Kurochim "Arcturus".Introduction.
As the story progresses, there will be photo comments of "tricky" places, in my opinion.
Photographing was carried out primarily in order to save ourselves from smut
during subsequent assembly. And believe me, it helped me.
The basic principle that I followed in the process of tuning the player is not to make
cardinal changes in the design and nevertheless squeeze the full potential out of it.
Before starting to create this improvement guide, I studied almost all the meager material on this type of player, read countless comments on fairly authoritative forums. As a result, you have a symbiosis of the collected material plus my corrections and recommendations.
First impressions are always deceiving.
After reading almost everything and everything about this type of "table" (unitra G-xxx), I began to form the opinion that in nature there simply are no normal players of "sovkokovo" production, with the exception of "Electronics" B1-01 (an exact copy of "thorens", which unfortunately does not want to fall into my hands for sane money). All reviews about "tables" like "unitra" suck! Direct drive sucks! Etc. and so on. But since God sent "Arcturus-006" (based on "unitra-Gxxx", then we will fight and squeeze the maximum out of it!
At the moment I do not consider myself to be among the cohort of audiophiles who have a total cost of equipment of 10 kilobucks and more and who basically do not put records with "apple color other than black". Perhaps, having understood and most importantly HEARING the differences and nuances in the sound of different components, I will re-read this text with a smile, but we will proceed from the principle "what we have at the moment".
And at the moment we have:
1. Acoustic system - Defender Mercury 50A (modified, materials and photos will be posted later)
2. Player "Arktur-006" (in the process of tuning)
3. NAD PP2 phono stage (ready for tuning, but the process will be launched after work on the player is finished)
4. Cassette tape recorder Technics RS-BX501 (actually appeared by chance, as a memory from childhood. Because as a child I dreamed about it and because I got it almost for nothing in awesome condition)
Begin.
On the good side, for a more or less objective assessment of the improvement, it was necessary to first turn it on "as it is", try to listen, then disassemble, assemble and turn it on again. But this could not be done for a number of objective reasons, namely:
1. No needle.
2. I knew for sure that the built-in corrector was a "bullshit!", and the budget NAD was just ordered.
3. The device has lain in a closet for about five years with a "killer" tuning of the electric cord, I'm just afraid to plug it into the outlet.
Disassembly.
And so, the player on the "operating" table. The first step is a complete disassembly, washing, lubrication. The process is not very interesting and dreary, because it is not very pleasant to turn out someone else's dirt.
Therefore, see the full photo archive for those who are interested, and here there will be only individual moments.
Comments and recommendations for disassembly:
Especially none, because it is quite easy and simple to understand.
In some instances, no paint was spared on the screws.
Twist the tonearm and set it aside (we'll deal with it later).
Do not lose the retainers and shims.
Since I got the player without a cover, I removed the brackets for it (especially since a viscous liquid leaked into the case - I barely washed it)
Next, the washing powder in the hands and wash the body and base of the table.
I did not paint and paste over the body with anything, because there is a desire to make another one.
I'm still looking for damping of the case and disk.
I did not take out the power supply unit from the case (yet).
Assembly.
First of all, a visual inspection of electronics, limit switches, wires.
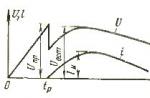
On the control board, we immediately change all the electrolytes. Don't save! The price of electrolytes is 10 rubles. And the search for the reasons for the unstable operation of the drive takes several evenings.
I just "hit". I soldered the conduits, measured them, the capacities are normal. After an hour of work began destabilizing rotation of the disk. It turned out that when heated, the capacitance of the capacitor was restored, and after cooling it "left" from the nominal value.
Easy tuning - replacement of incandescent lamps indicating modes "33" and "45" with LEDs.
It took a lot of time to adjust the smooth operation of the tonearm microlift (viscous fluid + elasticity of the electromagnet armature return spring)
During the assembly process, mechanics recommend that you compromise the following things (affects the stability of disk rotation).
1. Uniformity of the air gap between the disc (rotor) and coils (stator)
2. Leveling of the central support assembly (three adjustment screws)
Free advice - if the speed of the disc floats with all of the above comments, machine a new bearing center block. I was sharpened from graphite-fluoroplast.
This material is characterized by high frictional wear resistance and sufficient hardness.
After all of the above manipulations, the strobe marks stood up as if rooted to the spot (by eye
about 0.5 - 1 mm forward-backward)
Tonearm.
We disassemble. Everything is simple.
If we leave the ability to quickly change the head along with the shell, then we clean the pads.
We change, at will, of course, the wires in the tonearm. I put the "faces" in pairs twisted.
A phono stage and a head switch (a small scarf with two transistors) - damn!
The phono stage will be external, the switch, if there is a big need, we will put a relay one.
In fact, this is a continuation of the old theme: how to get the most out of old Soviet technology at minimal cost. Start
Watch video (wait for loading):
In 1983, the Berd Radio Plant launched this device into mass production. It cost at the very beginning, if I'm not mistaken, 238 rubles. Somewhere during this period of time, my salary was approximately 135-145 rubles per month. That is, the technology at that time was not cheap. Then, over time, the model was slightly modernized (purely aesthetically), and by the end of the 80s the price jumped to 270 rubles. Since at that time imported equipment was practically inaccessible to Soviet citizens, this model fully satisfied the needs of the middle stratum of Soviet society and novice music lovers. And most importantly - this player was assembled on the basis of the Polish Unitra G-2021 electric player (quite solidly manufactured in comparison with domestic analogues).
Price information: in the 70s, as a student, I barely raised money for myself for a simple and cheap Sonya for 750 rubles. He saved money from the profits received on the resale of imported records. Then, when already in 1980 he began his working life, he replaced Sonya with a rather solid Technics with a direct drive and a quartz speed. The new device cost me 1200 rubles. However, the desire to keep expensive imported records in the most perfect condition moved me further, and in 1983 I 1900 rubles! I bought Dual CS-731Q - perhaps the most desirable model at that time among Soviet music lovers.
However, constantly changing heads on an expensive player is terribly boring and over time you realize that there should be several players in the house. One must be micron-aligned, with an expensive head, timeless mechanics, gold-plated cables and other shamanic bells and whistles for crystal clear sound. The other is just a workhorse, on which you drive discs of not the first freshness every day, or you experiment with the selection of cartridges and preamps.

My choice fell on the Arcturus-006-stereo device, which, according to the instructions of those times, was considered a "high-class electric player." And most importantly, what attracted me to it was the Polish-made mechanics, clearly copied from some Japanese model. My friend set to work, who simply enjoys the process of dripping in various devices.

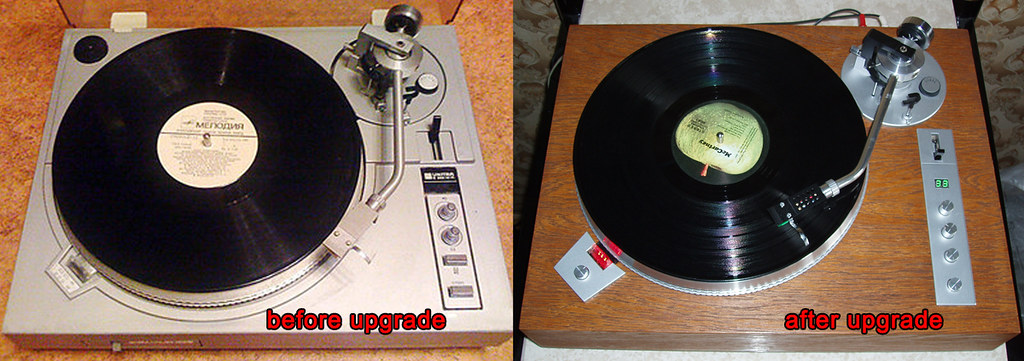
First of all, everything superfluous was thrown out, and first of all, the built-in corrector, which produced a nightmarish sound. Behind him, the creaky plastic case went into the trash. It was replaced by a massive wooden table made according to a special drawing. The Japanese Audio-Technica AT-95E perfectly sat in the place of the old Unitrovsky head. I thought about changing the shell as well, since the native one looks painfully miserable - it seems that they just cut off a piece of a corner. But a friend advised against it, because it got another 25 bucks, and then, only for the sake of aesthetics, but it would not give an increase in sound quality. He drilled a few holes in the old shell and blackened it. Immediately, the design began to look more elegant. New wires were run in the tonearm and damping was done. Damped and disc. But with the cover decided not to bother. They refused to install it at all. Just glued felt pads on the corners and it turned out to be removable. The lid material has faded a bit over time and even turned yellow. One person makes any covers in our Kyiv under the order. Well, I can order him a new one, but why? It will cost $ 40, but on the sound quality, what will it give? Well, the rest of the little things have been finalized.

I know that the first question that a curious reader will ask me will be about the cost of rework. Well, here I had an extraordinary case, because my friend did the work. I had two copies of this player model. They gave me one copy, but it was in a terrible state, although it was working. Therefore, for $50 I bought a second similar device, but already in decent condition, in order to assemble one out of two. I took both devices to a friend. We agreed that he would make one copy for me and practice on it. And from the second one he will then collect another turntable for himself. Thus, I paid only for a new head, a wooden plinth, half a can of varnish ... of course, they also soaked the device well. All this in total resulted in me a maximum of 100 dollars. In total, the total cost of the device that you see cost me = 150 dollars.
Of course, one could spend 2-2.5 times more money and take, for example, Thorens TD 160 or 166. But these vintage models also require maintenance and refinement, and the main drawback is twisted springs with all the ensuing problems. And then I’ll want to install an SME tonearm instead of the standard one, and so on ad infinitum… So I stopped for the time being on the balance of a moderate price and sufficient quality, especially since this toy suits me perfectly during the crisis period.