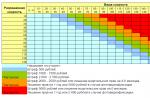
Selection of wire cross-section and fuse ratings for powering the radio and amplifier
Wires are best used copper, stranded type PV-3 and the like.
- Radio station without amplifier. The length of the supply wire is less than 2.5 m - 1 mm.kv, if the length is more than 2.5 m, then - 1.5 mm.kv, engine compartment fuse 5-10A.
- Radio station, with an amplifier of 100 watts (KL203, KP101-12, 747). The length of the supply wire is less than 2.5 m - 1.5 mm.kv, more than 2.5 m - 2.5 mm.kv. underhood fuse 15-20A
- Radio station, with an amplifier 150-200 watts (SG200, KL300, KL400). The length of the supply wire is less than 2.5 m - 3 mm.kv, more than 2.5 m - 4 mm.kv, engine compartment fuse 25-30A.
- Radio station, with amplifier 280-400 watts (SG400, KL500, 797). The length of the supply wire is less than 2.5 m - 4.5 mm.kv, more than 2.5 m - 6 mm.kv, engine compartment fuse 40-50A.
The battery fuse is best used with a flag fuse, as in all modern cars. Finding them is not difficult, as well as pads for them.
![]()
In the case of using fuses 40-50A, it is best to use fuses to power car acoustics. Fuses of large denominations with holders in the form of flasks have proven themselves well.
![]()
Powering the radio and amplifier with one or two wires?
Since there are several opinions about the correct connection, with one or two wires, I will say on my own that, in principle, both options are possible. But in each case, you need to make a decision based on the characteristics of a particular car. Sometimes problems with interference and self-excitation cannot be solved using one connection scheme, and an alternative one can help here.
Advantages of connecting with only one wire to the battery
- We pull only one wire from the battery.
- We use only one fuse for the battery.
- There are no problems with disconnecting the mass from the battery, with such a connection, a ground loop is not formed through the antenna cable.
- Such a connection is not sensitive to common-mode interference, and anti-phase interference is remarkably suppressed by the filter built into the radio station.
Disadvantages of connecting with only one wire to the battery
- Sometimes, especially on heavily used rusty car bodies and in some other cases, when the car body cannot serve as a full-fledged DC conductor, all sorts of special effects are possible. In this case, it is better to use an alternative scheme for connecting the minus directly to the battery.
Advantages of connecting two wires to the battery
- They arise from the shortcomings of connecting the negative wire to the body. When using two wires, we are isolated from defects and features of the conductivity of the body of a particular car.
Disadvantages of connecting two wires to the battery
- When the antenna is correctly installed, on an honest ground, and the ground is turned off, for example, an earth loop is formed from the battery, and if you forget to turn on the ground, then when you try to start the engine, all the starter current will flow through the antenna cable sheath.
- It is necessary to install an additional fuse on the wire going to the negative terminal of the battery.
- You need to pull the second wire to the battery
- With this connection, an earth loop is formed between the battery and the radio station, which has its own resonant frequency and, under adverse conditions, is quite capable of collecting interference from the on-board network and the surrounding space.
And remember, proper nutrition is the key to the correct functioning of the equipment. Some stations are very capricious regarding proper and stable power supply, an example of this is MegaJet MJ-555, which will fail if there is insufficient voltage. In addition, properly powered communication equipment is much less susceptible to interference that can be generated by the car's on-board network and other equipment, such as Chinese chargers, power supplies for cheap recorders and other electronic trash in which the Chinese, in order to save money, did not put the appropriate filters to reduce the cost. But this is a topic for a separate article.
Despite all the vagaries of the weather, summer has finally come, and most of the autotourists have gone on long journeys. It was during this period that there was a great interest among car owners in CB radio stations that operate on the truckers' channel and are of great benefit when traveling by car. Today we will tell you how to properly connect and configure such a station.
Connecting the radio to power
The following tips for installing such a walkie-talkie are suitable for those drivers who will not use it every day, but only when necessary, in the same summer season. In this case, few drivers will want to mount it in a conspicuous place in the cabin, which will not only spoil the whole appearance, but also attract thieves who are not averse to feasting on sophisticated devices inside the car. Thus, we choose the mounting option between the seats, in the tray for small items under the dashboard, and so on. In simple words - where it will not be visible and it will be very easy to get to.
When we found a suitable place for our walkie-talkie, then it's time to connect power to it. Some say that you will have to connect the radio with separate wiring from the battery, but this only applies if the station is used every day. In our case, everything is simpler - you just need to take power from the cigarette lighter socket. Thus, the connection will be very fast, safe and it will be the most correct.
All work will take about half an hour, and nothing will threaten the electrical wiring. And most importantly, this is the best option for new cars that are under factory warranty. After the station is turned off, the dealer will definitely not be able to refuse repairs.
A station with an output power of 4-5 watts, the current consumed will be 2-3 amperes and this is the maximum figure. Radio stations with a power of 8-10 watts - about 5 amperes and above.
So, the red and black wire that departs from the station must be lengthened by twisting or soldering by 1-2 meters, in general, the length depends on the location of the station. At the end of this wire, we solder the male connector, which will be inserted into the cigarette lighter. Such a connector is sold in any specialized auto shop.
If there is only one cigarette lighter socket, and on the road it will be necessary to connect a phone or other gadgets, but you will have to pull the wire directly from the battery, but for this you will need to stock up on both wire and patience and time.
Antenna Installation
After the station has been connected, it's time to install the antenna. Let's take as an example a quick-detachable antenna that comes with a magnetic sole and does not require damaging the car body. In this case, we will single out a few main theses, and we will not delve into the theory. So:
- Antennas up to a meter or even less - I work, but their efficiency is minimal. The efficiency will increase along with the length of the antenna. It is best to look at the two-meter version;
- The best place to install it is the roof of the car. the signal will be slightly worse if you install the antenna on the trunk. In order not to damage the paint on the roof of the car, it is best to put polyethylene under the magnet;
- The wire from the antenna to the station can be passed through the door seals. It is necessary to ensure that the seals do not leave large dents on the wire;
- The antenna cable must not be shortened or extended. What is left must be hidden under the seat, while twisting the cable into rings is not recommended;
- It is necessary to take into account the fact that antennas are sold without settings, since it depends on the installation location on a separate car. Basically, antenna tuning is done with a small hex key that adjusts the height of the antenna.
Setting up the antenna
It is the antenna tuning process that is the most important step in our history. Alternatively, the work can be entrusted to professionals, and finding a service station for this is very simple. But still, most drivers prefer self-installation.
In order to tune the antenna, you must initially stock up on a special tool called an SWR meter, with which we will measure the wave ratio. The simplest model of such a device costs from 500 to a thousand rubles. The most common options are devices called SWR-420, 430, and also KW-520. The quality is of course average, but for infrequent use it is just right.
We also need a high-frequency connector, which must be of the same standard as the socket on the radio and on the cable plug. When everything you need is on hand, it's time to connect the antenna.
- An SWR meter will need to be installed between the antenna and the station. The connector of the station with the help of a barrel must be connected to the connector of our device in the RTX connector, and the antenna in the ANT connector;
- The PWR/SWR switch must be in the SWR position and the FWD/REF switch must be in the FWD position;
- After turning on the radio, you must switch to transmission mode. By turning the knob on the SWR meter, you need to set the arrow to the number "10" on the SWR scale;
- Next, you need to switch the FWD / REF position to REF and press the PTT again. The best SWR-1 on the SWR scale. If it is more than one and a half, then you need to slightly adjust the antenna;
- To tune the antenna, you need to slightly increase the antenna pin and again adjust the 2,3 and 4 points. It is necessary to set an indicator that will be as close as possible to 1 on the SWR scale. 1.5 is a lot.
This completes the installation of our station and its configuration. Now you can talk to truckers in your travels and get useful information from them.
Typical misconceptions of users and errors in installing radios and antennas on a car
The main principle of antenna installation: when choosing the "best" antenna, do not put it in the "worst" conditions! If it is not possible to install perfectly, take the antenna shorter, but put it correctly. The efficiency will be much better than installing a long antenna coiled into a ring due to lack of space!
The following misconceptions degrade the quality of communication to a DIFFERENT degree.
Antenna tuning
You need to understand that ANY car antenna bought in a store is a HALF antenna. The other half is your car. Therefore, the antenna is tuned exclusively on the car, at the place of further location. By the way, many advanced buyers ask to adjust the antenna when selling. However, this cannot be done without installing it on the car (at the place where it will be used in the future). If you transfer an antenna tuned to one vehicle to a vehicle of another model, the antenna becomes untuned. The tilt of a tuned antenna turns it into a non-tuned one. Removing and installing a tuned antenna in the same place does not change the quality of the tuning!
Many users, having removed the antenna for the radio, which was at an angle to the roof surface, put the communication antenna in the same place in the same position. This is a mistake, because receiver antennas for radio tape recorders are specially designed for a specific installation configuration. And its parameters are selected for the desired size and slope. Transceiver whip antennas (including 27 MHz) are initially designed for vertical installation! Deviation from this position must be very carefully corrected by the setting, but it is not a fact that this can be overcome, because. even with good SWR, the antenna will work upwards, not horizontally, and it may turn out that a good connection will be with Kazakhstan due to reflection from the ionosphere, and not within a radius of 10 km along the highway.
Installing an antenna without ground
One of the most common mistakes when installing antennas (any whip antennas, not just 27 MHz) is to install the antenna "without ground". As a rule, a driver who installs an antenna on his own uses worldly experience, and when installing, he only thinks that the antenna should stand higher and hold on tight.
As a result, we see:
- antennas mounted on structures that do not have contact with the car body;
- antennas embedded in plastic;
- deliberately isolated from the body.
For antennas installed without mass, the maximum radiation pattern (radiation / reception direction) has a significant angle to the horizon. As a result - a short range, more interference from the car's network. Particularly inquisitive owners of walkie-talkies, when studying the possible causes of short range, having learned that "mass" is needed, begin to throw all kinds of "mass veins", not knowing that they can significantly change the circular nature of the radiation pattern and matching. Therefore, if there is any doubt about the installation method, it is better to contact specialists.
There are no complaints about the installation method, because. in some cases there really is nowhere else to put the antenna. BUT: in this case, a MAN TGA car is shown, on which there is no mass on the mirror arc! This is a rare case when it is possible and necessary to use a mass core (short and thick, from the base of the antenna to the bolt of the mirror arc to the door). Here the mass vein is not laid. Here's a little nuance. If it was depicted Kamaz, then everything would be correct.

Iveco Stralis car. The antenna is mounted on a mirror mount (plastic). Throw a massive vein on the bolt. It would be more correct to install the antenna in a regular place under the visor, which is 20 cm from the mirror. When the antenna can be installed without a mass core, it must be installed without it. In this example, the vein is very thin and long.
Installing the antenna on the rail

Such solutions are one of the classic installation options with an absolute misunderstanding of how the antenna works. Many people think that it just needs to be screwed to something. As a rule, roof rails do not have contact with the ground (but there are exceptions). If the bracket has contact with the railing, and the railing has no contact with the ground, then only the railing is the working (underlying) surface of the antenna.

This antenna is embedded in the searchlight crossbar. In this case, the antenna is shorted to ground with a bolt and is not an antenna, but simply part of the body. The result is an antenna with a non-circular directivity, with maxima to the right and left along the railing. It will work badly back and forth. The range in this case is 20-50 m. The lifetime of the transmitter of such a radio station, if other aggravating conditions are imposed, can be several seconds!


There is no mass initially in both cases. On the left, installation on plastic, in the photo on the right, the antenna is installed on special insulating gaskets. However, for contact with the ground, a mass core (white cable) was forwarded and this problem was eliminated.
At installation on spoilers and plastic surfaces
Special care is required, as often spoilers do not have contact with the metal body of the car. And installation even on metal parts does not give a guarantee in obtaining "mass". In the absence of a metal roof or other convenient metal substrate, the antennas are mounted on counterweights that imitate the "ground". Such antennas work less efficiently than those mounted on a metal surface, because. for proper operation, the counterweights must be the same size as the base 27 MHz antennas (i.e. about 50 cm). Counterweights press the lobes of the radiation pattern to the ground, increasing the range. Some radio owners, who have studied the theory of radio communication at their leisure, install counterweights (smaller, that is, of a different range) for the prevention of short range, including even magnetic ones and antennas embedded in a metal roof. Such an "improvement" option has not been studied in detail, and how much (and whether) the change in the diagram has occurred cannot be visually tracked, theoretically, no one has done this, but we are sure that there will be no significant effect.

Car - Freightliner ("American"). On this bolt there were cases of spontaneous loss of mass.

IVECO car (Eurostar or Eurotec). Antenna tilt too high. At this point, the mass can be obtained by stripping in the right places. Initially, it is not on plastic.

If the roof were not metal, it would be possible to do this, although the effect would not be great, because. counterweights of another range are demonstrated.
Amplifiers and walkie-talkies of high power.
To get a longer range, users are trying to increase the output power of the radio for amplifiers intended for installation mainly at the output of the radio up to 4 watts. Applying more power to the input of the amplifier may lead not to an increase, but, on the contrary, to a decrease in the output power of the "radio station-amplifier" complex.
- The use of an amplifier with an untuned antenna leads to the fact that the output power actually increases, but it does not leave the antenna. We have repeatedly demonstrated to customers
advantage of a 4 W station with a well-tuned antenna over a 90 W amplifier with an untuned antenna.
- Using an amplifier for an untuned antenna for a long time leads to station overheating and, as a result, burnout of the output stage as a result of a sharp increase in power returning from the antenna to the radio station output.
- Most buyers don't bother learning how an amplifier works, because the most acceptable amplifiers have a switch button for operation in amplitude or frequency transmission, and the user, having turned on the amplifier in FM mode, works as a walkie-talkie in AM modulation. Inconsistent modes do not give an increase in power and lead to strong signal distortion.
- Amplifiers are effective in urban areas, where due to the re-reflected from metal products (garages, roofs, cars ...) they can provide an increased range of up to 5-7 km. When working with base stations (for example, in St. Petersburg this is a paid service "Scream"), high power is very important and 10 W at a distance of 20 km is really not enough. But on the highway, where there are not so many metal objects, but there is a Russian terrain, your 50-100 W output power will not help you and you will be in the same ranges as the 4 W stations (namely: 5- 10 km).
- Selling cheap amplifiers are very unreliable:
- They break down quickly and are expensive to repair;
- Sellers do not give a guarantee on them !!!;
- Not coordinated with the radio station, they distort the sound, cause noise.
Antenna weather protection

In this case, the antenna connector is smeared with lithol (solid oil) (according to the owner) and wrapped with tape. Bolt-through antennas are indeed very susceptible to oxidation when mounted on a bracket. Do not smear with oil or light materials, because. when heated, they can penetrate the connector and break the contact. Lithol is a good waterproofing agent. It is enough to pour lithol or silicone sealant into the protective cap (fill completely), and then put it on. But adhesive tape is superfluous, because. in this "bag", on the contrary, water, condensate accumulates, and the appearance deteriorates.

The same applies to magnetic antennas put in plastic bags. We do not recommend using methods that bring much more corrosion than you expected.

The second option came from Poland. Basically, we met such decorations on trucks. To improve ventilation, we would recommend making small vertical cuts in the upper part.
Installing the antenna near metal structures.
Due to the lack of free surface, the antenna is often placed next to metal structures. This also applies to trunks and platforms of car carriers. Any whip antenna for both the walkie-talkie and the radio is affected by all surrounding objects. They greatly change the tuning and radiation pattern of the antenna despite the seeming insignificance of the dimensions.


On the drain is an antenna for the radio. The radio antenna is embedded in the roof. In this case, the fact that they touch each other (even if there is no electrical contact) can greatly degrade the tuning of BOTH antennas.
Apparently, the antenna for the radio was falling all the time, and the driver decided to fix it this way. The reception of the radio is unlikely to become noticeably worse, because. within the city, the radio tape recorder catches on the wiring thrown out onto the street, but the radio has lost up to 30-40 percent of the range.

Antenna for radio. Not only did the antenna originally serve as a holder for something, because. some hooks are tied to it, and the excess cable is wrapped around a metal core (side-view mirror stand), and a cable connected to the car body is also attached to the antenna pin! It is not even possible to guess what idea the owner of the antenna was implementing, and what kind of super connection he was counting on.
Fig. 1: A blunder is that the pin should not touch anything metal. If there is an electrical contact, then this is a short circuit to ground, if not (Fig. 2), then this is a strong detuning of the SWR and a strong change in the pattern.


Radio antenna. In the city, the signals are so strong that they can be caught even without an antenna, so all errors will appear when the signal is weakened and your radio will become useless at the border of the city, and not 100 km from it.

What is possible for receiving antennas is not allowed for transmitting. An antenna mismatch during transmission can cause the radio to overheat.
Installing the antenna at a low angle to the surface.
The antennas in both cases run parallel to the frontal surface of the cabin at a distance of approximately 7 cm from the underlying surface. This leads to a deterioration in SWR even for an initially tuned antenna up to 3-5 and a strong distortion of the radiation pattern. This is not allowed for transmitting antennas!


Antennas are curved. Such an installation example is shown in the movie "Jurassic Park", which is not correct.


Installing the antenna below the level of metal surfaces.
1. BELOW ROOF LEVEL:
The fear of damaging a long antenna leads to its installation on the side walls of the body, between the cab and the van, etc. There is not only a non-symmetrical radiation pattern, but also an incredibly poor SWR. Even when setting up such an antenna, you cannot get a long range. This is a variant that combines the two previous errors.


In both cases, the antenna is installed in such a way that a metal frame or a metal casing of a plastic body is located behind and much higher than it. In addition, in the latter case, installation was also made on the railing! It is unlikely that there is a mass. You can only sympathize with the quality of communication! In MAZs, KAMAZs, we strongly recommend that you embed antennas in the roof.
2. BELOW TRUNK LEVEL:

The radio antenna needs a "ground" for good communication, but in the city the signal is so strong that reception will be on wires of any length.

Antenna 27 MHz. The lack of "ground", shielding by the trunk wall negate the gain from using a good long Alan 9 Plus antenna.
Changing the angle of the antenna when the car is moving.
Decorating a flexible antenna with various objects leads to an increase in windage and, as a result, inertia. The antenna sways more than without load. Due to this fluctuation, the SWR changes during movement. With some settings, SWR fluctuations occur from 1 to 10. In this case, the radio is a candidate for combustion, not to mention the quality and range of communication.


The use of two antennas per radio.
Based on everyday practice, some believe that if one head is good, and two are better, then two antennas (tracker) pick up a signal better than one. However, the use of trackers is quite controversial, because. the radiation pattern of the paired antennas is not omnidirectional. If everything is done correctly, then the DN of the trackers looks like in fig. The antennas are located on the sides of the vehicle and are marked with bold dots (top view). We see that the RP maxima are directed forward and backward of the car, and the minima are along the axis connecting the two antennas. It turns out that we have a gain in amplification forward and backward, and to the sides - up to the absence of communication, i.e. A narrowly directional antenna, not a circular one!
Because Since our roads are by no means straight, at the slightest turn in the road, communication may be lost. However, if you set exactly this task, i.e. increasing the forward and backward range along the vehicle, then this is true ... ideally ... provided that:
The distance between the antennas is 1/4 wavelength (2.75m),
The lengths of the cables to each antenna are exactly the same.


At the slightest violation of these main conditions, a reversal of the DP in the UNKNOWN direction is observed. Setting up such a system is very difficult, because is determined not only by the SWR parameter of EACH antenna, but also by the LONG length of the cable from the adder to the radio and much more, the study of which is absolutely not worth the result obtained.
Some users put symmetrical identical antennas by connecting one to the radio (tuning the antenna to this range). The effect for the radio exceeds all expected. But this spectacle misleads everyone else.
Set and forget.
Most users do not realize that over time there is a change in the properties of the system, consisting of a walkie-talkie, antenna, connectors, cable, mount.
- At the antenna, the pin is loose;
- The walkie-talkie has a connector that connects it to the antenna;
- Contacts are oxidized;
- Fasteners oxidize, mass is lost;
- The cable is pinched, erased, numb, loses its tightness from temperature changes.
This happens even with mortise antennas, not to mention those mounted on fasteners.
Therefore, it is advisable to inspect and prevent the system when changing the season (i.e. 2 times a year): strip connectors, fasteners, tighten connectors, ring the cable, etc. If this is not done, then at some point the range and quality drop, and the radio burns out, although initially it was set up and everything was done according to the rules.


Recently, radio communication in civilian FM / AM bands is gaining all O more popular with motorists who often have to travel on highways. The thing is that the vast majority of heavy vehicles (trucks) are also equipped with this type of communication, the drivers of which are in constant informative communication with each other. Well, due to the fact that there are a lot of trucks on the roads of our country, this radio information channel is a real help for ordinary drivers. Listening to the broadcast, the owner of the radio station will always know in advance about all the nuances of the traffic situation along the route (traffic jams, accidents, alternative detours, where to have a tasty meal, cameras, etc...)
The installation of car radios has been carried out by our auto center for several years. During this time those the specialists of our auto center have developed the most optimal options for installing both the radio stations themselves (and their components) and antennas. The latter can have both a stationary installation option and a removable one. The installation of antennas for a walkie-talkie in our auto center is always subject to the final setting of the standing wave ratio (SWR), as well as the power (efficiency) of the antenna transmitted on the air, using a special device. Installing and configuring the walkie-talkie is an integral part of each other's work! With an untuned antenna, transmission will be ineffective, and in many cases, detrimental to the walkie-talkie itself....
Despite the fact that the radio station currently installed in the car is not a device prohibited for operation, the installation of the radio set can also be carried out both in an open and disguised version.
In the SOUNDSPEED auto center, the installation of radio stations can be carried out on any make and model of cars.
As equipment, we offer devices from such well-known manufacturers as President, Megajet, Sirio, Lemm. At the request of the customer, we can also carry out individual refinement of the equipment (re-illumination of the buttons and the radio display to match the standard instrument lighting, repainting, or finishing according to the technology


After installing the radio station and antenna, the specialists of our auto center, using specialized equipment, without fail, adjust the standing wave ratio. This work is included in the cost of installing the radio station.


* Discounts on car club cards for this equipment and its installation do not apply.
You can get acquainted with the equipment offered for installation, as well as purchase radio stations and all the necessary components (without installation, with the possibility of mailing to any region of the Russian Federation and CIS countries), in our online store
To get acquainted with a detailed photo report on the equipment of cars with radio communication, as well as ask any questions to our tech. specialists, or take part in the discussion of the topic, you can on our forum.
FIND OUT EXAMPLES OF RADIO STATION INSTALLATIONS IN OUR PORTFOLIO
Typically, there is no space for a CB radio on a vehicle. We fix the bracket on a solid and rigid surface: firstly, vibrations are harmful for the station, and secondly, it will not break in case of an accident. The rear panel should be ventilated - behind it is the transmitter radiator. And the panel with the speaker has its own requirements: it cannot be pressed, as this muffles the sound.
In a passenger car, stations are usually placed in the receiver socket, on the side of the driver's seat, on a shelf at the front passenger's feet, and sometimes they are also placed on the instrument panel. In a truck, they are often mounted above the glass. The usual place for the PTT is near the station, on a special tongue. No less popular is the rubber band attachment to the salon mirror bracket.
Antenna station sets the load on it - without it, the device can burn out! The main element of the antenna is an elastic metal pin. Its minimum resonant length should theoretically be equal to a quarter of the operating wavelength. For CB, this is about 2.7 m. But such a whip can bend the roof, so antenna manufacturers shorten the pin. The loss of "electrical" length is partially compensated by the matching and extension coils located at the base of the antenna or in the middle of the whip.
The length of the waveguide cable from the antenna to the radio is not arbitrary - it is a multiple of the wavelength divided by twice the dielectric constant of the insulation. The usual length is from 3.6 to 4 m. It is impossible to lengthen, shorten, pinch or wrap the cable around the antenna, it will not work with such a “beard”.
The antenna can be attached to the spillway, but then it will “shoot” mainly towards the roof of the car. The best antenna is embedded in the middle of the roof: the cable and connections will always be dry, and the operation diagram is almost circular. But not everyone will dare to make holes in the roof, which is why magnetic-based antennas are so popular. Alas, they do not have good contact with the "ground" - and the efficiency is lower. By the way, the thickness of the rubber gasket under the base of the antenna affects the operation of the system. And one more thing: you need to re-install the antenna exactly in the place where it was tuned, otherwise the standing wave ratio (SWR) will change.
Nutrition usually connected through the cigarette lighter, but it is more correct to take the "plus" from the backup fuse or a separate outlet. There are a lot of electrical devices in the car that interfere: the high-voltage part of the ignition, xenon headlights, a generator, various relays, etc. Therefore, it is advisable to put a filter on the supply wire, for example, ferrite "latches". They are put on closer to the radio station. There are also special adapters - such, for example, is produced by Berkut Design Bureau.
The antenna is a resonant radiator. Until you set it up correctly, it won't really work. When choosing it, we proceed from the operating frequency indicated in the passport - for CB it is 27 MHz. To match the antenna with the walkie-talkie, we use an SWR meter. We connect it between the radio station and the antenna cable. We turn on the radio station on the working channel in frequency modulation (FM) on the transmission mode - and see what the SWR is. If it is greater than 3.0, the station may burn out.
To tune the antenna we change the length of the pin, achieving an SWR close to one. The pin has to be either shortened or extended. Sometimes it makes sense to further adjust the place for the antenna on the roof. After tuning to the main channel, we check the SWR on adjacent channels - above and below. If the parameter changes, then the antenna is working. If the station (for example, ALAN 9001 or VEKTOR Navigator) has a built-in SWR meter, it can be used to control the matching directly while working in different grids.
The local communication range with a tuned antenna depends on its height above the ground. This distance can be roughly calculated using the empirical formula: Dmax = 4.1(√ h1 + √h2), where Dmax is the maximum possible communication distance in kilometers under the condition of line of sight; h1 and h2 - antenna heights from the ground in meters. Natural and artificial obstacles to the signal path shorten this distance. Clearings, open water, work from hills can increase the range. Solar activity fills the range with extra buzz and talk from around the world. (Experts expect special troubles at the maximum solar activity in 2012!) Recall: the FM signal is heard farther than with AM, and SSB - single-sideband modulation - is the longest.
Improving the connection with amplifiers is impossible. The heavy-duty station only "dusts", making it difficult to work on neighboring channels. Power from 4 to 10 W is enough to work at a distance between machines of 10-15 km - but this is usually the limit of what is possible. For comparison: my record for local communication at 4 watts is about 46 km.