At home, how to check the abs sensor with a tester? The question is probably of interest to many motorists, since if the technical inspection of the brake system is not timely, sensor malfunctions are possible. Modern vehicles are very difficult to sell without an ABS system.
The essence of the work is to evenly distribute the pressure in the brake system, as a result of which the car does not throw from side to side with a sharp decrease in speed. ABS is very convenient in rainy weather, snow, ice, when the slightest skid due to brake failure can end in a ditch or an accident.
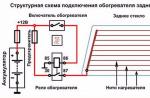
Structurally, the system consists of a "brain" - a control unit, hydraulic pipelines, brake calipers with pads, a touch sensor. Problems arise due to failures in the operation of the "block". Information about the malfunction is automatically displayed on the screen of the instrument panel of the car and the driver, seeing the signal, decides to contact the service station or do it himself.
Location by car
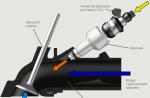
How to check the ABS sensor with a tester? In fact, having familiarized yourself with the algorithm of actions, the procedure is not so complicated. Each ABS sensor is attached to the brake caliper with a bolt. On the one hand, electric wires with voltage are connected to the sensor, on the other hand, a magnetic valve that comes into contact with the ABS gear. Thanks to the valve, the hydraulic mechanism regulates the pressure in the system according to the "inlet-outlet" scheme.
Sometimes such a system is called a stepped system, as it gradually allows you to reduce pressure. If a problem occurs, the ABS is no longer active and the brakes continue to work normally. However, their effectiveness is declining.
Sensor testing
Often, the product is damaged by electrical wiring, or rather, insulation damage, oxidation, or poor contact. For the procedure, we need the presence of:
- Tester;
- Household soldering iron;
- Terminal blocks.
- We drive a car to a viewing hole, you can just have a flat area;
- Squeeze out the handbrake, wedge the wheels with shoes, turn on the neutral speed;
- We jack up each wheel in turn, remove it;
- We have access to the brake complex. For maximum convenience, turn the steering wheel to the side, thus expanding the working space;
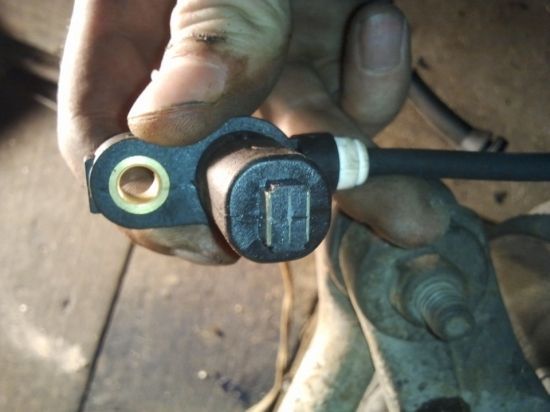
- We carry out visual diagnostics for integrity;
- We remove the terminals from the sensor, take the tester, connect it with the terminals to the sensor. Look at the display. If the arrow gravitates towards the “0” mark, then most likely there is a short circuit in the system, if towards “infinity”, then an open circuit in the electrical circuit;
- We turn the wheel by hand at different speeds, the indicator should also be variable. Each car has its own indicator. Therefore, look it up in the owner's manual for your vehicle;
- Having determined the cause, we proceed to replace the sensor or solder electrical wires. Remember that a broken chain can be in various places, not necessarily near the brake caliper.