Air conditioner filters should be washed or changed periodically, depending on their type. Otherwise, the air conditioner first reduces its efficiency, and after a while it may fail.
During the operation of the air conditioning system, the filters must be changed every 1-2 months. The frequency of replacement depends on the dustiness of the room in which the air conditioner is operating.
Some models of climate technology are equipped with a special sensor that informs the user about the need to replace filters.
As a rule, air conditioners are equipped with two types of air filters: coarse air cleaning and fine cleaning.
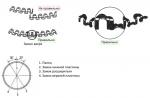
Coarse filter
This type of filter traps coarse dust, animal hair and other mechanical contaminants.
It is a plastic mesh and is installed in every air conditioner. The presence of a coarse filter significantly increases the life of the climate equipment.
The principle of its operation is based on the electrostatic effect.
This filter has a long service life - it does not need to be changed, it is enough to clean it.
This is a simple operation and can be performed by the user himself. The filter, guided by the manufacturer's instructions, must be removed, rinsed under running warm water, dried and reinstalled.
 Fine filters
Fine air filters make the indoor atmosphere healthier.
Manufacturers equip their climate equipment with various types of filters with unique properties. These include:
- carbon filters are made on the basis of carbon sorbent;
- the main purpose is the elimination of unpleasant odors, tobacco smoke and toxic volatile substances;
- catalytic filters are coated with a catalytic coating that has an antioxidant effect;
- catechin filters retain the smallest mechanical contaminants, and also have a bactericidal effect;
- photocatalytic filters - a reliable barrier to dust and other harmful impurities contained in the air;
- ultraviolet filters - with the help of ultraviolet rays, they purify the air of microbes and bacteria contained in it.
Fine air filters must be changed regularly. How to do this correctly is described in each operating manual for climate equipment.
Cleaning and replacement of filters are part of the complex of works on service maintenance of air conditioners.
Every air conditioner has an air filter. It is needed for rough cleaning of the air that is pumped through the air conditioner. First of all, this prevents clogging of the heat exchanger radiator, which is responsible for cooling the air, and also helps to remove a fair amount of dust from the room. The rather prosaic requirement of manufacturers to regularly clean these filters is often ignored, or users simply forget about it.
Maintaining and cleaning air conditioner filters is an easy enough task to perform without specific experience and knowledge, it is enough to understand a simple procedure. Thorough cleaning of the entire indoor unit of the air conditioner is also not difficult, but it requires more attention and responsibility.
How often is needed
Speaking as it is, cleaning the air conditioner filters is necessary as it becomes clogged, when the resistance to air flow increases by 10-15%. However, in practice, such guidelines are simply impossible to apply.
Manufacturers, depending on the shape and type of the filter, the power of the air conditioner, etc. It is recommended to clean the air conditioner filters on average two to six times a year. So, first of all, you should be guided by the instructions in the instructions for a particular air conditioner.
On the other hand, the operating conditions of air conditioners, even of the same model, may vary. If one is in the office, then a minimum of dust will fall into it. The situation is quite different with air conditioning in a residential area. There is more dust, more dirt, and the composition differs.
So how often is cleaning necessary? It is best to focus strictly on the manufacturer's recommendations for a particular model for the first few times. After that, according to observations on the condition of the filter, you can increase the time until the next cleaning, if the filter is still clean enough, or vice versa, reduce it if it becomes clogged too quickly. For a home air conditioner, it is quite reasonable to clean the filters once every two weeks. The filter material, with careful handling, will easily withstand frequent washing, but the air in the room will always be fresh and cool.
Integrated work
Filters are the first and often the only barrier to dust and dirt on their way to the heat exchanger. Over time, anyway, part of the dust settles on the radiator fins and fan blades, so a major cleaning of the indoor unit of the air conditioner is required. The same applies to the outdoor unit, which has a heat exchanger through which excess heat is discharged to the street.
Comprehensive cleaning of the air conditioner should be carried out twice a year or at least before the next season, the onset of hot weather. However, it is better to entrust such tasks to specialists who can effectively clean the equipment and not spoil it.
Quick cleaning
For regular filter cleaning, it is not necessary to invite a specialist. The procedure is very simple and does not require a tool or specific skills. This is the indoor unit of the air conditioner. It is advisable to read the instructions for the device, where the procedure for cleaning the filters is described in great detail, there are explanations for the design of the air conditioner itself.
Before carrying out any operations with the air conditioner unit, it is advisable to turn it off and de-energize it, wait 10-20 minutes to cool down or, on the contrary, warm up its main components. Since the air conditioner is usually installed under the ceiling, you will need a ladder or other reliable support to get to it.
The outer cover opens. Its latches are usually located on the sides of the front of the block. The places where the cover should be pulled are clearly indicated by ribs on the surface or clear icons.
Under the cover is a section with filters. These are rectangular, curved grids fixed on a frame. There can be from one to three filters, you need to remove everything one by one. On the bottom edge there are small protrusions - handles. If you pull on them, the filters are easily snapped off and removed. Part of the filter is usually wound around the heat exchanger under the housing, from there it is easy to get them out by simply pulling them, they are fixed on the skids.
 Removing the air conditioner filter
 Further, on the side of the control unit or just the display, there is an ionizer, if the air conditioner is in principle equipped with it. The ionizer is fixed directly on the radiator and consists of a support and the ionizer itself. The latter has a handle, which should be gently pulled, the ionizer will come out of the grooves along the edges and easily leave its nest.
On the other side of the ionizer is an additional filter flavor. This is more often a sponge, mounted on a flimsy plastic frame. If you pull on it, then this additional filter will pop out of the grooves.
All removed items are sent to the sink. It is enough to rinse them thoroughly with running water to wash off the dirt. In particularly severe cases, dish detergent and a sponge can be used.
After washing, the filters and the ionizer must be shaken, discarding the remaining water and dried.
Although there is access to the heat exchanger while the filters are removed, it is best not to touch it and do not try to clean it. This is a completely different task. In the presence of a thick layer of dirt, the maximum that is permissible is to carefully walk along the edge of the case with a vacuum cleaner with the nozzle removed, while trying not to touch the radiator plates themselves.
Assembly is carried out in the reverse order:
- The filter-flavor is installed.
- Ionizer.
- Basic filters.
The lid is wiped with a damp cloth and closed. This completes the quick cleaning of the air conditioner.
Complete cleaning
Comprehensive cleaning, which should be performed at least once a year, is best left to professionals. During preventive maintenance:
- The indoor unit is completely disassembled and all its components are cleaned, including the heat exchanger radiator and fan blades.
- The surface of the heat exchanger, the condensate collection tray are treated with antiseptics.
- The condensate drain hose is cleaned.
- The work of the electronic control unit and sensors of temperature, ozone and pollution is diagnosed.
- The casing is removed from the external unit of the air conditioner and thoroughly washed under high pressure with water and treated with antiseptic and protective anti-corrosion compounds.
- The pressure in the system is checked and, if necessary, the amount of freon is replenished.
As a result, the air conditioner starts to work at full capacity, in fact, as after installation.
If it is not possible to turn to professionals or for some other reason you need to clean it yourself, then all items except the last one with the replenishment of freon can be done by hand.
It is important to adhere to basic safety rules and treat all items of equipment with care. Any work is carried out only by de-energizing the air conditioner, removing the cord from the outlet or turning off the corresponding machine in the switchboard.
indoor unit
The first step is to clean the indoor unit. The lid opens, filters are removed, the ionizer is like during a quick cleaning. Next, the movable curtain is removed. It is enough to unscrew it gently to the central position, slightly pull it in the center so that it bends on one side and leaves the groove, and then on the other side. 
From the bottom of the body of the indoor unit are located from one to four mounting bolts. They should be unscrewed. Along the lower border of the case, it is necessary to pry the edge flat, preferably with a plastic object, and open the latches.
The entire front panel is hooked from the bottom and turns to the top. This will release it from the fasteners at the top so that it can be safely removed.
Attention: in some models of the air conditioner, sensors are attached directly to the housing. Before removing the housing, unscrew the fastening on the protective cover of the control unit and disconnect the connectors leading to these sensors.
Lastly, the ionizer housing and sensors are unscrewed. After that, there is access to the heat exchanger. The fan blades are often hidden under the heatsink, but can be accessed through a gap at the bottom. It is better not to try to remove it and clean it on the spot.
 Removed air conditioner cover. The arrow shows the location of the drum fan.
 All removed parts are cleaned under running water, with a sponge and dish detergent. If sensors were installed on the case, it is better to simply wipe the plastic with a damp cloth, preventing water from getting on the sensors.
On the air conditioner itself, to be cleaned:
- drainage hose;
- bath for collecting condensate;
- heat exchanger;
- fan blades.
Service workers for cleaning the indoor unit use a steam generator and a spray bottle with a prepared solution of antiseptic and anti-corrosion protection. The procedure is extremely simple. First, the bulk of the contaminants are removed with a vacuum cleaner, then with the help of a steam generator, the primary cleaning of the surfaces of the heat exchanger and fan blades is performed. All surfaces are treated with an antiseptic and then again with a steam generator to remove chemical residues.
Lastly, a condensate drain hose and a bath are punched using the same steam generator.
At home, it is desirable to change the sequence, and for cleaning use only a vacuum cleaner, a paint brush with a medium bristle pile, a brush with a long curved handle and a garden sprayer. If there is a steam generator or you can rent it, the work will go much more efficiently.
First of all, the drain hose is cleaned. To do this, it is enough to disconnect it from the nozzle of the bath and rinse with a spray bottle with water pressure. In case the drain is clogged, you should first substitute a container for liquid or a rag. After flushing, when the supplied liquid flows out easily, the hose is attached back to the nozzle.
Next, the fan blades are cleaned with a brush. On the one hand, the drum with blades from scrolling adheres and gradually turns, and on the other hand, the bulk of the dirt is removed with a brush. The loose dirt is removed with a vacuum cleaner.

Using a vacuum cleaner and a brush, the heat exchanger radiator and all internal surfaces of the air conditioner are cleaned. When the main part of the dirt is cleaned, proceed to the treatment with antiseptics. In this capacity, a 0.1% solution of Desaktin, available at a pharmacy, is used. Using a spray gun, the solution is applied evenly on the surfaces of the heat exchanger and the drum with blades, it is advisable to direct the solution jet so that it naturally enters the condensate collection tray, otherwise smudges may appear on the wall.
Attention: The heat exchanger plates are extremely soft, located very close to each other. When cleaning, the brush should be driven without pressure only along the edges, avoiding transverse movements. It is extremely difficult to fix dents and bends, and a special metal brush is used for this, and if they are left bent, this will significantly affect the efficiency of the air conditioner.
Lastly, the condensate collection tray is wiped. It is often fastened with a bolt on one side and several latches on the other. It is enough to partially remove it from the heat exchanger in order to gain access to the inner surface. You can not bend it so that it does not lose its shape, otherwise the slope will be violated, along which water flows strictly to the nozzle.
After fixing in place, the bath should be checked. Water is poured into the accessible corner farthest from the nozzle, about a glass. If all the liquid calmly and without residue flows out through the hose, then the drain is working normally. If it accumulates in the middle of the bath in the form of a puddle, then at the point of attachment with a bolt from the side of the pipe, it should be lowered slightly.
It remains only to collect everything in reverse order:
- Fix the ionizer unit, connect it to the control unit
- Fix the sensors and put on the case. First, the upper fasteners are touched, then the lower fasteners snap into place. Once the housing has converged without gaps and kinks, you can tighten the bolts.
- Insert filters.
- Fasten the guide rail.
- Close the filter compartment cover.
outdoor unit
A simple procedure, however, with improper handling of the heat exchanger, is the most dangerous in terms of air conditioning performance.
You will need a high pressure water source, a mobile car wash or a high pressure spray bottle.
All screws are unscrewed along the perimeter of the upper cover of the outdoor unit and the lower part of the front panel. After that, the top cover and the front casing with a protective grill for the fan are removed.
All elements inside the block are divided into two compartments. In one there is a heat exchanger and a fan, in the other - a compressor and automation. The first compartment can be safely washed with water under pressure until completely cleaned.
Important: When cleaning the heat exchanger, the jet of water under pressure should be formed narrowly directed and kept strictly in the direction of the radiator plates. Even a slight angle in relation to them can bend soft metal.
Advice regarding jet direction is important, especially around the edges of the radiator. In the vast majority of air conditioners in the outdoor unit, the heat exchanger is made with roundings. In order not to accidentally bend the plates, the water jet is made narrow and flat, moreover, it must be oriented strictly parallel to the plates.

As soon as cleanliness and order prevail inside the outdoor unit, you can wash the panels and put them in their places, fixing them with screws.
After cleaning the indoor and outdoor unit, at least twelve hours must elapse before the first use, so that the internal elements are completely dry. After cleaning, the air conditioner is ready for the new season and will work like new.
Few ordinary motorists know that the worst enemy of the air conditioner, or rather, its compressor, is excessive accumulated moisture, which does not make itself felt while it is in a liquid state. As soon as the split system starts to work in the air heating mode at the street temperature already a little below minus, moisture begins to crystallize and clog the capillary tube. As a result, the suction pressure begins to drop sharply, which leads to overheating of the compressor and its further failure. In addition, moisture that seeps into compressor oil radically changes its physical properties. It is not possible to filter the oil from the water in the compressor even with the most modern filter materials. Therefore, compressor oil must be changed completely without delay, and this process is quite long, time-consuming and complex.
To prevent moisture from entering the compressor and other functionally important components of the air conditioning system, a unit called a filter drier is used. The split system compressor dryer is an important and indispensable component of any air conditioning system that operates using a refrigerant. This device is necessary in order to clean the air conditioning system from both moisture and various mechanical impurities.
What you need to know about the air conditioner dehumidifier?
The adsorbent in the filter-drier of the air conditioning system can be various substances. They differ only in the quality of absorbency. Some are better at their job, while others are less successful. For example, the difference in absorption between different models can reach up to 30 grams of liquid, which is quite a lot.
Not all air conditioner dryer models are manufactured with a fuse in the form of a special float insert. When the temperature rises above 85 degrees, the insert begins to melt, causing the refrigerant to escape.
There are models that are equipped with glass through which you can control the level of refrigerant.

There is such a thing as mandatory replacement filter drier. To determine its functional resource, it is necessary to study the instructions for the air conditioning system, since it differs in different models.
This device allows you to save electricity, which is achieved by improving and normalizing the structure of the electric flow, dynamic absorption or release of reactive power, reducing resistance losses, and eliminating power surges in the network.
Features of replacing the air conditioner dryer
The air conditioning filter drier may need to be replaced immediately. This can be a sad consequence of its clogging during long-term operation. The tightness of the air conditioner filter-drier cartridge may also be broken. In this case, the dehumidifier is replaced by soldering the faulty device and soldering in a new one. During this process, you should follow the special instructions that you can get at the service center or when viewing thematic material on the Internet.
 Replacing the filter-drier of the air conditioning system is a fairly simple task, but still not without some nuances. The dehumidifier of the air conditioner is a device that is extremely sensitive to moisture, therefore it is necessary to work as quickly as possible and try to minimize the time for atmospheric air to enter the unit. Remove all air before introducing oil and refrigerant into the system. When changing, be sure to add more than 15 ml of oil drained using a filling station. Only new oil should be used.
It often happens that the used filter can clog the capillary tube. After you have replaced the device, diagnose all the nodes of the freon circuit. You need to understand that replacing the air conditioner dryer yourself is extremely dangerous for the air conditioning system in the future. There may be serious consequences that are associated with the failure of other major components of the air conditioning system. It is better, of course, to entrust the work only to qualified specialists who have the necessary equipment at their disposal, excluding the ingress of moisture, various kinds of contaminants and mechanical particles into the circuit.
Air conditioner dryer replacement process
1. Remove the battery.
2. Remove the refrigerant from the air conditioning system.
3. Remove the condenser. Depending on the version of the receiver, the hole for replacing the filter element can be closed with a plug with a retaining ring or a screw plug.
4. If the hole for replacing the filter element is closed with a plug with a retaining ring, then use a puller to remove the ring.
5. Remove the plug. For this purpose, you can cover the plug with a cleaning cloth and blow compressed air into the hole for connecting pipelines.
6. Remove the strainer and old cartridge from the dryer housing.
7. If the hole for replacing the filter element is closed with a screw plug, then unscrew it with a hex wrench.
8. Remove from dryer.
 9.
If particles of aluminum or plastic are found on the surface of the cartridge, it means that the pump part of the compressor has collapsed. Replacing only the cartridge in this case will not give a positive result. You will need to replace the compressor with flushing the system. This rather time-consuming procedure can only be performed in a specialized service center using special technological equipment.
9.
If particles of aluminum or plastic are found on the surface of the cartridge, it means that the pump part of the compressor has collapsed. Replacing only the cartridge in this case will not give a positive result. You will need to replace the compressor with flushing the system. This rather time-consuming procedure can only be performed in a specialized service center using special technological equipment.
10. Open the sealed package and install a new cartridge in the receiver. When purchasing a new filter element (cartridge), make sure that it has been stored in a sealed package. A filter element that has been stored unpackaged is unusable, even if it is brand new and clean.
11. Lubricate the plug o-rings with clean compressor oil. Screw the plug into the dryer.
12. If the hole was closed with a plug with a snap ring, install the plug and secure it with a snap ring. Make sure the circlip is fully seated in the housing groove.
13. Install the condenser in the reverse order of removal.
14. Have the A/C system charged with refrigerant at an authorized automotive air conditioner service center.
What does it mean to clean the air conditioner, split systems? First of all, this is cleaning the outdoor, indoor unit, drainage system and checking the operation, if necessary, refueling with freon. In this article we will focus on a very important element of the air conditioner - the filter.
Why? - you ask, because your air conditioner may refuse to work due to filter contamination, and, more importantly, negatively affect the atmosphere in the apartment and, as a result, the health of its inhabitants.
Consider how a dirty filter affects individual air conditioner units.
1. The compressor can run continuously without cooling.
2. Liquid refrigerant enters the compressor.
3. Suction pressure is very low.
4. The evaporator freezes up.
5. Operating costs increase significantly.
A clogged filter is not the only cause of an air conditioner malfunction when it is necessary to check the cleanliness of the filter, but in these cases it is very likely.
 The cleanliness of the filter affects not only the smooth operation of the air conditioner, but also the quality of the air in the room. In order to understand this, it is necessary to clearly understand the purpose of each type of filter, and then you will not carelessly turn off the red button, which indicates that the filter is clogged - replacing or cleaning it.
BIO filters contain enzymes - biologically active substances that kill microbiological animals, and are used in wall-mounted air conditioners. How do enzymes work? These substances destroy the cell membrane of microbes, thus, the BIO filter is able to destroy 95% of microorganisms and purify up to 99% of the air. Red button - lit up - change the filter without delay. Typically, the time of uninterrupted operation of such a filter is three months. The quality of the air mass is very high.
The CARBON filter is designed to absorb harmful substances, including formaldehydes, which are released a lot in our apartments, and to remove unpleasant odors - ammonia, annoying perfumes or cologne.
The electrostatic filter is designed to capture small particles from indoor air - it can be dust or smoke, which in Moscow conditions is especially important during forest fires or flying poplar fluff. A positive electrical charge on the filter surface is a trap for microparticles.
The SILVER ION filter works on a silver ion generator located in the filter. Air purification with such a filter is highly effective, since silver ions have the property not only to reduce activity, but also to kill bacteria due to the destruction of their internal structures.
NANO filter contains titanium dioxide (TiO2) used in General Climate air conditioners - does not require regular replacement. Periodically, it must be removed from the air conditioner and kept in sunlight, under the influence of which it restores its deodorizing effect. NANO filter - is able to absorb harmful substances, unpleasant odors and even neutralize viruses.
As soon as the air conditioner electronics signals the need to clean or replace the filter, do not hesitate, as we are talking about the health of people in the room with a dirty air conditioner filter. The masters of our service center perform a complete cleaning of air conditioners, split systems and replacement of filters at home. Please contact us, during the summer period our masters work in three shifts.