Good afternoon. Today we have a VAZ 2108, 2109, 21099 in the car service. He came to us with a desire to deal with the electrics. There was a power surge in the car, and after that the wiper blades, turn signals, and rear fog lights stopped working. The fuses are most likely to blame. In this article we will tell you where the VAZ 2108, 2109, 21099 fuses are located and how they change. We also attach a detailed fuse diagram in the mounting block.
| Vendor code: Fuse mounting block - 2114-3722010 |
| Tools: To replace fuses on VAZ 2108, 2109, 21099, you do not need a tool |
| Scheme and location of fuses VAZ 2108, 2109, 21099: |
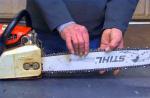
| We open the hood. Then right under the windshield you will see a mounting block. |
| Click on the 2 latches and open the lid. |
 |
| Inside there is a special tweezers for replacing fuses. |
 |
| We hook the fuse and change it. |
 |
| Fuse box with cover removed. |
 |
| On the left side of the driver under the panel, there is a fuse for the rear fog lights. |
 |
| What are the fuses in the VAZ 2108, 2109, 21099 mounting block responsible for. |
 |
Deciphering the values \u200b\u200bof fuses VAZ 2108, 2109, 21099:
|
Fuse no. |
Amps |
What is responsible for: |
|
Fog lamp on the right side |
||
|
Fog lamp on the left side |
||
|
headlight washer |
||
|
heater fan |
||
|
turn signals |
||
|
Oil pressure |
||
|
Interior lighting |
||
|
Power windows |
||
|
License plate |
||
|
Sound signal |
||
|
Dimension of the rear right lamp |
||
|
emergency |
||
|
Heated rear window heating element |
||
|
Right headlight |
||
|
Left headlight |
||
|
Low beam left headlight |
||
|
Dipped beam right headlight |
||
|
Spare |
||
|
Spare |
||
|
headlight washer |
||
|
heater fan |
||
|
Oil pressure |
||
|
Rear brakes |
||
|
License plate |
||
|
radiator fan |
||
|
Left tail light |
||
|
Right rear marker |
||
|
Emergency Signal |
||
|
cigarette lighter |
||
|
High beam right headlight |
||
|
High beam left headlight |
||
|
Low beam left headlight |
||
|
Dipped beam right headlight |
Where is the fuse box VAZ 21099 carburetor diagram located? The board itself is located under the hood on the left side of the windshield and is covered by a lid. It also draws a conditional connection diagram for each of the fuses and their rating (indicated in the allowable current range, that is, in amperes). The VAZ mounting block itself is closed in a plastic case. There are also spare fuses (on the sides). However, in the "nine" there is also a second block, which is already located in the passenger compartment. Here are the fuses that are responsible for connecting the power circuit to the fuel pump and some other components.
Diagram of the fuse block in the VAZ 21099
First of all, it is worth noting that in the VAZ 21099 of a new type, which have been produced since 1998, new PSU variations with U-shaped fuses were installed.
The principle of operation is the same, but the elements are not interchangeable. It is advisable to take this aspect into account when repairing or replacing fuses. The new type of power supply has a signal circuit that goes to the instrument panel. This is an indicator that lights up when a malfunction occurs in the operation of the unit itself and the electrical circuit. In older cars, this circuit was absent. In some cars, it was transferred to the airbag (operation indicator).
The diagram of the mounting block (PICTURE 1), which is located under the hood, is located on the cover from the inside. This is a conditional diagram with marks where each of the fuses is located and for which circuit it is responsible. Also, the scheme of the mounting block VAZ 2109 is additionally printed in the operating instructions for the vehicle. Using it, you can in a matter of seconds find the location of any of the electrical circuits, which provides the necessary information for diagnosing the contact of the electrical circuit. But at the same time, some of them connect several chains. For example, F4 is not only a cigarette lighter fuse, but also a relay that is responsible for rear window heating (if provided) and a portable lighting lamp connector.
If we consider the fuse box VAZ 21099 injector (without carburetor), then the connection diagram is identical there. The only exception is that some of the circuits will not be closed, but this is normal. As always, it can be compared with a conditional diagram, which is duplicated on the cover of the mounting block.
Image 1. Scheme of the mounting block.
A few words about the fuses themselves
A fuse is just a piece of conductor with a certain resistance and a maximum allowable critical load. If the specified range is overcome, its inner part simply burns out, and the electrical circuit breaks, preventing the wiring (and its insulation) from igniting.
In the car, for each of the electrical circuits, their own current limits are set. For example, the one that is responsible for the operation of the VAZ cigarette lighter is designed for 20 amperes. Naturally, if you put a fuse of a smaller rating here, then it will simply burn out at the slightest excess of its norm. If you put it with a higher rating, then when the permissible value is exceeded, the electrical wiring will ignite. Therefore, doing so is unacceptable and is considered a violation of elementary safety standards for the operation of the vehicle.
Spare parts are initially placed in the VAZ 21099 fuse box directly from the factory. They are located on both sides of the main board. In the VAZ 2108, it’s exactly the same, but only the relays responsible for the operation of the fuel pump and rear window heating (as well as the radio) are placed inside the cabin.
Interestingly, the largest possible load on the fuse box is on the circuit connecting the electric window lifts. There, the maximum current can be 30 amperes. In the blocks of the new sample, it was replaced with a standard of 20 amperes.

How to replace fuses correctly? For this you will need:
- turn off the motor;
- remove the negative terminal from the battery. It is advisable to wait a few more minutes to eliminate the residual voltage;
- remove the cover of the fuse block 2109;
- use a multimeter to find a failed fuse;
- check the circuit for a short circuit;
- install a new fuse;
- apply voltage to the circuit and make sure that there is no repeated overload.
In no case should repairs be carried out using non-original components, and even more so by replacing them with third-party conductors. Among Russian drivers, there is a popular tendency to put 5-kopeck coins instead of a fuse (this can be done on an old-style "nine"). By doing this, you need to be aware that you can not only burn all the electronics of the car, but also cause a fire!
How to check the operation of an electrical circuit?
In order to check the VAZ 2109 unit for operability, it is enough to test each of the circuits with a multimeter.
In variations of the carburetor motor, this is extremely simple, since the contacts of the block are completely open. If multiple breaks are found, it will be cheaper and easier to simply replace the entire block. A new sample will do, and even from 2114 - they are used there identically.
If only one of the parts of the block works, then you will have to look for a broken chain. The search will make it easier to know the following rules:
- if the circuit responsible for powering the stove does not work, then you need to look for the faulty element with F4 or F7. The latter is responsible for the operation of the fan, which blows warm air into the cabin;
- replacement of the cigarette lighter will be required if several circuits do not work at once: F4, F10, block 7;
- relay F7 is responsible for the washers, the cartridge of a portable lamp and the rear window brushes;
- if the fuel pump malfunctions, the “culprit” is the fuse board, which is located on the left side of the steering wheel (in the passenger compartment).
These are the malfunctions that drivers most often have to deal with.
Dealing with the fuse box in the VAZ 21099 carburetor is quite simple. The hardest part is finding the defective item. But fixing the problem is not difficult if spare fuses are available. In VAZ 21099, unlike VAZ 2108, they are provided by the manufacturer. Do not forget to restore them in a timely manner if necessary.
The well-coordinated work of the car is provided by many complex mechanisms and assemblies.
For the correct operation of the entire system of the car, electricity is used.
Fuses are used to protect the electrical system from overloads. All fuses are combined into one mounting block. VAZ 2109 fuse box electrical circuit is a small
fuse board.
Basic knowledge about the block on the vaz 2109
- This circuit board is located under the hood of the car on the left side near the engine shield under the windshield.
- VAZ 2109 fuse box wiring diagram is produced by manufacturers of two varieties. They have their own numerical designations, but in the common people they are called simply: “old” and “new”. There are several fundamental differences between them. Relays are designated differently on them, different types of fuses are used, and, accordingly, the connectors for them are different.
The structure of the old-style fuse box circuit
Mounting block 17.3722 of the old release consists of two components. The first is a printed circuit board to which all connecting elements with pads are attached by soldering. The second is the installation of relays and fuses.
Below is a breakdown of the label.
Relay
- K1 - is responsible for the time of washing the glass from behind.
- K2 - turn signals and emergency gang.
- K3 - windshield wiper.
- K5 - high beam headlights.
- K6 - headlight cleaner.
- K8 - responsible for the signal.
- K9 - turn on the fan in the engine cooling system.
- K10 - responsible for rear glass heating.
- K11 - low beam headlights.
The structure of the scheme of the new block
- K1 - headlight cleaner.
- K2 - breaker for turn signals and emergency lights.
- K3 - windshield wiper.
- K4 - control over the health of the light bulbs.
- K5 - responsible for the power window.
- K6 - sound signal.
- K7 - rear-view glass heating.
- K8 - high beam.
- K9 - low beam.
Circuit breakers
To distinguish between different fuse sockets, it is customary to use the designation
the Latin letter F. The fuses themselves are marked with a number and the letter A, where the number
means current, and the letter A means that this type is provided for protection against
short circuit currents.

VAZ 2109 fuse wiring diagram is indicated in this way.
- F1 - headlight cleaners. Use a fuse (10A).
- F2 - turns and emergency gang (10A).
- F3 - rear brake lights and interior ceiling (10A).
- F4 - glass heating and cigarette lighter (20A).
- F5 - signal and cooling fan (20A).
- F6 - power window on the front doors (30A).
- F7 - headlight cleaner (during operation) and heating fan (30A).
- F8 - fog light L (7.5A).
- F9 - fog light P (7.5A).
- F10 - dashboard lighting bulb, engine compartment lamp and number plate lamp (7.5A).
- F11 - right dimension and headlight (7.5A).
- F12 - low beam headlights P (10A).
- F13 - low beam headlights L (7.5A).
- F14 - high beam headlights L and a control lamp for turning on these headlights (7.5A).
- F15 - high beam headlights P (7.5A).
- F16 - turns (15A).
Fuse Replacement Instructions
If there is a problem with any electrical device in the car, the first thing to check is the fuse that is responsible for the correct operation of this circuit. If the problem is in it, do not be sad, repairing it with your own hands will not be difficult even for a beginner in this matter.
It is highly advisable to always have a set of new fuses on hand. But it should be remembered that not all electrical circuits are protected by fuses. Such devices include a generator, ignition, starter, the battery itself, central locking of the doors.
Precautionary measures
In the event of a breakdown and subsequent repair, precautions must be taken.
- When repairing automotive electrical equipment, be sure to turn off
wire from the negative terminal of the battery. - To replace fuses, adhere to the established markings. Do not under any circumstances replace them with others. Also, do not close the circuit with a jumper.
- Also, you can not close the wires to check the circuit for a spark, this will entail
a burnout of the current-carrying track. - If there is a need to remove the block, then it is impossible to use for this purpose
metal screwdriver. This may cause the relay to close and burn out the same
tracks, which will lead to a malfunction of the entire board.
Important Points
If you have a VAZ 21093 electrical circuit is faulty and you are faced with the task of replacing
block of a new sample to the old one, then in this case, be sure to connect the engine
fan, which is located in the cooling system through a relay.

By ignoring this, the tracks through which the current flows will burn out. If the task is the opposite, that is, we will change the old one to a new one, then you need to install a new version of the electric fan switch-on sensor. This must be done because its contacts are designed for more current.
What problems can be with fuse circuits
There may be several problems with the VAZ 21093 electrical circuit.
- The VAZ 21093 electrical circuit changes easily and it is not difficult to replace it yourself. Moreover, on the Internet there is an instruction with photos and videos on how to do it. But you can figure it out without it.
- The whole procedure is carried out carefully and without haste.
- Disconnect all existing fuses and relays.
- Remove the fee. Then either replace or clean the old one.
- Gently clean the conductive tracks with a solvent, just do everything
extremely carefully and carefully, since the current-carrying paths can easily be
damage, and if you damage them, you have to solder. - Assemble in reverse order.
- VAZ 21093 electric circuit is ready to perform its functions.
On the entire family of Samara 1 carburetor cars and on parts of carburetor cars of the Samara 2 family (VAZ 2113 - 2115), two types of fuse blocks, old and new, are installed. These devices are also called mounting blocks. They are the heart of the car's electrics, because they have executive relays for low-current circuits. With the help of the mounting block, the relay of high-current and additional circuits is also controlled - the starter, fog lights, heated seats and others. The installation location of both blocks is the same, the difference is in small, different connectors and a different arrangement of elements and a different case design.
Differences in the VAZ fuse mounting blocks

The catalog number of the mounting block of the old model is 17.3722. The main difference from the more modern block with catalog number 2114-3722010-60 is the worst protection against moisture, which is why the resource of the device is several times lower.
After all, the mounting block is located in the niche of the engine compartment, where rainwater or washer fluid often gets. The new mounting block also lacks a rear window washer. This is caused by changing the electrical circuit of the car and installing these relays in other places.
Another difference is that the new model of the mounting block uses a different type of fuse, which is more resistant to moisture. To distinguish one block from another, you need to read the inscription on the cover, the model number is indicated there. If for some reason you cannot read the text on the cover, remove it and compare the blocks with the photos from this article.

Faults and block diagrams
Despite some differences, the malfunctions of all models of such blocks are the same:
- contact oxidation;
- blockage due to dirt.
Once inside the housing of the mounting block, water mixes with dust and forms dirt, which eventually spreads along the bottom or top of the circuit board. Malfunctions of the mounting block are often very similar to breakdowns in other electrical systems of the car, therefore, it is possible to accurately determine the cause only after dismantling and opening the block.

It is necessary to remove and check the mounting block if the following malfunctions are observed:
- or arbitrary on/off/mode switching;
- problems with the radio;
- periodically disappearing ignition;
- fuzzy operation of wipers or washers;
- fuzzy operation of the sound signal;
- incorrect or fuzzy operation of direction indicators.
Video - The occurrence of a short circuit
How to remove and install the VAZ fuse mounting block

The basic procedures for removing the mounting block of any model are the same. To remove the mounting block, do the following:
- Remove the negative battery terminal.
- Unscrew the two nuts on the sides of the block (it is located on the driver's side of the engine compartment above).
- Lift the unit as far as possible and pull out all the connectors from the bottom.
- Install in reverse order. Insert all connectors first, then screw on the nuts.
How to disassemble and assemble
Before disassembling the mounting block, print out a photo or diagram of the installation of fuses and relays, and also mark or write down where which relays are installed, because the description of the parts that is present on the inside of the cover is not always helpful.
- Remove the cover. To do this, on the old model of the block, unfasten one latch from each side, on the new model, unfasten two latches from each block.
- Remove all relays and fuses. The new model has a special tweezer that helps pull out the fuses, it is located next to the turn signal relay.
- After that, unscrew the screws that connect both halves of the case.

On most blocks of older models, self-tapping screws are installed on top. On most of the new bottom. But it also happens the other way around, because not only AVTOVAZ produces blocks. Using a thin flathead screwdriver, pry the two halves of the case apart. If you can't disconnect, make sure you remove all the screws and try inserting the screwdriver in another place. After opening the case, remove the printed circuit board with the connectors installed on it. Reassemble in reverse order. First place the PCB on the fasteners of one half of the case, then put on the other half and gently squeeze them so that they connect. If you cannot connect the halves of the case, disassemble them and make sure that the printed circuit board is in place, then reassemble. Then fix the body halves with self-tapping screws.
How to repair
Carefully inspect the PCB tracks. If you find dirt somewhere between the tracks, moisten it with nail polish remover and a brush. Make sure the polish doesn't dissolve the brush. After removing all the dirt, carefully wipe the tracks with alcohol and dry with compressed air. Perform this operation on both sides of the printed circuit board. Check all connectors.
If dirt or oxidation is found, replace them. If you do not have the knowledge, tools, or parts to do this, contact an auto electrician. Do not spray connectors with contact cleaning sprays, it is likely that some of the contacts cannot be cleaned the first time. In addition, the spray will not help restore contact if the pressure plates (petals) are worn or weakened. If the PCB cannot be repaired and a new unit is expensive, buy and install a new PCB. Before doing this, make sure that it is suitable for your block, for which you compare the catalog number of your block and the one for which the board is intended.

A car is a complex mechanism, with many different components, parts and electrical circuits, we read the article -. To protect the latter (mainly from overload and short circuit), it provides fuses, which in the VAZ 2109 are mostly combined into one unit - the mounting one, which is also the fuse box.
What you need to know about the VAZ 2109 fuse box?
- The fuse box on the VAZ 2109 is located under the hood of the car: on the left, between the base of the windshield and the engine shield.
- Today, you can find two versions of the "nine" mounting block: the old one, type 17.3722, and the new one, 2114-3722010-60 / 2114-3722010-18 (installed on VAZ cars since 1998). Their main difference is the different designation of relays, connectors and fuses; different denominations of the latter, as well as the absence (as unnecessary) in the updated version of two relays: the electric motor of the cooling system fan and the rear window washer time.
- The designations on the body of the fuse block are the serial numbers of the fuses, which make it possible to determine, using the block diagram, which electrical circuit each of them is responsible for. For example, the fuse with the designation F3 in the new mounting block (in the old one it corresponded to the fuse number 6) is responsible for interior lighting and rear brake lights, and the F1 fuse (until 1998 - fuse number 3) - for headlight washers and headlight cleaners, etc.
Diagram of the fuse block vaz 2109.
Mounting block 17.3722.

- (K6) headlight cleaning relay;
- (K1) rear window washer time relay;
- (K2) relay-interrupter for direction indicators and alarm;
- (K3) wiper relay;
- contact jumpers in place of the lamp health monitoring relay;
- (K10) rear window heating relay;
- spare fuse;
- (K5) high beam relay;
- (K11) relay for turning on the dipped headlights;
- fuse;
- (K9) relay for turning on the electric motor of the fan of the engine cooling system;
- (K8) relay for turning on the sound signal;
Mounting block 2114-3722010-60.

- spare fuses F17-F29.
Connection diagram of the mounting block 2114-3722010-60.

- the outer number in the designation of the plug is the block number, and the inner one is the conditional number of the plug.
- fuses F1-F16.
- relay for switching on the dipped headlights K9.
- high beam relay K8.
- the relay of inclusion of sound signals K6.
- rear window heating relay K7.
- relay for switching on headlight cleaners K1.
- power window relay K5.
- lamp health monitoring relay K4.
- windshield wiper relay K3.
- relay-breaker for direction indicators and alarm K2.
Connection diagram of mounting block 17.3722.

- relay-breaker for direction indicators and alarm K2;
- wiper relay K3;
- power window relay (not installed) K7;
- lamp health monitoring relay (contact jumpers are shown inside, which are installed instead of the relay) K4;
- rear window washer time relay K1;
- relay for turning on the electric motor of the fan of the engine cooling system K9;
- headlamp cleaning relay K6;
- rear window heating relay K10;
- relay for turning on the sound signal K8;
- high beam headlight relay K5;
- relay for switching on the dipped headlights K11;
- the outer number in the designation of the plug is the number of the block, and the inner one is the conditional number of the plug;
Possible malfunctions of the VAZ 2109 fuse box and how to fix them.
1. Blown fuse (one or more).
This is the most common breakdown that can happen to the mounting block. Fixing it is simple: buy a new appropriate fuse with the right amperage and install it in place of the old one. But do not forget to find out the reasons for the failure of their last system. Otherwise, the problem may reoccur.
2. Oxidation of board contacts with current-carrying tracks.
Another fairly common problem, due to the not-so-best location of the fuse box in the "nine", due to which water can accumulate there. It is she who is the source of problems here, which can be solved in two ways: the first is to purchase a new mounting block and install it in place of the existing one, and the second is to simply clean the oxidized contacts. With the first option, everything is clear. As for the second, everything here is also extremely simple, the main thing is to approach responsibly, and perform all actions very carefully and accurately.
So, disconnect all the relays and fuses in the block, remove the board, clean it with a common solvent (it is important here not to damage the microcircuit tracks, you will also have to work with a soldering iron), and put everything back in the reverse order.