
The process of restoring car batteries in detail
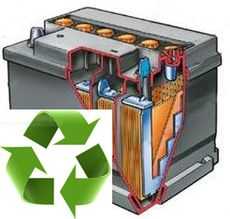
Like all things, a battery has a limited lifespan. In the case of lead-acid batteries, which we will talk about the restoration of, the service life is an average of 3-4 years. Often car owners simply buy a new battery if the old one starts to fail. At the same time, there are malfunctions in which the battery's performance can be restored and used for some more time. Let's look at the main causes of battery failure and methods for their recovery.
This article will focus on lead-acid batteries. About that, you can read the link. Battery failures can be divided into two groups: external and internal.
External
The following are external faults and how to resolve them:
- The plastic case of the battery is damaged. Such damage (crack, hole) can be caused both by external influences and as a result of processes in the battery itself (swelling, overheating, etc.). Here you need to understand that in the case of large holes, repairs should not be done and it is better to buy a new battery. And if the crack is small, then you can repair it using plastic and a soldering iron. Before carrying out work, all electrolyte is drained. When the crack is closed, you need to fill in a new electrolyte and charge the battery;
- The battery terminals are oxidized. Here the task of recovery is much easier. It is only necessary to clean the layer of oxides with fine sandpaper and a rag. It is a good idea to carry out the same operation on the terminals of the connected wires. After that, you can lubricate the terminals with a small amount of machine oil.


As you can see, among the internal faults of the battery, only sulfation is successfully eliminated. Moreover, if it is not in an advanced stage. Therefore, we will consider several ways to restore the battery in the event of sulfation of lead plates. But first, let's list what we may need to work:
- Fresh electrolyte;
- Distilled water;
- Battery charger;
- Hydrometer (measurement of electrolyte density);
- Protective equipment (glasses, gloves);
- Desulfating additive and some other chemicals.
How to repair a car battery with sulfation
The first step is to inspect the battery. To do this, drain the electrolyte and rinse the jars with distilled water. Then do a visual inspection. If the plates in the banks are damaged or crumbled, then the restoration of such a battery is impractical. If there is no external damage, then fresh electrolyte is poured and carried out (dissolution of lead sulfates on the plates).
Car battery recovery using CTC
CTC stands for Control and Training Cycle. Carrying out this event helps to restore the capacity and eliminate sulfation when it has not yet started. The process is a series of battery charge-discharge cycles. In addition to the charger, you will need a hydrometer (electrolyte density control), a voltmeter (voltage control) and a light bulb (or other source of consumption).
First, the battery is fully charged.
Don't forget to remove the caps from the battery cans! The charging current should be set to 10 percent of the nominal battery capacity. So, for common 55 Ah batteries, the charge current should be no higher than 5.5 amperes.
Charging takes 6-8 hours. By the end of the process, the voltage at the terminals increases, and the battery no longer perceives the charge.
At the end of charging, measure the electrolyte density in all banks with a hydrometer. The density of the electrolyte in a fully charged battery should be 1.27 g/cm. cube If the density is less or more, then add sulfuric acid or distilled water, respectively. After dilution, the battery is charged for 30 minutes. During this time, the electrolyte is mixed.
Electrolyte density table
Below is a table of electrolyte density and related battery characteristics:
| The degree of battery charge,% | ||||
|---|---|---|---|---|
| Electrolyte density, g/cm. cube (+15 gr. Celsius) | Voltage, V (in the absence of load) | Voltage, V (with a load of 100 A) | The degree of battery charge,% | Freezing point of electrolyte, gr. Celsius |
| 1,11 | 11,7 | 8,4 | 0 | -7 |
| 1,12 | 11,76 | 8,54 | 6 | -8 |
| 1,13 | 11,82 | 8,68 | 12,56 | -9 |
| 1,14 | 11,88 | 8,84 | 19 | -11 |
| 1,15 | 11,94 | 9 | 25 | -13 |
| 1,16 | 12 | 9,14 | 31 | -14 |
| 1,17 | 12,06 | 9,3 | 37,5 | -16 |
| 1,18 | 12,12 | 9,46 | 44 | -18 |
| 1,19 | 12,18 | 9,6 | 50 | -24 |
| 1,2 | 12,24 | 9,74 | 56 | -27 |
| 1,21 | 12,3 | 9,9 | 62,5 | -32 |
| 1,22 | 12,36 | 10,06 | 69 | -37 |
| 1,23 | 12,42 | 10,2 | 75 | -42 |
| 1,24 | 12,48 | 10,34 | 81 | -46 |
| 1,25 | 12,54 | 10,5 | 87,5 | -50 |
| 1,26 | 12,6 | 10,66 | 94 | -55 |
| 1,27 | 12,66 | 10,8 | 100 | -60 |
After that, you need to discharge the battery. This requires a suitable source of energy consumption. The easiest way is to choose a light bulb for power. Of course, if there is a charger (charger) with a discharge function, then you can discharge the battery with it.
How to calculate the wattage of a light bulb? We take the value of the current strength in the amount of 10 percent of the capacity of our battery. That is, at 55 Ah it will be 5.5 amperes. This value is multiplied by 12 volts and we get 66 watts. Such a power we need a light bulb.
We connect the consumption source to the battery terminals and leave it until it is completely discharged, that is, until the voltage drops to 10.2–10.6 V. More about. If the battery has not lost capacity, then the discharge time with the above parameters will be about ten hours. The shorter this time, the greater the capacity loss.
After discharging the battery, you must immediately put it on charge and so on for several cycles. As a result of the procedure, the sulfation of the plates decreases, the internal resistance of the battery decreases and the capacity increases. Thus, the car battery is restored with slight sulfation.
Recovery car battery in multiple charge mode
The current is set at 0.04 of the nominal capacity of the battery. Charging time is approximately 8 hours. Then there is a break for 12-16 hours. Breaks are made in order to equalize the potentials inside and on the surface of the lead plates. In this case, a denser electrolyte diffuses into the space between the electrodes.
Then the battery charging cycle starts again. Such charge-discharge cycles can be carried out up to 5. As the capacity increases, the density of the electrolyte will increase. Monitor this value and dilute it with distilled water if necessary. We also recommend reading about.
The result of the repair always depends on the determination of the master to achieve the intended effect and his willingness to spend the right amount of effort, money and time. The cost of repairing batteries must be specified after a thorough check and diagnosis of "disease". Repairing a car battery with your own efforts is justified if the estimate for its repair is no more than half the price of a similar new product, given that most of the work will be done by yourself.
Repair of a crack or chip in the case, violation of the integrity of the contacts will cost symbolic costs. For expensive branded models, shabby, but retaining at least half of the planned resource, battery repairs are usually carried out in car workshops.
If you have the patience and desire to figure out how to repair a car battery with your own hands, watch the video:
But it is better to refer to the literature on the maintenance and repair of automotive equipment of the 60-70s of the last century. Do not be confused by the age of the source - over the past 30-40 years, acid batteries have become more perfect, but the main breakdowns and repair methods have remained the same. Usually the topic - how to repair a car battery, is sorted out to the smallest detail.
What causes lead-acid batteries
Problems with the tightness of the case arise as a result of careless handling of the battery. Modern materials, shock-resistant acid-resistant plastics, such as polypropylene, tolerate mechanical and thermal effects well. The exceptions are cases when the battery case is destroyed due to the internal short circuit of the electrode plates when charging with a high current. Then a lot of heat is released, an excess pressure of gases and water vapor is formed.
To repair a crack in the battery case, you will need:

We carry out repairs in the following order:
- if the crack on the case is below the level of the electrolyte, drain it from the battery using a large medical syringe with a piece of a PVC tube, 20-25 cm long;
Important! Despite numerous advice from Internet experts, it is absolutely impossible to drain the electrolyte by simply tipping the battery over. When the battery is turned over, the lead oxide deposit, which collects in special pockets at the bottom of the case, can cause interelectrode shorting of the plates and permanently disable the battery.
- with a sharp knife, we form a V-shaped groove along the entire length of the crack. At the ends with a thin drill, we unfold tiny holes of 1 mm. They are needed to prevent further development of the crack;
- heat up with a soldering iron or in the flame of an ordinary candle the staples to a temperature of 400-450 degrees. We carefully fuse them into the edges of the crack every 12-15 mm. Such a bandage will keep the edges of the crack in contact;
- we make a heat shield from a heat-resistant material, you can paronite, 10x15 cm in size. We cut a slot in the sheet, the size and shape exactly matching the geometry of the crack. We combine the cutout with the shape of the groove and securely fix it on the battery case;
- for soldering, you can use a special soldering rod or tape, or you can make solder yourself. We cut off thin, like a thread, strips from the prepared polypropylene. Their length and number should correspond approximately to the volume of material required to fill the V - shaped gap. We turn into a thin tight tourniquet;
- heat the edge of the crack with a hair dryer, melt the edge of the soldering material and press it with force to the beginning of the crack. By heating the polypropylene solder and the crack, we consistently close the entire gap;
- in addition to soldering, the crack can be sealed with polystyrene dissolved in dichloroethane or KR-30 solvent. To apply the patch, the surface around the crack at a distance of 15-20 mm must be treated with emery cloth and degreased with acetone.
Sulfation of electrodes
Research statistics of the Battery Council Int. speaks - 80% of the cause of battery failure is sulfation of the plates.

One of the available types of do-it-yourself car battery repair is the elimination of sulfation of battery plates. The surface of the electrode is covered with a whitish coating that prevents the normal flow of current. The capacity of the battery, even after a full discharge-charge cycle, is an order of magnitude less than a serviceable charge.
Any experienced car enthusiast knows how to repair a battery with their own hands. With a low degree of electrode sulfation, the deposit on the surface of the plates still has a loose and porous consistency.
Experts offer to repair a car battery with simple and effective procedures:
- replace the electrolyte in the battery with warm distilled water. For several hours, a chemical reaction of dissolution of salts from the surface of the electrodes will take place in the battery. Distilled water, as the salts go into solution, will turn into an electrolyte, a potential of 7-10 volts will appear on the terminals;
- drain the resulting solution and wash the battery several times, first with distilled water and then with pure electrolyte;
- fill the battery capacity with fresh low-density electrolyte and charge it with a charge current limit of no more than 116 rated capacity for 10-12 hours;
- Discharge the battery for 7-8 hours using a normal car light bulb. The charge-discharge cycle must be repeated at least 4-5 times.
In the absence of problems with shorting, warping of the plates, repair, the battery capacity can be restore to 80-85% of the original.
Advice! Use asymmetric current to charge the battery, its effectiveness has been proven in practice, and many manufacturers of specialized chargers implement a similar function in their products.
If sulfation of the plates reached 30-40% of the electrode surface, it is still possible to repair the battery with your own hands, but already with the use of chemicals:
- electrolyte is drained from a charged battery and replaced with a 2% aqueous solution of Trilon B with the addition of 5% ammonia;
- after 60 minutes, the solution is drained and the jars are washed with distilled water;
- after washing, electrolyte is poured and charged with a current of 1/10 of the battery capacity. If necessary, the procedure is repeated two or three times;
- this technology allows you to simply and effectively repair batteries not only for automobiles, but for any similar ones, most importantly - with your own hands and strength;
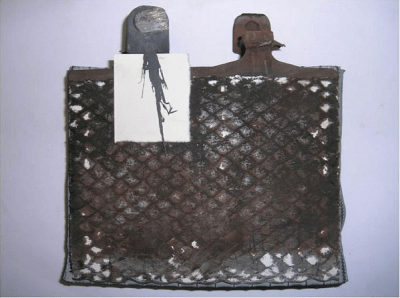
Internal short circuit of the electrodes in one of the battery cans
The elimination of an internal circuit in a bank is one of the latest available types of do-it-yourself battery repair. The battery has six groups of pairs of electrodes, called banks, assembled in series in a sealed case. Each of the cans can consist of 6-10 pairs of electrodes of different polarity, separated by special dielectric insulators - separators. If the separator is destroyed, or for any other reason, there is direct contact between the pair of positive and negative electrodes, the ability of the electrodes to store energy will be lost.
How to repair the battery in such a situation - repair is possible only if the short circuit is caused by lead microparticles that have accumulated at the bottom of the battery and formed a kind of jumper between the electrodes. To do this, a small hole is drilled in the bottom part of the closed jar and the supposed cause of the short circuit is washed out with a flowing electrolyte - the bottom sediment of lead sludge. If 3-4 single washing did not give the desired results, the battery is discarded.
Before deciding on the possibility and impossibility of repairing lithium batteries, the health of the control units, controllers, wiring and contact group is considered.
There are several reasons for the failure of a lithium battery:
- failure of the control system board (BMS), battery repair comes down to the usual replacement of the controller;
- failure of wiring, switches and load switching devices. With the help of a car tester, they check the serviceability, and, if necessary, replace the element;
- if the first two factors are excluded, the lithium cells from which the battery is assembled are subject to repair directly.
Comment! In the event of a failure of a part of the lithium battery cells, the cost of repair, revision and replacement will be comparable to the price of a new battery.
All batteries have an expiration date, with numerous charge-discharge cycles and many hours worked, the battery loses its capacity and holds a charge less and less.
Over time, the capacity of the battery drops so much that its further operation becomes impossible.
Probably many have already accumulated batteries from uninterruptible power supplies (UPS), alarm systems and emergency lighting.
Lead-acid batteries are found in many household and office equipment, and regardless of the battery brand and manufacturing technology, whether it is a regular serviced car battery, AGM, gel (GEL) or a small flashlight battery, they all have lead plates and an acidic electrolyte.
At the end of operation, such batteries cannot be thrown away because they contain lead, basically they are waiting for the fate of recycling where lead is extracted and processed.
But still, despite the fact that such batteries are mostly "maintenance free", you can try to restore them by returning them to their previous capacity and use them for some more time.
In this article, I will talk about how restore 12v battery from UPSa on 7ah, but the method is suitable for any acid battery. But I want to warn you that these measures should not be taken on a fully working battery, since on a working battery you can only achieve capacity recovery by using the right charging method.
So we take the battery, in this case old and discharged, pry the plastic cover with a screwdriver. Most likely it is point glued to the body.

Lifting the lid, we see six rubber caps, their task is not to maintain the battery, but to bleed the gases formed during charging and operation, but we will use them for our purposes.

We remove the caps and in each hole, using a syringe, pour 3 ml of distilled water, it should be noted that other water is not suitable for this. And distilled water can be easily found in a pharmacy or at a car market, in the most extreme case, melt water from snow or pure rain water can come up.

After we have added water, we put the battery on charge and we will charge it using a laboratory (regulated) power supply.
We select the voltage until some values \u200b\u200bof the charging current appear. If the battery is in poor condition, then the charging current may not be observed, at first, at all.
The voltage must be increased until the charging current appears at least 10-20mA. Having achieved such values of the charging current, you need to be careful, since the current will increase over time and you will have to constantly reduce the voltage.
When the current reaches 100mA, there is no need to reduce the voltage further. And when the charge current reaches 200mA, you need to disconnect the battery for 12 hours.
Then we reconnect the battery for charging, the voltage should be such that the charging current for our 7ah battery is 600mA. Also, constantly observing, we maintain the specified current for 4 hours. But we make sure that the charging voltage, for a 12-volt battery, is no more than 15-16 volts.
After charging, after about an hour, the battery needs to be discharged to 11 volts, this can be done using any 12-volt light bulb (for example, 15 watts).

After discharging, the battery must be charged again with a current of 600mA. It is best to do this procedure several times, that is, several charge-discharge cycles.
Most likely, it will not be possible to return the nominal capacity of the battery, since the sulfation of the plates has already reduced its resource, and besides, there are other harmful processes. But the battery can continue to be used in normal mode and the capacity for this will be enough.
Regarding the rapid wear of batteries in uninterruptible power supplies, the following reasons were noticed. Being in the same case with an uninterruptible power supply, the battery is constantly subject to passive heating from active elements (power transistors), which by the way heat up to 60-70 degrees! Constant heating of the battery leads to rapid evaporation of the electrolyte.
In cheap, and sometimes even some expensive UPS models, there is no charge temperature compensation, that is, the charge voltage is set to 13.8 volts, but this is acceptable for 10-15 degrees, and for 25 degrees, and sometimes much more in the case, the charge voltage should be a maximum of 13.2-13.5 volts!
It's a good idea to move the battery out of the case if you want to extend its life.

It also affects the "constant small under charge" by an uninterruptible power supply, 13.5 volts and a current of 300mA. Such recharging leads to the fact that when the active spongy mass inside the battery ends, a reaction begins in its electrodes, which leads to the fact that the lead of the down conductors on (+) becomes brown (PbO2) and on (-) it becomes "spongy".
Thus, with a constant charge, we get the destruction of current leads and the "boiling" of the electrolyte with the release of hydrogen and oxygen, which leads to an increase in the concentration of the electrolyte, which again contributes to the destruction of the electrodes. It turns out such a closed process that leads to a rapid consumption of battery life.
In addition, such a charge (recharge) with a high voltage and current from which the electrolyte "boils" - converts the lead of the current leads into powdered lead oxide, which crumbles over time and can even close the plates.
With active use (frequent charging), it is recommended to add distilled water to the battery once a year.
Top up only on a fully charged battery with control of both electrolyte level and voltage. In some case, do not overfill, it's better not to pour it because you can’t take it back, because by sucking out the electrolyte, you deprive the battery of sulfuric acid and, as a result, the concentration changes. I think it is clear that sulfuric acid is non-volatile, therefore, in the process of "boiling" during charging, it all remains inside the battery - only hydrogen and oxygen come out.
We connect a digital voltmeter to the terminals and pour 2-3 ml of distilled water into each jar with a 5 ml syringe with a needle, while shining a flashlight inside to stop if the water is no longer absorbed - after pouring 2-3 ml, look into the jar - you will see how the water is quickly absorbed, and the voltage drops on the voltmeter (by fractions of a volt). We repeat topping up for each jar with pauses for soaking for 10-20 seconds (approximately) until you see that the "glass mats" are already wet - that is, the water is no longer absorbed.
After topping up, we inspect whether there is an overflow in each battery bank, wipe the entire case, put the rubber caps in place and glue the lid in place.
Since the battery shows about 50-70% charge after topping up, you need to charge it. But charging must be carried out either with an adjustable power supply or with an uninterruptible power supply or a standard device, but under supervision, that is, during charging it is necessary to observe the condition of the battery (you need to see the top of the battery). In the case of an uninterruptible power supply, for this you will have to make extension cords and bring the battery out of the UPSa case.
Place napkins or plastic bags under the battery, charge up to 100% and see if electrolyte does not leak from any can. If suddenly this happened, stop charging and remove smudges with a napkin. Using a napkin soaked in a soda solution, we clean the case, all the cavities and terminals where the electrolyte has got in order to neutralize the acid.
We find the jar where the "boiling" came from and see if electrolyte is visible in the window, we suck off the excess with a syringe, and then carefully and smoothly fill this electrolyte back into the fiber. It often happens that the electrolyte after topping up is not evenly absorbed and boils up.
When recharging, we observe the battery as described above, and if the "problem" battery bank starts to "poured out" again during charging, excess electrolyte will have to be removed from the bank.
Also, under inspection, at least 2-3 full discharge-charge cycles should be done, if everything went well and there are no smudges, the battery does not heat up (light heating does not count when charging), then the battery can be assembled into a case.
Well, now let's take a closer look cardinal methods of resuscitation of lead-acid batteries
All the electrolyte is drained from the battery, and the insides are washed first a couple of times with hot water, and then with a hot soda solution (3 tsp of soda per 100 ml of water), leaving the solution in the battery for 20 minutes. The process can be repeated several times, and finally thoroughly rinsed from the remnants of the soda solution - a new electrolyte is poured.
Then the battery is charged for a day, and after, for 10 days, for 6 hours a day.
For car batteries with a current of up to 10 amperes and a voltage of 14-16 volts.
The second way is reverse charging, for this procedure you will need a powerful voltage source, for car batteries, for example, a welding machine, the recommended current is 80 amperes with a voltage of 20 volts.
They do a polarity reversal, that is, plus to minus and minus to plus, and for half an hour they “boil” the battery with its native electrolyte, after which the electrolyte is drained and the battery is washed with hot water.
Then a new electrolyte is poured in and, observing the new polarity, they are charged with a current of 10-15 amperes for a day.
But the most effective way is done with the help of chem. substances.
From a fully charged battery, the electrolyte is drained and, after repeated washing with water, an ammonia solution of Trilon B (ETHYLENEDIAMINETETRAACENETIC Sodium) containing 2 weight percent Trilon B and 5 percent ammonia is poured. There is a process of desulfation for 40 - 60 minutes, during which gas is released with small splashes. By the cessation of such gas formation, one can judge the completion of the process. In case of particularly strong sulfation, the ammonia solution of Trilon B should be refilled, removing the spent one before that.
At the end of the procedure, the inside of the battery is thoroughly washed several times with distilled water and a new electrolyte of the desired density is poured. The battery is charged in the standard way to the nominal capacity.
Regarding the ammonia solution of Trilon B, it can be found in chemical laboratories and stored in sealed containers in a dark place.
In general, if you are interested, the electrolyte composition produced by Lighting, Electrol, Blitz, akkumulad, Phonix, Toniolyt and some others is an aqueous solution of sulfuric acid (350-450 g per liter) with the addition of sulfate salts of magnesium, aluminum, sodium, ammonium. Gruconnin's electrolyte also contains potassium alum and copper sulphate.

After recovery, the battery can be charged in the usual way for this type (for example, in UPSe) and not allowed to discharge below 11 volts.
Many uninterruptible power supplies have a "battery calibration" function with which you can carry out discharge-charge cycles. By connecting a load of 50% of the UPS maximum at the output of the uninterruptible power supply, we launch this function and the uninterruptible power supply discharges the battery to 25% and then charges up to 100%
Well, in a very primitive example, charging such a battery looks like this:
A stabilized voltage of 14.5 volts is supplied to the battery, through a high-power variable wire resistor or through a current stabilizer.
The charge current is calculated using a simple formula: divide the battery capacity by 10, for example, for a 7ah battery it will be - 700mA. And on the current stabilizer or using a variable wire resistor, you must set the current to 700mA. Well, in the process of charging, the current will begin to fall and it will be necessary to reduce the resistance of the resistor, over time, the resistor knob will come all the way to its initial position and the resistance of the resistor will be zero. The current will further gradually decrease to zero until the voltage on the battery becomes constant - 14.5 volts. The battery is charged.
For more information on the "correct" charging of batteries, see
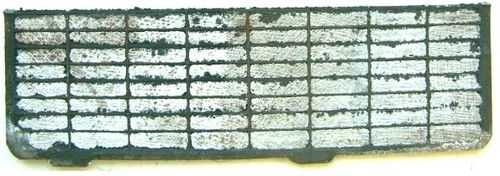
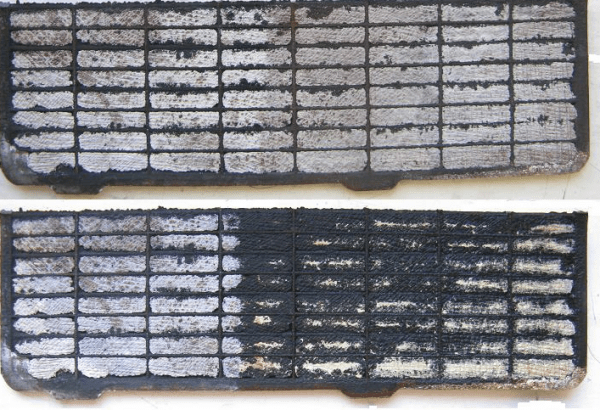
light crystals on the plates - this is sulfation
A separate "bank" of the battery was subjected to constant undercharging and, as a result, was covered with sulfates, its internal resistance grew with each deep cycle, so that, during the charge, it began to "boil" before anyone else, due to loss of capacity and removal of electrolyte into insoluble sulfates.
The plus plates and their grids turned into powder in consistency, as a result of constant recharging by an uninterruptible power supply in the "stand-by" mode.
Lead-acid batteries except for cars, motorcycles and various household appliances, where they are not only found in flashlights and watches, and even in the smallest electronics. And if you got into the hands of such a "non-working" unmarked lead-acid battery and you do not know what voltage it should give out in working condition. This can be easily recognized by the number of cans in the battery. Locate the protective cover on the battery housing and remove it. You will see gas bleed caps. by their number it will become clear how many "cans" this battery is.
1 bank - 2 volts (fully charged - 2.17 volts), that is, if cap 2 means a 4 volt battery.
A fully discharged battery bank must be at least 1.8 volts, you can’t discharge it below!

Well, in the end I will give a little idea, for those who do not have enough money to buy new batteries. Find companies in your city that deal with computer equipment and UPSs (uninterruptibles for boilers, batteries for alarm systems), agree with them so that they do not throw away old batteries from uninterruptibles, but give them to you, possibly at a symbolic price.
Practice shows that half of AGM (gel) batteries can be restored if not up to 100% then up to 80-90% for sure! And this is a couple more years of excellent battery life in your device.
Greetings friends. Today I will tell you about the most effective way to restore capacity in lead-acid batteries.
During the period of even the most correct operation, the battery loses its capacity every day. And at one fine moment, its charge is not enough to start the car engine. This example is aggravated with the advent of cold weather.
Naturally, the motorist puts the battery on charge and after a while sees that the battery is not charging, and the voltage during charging is normal - 14.4-14.7 V or higher (12.6 without a charger).

Then, if there is a load plug, the check is performed by it and it turns out that under load, the voltage drops a lot. Everything points to a loss of battery capacity. The reason for this is the sulfation of the plates.

Usually, with proper operation, this happens after about 5 years. This is a very good indicator. And there is a way out - buy a new battery. But, if you want to save money (since batteries aren't cheap these days), and extend battery life by a couple more years, then maintenance is a must. And not simple, but special, which can reanimate the battery.
What kind of batteries can be recovered?
This method is suitable for batteries that have not been subject to serious current or mechanical damage during their operation. And they became unusable as a result of temporary, natural sulfation.This method is not suitable for batteries that have internal shedding of plates, internal shorting of cans, swelling or other mechanical damage.
The method is excellent for desulfation of the plates and is popularly called the "polarity reversal" method of the battery.
I will divide battery recovery into three steps.
Battery recovery process
Stage one: preparation
The first thing that is not necessary, but you need to do is to clean the surface of the battery from any contaminants. Wash the entire surface with detergent.Next, visually make sure that there are no damages on the case, that there are no swellings and bulges on the sides.
Second, open all the corks of the jars and make sure that there is electrolyte. If it is not in one of the cans, then you need to make sure that there are no cracks on the body.
Then, using a flashlight, inspect the plates inside - there should be no shedding. Here, just for one thing, you can clearly see sulfation - a white coating on the plates.

If everything is in order, add distilled water to each jar to the level. It will not be superfluous to measure the density of the electrolyte in each compartment.
Stage two: the classic recovery method
Before moving on to reversing the battery, it is necessary to test the usual recovery method, which has already become a classic.Step one: We charge the battery to a full charge of 14.4 V.

Step two: with a halogen bulb or other load, we discharge the battery to 10.6 V (voltage is measured under the same load).

We repeat the cycle of these two steps 3 times and charge the battery to full. We check the capacity with a load fork or a starter in the operation of the machine. If the battery has recovered - good - we continue to operate. If not, or not enough, then go to the third stage.
Stage three: battery polarity reversal
This battery recovery method is the most effective of all. And reanimates the battery in almost 90% of cases.Step one: we hang a load on the battery in the form of a halogen lamp, and discharge the battery to zero. The lamp will go out in about a day (it all depends on the initial battery capacity). We leave the battery with the lamp connected for another 2-3 days in order to finally discharge the remnants.
Step two: reverse charging the battery. We connect the charger in reverse: plus to minus, and minus to plus. In order not to spoil your charger (or so that the short circuit protection does not work), we connect the same halogen lamp in series with the batteries. And charge the battery in reverse polarity. After the voltage has risen to 5-6 volts, the lamp can be excluded from the circuit. It is desirable to set the charge current to 5 percent of the battery capacity. That is, if the capacity is 60 ampere-hours, then the charge current in the opposite direction is set to 3 amperes. At this time, all electrolyte jars begin to actively boil and hiss - this is normal, since the reverse process is underway.

We charge for about a day, until a voltage of 12-14 V appears. As a result, you have a fully charged battery, in which the plus output is minus, and the minus is plus.

Step three: again completely discharge the battery with a halogen lamp for a couple of days. Then we make the correct charging plus to plus, minus to minus. We charge to the full up to 14.4 V.
This completes all steps.
Battery recovery result
Usually the result helps to increase the battery capacity to 70-100% of the factory capacity, of course there are exceptions.Specifically, in my case, it was possible to increase the capacity by 95% - which is an excellent result. The white sulphate coating disappeared from the plates, and they turned black like a new battery. The electrolyte became more transparent and pure.
Battery Recovery Video
I recommend that you watch a video where a completely "dead" battery is restored, which is about 10 years old.At first, there is a “buildup” with a change in the polarity of the power supply, and almost at the very end, a full polarity reversal cycle has already been given.
Content
During the use of a mobile device, the battery will definitely consume its resource and “age”. This is manifested in a rapid decrease in charge and slow charging. Sometimes the device after turning off simply does not turn on and does not respond to pressing the buttons. This is a characteristic and familiar phenomenon for lithium batteries, which are currently used in all smartphones. You can purchase a new charge source, but if you want to save money, there are options for resuscitating the battery yourself.
How a phone battery works
Most of the gadgets have a battery function. There are several types of batteries for phones:
- Ni-Cd - nickel-cadmium;
- Ni-Mh - nickel-metal hydride;
- Li-Ion - lithium-ion.
NiCd batteries have the largest charge volume, they are easy to manufacture, store and operate. Often used to power medical equipment, radios, power tools and professional video cameras. NiMh batteries generate more heat during charging, requiring the use of a complex algorithm to determine full charge. For this reason, most of these batteries have an internal temperature sensor. NiMh charges for a long time (2 times the duration of NiCd charge replenishment), but their capacity is much larger.
Batteries of the Li-Ion type, when recalculated for one kilogram of weight, are 2 times higher than the NiCd value. For this reason, lithium-ion batteries are now used in all phones, laptops, where, in addition to battery life, the weight of the product is also important. The very design of the battery is very simple: two graphite sheets of lithium oxide and cobalt, which are lubricated with electrolyte and rolled into a roll.
Why is the battery draining
Smartphone owners after a year or a year and a half begin to notice a decrease in the device’s performance, the charge quickly leaves. This can happen for several reasons, some of them can be solved programmatically (disabling unnecessary functions, wi-fi, cleaning viruses), while others can only be technically corrected by restoring the battery capacity. The following factors are popular reasons why the battery is discharged.
The vast majority of smartphones run on the Android operating system, which, due to its complexity and open source code, is prone to failures, OS optimization is at a low level. Dozens of programs automatically run in the background, even in standby mode (with the screen off) they continue to “eat up” the charge and lead to a rapid decrease in battery capacity. Many of these background programs are not needed by the average user and should be disabled.
- Viruses
The Android system is free, so it gained such popularity, hackers could not get around it and began to create malware for it. The activity of such viruses leads to a rapid decrease in the battery charge of the phone. In addition, the performance of smartphones drops even with strong processors. The following signs (except for antiviruses) will help determine the presence of "pests": the appearance of advertisements in the wrong places, an increase in the temperature of the gadget's case, and system slowdown.
- Bad battery
Battery failure leads to a rapid loss of energy. This happens more often with long-term use, usually after a two-year period. This is an inevitable process of equipment resource consumption. Sometimes a decrease in the nominal capacity of the battery occurs due to contamination of the anode and cathode. This leads to a slowdown in physical and chemical processes that affect the ability of the battery to release the accumulated charge. Using some methods, you can achieve the original value of the battery.
Battery capacity and shelf life
Recovery processes with constant use of the device will not be able to return one hundred percent to the same amount of voltage. Over time, the power of the battery decreases, it wears out and becomes unusable. Li-Ion batteries have a shelf life of 2 years from the date of manufacture. During this period of time, from 20% to 35% of their power is lost. Restoring an old battery is not an easy task, so pay attention to the date of manufacture of the phone.
How to check your phone battery
For the test, you need a device called a voltmeter, which helps measure the voltage of the equipment. It is recommended to first carry out a visual inspection of the battery. If the battery has been in operation for a long time, then its structure could undergo deformation, for example, swell. If liquid gets on the contacts, it will oxidize. These factors affect the battery capacity and decrease the specific value. To check the battery you need:
- remove the battery from the device;
- attach the positive contact of the voltmeter to the positive pole;
- do the same with the negative;
- set the nominal value of the measured voltage in the settings.
The voltage that you received during the measurement and will display the degree of battery charge. To evaluate the indicator, you can use the following values:
- less than 1 V - you need to charge the battery;
- about 2 V - the battery is charged, the capacity is average;
- 3.6-3.7 V is a fully charged high capacity battery.
Phone battery recovery
If you wish, you can try to restore the "life" of the battery using some methods. Restoring a smartphone’s battery is a temporary measure, the device’s resource is not infinite, so at some point the battery will still have to be replaced. Below are methods to increase battery capacity that you can do yourself at home. Some will require additional tools, the ability to work with your hands. If you are new to this area, then it is better not to restore, but to buy a new battery.
With a dedicated charger
You can restore a Li-Ion battery using a multimeter and Imax B6. The latter device is easy to buy, it is well suited if you need to resuscitate the battery at home. First, check the battery itself with a multimeter. Connect it by setting it to voltage measurement mode. In the presence of a deep discharge, the multimeter will show this in the minimum U value in millivolts.
Sometimes the controller does not allow measuring the real amount of voltage. There are two outputs - plus and minus, which go directly from the battery to the controller. The voltage at the terminals is usually 2.6 V, but for lithium batteries this is not enough, to get the real voltage you need to charge the battery to 3.2 V. Then the multimeter will begin to reflect the real voltage. It is necessary to ground the negative wire, and connect the red wire to the power supply, there is no need to set a large current.
Imax is convenient in that it supports several modes that differ for different types of phone batteries. Activate the appropriate mode (lithium polymer or lithium ion), set the voltage to 3.7 V, and the charge to 1 A. The voltage will begin to rise, indicating a successful restoration of the capacity. The indicator should reach 3.2 Volts and the battery will “swing”. Then it can be inserted back into the tablet, phone, or fully recharged using the native device.

Restoring phone battery capacity from another battery
You will need any other 9 volt battery, electrical tape, a thin simple wire. This do-it-yourself phone battery recovery will be of interest to all electronics lovers. You can restore the capacity using the following algorithm:
- Connect the wires to the contacts of the battery that needs to be restored. Each pole needs its own.
- You can not close plus and minus with the same wire, this will lead to a short circuit and you will not be able to restore the battery.
- Secure the contacts with duct tape, making a mark with a + and - marker.
- Connect the positive terminal to the "+" on the 9-volt battery, and the negative terminal in the same way.
- On this side, also fix the contacts with electrical tape.
- After a while, the battery should start to heat up.
- When the battery becomes noticeably warm, you need to disconnect it from the "donor" and put it in the phone to check its operation.
- After turning on, immediately check the charge level, put the mobile in standard mode to charge.
Using a resistor and a "native" charger
This method is simple, you will not need special devices or devices, you will only need your own charger. Phone battery repair will require the following:
- resistor device with a nominal value of at least 330 ohms, maximum - 1 kOhm;
- power supply 5-12 V (suitable charger from the phone).
To restore the battery, you need to perform the following simple connection scheme: minus from the adapter to the minus of the battery, plus is output through a resistor to plus. Then you need to apply power and the voltage on the battery will begin to rise. You should bring it up to 3V, this will take 10 to 15 minutes. Then you can use the battery as usual.
Phone battery recovery with a fan
You will definitely need a power supply unit with an output voltage of at least 12 V. Connect the corresponding one from the device to the negative connector of the fan, also connect the negative one and manually fix the wires on the battery. Connect the power supply to the outlet, the fan should start spinning, which indicates the supply of current. You should not keep charging for a long time, 30 seconds are enough to reach the required indicator U. This will help "revive" the battery and charge it without problems from a regular outlet.
Cold battery resuscitation
This option, how to restore the phone's battery rarely works, but you can try, because there is no risk of damaging it. It is necessary to put the battery in a plastic bag (foil or paper is not suitable) so that water does not get into the phone. To reanimate the phone battery, you need to put it in the refrigerator (freezer) for 12 hours. After cooling, let it warm up in the room, do not forget to wipe it dry. By freezing, it is possible to restore some capacity so that it can be charged through a regular outlet.

How to restore a lithium battery after a deep discharge
If you do not use the device for a long time, a deep discharge may occur. The voltage drops to unacceptable levels, the device is tightly turned off by the controller and it cannot be charged from the outlet. In this case, it is possible to restore the battery only by unsoldering the protection system. Then power is supplied using a special device, for example, Turnigy Accucell 6. The device itself will monitor the battery recovery processes.
Using the "Type" button, you can select the charge program. Press the "Start" button, then for Li-ion - 3.5 V, for Li-pol - 3.7 V. The current should be set at 10% of the rated battery capacity. To do this, press the "+" and "-" buttons. When the value reaches 4.2V, the mode change to "voltage stabilization" will begin. The device will emit an audio signal after charging is completed, and the message “Full” will appear on the screen
When the battery swells
With the degradation of the battery, physical deformation can begin. Bloating makes the device unusable, but you can try to repair it. You need to find a kind of cap on the battery, which is located under the sensor board. Next, you will need a needle or nail. Pierce this cap, you need to do this carefully, separating the upper part with the sensor board with contacts from the battery case. Wait for all the accumulated gas to come out of the housing, put the metal plate back in place. For this you need:
- put the battery on a flat surface;
- put the plate on top;
- it is easy to squeeze her body;
- when it is level, solder the sensor board back;
- cover the puncture site with waterproof glue.
Full charge and discharge of the phone battery
This is the simplest, but inefficient way to restore battery capacity. You need to "drive" the battery several times until it is completely discharged, and then completely restore it. For this:
- download a resource-intensive utility (AnTuTu) or a game and completely put the phone down (until it is turned off);
- connect the power and wait for 100% charge;
- repeat the previous steps 3-4 times.


