Since the phrase about the state of Russian roads came out from Gogol's pen, the problem has not become less urgent. As before, in some godforsaken corners of the country, people generally forgot to dream about asphalt pavement. The only way out is to transfer to all-terrain vehicles. Alas, the models offered by car factories are not able to satisfy the needs of motorists from the outback. Ordinary people need a small, economical, and, of course, a cheap off-road vehicle. Only in a home workshop from improvised materials can such a dream come true.
Materials and components for an all-terrain vehicle on tracks
It would be fair to warn in advance that power units removed from cars are the cause of increased fuel consumption. But compared to motorcycle engines, they have a tangible power reserve. The manufacture of caterpillars also entails additional costs.
The body of a homemade all-terrain vehicle is best constructed from aluminum or duralumin sheet. It will be necessary to purchase triplex glass, liquid rubber (can be replaced with silicone grease). The main material for the tracks will be a sheet (or strip) of rubber. One pair of bridges borrowed from Soviet cars - Zaporozhets or Zhiguli.
There are important points that should be taken into account in the process of creating an all-terrain vehicle on tracks.
A self-made body is subject to such requirements as strength, tightness and streamlining with oncoming air flow while driving. As for geometry, the best solution would be a body that resembles a flat-bottomed boat.
In view of the fact that you have to travel around (more precisely, “caterpillar”) wetlands or even overcome shallow water bodies, the body should contain a minimum of seams. In other words, instead of welding, a single sheet must be bent, giving the desired shape. The metal sheet is used to manufacture not only the cabin, but also all compartments, including the one intended for the engine. To exclude the harmful effect of water, moisture-proof material (for example, rubber) reliably covers the joints and fastenings of the nodes. Particular care should be taken to protect the battery and electrical wiring from moisture as much as possible. It is better if special mines are allocated for them.

The rigidity of the design of the cross-country vehicle should be provided by a frame made of steel pipes. Bridges and the engine will be installed and fixed on a frame made of copper pipes.
In the body, make holes designed to bring out the bridges. The joints of the axle shafts and the body (in the holes) should be thoroughly sealed with rubber sleeves.
The highlight of this all-terrain vehicle is the presence of a caterpillar, without which it is difficult to imagine movement on any off-road and even swimming. The treadmill is cut out of sheet rubber and looped. When calculating the dimensions of the caterpillar, the distance between the shafts that are leading is measured. An important element that makes it easy to overcome any dirt is the lugs attached to the outside of the track with rivets. And if they are made in the form of small blades, then the lugs will play the role of blades when the caterpillar is immersed in water. Such an idea is not difficult to implement, having a thick aluminum sheet at hand. Next, you need to measure the width of the wheels. This value will be needed when calculating the distance between adjacent elements of the limiters, which are attached to the inside of the track. The center of each wheel as here http://modelist-konstruktor.com/ must exactly match the center line of the track and thus the wheel will be located between the stops.
The tensioned state of the tracks can be ensured in the following way: fill the space between the bridge wheels with the driven wheels.
The final step is to complete the cabin with laminated glass (triplex or duplex) with rubber mounts. ATVs - homemade tracks, the drawings of which are in this article, are popular with creative people.
Many lovers of home-made equipment are engaged in the development and manufacture of tracked all-terrain vehicles.
A variety of solutions are used to bring ideas to life, but the biggest problem for enthusiasts of this type of transport has been and remains caterpillars. Of course, no one forbids the use of factory-made propulsion devices in their samples, but I want a self-made all-terrain vehicle (or snowmobile) to also have home-made tracks. Let's look at some ways to make tracks that have shown fairly good performance.
The simplest option
A caterpillar mover for snowmobiles and light all-terrain vehicles can be made on the basis of an ordinary bush-roller chain and a conveyor belt. For the manufacture of such a caterpillar, there is no need to have special tools or equipment, everything is done “on the knee”.
Caterpillar from a conveyor belt
To prolong the life of the tape, it is advisable to sew its edges with a fishing line in increments of about a centimeter (just like seamstresses do overcasting the edges of the fabric), this will save the tape from fraying. The connection of the tape into a ring can be done in any available way, for example, using a hinge like a piano loop, or sewing the ends of the tape (a less reliable method).
The thickness of the tape should be selected based on the engine power. When using engines from domestic motorcycles, good results are shown by a tape with a thickness of 8-10 millimeters, which is used on agricultural conveyors.
Despite the ease of manufacture, such a homemade caterpillar for a snowmobile has a decent resource and is also easy to repair if necessary.
Tire tracks
The manufacture of caterpillars from automobile tires is quite common among home-made people. For this purpose, tires from trucks are selected, preferably with a suitable tread pattern (there will be less work with the tire in the future).

Tire caterpillar
To make such a caterpillar, it is necessary to cut the bead from the tire, leaving only the treadmill. This work is quite laborious and requires a lot of patience, since only a well-sharpened shoe knife is used from the tools.
To simplify the work, you can moisten the blade in soapy water from time to time, then the rubber is easier to cut. As an option, you can consider the use of home-made cutting devices, or use an electric jigsaw on which a file with a fine tooth is fixed (it is also better to moisten the file with soapy water).
First, the beads are cut off from the tire, then, if necessary, the extra layers are removed from the wrong side of the resulting ring (if the track is too hard). After that, if the tread pattern does not meet the designer's requirements, a new lug structure is cut.
A home-made tire caterpillar has an undoubted advantage over the above-described sample, since it has an initially closed loop, which means that its reliability will be many times higher. The downside is the limited width of the finished track, but if necessary, you can use a double and triple width version.
Belt tracks

Attractive because of its relative simplicity is the option of making a caterpillar with your own hands.
Belts with a wedge-shaped profile are connected into a single unit with the help of lugs attached to the belts with rivets or screws.
Thus, a track is obtained with already existing holes for the drive sprocket (for this, you only need to leave gaps between the belts).
There are many ways to make caterpillars - the main thing is to have the desire and patience, and then everything will work out.
Ivan Sardaev, a 67-year-old resident of the city of Topki, took up the invention and creation of various vehicles almost 20 years ago.
In 1993, together with his wife, daughter and son, he returned from Vorkuta to the city of his childhood and built a house in four months. It turned out to be large, spacious, with an area of 150 squares.
Well, about four years after we moved in and settled down, I got tired of removing snow in the winter after a snowstorm: you work with a shovel, and your hands get tired. Like it or not, involuntarily you begin to think with your head, - the pensioner laughs.
Snowplow Ivan Sardaev.

In the beginning there were scooters
Ivan Vasilievich admits: he was fascinated by technology from childhood. As a child, he assembled scooters, sometimes on bearings, sometimes with wheels from a baby stroller. But it was back in 1997 that the tricycle snowplow became his first full-fledged invention. She was unusual - she had two wheels in front, and one - controlled - behind. As the inventor now recalls, the car was weak - it could only rake snow on the paths. He decided to improve it and assembled a model a little more complicated, then another. And then he got so involved in the process that he began to create snow blowers with buckets and rotary augers. And not only them.Topkin's very first snow blower was three-wheeled.

In 2007, Ivan Sardaev even published an article about three of his models in the Modeler-Constructor magazine, and two years later, about the security system. He invented it and mounted it in his house, if necessary, she transmits a signal to his mobile phone.
Several bucket snow blowers, a pair of auger machines and a pair of snowmobiles on pneumatics - this is an incomplete list of mobile equipment that Ivan Vasilyevich assembled until 2013. And all this in his spare time - despite his age, he still fixes TVs for people. And four years ago, his son gave him a computer, and when the pensioner mastered the Internet, new ideas appeared. One of the last was the idea to make an all-terrain vehicle on a caterpillar track with your own hands. 
And the roof is from Moskvich
He began to implement the idea in 2015, and it took Ivan Sardaev a year and a half to create an unusual car. Most of the details in the S-10 all-terrain vehicle, the inventor gave this name to his offspring - from the Zhiguli of various models. The rear axle, motor and gearbox are from the “classics”, the rollers in the tracks are the wheels from the eleventh VAZ model. Many parts were collected from neighbors, who, by the way, admire the golden hands of the master, or were selected at car parsing and metal collection points. The roof of the all-terrain vehicle is from the Moskvich, but the caterpillars had to be thought through and assembled by myself to the last detail. For them, the inventor was even forced to buy a conveyor belt in a store.A snowmobile on pneumatics is another machine assembled by the hands of a telemaster from Topki.

In total, Ivan Vasilievich spent more than 30 thousand rubles on certain purchases for his offspring.
Most of all I had to tinker with the caterpillars, - the pensioner admits. - It was a very painstaking work that required special care. After all, there’s something you bend wrong, you miss a little and that’s it, either the teeth will cling, or the tape will move out, and in both cases the car will not go.
This is how the all-terrain vehicle looked in the summer of 2016.

Currently, the Topkinian is testing his all-terrain vehicle. On a flat road, it can move at a speed of 35 - 40 kilometers per hour, and on virgin snow, the speed is reduced by about half. By the way, instead of a steering wheel, he has two control levers, like a tractor, and also a double all-terrain vehicle for the driver and passenger - it is always warm, the interior is heated by two stoves.
So far, Ivan Sardaev does not go further than the courtyard and the street where his house is located. But in the future, after the car has been tested at other times of the year, he hopes to register it, as it should be. But the creator does not want to sell it, even for 350 thousand rubles, in which such equipment was priced on one of the sites. You need such an all-terrain vehicle yourself.
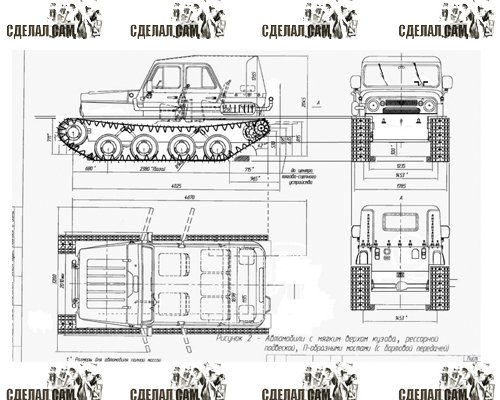
Caterpillar all-terrain vehicle S-10 of the Kuzbass pensioner. Ivan Sardaev worked on the all-terrain vehicle for a year and a half. The VAZ-2103 engine, the cab is the top of the Moskvich-2140 cab.
In many villages, and even more so in remote areas, special equipment is required to get to the right sites. The situation is worst in rainy or frosty seasons. To increase their own mobility, many residents of such settlements prefer to create a caterpillar all-terrain vehicle with their own hands. This is due to the remoteness from large cities and the high cost of factory models.
Such a caterpillar mini-all-terrain vehicle is a single-seat vehicle, whose carrying capacity is about 200 kg. The width parameters of future equipment are calculated depending on the required stability parameters during movement. The power plant is used from old domestic cars and should produce 50 or more liters. With. Such parameters are enough for movement at a speed of 20-30 km / h. But off-road, when there is movement in swampy areas, the average speed is 10-15 km / h.
The all-terrain vehicle has excellent maneuverability in wetlands
Necessary spare parts and materials for the manufacture of the machine
Usually homemade all-terrain vehicles on tracks consist of elements that you can buy or make yourself. So, when the unit is created from a walk-behind tractor, then the following elements are included in its design:
- Frame in the form of the main power element to which all nodes are attached.
- Rear axle designed for mounting the rear wheels.
- Track belt, as well as a track tensioner.
- Control system.
- Fuel tank.
- The driver's seat, which is recommended to be protected from possible dirt ingress on it while driving.
- A lighting system that allows you to move safely even at night.
It is recommended to equip such vehicles with a reduction gear, as well as a forced cooling system for the power plant. One air flow in the process of movement at low speeds is not enough to maintain the proper thermal conditions. The frame is installed between the front and rear axles, using pipes with a square section as a base.
This will give the structure rigidity. At the same time, it is recommended to make the docking of the frame elements rigid in order to get a one-volume home-made tracked all-terrain vehicle.
One of the most crucial moments is the creation of a sketch of the future unit. In such drawings, it is required to clearly indicate the location of all mechanisms and assemblies as accurately as possible. The choice of parts (homemade or factory) is determined depending on their performance and the load to which they will be subjected. As a power plant, an installation removed from an old car (often domestic) is used. If the unit is made small, then the power of the motorcycle engine is enough.

ATV blueprint
As for the undercarriage, it has the form of rubber tracks, a special tension system, suspension and forks. In order to create the tracks themselves, old car tires are often used. A metal frame is used as the basis for the chassis. But to create a control system, you need to use ready-made elements borrowed from cars or motorcycles. Homemade swamps are equipped with a power system, where the entire supply of fuel is stored in a special tank. Often it is gasoline or diesel, gas power plants are rarely used.
The process of creating home-made all-terrain vehicles with a caterpillar chassis design begins with the installation of the body. This item must be high strength and waterproof. The base is created rigid, for which steel pipes are used, which are able to withstand loads several times higher than those that arise during the movement. After that, the installation of the tracks themselves is carried out. For this purpose, ordinary sheet rubber is used, from which ring rubber is created. Further, special aluminum blades are attached to it from the outside. Limiters are mounted on the reverse side, having a step width no greater than the width of the wheels.
After that, the removal of bridges is carried out due to special holes in the body. For protection, rubber sleeves should be used. The tape itself is attached so that the driving front and rear wheels are between the stops. Further, additional wheels are installed and fixed between the main ones. They are necessary to maintain the tape.
Upon completion of all work, heavy-duty glass must be installed in the cab to prevent dirt from getting inside.
As individual elements, as well as parts of the structure, are created, it is recommended to check them for strength and performance. It is recommended to provide at least a 5-fold safety margin in order to increase the reliability of the future unit. As soon as the bench tests are completed, you can start testing the all-terrain vehicle in the field. This will allow you to evaluate the behavior of the transport.
Photos of the coolest homemade all-terrain vehicles
One of the popular models of light all-terrain vehicles is Karakat:

All-terrain vehicle Karakat
Also, caterpillar-type all-terrain vehicles were created in other states and had the following form: 
Another domestic homemade product is a frame structure equipped with a gearbox, as well as disc brakes:

All-terrain vehicles excel in difficult road conditions
As soon as winter begins in our country, given the climate, two-wheeled vehicles are removed to the garage until spring. It may be impossible to use the car for transportation due to heavy snow. And here a snowmobile on tracks comes to the aid of all motorists who want to move along a snowy road, which can be made from a walk-behind tractor with your own hands.
Not everyone has the opportunity to buy an additional vehicle for themselves, but everyone can independently design a home-made caterpillar snowmobile from a walk-behind tractor.
Advantages and features of a homemade snowmobile

- The vehicle has a mechanical drive and a caterpillar walk-behind tractor, when driving on which, you will not get stuck in snowdrifts.
- The steering is through the skis, and the steering system is in front, so you can easily control it.
- The price when buying a vehicle is important. Therefore, if you calculate, the cost of manufacturing a snowmobile on your own will be five times lower than buying it from a manufacturer. And even cheaper, it will come out due to the available walk-behind tractor and other parts.
- Reliability - where a person will not pass and a car will not pass, a snowmobile will overcome all obstacles with ease.
- If the snowmobile is made by hand, then the designer approaches the choice of parts very carefully. By doing everything yourself, you are responsible for the quality of your design. In addition, paying great attention to the nodes of the mechanism, you make the snowmobile all-terrain.
The device of a homemade motor-block snowmobile
This is a sought-after invention that you can do yourself with quality parts. The walk-behind tractor is taken partially (individual parts) or used completely. If you decide to use it not in a complete set, it is necessary to weld the supporting frame with the rear axle, steering fork and wheels on it. The most difficult stage in this case is the transformation of the working shaft of the walk-behind tractor into a drive gear.
The most practical and versatile solution in the manufacture of self-propelled guns will be the use of parts from a walk-behind tractor. You only need to remove the steering fork and engine from the finished walk-behind tractor.
The motor can be located at the rear of the structure.
Before starting the self-production of the structure, draw a drawing, collect all the necessary material, prepare the tool, and you can proceed. The design is quite simple and anyone can handle it, technical education and some skills are not required for this.
If you did not graduate from the Faculty of Engineering and it is difficult for you to draw up a drawing, use ours.

Drawing a simple frame for a homemade snowmobile
The drawing shows the frame that you will need in the manufacture of the snowmobile.
A walk-behind tractor in a homemade caterpillar snowmobile is the main part due to which your vehicle will move.
If everything is done correctly according to the drawing, you will have a goose-based snowmobile.

Snowmobile frame drawing on tracks
Making a caterpillar snowmobile with your own hands
Before starting work, decide on the tool. You can say with 100% certainty what you need: various screwdrivers, a hammer, welding, a pipe bender (if there is no finished frame).
Before preparing a drawing for self-manufacturing a snowmobile, familiarize yourself with the standard configuration.
- Frame. Each snowmobile has a frame: the more complex the design, the more reliable and strong the frame must be. The best option is to take from an ATV, scooter or motorcycle. If there is no such part, you can weld it yourself from pipes with a diameter of at least 40 mm.
- Seat. The seat on the snowmobile must be strong, as the structure itself is quite low.
Mandatory condition: the seat must be made of waterproof material.
- Engine. When choosing an engine, pay attention to its power. If you want a powerful snowmobile, then the engine should be like that.
- Tank. A container with a volume of 10-15 liters, made of metal, is perfect for a fuel tank.
- Skis. If you do not have ready-made skis that can be adapted for a snowmobile, you can make your own from wood. It is better if it is plywood of at least nine layers.
- Steering wheel. When choosing a steering wheel, think about your comfort. It is best if it is borrowed from a two-wheeled unit.
- Caterpillars. Making tracks is perhaps the most difficult part in the whole self-propelled.
- Drive unit. In order for the tracks to rotate, you will need a drive - it is best to use a chain from a motorcycle in this case.
Frame
If there is no finished frame available, then it is easy to weld it from a profile pipe, and give it a shape using a pipe bender.
If it is not possible to make calculations and draw up a drawing on your own, then for example, use the drawing from our website.
Once the frame is assembled, treat it with an anti-corrosion compound and cover it with a quality paint that will withstand both moisture and frost.
caterpillars
Everyone who previously independently designed a caterpillar walk-behind tractor notes: making caterpillars is the most difficult process in homemade work.
The easiest way to construct them is from tires from a car. This option is the most advantageous - high-quality and low-budget. The part is made in a closed circle, so tire break cannot occur.

Caterpillars for a snowmobile from a tire (tire)
Instructions for making caterpillars:
- From a car tire: take a tire and cut off the sides (it is better to do this with a sharp knife). You need to cut so that the flexible part with the tread remains.


