Depending on the year of manufacture of the car, the wiring diagram for the VAZ-2107 generator may vary. Over the years, various appliances have been added to the car, and electricity consumption has increased. If in the early 80s you could meet a maximum of a radio receiver or (in very rare cases) a cassette recorder on cars, then in our time the list is supplemented by central locks, alarm and security systems, acoustics (subwoofers, powerful amplifiers).
Various kinds of devices help the driver - video recorders, navigators, inverters, chargers, pumps, etc. And they all consume electricity, and a generator helps to replenish the charge, which charges the battery to the optimum level.
Carburetor engines
The connection diagram of the VAZ-2107 generator (carburetor and injector) depends on the year of manufacture of the car. On the first carburetor models, the G-222 generator was installed. The same device can be found on mass-produced VAZ-2105 and VAZ-2104 models with a carburetor injection system.
The maximum output current for such an installation is 55 amperes. But in recent years, cars with an injection injection system have become widespread. Its use implies a large current consumption, so it is necessary to use a generator with a large current in order to ensure a normal level of charge and power to all consumers.
injection motors

On injection motors, generator sets 5142.3771 or similar are used. They have increased energy, the maximum current is about 80-90 A, it all depends on the design option. Cars of the seventh series and similar models are good because they are like a designer. They can be installed on almost any generator, similar in design to the "native".
For tuning, installations with a recoil current of 100 amperes and above are used. But the use of such devices is justified only on the condition that many powerful consumers are connected to the electrical equipment. Regardless of the design, the generators produce alternating current; a voltage regulator, a capacitor and a block of diodes are installed in the case.
Cars up to 1986 release

The G-222 generator was used in cars. The connection diagram of the VAZ-2107 is almost the same as on later models. But there are features, among the main ones - there is a control lamp showing the battery charging. And she worked with the help of an electromagnetic relay.
When the ignition is turned on, the lock supplies power through the instrument panel fuse to the battery charge lamp solenoid relay and coil contact. The second contact of the coil is connected to the center wire on the generator (to the connection point of the three windings).
The electromagnetic relay has normally closed contacts, so when the ignition is turned on, the lamp is on. But as soon as the engine starts to work, the generator generates current. And a current flows through the coil of the test lamp, which causes the armature to attract and open the contacts.
At the same time, the power of the incandescent lamp stops, it goes out. This indicates that the battery is charging normally. Only under the condition that the lamp power is cut off will voltage be applied to the excitation winding and the generator will be able to enter the operating mode.
Cars manufactured in 1996 and later (carbureted engines)
The connection diagram of the G222 generator on the VAZ-2107 after 1996 of release differs from the previous one in one small feature - the power supply to the excitation winding has been changed. Cars have been improved, and some improvements allow you to immediately kill two birds with one stone - to simplify the design and make it easier for the driver.
After 1996, instead of a control lamp, they began to install a voltmeter, which more or less accurately shows the battery level. And if the lamp allows you to control only the presence or absence of voltage on the generator, then using a voltmeter, the driver visually assesses the level. And if necessary, can understand that it is necessary to carry out repairs or maintenance.
Scheme of the generator on injection motors

In fact, the design of the generator set is not much different from those that were installed on carburetor engines. Only the type of excitation and control of serviceability differs. In the dashboard, not only a control lamp is installed, but also a voltmeter, these two devices allow you to assess both the presence and the level of charge. Current flows through the filament of the lamp and is applied to the excitation winding when the engine starts. The connection diagram of the VAZ-2107 generator, regardless of the year of manufacture, implies operation in the following mode:
- When the ignition is turned on, power is supplied to the excitation winding. A magnetic field develops around the armature.
- When the crankshaft rotates, the starter also starts moving the generator armature. With the help of movement and a magnetic field, a potential difference arises at the ends of the stator windings.
- From the windings, the voltage (alternating, three-phase) is supplied to the rectifier unit, and from it to the output "30" of the generator.
- The output "30" is connected to the battery (positive terminal). Consequently, the entire electrical system is powered and the battery is charged.
At the same time, the battery and the G221A generator work in parallel. The connection diagram of the VAZ-2107 with carburetor and injection engines is almost identical, only minor features are available.
Conclusion

If a lamp is provided for control, then current will flow through it, regardless of whether the generator or battery feeds the power supply system, they work in pairs. But if a break occurs in the excitation winding, the brushes are erased, then the lamp will not go out, since the generator will not be able to enter the normal operating mode and provide power to all consumers. The VAZ-2107 generator connection scheme has no more features.
Almost the same is used on all cars (and not only produced by AvtoVAZ, but also by other plants). The power supply circuit of the excitation winding is used standard, the laws of electrodynamics are the same everywhere. Without power to the rotor winding, it will not be possible to remove voltage from the stator terminals, since there will be no rotating magnetic field.
The machine cannot be operated without a properly charged battery. If you notice that there is no charging on the VAZ 2107, the malfunction must be fixed immediately. If you continue to use the car, especially at night, the battery will run out very quickly and you will have to use a tug or tow truck. To figure out why there is no battery charging and how to fix the problem, you need to start with a theory.
VAZ 2107 generator and the reasons for the lack of charging
To start the engine and the correct operation of the ignition system and other electrical circuits of the VAZ 2107, a DC voltage is required in the on-board network. When the engine is not running, the battery maintains the proper voltage. After the engine starts, the car's generator provides battery charge and maintains the voltage of the on-board network at a level of 13.6-14.2 V. Regardless of the engine speed, the output voltage on the generator remains constant. The relay-regulator is responsible for this, which changes the voltage of the generator excitation circuit. If the voltage rises above an acceptable level, the winding current decreases, reducing the output voltage. And vice versa.
If the charging of the VAZ 2107 is lost, the reasons may be as follows:
- malfunction of the relay-regulator;
- breakage or poor contact in the excitation network or generator output voltage;
- broken alternator belt.
Restoring the normal operation of the generator should begin with determining the cause of the lack of battery charge.
How to determine the lack of battery charging VAZ 2107
The first sign of a lack of charging is a burning control lamp on the instrument panel or a voltmeter needle that is not in the green sector when the engine is running. A more reliable way is to check the voltage on the battery with a voltmeter. 
With the engine running, the normal voltage on the battery is 13.9 ± 0.3 V. When the battery is not charging, the voltage on it is approximately 12 V.
Important: in order to avoid failure of the regulator relay and the electronic engine control unit, it is forbidden to remove the battery terminals while checking the voltage of the on-board network with the engine running.
Undervoltage and overvoltage of the on-board network harms the battery. In the first case, it is discharged, in the second case, the electrolyte boils away, which leads to battery failure.
What is needed to repair the battery charging VAZ 2107
To identify and eliminate malfunctions, the following devices and tools are needed:
- multimeter;
- control lamp 12 V;
- flat screwdriver;
- pliers;
- sandpaper.
Troubleshooting battery charging VAZ 2107
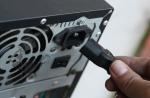
First, it is worth checking the health of the generator belt - it is he who makes the generator rotate and generate current. This belt drives the coolant pump, so this malfunction also manifests itself in engine overheating. 
If the charge control lamp does not light up, and the voltmeter shows the normal voltage of the on-board network, and the battery is not charging, the reason is in the contacts on the terminals. 
Remove the wires from the battery and clean the battery terminals and wires with sandpaper. If the charge does not appear, it is necessary to measure the voltage at terminal "30" (generator output) with the engine running. If the voltage at this terminal and the battery is very different, you need to strip the contacts and ring the wire going from the generator to the battery. The defective wire must be replaced.
If, when the engine is running, the voltage in the on-board network is within normal limits, but when the load (headlights) is connected, it drops, the reason lies in the weak tension of the alternator belt. When the load increases, the weakened belt slips. A correctly tensioned belt should sag by 12-17 mm with a force of 10 kgf. A loose belt must be tightened or replaced.
Important: if the belt is over-tensioned, there is an excessive load on the bearings of the generator and pump, which can lead to their failure.
Other reasons for the lack of charge may be a broken rectifier diode on the generator, an open or short circuit in the rotor or stator winding.
Diodes can be checked with a multimeter or test lamp. With a multimeter, you can check the resistance of the diodes in the direction in which they should be blocked. To check with a test lamp, it is necessary to remove the “+” terminals from the battery and connect a test lamp. With the wire of the test lamp, it is necessary to touch the three bolts of the rectifier devices in succession. Then do the same operation, only by disconnecting the “-” terminal. If the lamp lights up, the diode under test is broken. 
If one of the diodes fails, the diode rectifier assembly must be replaced.
A break in the stator winding is determined by a multimeter by measuring the resistance between the bolts of the rectifier unit. The absence of contact of the winding with another indicates its breakage. In this case, it is necessary to replace the winding or the generator assembly. 
A common cause of generator failure is brush wear. To check them, it is necessary to dismantle the brush assembly. The length of the brushes must be greater than 5 mm, otherwise they need to be replaced. Also, the brushes can warp or “stick” in the wells. Therefore, it is necessary to check the condition of their lateral surface. 
Note: the VAZ 2107 generator (carburetor) is no different from the unit for the injection version of the "seven". Therefore, all tips for checking and repairing the generator are relevant for both modifications of the car.
If the control lamp does not light up and other devices do not work when the engine is running, while there is no battery charging, the reason is a blown fuse or a broken ignition lock (relay).
The reason for the lack of battery charging may be a breakdown of the relay-regulator. To check it, it is necessary to connect “+” from the battery to the upper contact, and “-” to the left one and check the voltage on the brushes, which should be 12 V. If the voltage is lower, the relay-regulator must be replaced.
As on any car, the generator on a VAZ 2107 car, the injector works in parallel with the battery - these are two power sources of the car that are used in different modes. The article discusses the generator 37.3701, the principle of operation of a generator with different characteristics, including a maximum current of 80 Amperes, and provides instructions for connecting the unit. The G222 generator set is similar, you just need to pay attention to some differences.
[ Hide ]
Features of the generator device on the seventh VAZ model
A generator is equipment designed to generate direct electric current up to 80 amperes. With its design, it resembles an electric motor: two windings and side covers with bearings are enclosed in the body. Over the years, the designer has achieved an improvement in the characteristics of the unit and the issuance of current with a power of up to 80 Amperes and above, that is, it has become more powerful.
The VAZ 2107 generator with an injector is a three-phase electric machine with electromagnetic excitation, delivering a direct current of up to 80 - 90 Amperes, depending on the design.
The device includes:
- stator;
- rotor;
- two aluminum alloy covers;
- built-in rectifier;
- two bearings;
- three-level voltage regulator.
The unit is located to the right of the engine, and is attached with two bolts to the power unit bracket. Driven by a belt drive from the crankshaft pulley. The electrical circuit on different models may differ in the location of parts.
The principle of operation of the unit and the charge control lamp
The principle of operation of the generator 37.3701 and G222 are identical. The generator device converts the mechanical energy that appears when the crankshaft rotates into electrical energy. The resulting electricity is needed to power the on-board network and recharge the battery. Alternating current is converted into direct current with a power of 80 amperes thanks to a rectifier unit consisting of 6 diodes.
A three-level regulator maintains the voltage at the required level. After the ignition is turned on, the voltage passes through the control lamp, reaches a three-level regulator, and then enters the excitation winding.
This process can be visualized in the form of a diagram:

In the diagram, the main parts of the on-board network are marked with the following numbers:
- Battery.
- Generator set.
- Mounting block.
- Egnition lock.
- Voltmeter for measuring voltage.
- A lamp that controls the charging of the battery.
Power comes from three diodes, which are located in the rectifier unit. If, after switching on the ignition, the control lamp does not go out, this means that the battery is not sufficiently charged. In this case, it is necessary to check what voltage is in the on-board network. Technical characteristics of the generator: at a voltage of 13 V, the maximum current is 55/80 Amperes (the author of the video is Vladimir Zagrivy).
If the voltage is not correct, then the cause may be:
- short circuit in the network;
- battery malfunction;
- breakdowns in a three-level voltage regulator;
- malfunctions of the VAZ 2107 generator set with an injector.
In this case, you need to check the degree of tension of the drive belt, the condition of the bearings, and the serviceability of the three-level regulator. In addition, it is worth checking the battery charge and its expiration date. Since the generators 37.3701 and G222 installed on the VAZ 2107 with an injector and a carburetor do not have big differences, their care is the same for both models. It is enough to make sure that moisture and dirt do not get on them.
DIY generator connection guide
With an injector or carburetor can become:
- burnt windings;
- the resulting interturn circuit;
- mechanical damage to the case;
- malfunction of the three-level regulator, etc.
The generator replacement procedure consists of removal, installation and connection.


Install the generator set in reverse order. Before installing the unit, you need to study well the connection diagram of the 2107 generator with an injector or carburetor, as well as the electrical connection diagram. In this case, you need to pay attention to the difference between 37.3701 and G222.
After installation, you need to adjust the belt tension. To adjust the belt tension, you need to loosen the two bolts securing the unit. Using the mount, tension the belt and fix it in this position with the nut on the adjustment plate. Then you need to check the degree of tension. To do this, press the belt between the pulleys.
The deflection should be in the gears from 10 to 17 mm. The procedure should be repeated until the desired value is reached. After tightening, all fastening nuts are finally tightened. On this connection of the unit can be considered finished.
Modern cars are equipped with a large amount of electronics, so the generator must be powerful in order to provide power to the on-board network and the operation of network elements. Therefore, you need to carefully monitor its technical condition.
Video "Removing the generator from the VAZ 2101-2107 models"
This video from Nikita Shurikov demonstrates how to do it yourself with a VAZ classic.
The generator in cars is designed to generate electricity and charge the battery. If the normal operation of the car electric generator is disturbed, the battery starts to discharge and soon the car will stop starting at all - there will not be enough battery charge. This device consists of a three-phase diode bridge, which in turn has 6 silicon diodes. Electric voltage is created by excitation of the rectifier at the moment when the rotor poles change under the stator windings. As the rotor rotates inside the machine stator, the rotor poles reverse. To increase the value of magnetic fluxes, the stator contains an electromagnetic exciting winding in the region of the magnetic circuits. Marking and designation of wires:
- R - pink.
- F - purple.
- Oh, orange.
- BW - black and white.
- KB - brown-white.
- CHG - black and blue.
- K is brown.
- H - black.
- B - white.
Wiring diagram for the VAZ-2101 generator

Structurally, the generator 2101 consists of the following main elements:
- Rotor- the moving part rotates from the crankshaft of the engine. It has an excitation winding.
- stator- the fixed part of the generator, also has a winding.
- Front and back covers bearings are installed inside. They have eyelets for attaching to the internal combustion engine. A capacitor is located in the back cover, which is necessary to cut off the variable component of the current.
- semiconductor bridge- called the "horseshoe" for the similarity. Three pairs of semiconductor power diodes are mounted on a horseshoe base.
- Pulley, on which the belt of the VAZ-2101 generator is put on. The belt is wedge-shaped (on modern cars, a multi-ribbed one is used).
- Voltage regulator installed in the engine compartment, away from the generator. But still it must be considered part of the structure.
- brushes mounted inside the generator and transmit the supply voltage to the excitation winding (on the rotor).
Wiring diagram for the VAZ-2106 generator

Wiring diagram for the VAZ-2107 generator

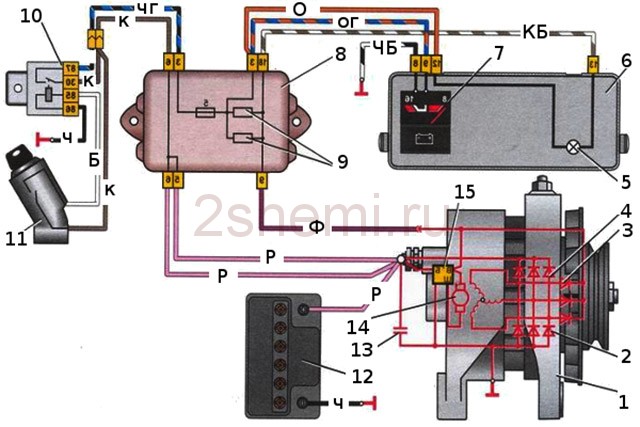
1 - battery; 2 - negative diode; 3 - additional diode; 4 - generator; 5 - positive diode; 6 - stator winding; 7 - voltage regulator; 8 - rotor winding; 9 - capacitor for suppression of radio interference; 10 - mounting block; 11 - control lamp of the battery charge in the instrument cluster; 12 - voltmeter; 13 - ignition relay; 14 - ignition switch.
Wiring diagram for the VAZ-2108 generator

The VAZ-2108 generator has a rather massive stator winding, since it uses a large cross-section wire. It is with its help that electricity is generated. The wire is wound evenly over the entire inner surface of the stator into recesses in the magnetic circuit specially provided for this purpose. Separately, it is worth talking about the latter. The middle part, the generator stator, consists of a set of thin metal plates pressed tightly against each other. Often they are boiled on the outside so that delamination does not occur.
Wiring diagram for the VAZ-2109 generator
- Alternator. Can be installed with series 37.3701 or 94.3701.
- negative diode.
- additional diode.
- positive diode.
- The control lamp of the generator, it is also a lamp for discharging the battery.
- Instrument combination.
- Voltmeter.
- Relay and fuse box located in the engine compartment in the compartment between the engine and the passenger compartment.
- Additional resistors built into the fuse box.
- Ignition relay.
- Egnition lock.
- Accumulator battery.
- Capacitor.
- Rotor winding.
- The voltage relay is located in the engine compartment.
Wiring diagram for the VAZ-2110 generator
On VAZ-2110, 2111 and 2112 cars, a 94.3701 generator was installed with a maximum output current of 80 Amperes and voltage = 13.2–14.7 Volts.

We give a transcript ten generator connection diagrams:
- Battery 12V;
- generator 94.3701;
- mounting block;
- egnition lock;
- battery charge warning lamp in the instrument cluster
How to check the generator with your own hands
How to check a VAZ generator using model 2109 as an example. Alternator type 94.3701, three-phase, with built-in rectifier unit and electronic voltage regulator, right rotation.

Generator Wiring Diagram. The voltage for excitation of the generator when the ignition is switched on is supplied to the terminal “D +” of the regulator (terminal “D” of the generator) through the control lamp 4 located in the instrument cluster. After starting the engine, the excitation winding is powered by three additional diodes installed on the rectifier unit of the generator. The operation of the generator is controlled by a warning lamp in the instrument cluster. When the ignition is turned on, the lamp should be on, and after starting the engine, it should go out if the generator is working. The bright burning of the lamp or its glow in the glow floor indicates malfunctions.
The "minus" of the battery must always be connected to ground, and the "plus" must be connected to the "B +" terminal of the generator. An erroneous reverse connection of the battery will immediately cause increased current through the generator valves, and they will be damaged.
The generator must not be operated with the battery disconnected. This will cause transient voltage surges at the B+ terminal of the alternator, which can damage the alternator voltage regulator and electronic devices in the vehicle's electrical system.
It is forbidden to test the generator’s performance “for a spark”, even by briefly connecting the “B +” terminal of the generator to ground. In this case, a significant current flows through the valves, and they are damaged.
Replacing and removing the generator
The generator on the VAZ car is removed either for a complete replacement in case of failure or for repair work to replace faulty parts. To perform dismantling, prepare a standard set of tools; it is advisable to drive the car into an inspection hole.


- Disconnect the battery.
- Remove the protective rubber cap from terminal "30" and unscrew the nut, remove the wires from the stud.
- Disconnect the block with wires from the generator connector.
- We loosen the tightening of the generator fastening to the adjusting bar, after which
lift it all the way up to the cylinder block and remove the belt from the pulleys. - Completely unscrew the bolt securing the adjusting bar to the cylinder block, then unscrew the 2 bolts securing the bottom bracket to the block from the bottom of the car and remove the generator by pulling it out of the engine compartment.

A modern car has a large number of electrical equipment for various purposes powered by the on-board network. When the engine is running in a VAZ 2107 car, the voltage is generated by an alternating current generator, which is a synchronous dynamo. The unit is driven from the engine pulley by a V-belt. During operation, the natural wear of the device, as a result of which it is not set parameters.
The VAZ 2107 car has a generator of one of two versions: model 372.3701 and 9412.3701. The latest later version differs from the previous one in the following elements:
- The rectifier unit is mounted on the outside of the back cover and is protected by a plastic case.
- The cooling impeller of the device is placed inside, which provides it with greater efficiency.
- The slip ring diameter has been reduced to reduce wear on the brush assembly.
This design provides a reduction in the circumference and does not increase the output in the details.
External manifestations of unit malfunctions
Diagnosing failures of the electrical equipment of a VAZ 2107 car for a driver with relevant experience is not particularly difficult. The generating device provides the voltage necessary to charge the battery and the stable functioning of other devices. Its nominal value is 14 V, which can be measured with a multimeter at the terminals.
If the generator of the VAZ 2107 car gives a voltage of less than 11.5 V, you should check the degree of tension of the drive belt, it may slip. This is usually accompanied by a characteristic whistling sound that disappears when pulled up. If extraneous noise does not disappear, it is necessary to replace the worn V-belt and check the condition of the rotor bearings.
Dismantling the generator
For a thorough check of the device, it is necessary to remove it from the VAZ 2107 car and disassemble it. The electric generator is dismantled with strict adherence to the recommendations. Machine repair manual developed by the manufacturer. It is important to disconnect the battery before performing work in order to prevent a short circuit when the contact parts of the wire touch the case.

The generator, designed to provide battery charging and power devices, is removed in the following order:
- The machine is installed above a viewing hole or on a lift, the protection and mudguard on the left are dismantled from it.
- The wires are disconnected from the generator and the nut is unscrewed, fixing its position on the tensioner curly bar.
- The belt is removed from the pulleys.
- We unscrew the bolt securing the device to the bracket and pull it out of the hole.

After that, carefully remove the generator from the engine compartment of the VAZ 2107 car, while being careful. The unit is cleaned of dirt with a rag and brush and subjected to an external inspection for external damage. This does not guarantee the detection of faults, but rocking the rotor shaft from side to side allows you to detect play in the bearings and, accordingly, their wear.
Checking generator parts
Disassembly of the device installed on the car is carried out with a bench tool in the following order:
- Without applying excessive force, unscrew the bolts securing the voltage regulator and the rectifier unit.
- Using the key on “8”, we disassemble the studs tightening the body and remove the back cover. The generator is divided into several parts.
- We defecate the bearing and brush assembly. If the remaining length of the contact devices does not exceed 5 mm, they must be replaced.
- Damage to the sealing rings of the bearing indicates its wear, and this product is dismantled and a new one is installed in its place.
- We remove the pulley from the rotor, holding it in a vice, while we should not forget about the possibility of deformation of the assembly. When tightening, carefully monitor the condition of the part.
- After that, we remove the shaft from the bearing and check it.
Control of the electrical part of the generating device of the VAZ 2107 car, which provides battery charging and power devices. This uses a multimeter in resistance test mode. It is necessary to make sure that there are no breaks in the windings of the rotor and stator, as well as that there is no interturn short circuit. At the next stage, the generator of the VAZ 2107 car is checked for the serviceability of the voltage regulator.

This node is checked according to a certain method using a battery and measuring instruments. After carrying out control measurements and if no deviations are found, we begin to work with blocks of rectifier diodes. On the VAZ 2107, the generator is equipped with a circuit of six semiconductor devices that ensure the linearity of the output characteristics. If during the checks a significant number of faults are identified, the elimination of them does not make sense, it is cheaper to purchase a new one.