Carrying out the modernization of his car, a rare driver will forget about such an important element as sound insulation. But in order for tuning to live up to the expectations placed on it, it is necessary to competently approach the installation of materials. How to soundproof a car with your own hands will be described later.
Why is car soundproofing necessary?
Many people ask themselves the question: “What will the soundproofing of the cabin give?”. In fact, after such a procedure, the motorist will notice a number of advantages:
- The level of vibration in the cabin will be reduced.
- Noise will be reduced.
- The car will receive thermal insulation (most materials are capable of this).
Of course, all this can be felt only if the materials are selected correctly and the installation technology is followed. Therefore, if you are not sure that the installation of sound insulation on a car with your own hands will go smoothly, it is better to contact the service, or study the procedure with special care.
The best materials for high-quality sound insulation and their prices
If you go to a specialized store, you will notice that there is a wide variety of noise and heat and sound insulation for a car. Making a choice can be quite difficult.
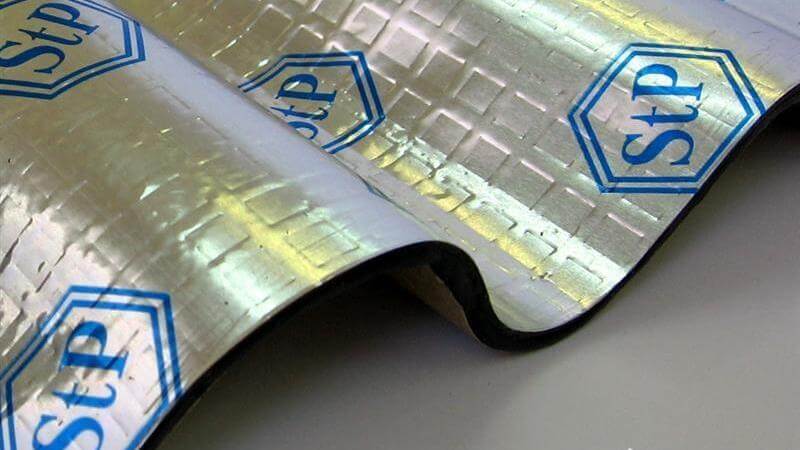
Stp Vibroplast Silver
Flexible cover that perfectly absorbs vibration. The material has an aluminum base and a layer of self-adhesive film. The coating has markings (squares 5 × 5 cm), along which you can easily cut out the desired shapes. During installation, no heating is required. The cost is about 200 rubles per sheet. The thickness is 2mm. It is possible to soundproof a car with this material in the area of \u200b\u200bthe doors, trunk, hood and roof.
WATCH VIDEO
You can also purchase vibroplast Gold. It has the same properties but is thicker (2.3mm) so it absorbs vibration better.
Accent 10
It is made of polyurethane and metallized film. Also has a self-adhesive surface. Coating thickness - 10mm. Suitable for installation in the trunk and under the hood, as well as on the bulkhead of the engine compartment. In addition to sound absorption, it also has heat-insulating properties. The average cost is 250 rubles per sheet.
WATCH VIDEO
splenitis
Great option for car soundproofing. The material has a special layer for gluing to the surface. The thickness can be very different: from 2 to 8 mm. The coating does not absorb moisture and retains its properties over a wide temperature range.
WATCH VIDEO
Splen must be glued to vibration-absorbing material. The air temperature should be about 25 degrees. The cost of such sound insulation may vary depending on the thickness.
Noise isolation with felt
Now many companies offer ordinary felt as sound insulation. It can be imported or domestic, have different brands, but the essence remains the same. But is it worth choosing this rather expensive material?
Manufacturers claim that felt works much better than the same Splen. And indeed it is. However, it must be remembered that this material absorbs water well. And in this state, it stops working.
WATCH VIDEO
Therefore, if the choice fell on felt, then you will need to take care of its sealing. In addition, it will not work to stick soundproofing using a standard film (it simply does not exist). Therefore, the procedure becomes much more complicated.
Liquid noise insulation: protection of arches and bottom from the outside
Another popular way in which they offer to do soundproofing a car. It is used in parallel with conventional materials.
The composition for liquid soundproofing is applied to the bottom of the car and wheel arches. To do this, you can use a brush or a spray gun.
WATCH VIDEO
Do-it-yourself soundproofing can significantly reduce the noise level in the cabin. However, it is desirable to use it in conjunction with other methods of isolation.
DIY soundproofing tools
In addition to the material itself, proper car soundproofing will require additional equipment. For work you need:
- Building hair dryer (homemade will not work, as the temperature of its operation is insufficient).
- Solvent (used for degreasing surfaces).
- Scissors.
- Roller roller (optional, but can greatly simplify the process).
How to soundproof a car
If all the materials required for soundproofing a car with your own hands have already been purchased, you can proceed to the main work. The procedure will vary somewhat, depending on which part of the body is insulated.
Work on the hood
You should not expect that a do-it-yourself skimmer of a car glued to the hood will completely eliminate the sound. Of course, the material will absorb some of the waves, but the noise will still be there. The main task of gluing material in this area is thermal insulation for the winter.
It is necessary to correctly select the material for the work. It must have sufficient thickness and be resistant to high temperatures in order to avoid fire (accent and vibroplast will do). But you should not get carried away: too heavy a hood can disrupt the operation of shock absorbers.
WATCH VIDEO
Factory soundproofing is not touched: new material is mounted on top of it. The procedure for gluing sound insulation in a car will be as follows:
- First, the sound insulation of the car is calculated. After that, cut the material to size. If the body shape is very complex, it is advisable to pre-prepare paper patterns.
- Next, the surfaces of the car are cleaned: parts that interfere with work are removed, rust and dirt are cleaned off. After that, it is necessary to carry out degreasing.
- Finally, you can start applying the material. The procedure will depend on the selected coverage. There is no universal instruction in this case, so you need to follow the recommendations of the Shumka manufacturer.
Door soundproofing
Perhaps this is one of the most important steps to protect the cabin from extraneous sounds. If you properly soundproof the car in the area of the doors, the sound from the operation of the systems will be almost inaudible, and the sound quality of the music will improve.
The choice of material will depend on the purpose of the work. In most cases, you can get by with a layer of vibroplast. However, if the goal is to improve the performance of the audio system, then it is better to use at least 4 layers of materials (although you should not get carried away either, as this can lead to sagging doors).
To make the car noise properly, the layer order would be:
- First comes the vibroplast (similar vibration-absorbing materials can be used). It is mounted inside doors. It is necessary to properly glue the vibration isolation in the car and follow the manufacturer's recommendations.
- Next, splenitis is installed. For high-quality insulation, a layer of 4-8mm will suffice.
- Of course, two layers will be enough for most car owners. But, if the car has a high-quality audio system, it is advisable to add more. Now vibroplast and splen are already glued outside the doors (under the door cards). It is also desirable to seal all technological openings.
- The next step will be the installation of anti-creak material. For these purposes, Madeleine and Bitoplast are suitable.
- Thus, the front doors are isolated. For the rear, the procedure will be similar. But, if they do not have speakers, you can make smaller layers of materials.
Soundproofing the ceiling
The next step is to "noise" the ceiling. This stage is very important because it can reduce the noise level in the cabin during rain.
For the ceiling, a layer of vibroplast and 1-2 layers of splenite will suffice. Do-it-yourself vibration and sound insulation of the car is selected so as not to move the center of gravity up too much. In addition, it must be borne in mind that the factory trim must also be attached.
Floor insulation
Neither professional nor budget soundproofing a car with your own hands can do without high-quality "noise" of the floor. Here you can almost not limit yourself in the materials used.
Heavy soundproofing "Bimast Bomb" is suitable for the floor. And already a layer of splenitis is glued on top of it. Particular attention is paid to wheel arches.
Fenders and wheel arches
Such soundproofing will get rid of noise when driving on snow or ground. To carry out the work, you will need to remove the fender liner. Then they are cleaned. A vibroplast (preferably Gold) is glued to their inner side. After that, you can return them to their place.
For additional insulation, you can treat the fender liner with liquid "shumka". This will greatly improve the effect.
Important! Regardless of the application area, it is necessary to ensure that the insulation lies evenly and without gaps.
Soundproofing car doors with your own hands is the choice of most car owners.
The fact is that such work is quite simple and does not require complex technical skills. The procedure is carried out to reduce external noise and vibrations of the body of the car itself, inevitable during operation. The latter is especially true if you plan to install a powerful audio system in the car.
What material to choose
Modern industry produces a variety of materials for noise and vibration isolation. Some car owners prefer to use cheaper industrial materials, but they usually do not withstand prolonged intense vibration. Therefore, specialized absorbent materials intended for use in motor vehicles are a priority choice. All of them are divided into two large groups:
- noise absorbers;
- vibration dampers.
The structure of noise absorbers (vibroton, splenitis) is cellular. In this case, the cells are not arranged in even rows, but randomly. Sound waves, falling into them, scatter and subside. Additional insulation is an aluminum coating of materials. 
Vibration dampeners (vibroplast, vizomat) are represented by heavy compounds based on bitumen and foamed polymers. Noise and vibration isolation of car doors is ensured by a tight fit of the layer of polymer material to the metal and damping of natural vibrations.
Proper sound insulation of car doors involves the use of both types of insulation. In this case, the thickness of the layers and the places of their application depend on the required level of sound absorption. So, if the work is carried out in order to somewhat reduce the level of noise penetrating from the street, an average or minimal protective coating is sufficient. To install audio systems, protection from extraneous sounds must be maximum.
Preparation for work
Before starting work, you should prepare the car: remove the door trim, protective films, remnants of the old sound insulation or anti-corrosion coating. In general, there is no need to remove the mechanisms of power windows and door locks. However, to ensure comfortable working conditions, it is recommended to do so.
The internal surfaces of the doors are cleaned of dirt and dust. Areas where rust is present are cleaned to bare metal. Taking into account the fact that such places are hidden from view, they can be treated with a rust converter and anti-corrosion mastic. It is impossible to mount sound insulation on rusty areas.
Before starting the installation of sound insulation, all surfaces on which materials will be glued should be degreased with special compounds, gasoline or alcohol. Pasting begins only after complete drying of the surfaces.
Soundproofing installation
In the maximum version, the first layer of vibration isolation is glued to the inner surface of the outer layer of the door. The material is recommended to be glued in long strips, with a slight overlap on each other. The entire accessible surface is glued.
The second layer is glued noise absorber. It should be mounted in the widest possible layers. The result is a two-layer coating that dampens vibration and captures sound waves.
For better insulation, the inner layer of the door is treated in the same way. At the same time, technological holes in the doors are sealed with special aluminum foil, on top of which layers of material are applied. When processing, it is necessary to take into account the trajectory of the movement of the cables and lock drives. 
The door trim itself is also processed. All its joints must be filled with sealant. After that, the inner surface of the skin is glued with a sound-absorbing coating. This avoids squeaks from the skin itself, which sometimes occur on budget cars.
Pros and cons of soundproofing
Like any other refinement that distinguishes the car from the factory design, door noise has its positive and negative sides. The advantages of soundproofing include:
- a significant increase in the comfort of the car;
- when selling your car, you can evaluate it higher than similar offers;
- powerful speakers can be installed in the door;
- doors become heavier, as a result of which they close softer and more solidly, without making extraneous sounds.
The list of negative aspects of vibration isolation is shorter:
- doors weighted due to insulation sag more often, requiring repair or replacement of hinges;
- some drivers, when operating such a car, may make mistakes related to the poor audibility of external sounds (the driver did not hear the signal of a neighboring car and got into an accident).
Perhaps this is where the disadvantages of sound insulation are exhausted. The question of how to soundproof car doors is simple. Therefore, if there is a desire, financial capabilities and a certain amount of adventurism, any driver who knows how to use the simplest tool can perform this manipulation on his own vehicle.
Before you start soundproofing a car, decide what goal you want to achieve: improving the sound of music in the car, reducing the audibility of squeaks, or simply increasing comfort. Many motorists are interested in how to properly make soundproofing in a car with their own hands, if they have not done anything like this before. Soundproofing a car (especially if you have a limited budget) should be done in stages. First - the doors, then - the hood, trunk, etc.
Before starting work, it is better to first make sure that you have stocked up with everything you need. In the arsenal should be:
- Dryer for construction work (it is strongly not recommended to use a home hair dryer).
- Roller for leveling and rolling insulating material on the surface of the car.
- Scissors for cutting insulating material.
- Thinner (a degreaser such as White Spirit can be used).
 Car soundproofing scheme
 Hood noise isolation
It is a common misconception that soundproofing in the hood can eliminate engine noise in a car. This is wrong. Sound insulation of the hood, first of all, is designed to provide thermal insulation of the engine in the cold season. Be sure to consider the weight of the material. If the hood is too heavily loaded, the shock absorbers will fail in no time and you will have to change them.
Vibroplast Silver should be used for vibration isolation. It is very lightweight and durable. For thermal insulation, it is better to use an accent material. It will keep the heat under the hood even at -40 degrees and at the same time will not cause ignition. Consider the fact that the fixed hood soundproofing should not be dismantled - additional layers are put on as an assistant, not a replacement.
 Soundproofing car hood
 If there is no stationary thermal insulation on the car, the mounting layer can be increased up to 15 mm. Such a coating will reduce the noise level, while not allowing the engine to freeze.
Door soundproofing
Noise isolation of the doors in the car should be done at least for the sake of reducing the level of noise penetrating from the street and increasing the quality of the audibility of music inside the cabin. Noise isolation in the doors is noticeable like no other - you immediately feel that the music began to sound much cleaner than before. Vibroplasts "Silver" and "Gold" are suitable to ensure the lowest level of sound insulation of doors. They are applied to the inside of the valves next to the column. The thicker the layer of insulating coating, the better the noise isolation. The thinner the metal, the thicker the layer must be to ensure a normal noise level. can be carried out regardless of the type and brand of the vehicle.
When insulating the doors of the car, we must not forget about the weight of consumables. If it is too large, the doors may be deformed, after which the owner of the car will be forced to look for new hinges to replace the old ones.
If you have an audio system installed in your car, and you are striving to improve its sound, noise isolation measures should take place in four stages.
 Soundproofing car doors
 At the first stage, sound insulation in this area is made from the inside. The second layer is laid immediately on top. At each stage, the thickness of the layer should not exceed eight millimeters. The third and fourth stages involve external soundproofing. At the third stage, the surfaces under the road maps are processed. At the same time, technological holes are sealed - the door becomes completely airtight. The 4th stage involves isolating the door cards themselves - this will get rid of annoying squeaks. At the same time, the rods and handles are pasted over with a special material "Madeleine Antiscript".
The rear doors of the vehicle are insulated in the same way as the front doors. They don't have speakers. Therefore, it is possible to reduce the number of insulating layers and reduce the quality of the material used.
Roof noise insulation
The basic purpose of soundproofing the top of a car is to eliminate the drumming that is heard in the cabin whenever it rains. You will feel the effect of noise isolation on the first bad day. Instead of the usual rumble, only a muffled noise will be heard, which will not cause any irritation.
The answer to the question of how to soundproof a roof is very simple. Vibroplast "Gold" acts as the main coating for soundproofing the ceiling of the car. It must be applied in several layers, without overloading the coating. The noise-absorbing agent in the processing of the ceiling is splenitis with a thickness of four or eight millimeters. It is usually applied in one or two layers.
 car roof soundproofing
 The only limitation on the thickness of the cover during roof soundproofing is the ability to put back on the car skin and stationary insulation covers.
Soundproofing wheel arches and trunk
When it's your turn, you should start with the rear wheel well. It is better to process it with a soundproof coating over the entire area. In this case, the fender liner and the plastic cover of the trunk should also be treated using the Bioplast anti-creak agent. can significantly reduce the noise emitted by the machine while driving. However, the most important thing is the wheel arches. If you carefully insulate them, during the ride in the cabin you will not hear the impact of small pebbles on the metal. And in winter, the grinding of winter tires will not cause discomfort to passengers.
 Soundproofing wheel arches
 How to soundproof this area? Very simple! Soundproofing of wheel arches is carried out in the following sequence:
- Remove the fender liner and put it aside (they, being good sound insulators in themselves, will still come in handy).
- Clean niches from dirt and dust.
- Apply a thick layer of soundproofing material to the inner surface of the niche. Use vibroplast "Gold".
- Treat niches with an anti-gravel agent - it will allow you to kill two birds with one stone: protect the interior from noise and protect the surface from rust.
If plastic fenders are installed on your car, they can also be covered with soundproofing material. To do this, Vibroplast "Silver" is applied to the outside, as well as biplast (to ensure the proper level of sound absorption). After that, the part is placed in its place. If you do everything right, the impact of stones, dirt and debris on the wheel arches will no longer annoy you.
The main purpose of soundproofing is to get rid of the noise that occurs when the car moves in the cabin. Any car, even a new one, passes a certain amount of noise from the engine, rolling wheels, noise from the wind and the sound stream created by passing and oncoming traffic.
Factory insulation in most cars does not cope well with this task. An exception can be recognized only as models of the premium sector. The more budgetary the car, the weaker its protection from extraneous noise. This is due to the fact that the installation of high-quality sound insulation is quite expensive, and in the economy class it can be up to 10%. Fighting for the buyer, the manufacturer reduces production costs and, first of all, for sound insulation.
The older the car, the more noise penetrates into its interior from the side, and extra squeaks and rattles appear inside, which irritate the driver and passengers. Excessive noise in the cabin causes the driver to quickly get tired and reduce road safety.
The only way to solve the problem with increased noise - install additional soundproofing in the car.
car soundproofing service
The fastest and easiest way to get rid of extraneous noise in the cabin is to make the soundproofing of the car in a car service from experienced specialists.
But this method has one significant drawback - the cost of the work performed. The second problem is the choice of the car service itself, many promise to do it efficiently and on time, but not many people put it into practice.
The best way to choose a workshop is the reviews of familiar car owners who have performed car soundproofing on this service. Reviews on the Internet do not matter, because in order to attract potential customers, managers write praise on their own websites.
Before starting work, you should visit the service and ask the master how and with what materials the work will be performed. Well, if soundproofing work is carried out in the workshop, it will be possible to assess the level of skill of specialists and their attitude to the work being done. With the availability of funds and quality service, this is the best option for soundproofing a car.
How to properly glue soundproofing in a car, video:
Do-it-yourself car soundproofing
For people who like to do everything on their own or do not have enough money to do quality work in the service, you can do the soundproofing of the car with your own hands. This method is convenient in that the work can be done slowly and in parts. To perform the work does not require special skills and sophisticated equipment.
This will require:
- soundproofing material;
- Solvent or white spirit;
- Scissors and a clerical knife for cutting;
- Industrial dryer;
- Gas cartridge with a burner;
- Stitching roller;
- A set of locksmith tools.
High-quality sound insulation of a car largely depends on the material chosen. The industry offers a large selection of these materials, and it is quite easy to get lost in them. We will tell you how and what material is better for car soundproofing.
The main property of any soundproofing material for soundproofing is lack of hygroscopicity. Therefore, when choosing a material, we pay special attention to this, since the accumulated moisture leads to corrosion of the metal.

Soundproofing materials for cars
Car soundproofing materials can be divided into the following types:
- Bituminous shale;
- polyurethane;
- Felt;
- Liquid car soundproofing.
Vibroplast
The main material for noise protection of doors, floor, interior, trunk lid and hood. It is a polymeric, bitumen-shale composition with an adhesive layer to facilitate application to protected surfaces.
Aluminum foil is applied to the top layer by the method of pressed duplication. To facilitate cutting, the surface of the foil has a pattern in the form of squares measuring 5 × 5 centimeters. The adhesive layer is protected by a special film.
The material does not accumulate or absorb moisture, is not subject to decomposition from external factors, when properly applied, it protects the metal from corrosion, and has the properties of a sealant.
The material is easily applied to the surface, repeating its contours. There are several types of bitoplast, the differences are the fillers used and the thickness of the layer. The main disadvantage of this material is its weight.
With a thickness of 2 millimeters, the weight of one square meter will be 3 kilograms, and a material with a layer of 4.5 mm already weighs 6 kilos.
The thicker the layer, the better the vibration and noise insulation characteristics of the vibroplast. But it takes 8 to 10 square meters to process a car, so the weight of the car will increase depending on the thickness of the material applied.
Splen
This material, due to its excellent soundproofing characteristics, has become widespread. The material additionally has good thermal insulation performance, does not absorb moisture, is lightweight and easy to install thanks to a special adhesive layer.
In operation, withstands temperatures ranging from -45 to 64ºC, wear-resistant. It is used to protect the most noisy areas in the car: wheel arches, tunnels, doors, side pillars and other elements at your discretion.

Depending on the purpose, the splen is 2, 4 and 8 millimeters thick. The last digit in the marking indicates its thickness, for example, Splen 3004 has a thickness of 4 mm.
Thanks to a special adhesive layer, sound insulation of the car interior is quite simple, it follows all the contours of the surface, and excesses and folds are easily cut with scissors in place. The material is lightweight and does not reduce the vehicle's payload.

Felt
A widely used material for soundproofing. It has high sound absorption rates, has a low cost. In addition to sound absorption, synthetic and natural felts have high thermal insulation performance and can be used in any temperature range.
The limitation in the use of felts was its ability to accumulate moisture. Felt has a porous system that absorbs moisture and condensate well.
It is almost impossible to dry the felt during operation, so it should be used only in those places where there is no possibility of access to moisture.
The use of felt insulation under the mats leads to rapid corrosion damage to the underbody of the car. Having accumulated moisture, the material not only significantly loses its sound-absorbing characteristics, but also becomes an ideal environment for the development of mold and mildew. Raw felt leads to constant fogging of the windows, the appearance of an unpleasant smell in the car.
The second main disadvantage of this soundproofing agent is the complexity of installation, the adhesive coating applied to the felt does not adhere very well and often comes off the surface. Given the above, it is better to limit the use of felt for car soundproofing.

Liquid soundproofing.
Proper sound insulation of the car must be carried out comprehensively both inside the car and outside. Outside, noise-absorbing mastics should be treated with the bottom and wheel arches, which are the main suppliers of noise to the cabin.
Treating the exterior elements of the car with mastics not only reduces the noise level, but also protects the metal elements from corrosion.
Modern manufacturers offer a large selection of liquid sound insulation: bitumen-shale and rubber-bitumen mastics, two-component and foaming compositions.
Liquid noise insulation should be applied to clean, grease-free surfaces. In some cases, the application of a soundproofing coating will require the application of a primer for better adhesion.
Liquid formulations fill all joints well and provide additional protection against noise penetration. Liquid formulations are applied to surfaces with a spray gun or brush. When working with compositions, it should be borne in mind that most of them have a long drying time, reaching up to several days.

Preparatory work
Soundproofing work should be carried out in the warm season or in a heated and well-ventilated area.
Processing of the car can be carried out both as a whole and in small elements. For example, at the initial stage, you can process the bottom and wheel arches of the car with liquid sound insulation, then the trunk and doors.
The most time-consuming work is to protect the internal elements of the car interior: floor, roof and pillars.
Before you make soundproofing with your own hands, the car should be washed, so the paintwork is protected from damage, and it’s more pleasant to work with a clean car. When processing the bottom, the car should be installed on a lift, inspection hole or overpass.
It is best to start work with a lack of experience with simple and even surfaces. For testing your strength, the luggage compartment and trunk lid are well suited. We prepare noise-insulating materials for cars, equipment and tools and set ourselves up for a long and painstaking process to reduce the noise level in the car.

Execution of work
Finishing the bottom and wheel arches
These works will slightly reduce the noise level in the car, but it is better to carry out them in the first place for additional protection of the car from corrosion. Before starting work, the treated surfaces are thoroughly washed using car shampoos.
Particular attention should be paid to hidden cavities, moisture flowing out of them will not allow high-quality soundproofing materials to be applied.
Surfaces are inspected, all corrosion deposits and rust are removed using abrasive materials or a rust converter. The surface is degreased and mastic is applied using a spray gun or an ordinary brush.

The outer surfaces of the car should be treated with soundproofing compounds in 2-3 layers, with intervals between applying layers of 2-4 hours.
Soundproofing the wheel arches of a car with your own hands, as well as the bottom of the car, is a simple process, especially if you use a lift. In this case, all four wheels are turned away, otherwise you will have to turn off each wheel separately with the car hanging with a jack.
After carrying out the work, you can evaluate the quality, the cabin should become a little quieter, especially in the area of \u200b\u200bthe wheel arches.
Do-it-yourself soundproofing of wheel arches of a car, video:
Trunk and trunk lid.
Before starting work, we take everything out of the trunk and remove the inner lining. We remove all debris and dust, for these works you can use a household vacuum cleaner. We inspect the surfaces, if rust is detected, we clean or process with a rust converter, primer.
Degrease surfaces with white spirit and apply the vibroplast cut out according to the patterns. Vibro-noise-insulating materials should be applied as accurately as possible to each other, leaving no gaps. For a better fit, we heat the material with a building hair dryer and roll it with a special roller.
The main sources of noise penetrating the interior of the car are the wheel arches and the spare wheel well, they should be protected as carefully as possible.
After the vibroplast is completely laid, splenitis is applied with an adhesive layer. Before gluing this insulating material, the protective film covering the adhesive layer should be removed from it. Excess splenitis is trimmed with a clerical knife.
we look at the quality of work, and if everything went satisfactorily, we proceed to the processing of the following elements of the car.

Do-it-yourself car door soundproofing
There are many opinions on how to properly soundproof car doors, but everyone admits that it is through these elements that a significant part of the noise enters the cabin and it is very difficult to work there.
To perform work, remove the door trim, dismantle the built-in speakers ( in the presence of), if possible, dismantle electrical equipment and wiring as much as possible. We remove debris, dust and degrease.
It is not possible to completely process the inner surfaces of the door with vibroplast due to the inconvenience of the design. Therefore, we coat the untreated fate with any mastic. We glue splenitis on top of the vibroplast.
It should be noted that after carrying out the work, therefore, it is not worth using very heavy materials.
We glue the outer surface of the door with a thin splenite or bitoplast. We also glue the inner side of the door trim with a thin splenite or bitoplast. After processing all the doors, the sound insulation of the car will improve significantly.
Video on how to glue doors:
Roof and floor
Do-it-yourself gluing a car with soundproofing inside the cabin is not as difficult as dismantling the trim elements. Therefore, work on the processing of the roof and floor should be carried out simultaneously.
It is better not to touch the front panel yourself or entrust it to specialists. It is better to start work from the roof, gradually going down. To process the roof, you can use thin vibroplast, on which you can stick felt.
For processing car racks, splenitis or vibroplast is used. To protect the floor, a vibroplast is used, on top of which a splen is applied. If the factory soundproofing of the floor is made of felt, then it is better to replace it with synthetic materials.
When processing the interior, you should pay attention to the following nuances:
- When processing the roof, you should not use a very thick vibroplast, the center of gravity will shift and the car will lose controllability.
- The use of insulation materials that are too thick can create problems with flooring installation.
With the right work carried out, the sound insulation in the car will improve significantly, and traveling on it will be a real pleasure.
After carrying out work on soundproofing, the sound of the speakers will significantly improve, and road noise will not interfere with normal conversations in the cabin.
Whether it is worth soundproofing a car, how and what materials to use for soundproofing depends only on the owner of the car, his financial capabilities and skills.
Modern automakers, trying to reduce the cost of standard and economy equipment, produce only minimal vibration and noise reduction, which is completely insufficient. Noise in the passenger compartment significantly reduces the comfort of the trip, quickly tires both the driver and passengers. To correct the situation, do-it-yourself soundproofing of a car can be done, what materials are required for this this article will tell.
Advantages and disadvantages of soundproofing
In addition to a significant reduction in the level of noise pollution in the car interior, soundproofing a car provides the following additional benefits:
- Improves the sound quality of the speaker system;
- The thermal insulation properties of the car increase: it cools down more slowly in the cold and heats up more slowly in the summer;
- Additional anti-corrosion treatment is carried out.
Glued soundproofing coating of the luggage compartment of the car
It should be noted and the negative aspects of sound insulation:
- The mass of the car can increase up to 50 kg;
- In case of improper installation or careless installation, additional “cricket” creaks may appear;
- Over time, sagging of the door may be observed;
- Fuel consumption increases.
Where is the noise coming from in the car?

Areas of penetration of extraneous noise into the interior of the car
doors
Since in production the doors are practically not processed with materials for soundproofing cars, a significant amount of the total share of sounds penetrates through them. Therefore, soundproofing doors is the minimum required level of additional finishing work. At the same time, it is desirable to install vibration-absorbing dampers around the speakers, which will significantly improve the quality of their sound. For isolation it is recommended to use: Bitoplast, Germeton, Isotone, Accent.
wheel arches
Contrary to popular belief, arches, as such, do not emit sounds, but are a source of vibrations, which are transmitted to other body elements that are sources of noise. What material to choose for soundproofing car arches, given their load? You can use vibration damping materials Vibroplast and Vizomat.
Floor
Proximity to vibrating nodes and a large area make this structural detail a source of a significant proportion of noise. It can be reliably isolated only with the help of multilayer materials that dampen both noise and vibration. When soundproofing a car with your own hands, what materials are required to process vibration sources are Shumoff or Bimast and Vibroplast as the first layer (base). It is recommended to use bitumen-based materials that provide additional anti-corrosion protection: Shumoff and materials based on it Mix and Mix F.
Ceiling
It is a source of sounds mainly at high speed, the oncoming air flow creates a rumble even during rain. For isolation, vibration dampers and noise absorbers are used: Bitmast, Vibroton, etc.
Hood

Hood soundproofing with Bitmast Bomb
It is the source of a significant part of the noise in the car. When insulating it, it is recommended to use self-adhesive materials for complex purposes (they isolate both from noise and vibration). The main condition is high thermal insulation performance, the presence of a heat-reflecting foil layer.
Trunk
It is also an important element, the processing of which will significantly improve the sound of the speakers and reduce noise pollution in the cabin, especially in the passenger seats. What materials are required for soundproofing a car with your own hands, those that have good strength and resistance of the upper layer to mechanical damage are suitable for the trunk: Shumoff M4 and Mix6, vizomit MP, bitmast suoer.
Overview and characteristics of popular materials for car soundproofing
Soundproofing materials for cars can be divided into several categories:
- Noise isolation;
- Vibration isolation with noise damping effect;
- Noise-insulating with heat-insulating effect;
- Noise-insulating with anticorrosive effect;
- Combined - combining several useful functions.
Soundproofing materials
Shumoff Garmeton - is a material resembling foam rubber, but its soundproofing properties are 10 times stronger. Does not burn and does not absorb moisture well. A distinctive feature is the slow recovery of the original volume, within 45 minutes, which gives additional time during installation and contributes to the fact that the material completely fills the allotted space.
Garmeton A15 - in addition to the listed properties, this material has a relief surface, which allows you to further disperse sounds.

Door pasted over with Garmeton A15
Shumoff Mix and MIX F are bitumen-based materials. They are an analogue of factory materials used for soundproofing the floor, hood and trunk in premium cars. To fix on the surface, the material must be heated to a temperature of 150°C. For this, a regular building hair dryer is quite suitable. MIX F has a self-adhesive base covered with waxed paper, which greatly simplifies the installation process.
Preliminary surface preparation is limited only to rough cleaning from dirt and dust. It withstands negative temperatures well, has a reinforcing layer that allows the material to stick to the surface even if part of the roll has peeled off. It is allowed to re-glue lagging parts by heating.

Car interior pasting with Shumoff Mix F material
Shumoff M2, M3 - have an outer protective layer profiled from thick aluminum foil, which provides additional mechanical protection of the treated surface. Adhesive layer on a rubber base resistant to aggressive environments. A highly filled polymer composition is used as a sound-damping material. The relief surface of the metal layer is preserved after installation in at least 50% of the cells, which gives the entire structure additional spatial rigidity.

Processing the door with soundproofing material Shumoff M2
Soundproofing materials
Vibroplast M1, M2 - consists of a sound-absorbing polymer material and aluminum foil. M2 has an additional adhesive layer. Easy to install, holds its shape well, applied without heating on a degreased surface. Installation is recommended to be carried out at a temperature of about 15°C. Inert to aggressive chemical and biological substances, provides additional corrosion resistance to the treated areas of the body.
Recommended areas of application: car body, doors, car roof. It dampens noise and vibrations by converting mechanical energy into thermal energy. The oscillatory energy of vibrations is converted into heat from the friction of the foil and the viscoelastic base layer.
Bitoplast 5, 10 - has the popular name "anti-creak" and is used to dampen vibrations in the dashboard, dashboard, steering column, etc. Outwardly, it resembles a very dense foam rubber, does not absorb moisture, burns only under the influence of an open flame, while emitting rather caustic smoke with black soot.
Shumoff M4 - used to dampen vibrations and reduce noise. Applications: wheel arches, partition of the engine compartment.
Combined materials
Shumoff P4 - in addition to sound insulation, it has good thermal insulation capabilities. It consists of two layers, between which there is an air gap. It has high elasticity and adhesive base resistant to water.
Comfort 3 - used as noise, sound, waterproofing. The material resembles foamed rubber, does not creak and does not collapse at low temperatures. With prolonged compression and friction, it does not lose its original shape.
Video review of some materials for soundproofing:


