Chose between "Mitsubishi Lancer" and "Chrysler Stratus". The second was more liked, but was excluded for some reason. I thought: the car is good, comfortable, but American cars have problems with spare parts and maintenance. It is better to take a reliable and proven option, namely the 9th generation Mitsubishi Lancer.
All the necessary documents for the purchase were completed in one day. And here he is my handsome man - a 2004 car with a 1.6-liter engine, automatic transmission and air conditioning.
The first serious test for the newly purchased car was coming - passing a technical inspection. On the day of the inspection, I purchased the missing set of mandatory equipment - a car fire extinguisher, a first aid kit and an emergency installation sign. During the inspection, no flaws were identified, which means that the car was in perfect technical condition, although it was 5 years old. The only thing the master advised during the inspection was to change the rear silent block (what is a silent block).
After a month from the beginning of the purchase - there were no troubles, the car pleased. The only annoying moment when I came to the garage in the morning and the car refused to start. It didn't take long to find the cause, it was a dead battery. It turns out that I forgot to turn off the interior light bulb, which drained the battery. Well, the knowledge of how to light a cigarette from the battery came in handy and it was not difficult to return the car to working condition. This trouble was helped by motorists in the garage complex, who provided "crocodiles" to charge the battery.
The case of a dead battery was a good lesson. Now, when leaving the car, I carefully inspect the electrical equipment for their "off".
A few months later, the Mitsubishi Lancer had a serious test - a trip to another city to visit relatives 1000 kilometers away. Let's see what the car is capable of. On the track, you can safely go "for a hundred" without any straining. The only thing that does not suit is the low engine power when overtaking trucks. This is due to the choice of automatic transmission. With mechanics, according to experienced ones, the car has decent dynamics. So, if you often drive outside the city, then it is better to choose cars with a manual transmission, and if you rarely leave the city, then the best choice is with a gun.
Something we are a little distracted from the essence. When I arrived in a foreign city, I got a little lost. In those minutes, I thought, oh, it would be nice if I bought a car GPS navigator (how to choose a car navigator). It will be necessary to buy with the first salary, because this is a useful thing for a car enthusiast, as I myself was convinced from my own experience.
Approximately 10,000 kilometers have passed since the purchase of the car. The most serious malfunction that happened was refueling with low-quality fuel. After the next refueling, the light on the instrument panel came on.. As I later found out, it caught fire due to low-quality gasoline getting into the tank of the car. I managed to extinguish the light bulb with my own hands. To do this, fill in 10 liters of high-quality gasoline and reset the terminal from the battery. In the program, the information will be overwritten and the light will go out.
In addition to this light bulb, nothing bad happened to Mitsubishi Lancer. No wonder the ninth generation Lancers are popular among motorists. This is a reliable car for the money.
Probably someone already wrote about this, but do not blame me if I repeat myself. I covered various forums and found this interesting information: it turns out that in our car there are a lot of additional options that are blocked by software that our narrow-eyed brothers in mind fill in in cars delivered to Russia. I think many will be interested in what these options are. Here is the list:
Activation of the standard alarm
In case of unauthorized opening of the doors (not by the button on the key), the system begins to monotonously beep with a horn.
Coming Home Light "The path to the house"
If necessary, after turning off the ignition, if you “blink” the main beam within 60 seconds, the dipped beam will turn on and the specified amount of time will be on (15,30,60 or 180 seconds), while you can close the car and go home, the headlights will automatically turn off. After turning off the headlights, a new timer of 60 seconds will start, during which you can repeat the procedure if it is still needed.
Welcome Light "Welcome light"
When you open the car with the button of the regular key, either the dimensions or the near one (set) light up. It works only at night - it detects by the light sensor.
Comfort Washer
When the wiper lever is pressed for a short time, a full-fledged automated washing of the windshield will be performed with several successive jets of liquid and timely sweeps of the wipers, this automation can always be interrupted, and it can also be prevented from triggering by certain actions
Auto-closing of door locks upon reaching a speed of 20-30 km / h
If the driver's door is unlocked, then when the car speeds above 20km/h, ALL doors will automatically lock, and if the driver's door is manually unlocked at a speed of more than 20km/h, it will instantly lock again. On some trim levels, the inclusion of this option also allows you to activate the auto-closing of the door locks by setting the lever to position D
Unlocking the locks by pulling out the key, more precisely by moving it to the Lock position or moving the automatic transmission lever to the P (Parking) position
It is possible to make a dependence on the power window lock button - if it is recessed, then the function does not work and vice versa. In the version of cars with manual transmission, only one option is available - to turn off the ignition, since they do not have P mode by definition.
Enabling step-by-step opening of doors, including on cars made in 2007.
When you press the "Open" button of the standard key once, only the driver's door is unlocked, and when you press it twice, all doors are unlocked (the second press should occur no longer than 2 seconds after the first). On a car of early years, this function requires hardware intervention - rewiring, with this I can also help when activating the function.
Sunroof closing activation with button key
It just so happened that on cars equipped with an automatically sliding sunroof, the Japanese mistakenly (whether?) assigned it a different type in the coding variant, due to which it is impossible to close the sunroof at the same time as raising the windows with the standard key button. I can easily correct this oversight on their part.
Turning on all types of Daytime Running Lights (Normal, Dimming, Independent) All three types provide for the inclusion of lighting devices located in front of the car when the engine is started:
a) The usual type is the banal inclusion of the dipped beam of the main headlights in all modes of the light control handle, except for the dimensions (OFF, AUTO, ON) when the engine is started. At the same time, the side lights are always on, that is, including the rear of the car.
b) Dimming - this type of DRL provides for the operation of the dipped beam of halogen headlights in the glow floor, that is, the brightness of the lamps is reduced. This works thanks to the use of a special relay operating on the principle of PWM (Pulse Width Modulation). The advantages of this type of DRL are the increased life of the bulbs, as well as the absence of the side lights turning on when the engine is started.
c) The independent type is usually used for stand-alone DRL lights, for example, diode strips installed next to the PTF, etc. Its essence lies in the fact that the installed lights work only when the headlights are off, and as soon as the headlights turn on, they instantly turn off and vice versa. For this type of DRL, the car has a specially designated place for the relay in the engine compartment fuse box. Also, the third type allows you to use PTF as a DRL without violating the usual algorithm of their work, that is, PTF burns during the day, and the headlights turn on in the evening, and then you can turn on the PTF in the usual way if you wish.
All three types of DRLs provide the ability to start the engine when parked without turning on the corresponding light; for this, you only need to raise the handbrake before starting. When the engine is running, the reaction to the handbrake is disabled. Also, if you try to move on the raised handbrake, the light will turn on anyway
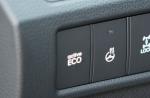
Removal of auto-switching of the fuel consumption calculation mode from manual to automatic after more than 4 hours of inactivity with the ignition off.
The car has two flow meters - one manual, the second automatic. Switching between them is carried out by the INFO button through the SETTINGS menu of the dashboard.
The problem is that when you set the manual mode after 4 hours of inactivity, the automatic mode will still turn on. The essence of the refinement is to disable this automatic transition.
Changing the operation of the headlight washer, including disabling the dependence on the wipers.
There are many modes of operation of the headlight washer, there are those that the washers work only while the button is pressed, and there are those in which the washers are turned on not only with a special button, but even when the wipers are turned on. This is precisely what causes general dissatisfaction, especially in winter, when the washer is "worth its weight in gold." The refinement consists in removing the automatic dependence of the washer on when the wipers operate.
When installing third-party headlight washer systems, many also want to turn them on with a regular button on the end of the light handle, for this purpose it is also necessary to set the correct type of washer in coding
Activating cruise control
On modern cars, for the cruise control system to work, it is no longer enough just to install the buttons on the steering wheel - it is also required to activate this function in the engine ECU
Activation of the washer fluid level indicator in the tank
This function allows you to install a sensor in the washer reservoir, which subsequently indicates a low fluid level on the dashboard in a regular way, which is very useful information for the driver, eliminating surprises associated with this, especially annoying in winter
A slight signal with a horn when the car is closed with the button of a regular key
This function is useful for those who actively use their native comfort system - a regular key. She adds three more sound options to the silent version, in which the turn signals only blink:
a) Each time you press the "close" button, a light "beep" is produced by a horn
b) When the "close" button is pressed twice, a light "beep" is produced by a horn
a) Each time you press the "close" button, but only during daylight hours, a light "beep" is produced by a horn (according to the light sensor with the handle installed in AUTO mode)
Activation / Deactivation of the standard tire pressure monitoring system
To install the system, it is enough to buy 4 sensors and change the frequency of the keyless system.
Such are the things. The most interesting thing is that in order to activate all these functions, a regular scanner and a bright head are enough. Those. these functions are initially provided by our electronics, only muffled. The dealer refuses to do such work. Is there anyone from Krasnodar who can do this?
20.04.2014
Let's fix it now! - the electrician said confidently, took a soldering iron and started doing something under the hood of the car. Then he straightened up and said with satisfaction: - Well, now everything will work, - and turned the ignition key.
First, the fog lights came on. Behind them, the low beam headlights turned on. Then a distant light flashed brightly. Windshield wipers waved casually. The turn signals flickered playfully. Then something clicked and everything went out at the same time. A curtain. Nothing else worked.
This is how the client saw the repair of his car from the side in that car service, where he came to be repaired with a simple, as it seemed to him, problem: “the headlights of the near-far did not work, the dimensions did not turn on, well, and other little things.” In the photo, this car is "as is" from the previous car service.
A cursory inspection of the engine compartment caused surprise: “Why was it necessary to disassemble and solder something, solder it in Front ECU?».
No, the search direction (“in principle and in general”) is correct, but “solder-solder”? Meaning? I can only assume that during the previous inspection of the engine compartment, someone accidentally leaned on this block or on something near it, then, by divine coincidence, something suddenly worked and it was decided to look for a malfunction inside the Front ECU block. This is the only way I can explain the intervention of a rough Russian soldering iron in elegant Japanese electronics.

Let's start dancing in Russian - "from the stove." They say that only a fool will trample on an unknown road, and a smart one will first study it. What do we have on this car in connection with the declared malfunction?
According to the client: "the low-beam headlights did not work, the dimensions did not turn on, and other little things." Already hot. And you need to turn on your brains and remember that on this car, a block called the Front ECU is responsible for this whole tangle.
What is it for and what does it manage (traditionally and main):
· dipped headlights
high beam headlights
sidelights
headlight washer and washer motor
wiper motor
I don’t list the rest of the incoming-outgoing “pluses and minuses”, until they are the essence.
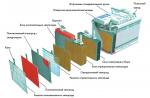
If this unit - Front ECU is lifted, pulled out of its place a little, then you can be surprised at the small number of contacts available: "So many consumers - and so few wires." Well, yes, you guessed it too - the SWS multiplex system is used here. If someone is not aware of the issue, a few words.
We have "consumers": dipped and main beam headlights, turn signals, sidelights, windshield wipers and other loads with a total number of ... well, for example, 10 "consumers". Now let's estimate how many wires, relays need to be led and tied to each consumer. How much does it get? Roughly: "About twenty." A lot of. How to reduce and simplify? And thus: “transmit several different signals on one bus (wire)”. What are we winning? The most important thing is the reliability of data transmission. And this is safety. All other advantages of the multiplex data transmission system are secondary. I will allow myself to use educational materials from open access. Here is the narrow outline:

And here is an extended schema to have a general idea (traditionally):

The SWS or LIN bus is a low speed bus compared to CAN, which is justified: look at the end consumers and you will understand for yourself what is primary, what is secondary and why the low speed SWS bus is responsible for controlling only such consumers. Mitsubishi vehicles use tires of all three classes.
Class-A - low performance (< 10 Кбит/с), для несложной диагностики, передачи общего назначения
· Class-B - medium speed (10-125 Kbps), for transferring the bulk of non-critical and non-diagnostic data.
· Class-C - high speed (from 125 Kbps to 1 Mbps or more), for real-time systems related to safety, such as control of engine valve timing, fuel supply, in addition to destination diagnostics.

But this is all theory. And how to look for a malfunction? You can follow the recommended instructions and use the scanner.

Then look at the signal on the monitor:


After that, open the manuals, familiarize yourself with the diagram, the location of the harnesses and other necessary information - what signals come and go, where the Front ECU is located, how the harness runs, and so on:
Is it possible to do so? Can. But why not ask the client about the immediate history of his car? Moreover, during the initial examination, something was noticed.
- Was the car broken?
- Well, yes, it was...
This is very good. This is a confirmation and an indication of the direction of the search: "First of all, look behind the wheel." So, "simple and stupid." The top screenshot shows the location of the harnesses. Schematically. And now live:

Why did you immediately start looking for a malfunction in the fender liner? No, not because I'm a wizard. I'm just learning from my colleagues. I read forums. Sometimes I call Dmitry Yuryevich (nickname mek), and I go to bed well after 12 at night. And all this helps to be in good shape and "on the edge." Look at the photo, there is an amazing gadget called Fault Finder on the floor:

If someone has not yet purchased it, run to the store.
Set FF310 designed to detect and localize breaks and short circuits in vehicle electrical circuits. Included in the kit FF310 includes miniature transmitter and receiver. The transmitter is connected to a faulty electrical circuit and generates a high frequency signal. A flexible probe receiver is used to locate breaks or short circuits. This is achieved by moving the probe along the wire harness. The receiver identifies the type of malfunction (open or short circuit), which is indicated by light and sound indicators.
The versatility of the design allows the device to be used on any cars and motorcycles with on-board voltage from 6 to 24 Volts. Without any restrictions, the device can also be used on promising vehicles with an on-board network voltage of 42 Volts.
The set is supplied in a convenient plastic case, which, in addition to the items mentioned above, also includes a special piercing probe and a set of connectors for connecting the transmitter to fuse sockets of various types.
And the video shows troubleshooting. If you listen closely, you can hear the operation of the device - how it signals an open circuit. Watch the video, everything is well shown and everything is clear:
Yes, a recent accident with damage to the left front fender played a role - the wire was broken. It took some time to recover. Pay attention to the purple wire: someone has already tried to repair it, but apparently they did it somehow.

When I talk to clients - and I always do it, definitely, it's like brushing my teeth in the morning, I always get interested and try to find out the life history of the client's car in detail. And there is no my “know-how” in this, the admin of the Legion forum back in the 90s of the last century said in his articles: “It’s stubborn to find out how and what this car lived before getting into repair.” After all, this is a storehouse of information necessary for repair! Only here it is necessary to strictly weed out the unnecessary and cling to the little things - as in this case. Upon inspection, I noticed scuffs and bumps on the left front fender of the car. Scratch or impact? It turned out that "a small accident." And in this place, I know from my repair practice, an important electrical harness passes. How is he? What is his condition? So there is no “magic” here, just attentiveness.
Well, then, after the restoration, a mandatory check of the restored: “is there a contact?”.

And then handing over your work to the client.
- Let's watch! - happily said to the client and turned the ignition key.
Then the client looked at me, and I looked at him - nothing at all worked. And I was sweating, to be honest. Are you kidding! I checked everything again - no, miracles do not happen! What is the reason then?
At such moments, the brain works like a powerful computer. I immediately remembered how this story began - how someone dug into the Front ECU. I looked back. Near stood the same Lancer. To remove the same block from him was a matter of several minutes. Put. I check again:
- Well, now everything works!
And in order to demonstrate to the client that my work was done with high quality and I didn’t spoil anything, didn’t close it, I return the same block to its native place: if I screwed up something, the block could fail.
- Works? Works. As you can see, the repair is over, the reason has been clarified, the only conclusion is: bring the same unit, we will install it and everything will work.
P.S. So it turned out: after replacing the unit, everything began to work properly. Intelligent Closer Module
for Mitsubishi Lancer 9th generation.
Description
What can he do:
On a signal from the alarm, raises all the windows. The start of the glass lifting occurs sequentially, with an interval of 0.5 seconds. If the ESP passenger control panel lock button is pressed, the windows will not go up. You can configure the module to ignore the lock button.
If the driver's window button is held in the auto-up position for more than one second, the module will start raising all windows. This feature can be disabled.
For pre-styling Lancers, you can connect the function of automatically closing / opening passenger windows from the driver's ESP control panel. This function works in one of two options - if you briefly (less than 0.5 sec) press the window closing (opening) button, the glass will be closed (opened) to the end. In the second option, to start automatic closing (opening) of the glass, it is necessary to hold the button pressed for more than one second.
! The module only works with Mitsubishi Lancer 9th generation! 10 is a different system.
It is possible that the module will work with other MMC machines of approximately the same production years (2003-2008), with an ESP control system similar to that of the 9th generation Lancer. But this needs experimental confirmation.
Installation and connection
To install the module, you need an additional automotive relay (30-40A) with normally open or changeover contacts, and 1.5-2 meters of two-wire wire to connect to the driver's window up button.
It is also desirable, near the driver's ESP ECU, to put a connector on the wires going to the driver's window button. So that you can, if necessary, remove the driver's ECU ESP.
Most of the connections are made at the connector block located behind the plastic shield below the hood opening lever. So it is logical to install the module above and to the right of the mentioned connector block (closer to the engine). There is a relatively flat section of the machine body to which you can stick, for example, with double-sided tape.
The required block of connectors is hidden here: And here the extra plastic is removed:


Connection is made to wires from two connectors. Both are circled in blue in the photo. Upper - С-29, lower - С-21

One of the power supplies is taken from the lower connector, everything else is connected to the upper one, except for the wires going to the ESP button and to the alarm.
Scheme (pinout) of the module connector:

Module connection diagram:

Module connection:
The green wire, together with the common wire of the external relay (terminal 30) and the winding wire of the external relay (terminal 86), are connected to a thick green wire - connector C-21 pin 2.
The yellow wire, together with the normally open wire of the external relay (terminal 87), is connected to the thick yellow wire - connector C-29 pin 10
The green-yellow wire is connected to the second wire of the external relay winding (terminal 85)
The black wire connects to the black ground wire - connector C-29 pin 3
Purple wire:
If the pre-styling car is not connected anywhere. The regular purple wire of the driver's door wiring harness coming to connector C-29 pin 8 must be cut and the ends insulated.
If the car is restyled (ESPs work 30 seconds after the ignition is turned off) and there is a need to use the standard dipped beam auto-extinguishing function, then it is necessary to install one more additional relay - a signal relay, for example TRB-12VDC-SB3-CD, with a protective diode in accordance with the diagram above.
If the car is restyled (ESPs work 30 seconds after the ignition is turned off) and there is no need to use the regular low beam auto-extinguishing function, then the purple wire of the module is connected to the purple wire of the SWS control line - connector C-29 pin 8.
The wire of the control line of the ESP ECU (connector C-29 pin 7, green with red) is cut and an orange wire is connected to the segment going to the driver's door, and a red wire to the other.
An additional wire is connected to the gray wires, which is laid in the driver's door parallel to the standard harness, and soldered to the contacts of the driver's window lift button.
The photo shows where the wires in the ESP ECU should be soldered.

Driver's window button contacts labeled "MU" and "AU"
Wires can be removed from the ESP computer through one of the existing windows in the block housing:

Here is the place of the twist, which is visible in this photo, and it is desirable to put the connector.
In order for the wires not to be pinched by the stiffening ribs of the case, they (the ribs) must be slightly cut at the edge with a sharp knife.

Setting
The module must be configured with the ignition on.
All passenger windows must be fully closed before entering setup mode.
Entering the module setting mode
Within five seconds, you need to press the passenger ESP lock button, press, press, press and press again.
The module will confirm the activation of the mode by lowering the passenger windows approximately half way.
Exit module setup mode
To exit the setup mode, press the passenger ESP lock button.
Also, the module will automatically exit the configuration mode if no buttons are pressed within 25 seconds.
Upon exiting the setup mode, the module will fully raise all windows.
Programming the window lifting prohibition mode from an external signal
Pressing the button for lifting the right front window turns on the mode of prohibiting the lifting of windows from an external signal when the passenger ESP lock button is pressed. The module confirms the activation of the mode by lifting the right front window.
Pressing the button for lowering the right front window disables the window lifting prohibition mode from an external signal when the passenger ESP lock button is pressed. The module confirms the deactivation of the mode by lowering the right front window.
Programming the lifting mode of all windows from one button
Pressing the button for lifting the right rear window turns on the mode of lifting all windows while holding the driver's window button in the auto-up position for more than 1 second. The module confirms the activation of the mode by lifting the right rear window.
Pressing the button for lowering the right rear window turns off the mode of lifting all windows with one button. The module confirms the deactivation of the mode by lowering the right rear window.
Programming the mode of automatic lifting / lowering of passenger windows
(relevant for pre-styling 9th Lancer)
A short press of the button for lifting the left rear window (less than 1 sec) switches on the mode of automatic raising / lowering the windows by a short (less than 0.5 sec) pressing the button. The module confirms the activation of the mode by lifting the left rear window.
A long press of the button for lifting the left rear window (more than 1 second) switches on the mode of automatic lifting / lowering of the windows by long (more than 1 second) pressing the button. The module confirms the inclusion of the mode by sequentially raising and lowering the left rear window.
Pressing the button for lowering the left rear window disables the forced auto-up / down windows. The module confirms the deactivation of the mode by lowering the left rear window.
Programming the Trigger Pulse Tracking Mode
Pressing the driver's window auto-up button switches the trigger pulse tracking mode. The module confirms the mode switch by raising or lowering all passenger windows.
If the module has lowered all passenger windows, then the module's operation time is limited by the duration of the alarm triggering pulse (blue wire). If the negative potential at the input disappears, the module will stop the glass lifting and turn off.
If the module has lifted all passenger windows, then the module operation time is about 25 seconds, regardless of the duration of the trigger pulse. The module, in this mode, requires the duration of the trigger pulse at least one second.
Questions and answers.
Q. Is it automatic to close when arming?
A. Closing windows is triggered by an alarm. It should provide, when arming, the appearance of a mass on the blue wire. As far as I understand, in the vast majority of signaling there is an "additional channel" that allows you to give out an impulse when arming.
Additionally, the module monitors the state of the passenger ESP lock button, and if it is pressed, it does not raise the window (this function is configurable).
Q. Do the gray wires connect to the driver's button for the one-button all-windows function only? To implement automatic window lifting only when arming, do they need to be connected or not?
A. The module can only control the driver's window by emulating a button press. Therefore, whenever there is work with the driver's glass, this is done through gray wires.
In order for the driver's window to close when arming, the gray wires must be connected.
Another question is that you can not use the module to its fullest and use only the automatic closing / opening of passenger windows from the driver's ESP control panel in the pre-styling Lancer. Then you can get by with just four wires - yellow, black, orange and red.
Q. Is the control going on the bus?
A. Yes, the control is via a digital bus. But, unfortunately, only passenger windows. With the driver's one, you have to emulate pressing a button.
Q. Why harp it if it's been on sale a long time ago!?
A. 1. Universal modules are difficult to make friends with Lancer's safety glass lifting system.
2. This module allows you to implement additional functions that are not available in universal modules.
Q. And I may have overlooked or did not understand, but the function if, for example, left a hand there and it was clamped, will the glass go down? Or will it hurt a lot?
A. All safety features remain in place. The windows are lifted by native blocks in the normal mode. The module only gives them commands.
Q. What alarms will the module work with?
A. With any that is able to issue, when armed, a negative pulse with a duration of at least 1 second