Household snowplows are used by many owners of country houses and cottages to clear the area from fallen snow masses. Hardly anyone wants to do it manually, which is why there is a demand for such devices.
Moreover, there are quite a lot of models of snow blowers on the market of special equipment, both domestic and foreign manufacturers.
However, in the process of working with a snow blower, a number of certain problems can arise with it. We are talking about probable breakdowns, from which no owner of these units is insured. One of the most vital parts for a snow blower is the gearbox, which is located close to the engine.
Device and application
The torque from the engine of the snowplow is transmitted to the working system by means of a V-belt transmission and a power take-off shaft, to which the auger mechanism is connected through a gearbox, as well as a rotor. The gearbox itself is divided into two types:
- serviced. This type of gearbox must be periodically disassembled to replace the lubricant. Such gearboxes have a longer service life, because the lubricant contains bronze components that partially restore the gearbox gear.
- Maintenance free. Such gearboxes do not require any maintenance, but they are not subject to repair. In the event of a breakdown, the gearbox is removed, and a new part is purchased in its place.
As for the gear located inside the gearbox, it is made of soft metals. Basically, the material of manufacture is bronze.
This is understandable, because in the event of jamming of the auger mechanism, it is necessary to prevent damage to the engine, which is the main working unit of the snow blower. The augers themselves are attached to the shaft with shear bolts that perform the initial protection.
In case of any emergency, these bolts are cut off, which avoids damage to the engine. If this does not help, then the gearbox will take the brunt, protecting the snow blower motor.
Depending on the classification of snow blowers, more precisely, the scope of their application, the type of gearbox housing also depends. For professional models of snowblowers that are used to clean snow masses from large areas, the gearbox housing will consist of cast iron.
In turn, household-level models have a gearbox made of an alloy of silicon and aluminum. The body itself consists of two halves, which are connected by bolts.

In addition, gearboxes may differ in their overall dimensions, as well as the dimensions of the gear included in their device. This directly depends on the size of the snow blower bucket - the larger it is, the larger the size of the gearbox itself.
When buying, you need to pay attention to this, because snowplows of different capacities must have different gearboxes. If representatives of the same model range of units have different power, but one type of gearbox, then they are unlikely to be completely reliable.
Causes of malfunctions and repairs
Many experts advise choosing snowplows that use a serviced gearbox. Of course, it requires certain handling, but it will also last much longer than a maintenance-free gearbox.
However, this issue has a second side - such gearboxes tend to break at the most inopportune moment. Consider, using the example of Patriot, Champion and Profi snow blowers, what kind of gearbox breakdowns can be, as well as methods for their elimination.

Possible problems:
- There are sharp knocks in the gear of the Champion snowblower - the most likely cause of this problem is damage to the turns of the worm or bearings. The way out of the situation is to adjust or replace the bearings, as well as purchase a new worm pair.
- If you observe that the gearbox of the Patriot snow blower is excessively hot, then several factors can be the reasons for this phenomenon. In particular, it may be due to insufficient lubrication, or to bearing wear.
- In the first case, you just need to add the right amount of lubricant, and in the second, you need to adjust the bearings, or replace them with new ones.
- If the gearbox of the Profi snow blower vibrates very strongly, then misalignment of the shafts and the implement motor may be a likely cause. Thus, do-it-yourself repair of the gearbox of the Profi snow blower is carried out by eliminating this misalignment.

- If grease is leaking from the gear of the Celina snow blower, then a clogged drain hole in the vent may be a likely cause. To correct this situation, you need to rinse the vent plug in kerosene, and then wipe it dry.
- Another common cause is gear wear, which is part of the gearbox design. This is quite understandable, because it is made mainly of bronze, therefore, during long-term operation, its edges can simply be erased.
- The only way out of this situation is to completely replace the gear with a new one.
In most cases, snowblower gearboxes can be repaired without requiring replacement. Of course, it may be necessary to purchase separate gearbox components - an oil seal, gears, etc. However, this is not such a big expense as in the case of buying the entire gearbox.
By the way, the cost of components can be different. For example, a 24-tooth snow blower auger gear will cost about 3 thousand rubles. By the way, gears of different types of gearboxes can have a different number of faces in their stock - basically, these are 20 teeth and 24 teeth, depending on the model of the snow blower.
For more information about repairing the gearbox, see the video:
How to do it yourself
Self-manufacturing of the gearbox involves the use of various components from other equipment. The fact is that the gearbox itself is a rather complex part, so making it yourself is quite problematic.
 In general, a do-it-yourself snow blower gearbox will consist of several important components:
Gear housing, consisting of two halves
It is impossible to make it yourself, so you need to purchase them separately. Fortunately, the cost of one half of the case is about 700 rubles, which is quite cheap.
Gear
For their manufacture, special metal-cutting equipment will be required, but the purchase of a finished spare part would also be the best solution (see). For example, the gear wheel of the Patriot snow blower, the price of which is about 3 thousand rubles, will be the best solution.
Oil seals
They are used as a seal to keep grease from leaking out. They cost about 100 rubles apiece, so their purchase will not hit your budget.
Correct using and maintaining a gasoline powered snow blower is a guarantee that it will:
- effectively cope with any snow;
- will last for many years.
If you bought new snow blower, we strongly recommend that you read the instruction manual carefully immediately.
If you bought used a snow blower from your hands, and you were not given an instruction manual, then in this article you will learn:
- what routine work needs to be done;
- how to identify faults;
- what can be repaired by yourself;
- for which repair it is necessary to contact the workshop.
To understand how and why it is necessary to maintain and use a gasoline snow blower, you need at least in general terms understand him:
- device;
- principle of operation.
Base and most expensive part any gasoline snow blower is an internal combustion engine. Most snowblowers have four-stroke motors, however, there are also two-stroke engines.
 Both and non-self-propelled gasoline snow throwers are designed in such a way that exclude even the slightest possibility of damage engine.
To do this, the drive from the engine to the gearbox and snowplow mechanism is made using a belt.
The peculiarity of the belt drive is that it.
That is, when the auger encounters an obstacle that is too hard to cut through, the slipping V-belt will prevent the motor from being overloaded and protect it from damage.
Friction the drive is also a kind of protection, because the contact patch of the pressure pad and the friction disc is very small and does not exceed 1 cm².
It is the friction drive that limits the torque supplied to the wheels, as well as the speed of their rotation.
Snow Blower Developers Using Friction Mechanism implemented a variator, in which the transmission coefficient depends on how far the friction disk is moved away from the center of the rotating platform.
Serious minus such a design of a gasoline snow blower is:
- extremely weak torque;
- rapid wear of the friction disc in 1-2 gears.
In addition, gasoline snow throwers are equipped with two types of augers:
- metallic with shear bolts;
- plastic covered with rubber.
The first option is cheaper to maintain, because 2-3 shear bolts cost less than even one plastic auger. But the second option is cheaper to manufacture, so the plastic auger is installed on inexpensive non-self-propelled models with a low-power engine.
First maintenance
 After you have bought a gasoline snow blower, you need to carry out the first maintenance.
This applies to both unknown Chinese units and snow throwers under well-known brands.
You will lose 1-2 hours for maintenance, but make sure that the device is fully ready for operation or you will find various malfunctions.
After which you will either have to eliminate them, or to return snow blower to the seller and demand:
- replacement with a similar but serviceable one;
- warranty repair;
- refund.
After you have unpacked or unpacked the snow thrower, carefully inspect the machine. It shouldn't have broken wires or bent at a distinct angle cables. After that, carefully check that all bolts and nuts are in place and tightened. This fully applies to both self-propelled and non-self-propelled gasoline snowplows.
You should also have a snow blower detail so you know how to assemble and disassemble your snow blower.
Wrong disassembling and assembling the snow blower can lead to serious damage and complete loss of performance.
Be sure to check if there is included snow blower:
- special lubricant for the gearbox;
- spare wedge and toothed belts;
- spare friction ring;
- shear bolts.
If any of the components is not available, buy it. After all, these are consumables that it is desirable to change. every season.
Necessarily lubricate all cables from the inside with a thin low temperature oil, such as spindle oil, or treat with WD-40 fluid.
If the snowblower has electric starter, then check the condition of the contacts and the correct connection of the supply wire.
If you don't know how to check correct wire connection then refer to:
- in a specialized workshop;
- to an experienced auto electrician.
First maintenance of gearbox and auger mechanism
Check bolt tightness reducer, they should not twist from light pressure on the key. Then unscrew the small hole plug located on the top of the reducer and check that the hole in the plug is not clogged.
 Fill the gearbox with grease.
To do this, unscrew the lower (drain) bolt and pour semi-fluid grease through the upper hole.
Depending on the model of a gasoline snow blower, 80 to 200 ml of lubricant will be required.
Exact value look in the instruction manual.
If, after pouring the required amount of grease, the factory grease did not start to come out of the drain hole, then it forgot to fill at the factory.
In this case, keep adding grease until it comes out of the drain hole.
Once the lubrication will appear in the drain hole, screw the bolt into it and tighten with a wrench with a little effort. After that, add another 10–15 ml of lubricant and screw the plug into the upper hole.
Remove all bolts that secure the auger to the gearbox shafts and side bearings and make sure they have slots, that is, the bolts are not ordinary, but shear.
If ordinary bolts are installed, be sure to replace them with shear ones, because if the auger collides with concrete or some solid object, the bolts will be cut off and neither the gearbox nor the motor take no damage.
Remove screws and grease engine oil:
- gearbox shafts;
- side bearings.
If you have caterpillar snow removal equipment, be sure to check the operation of the lever that changes the slope of the bucket. To do this, with the engine off, move the lever to different positions and measure the distance from the ground (floor) to the bottom of the bucket. A change in distance indicates that everything is in order.
If the distance does not change, contact a shop or certified workshop to have the unit repaired there.
First engine service
Put the snow blower horizontally, then unscrew the plastic oil filler cap and check the oil level. On two-stroke gasoline engines, this operation is not required, because they are supplied with oil along with petrol.
 If the oil is in order, then return the plug to its place and unscrew the spark plug.
Gently pull the recoil starter cable a few times - the engine should spin easy and no mess.
Buy from any auto parts store compressometer and measure engine compression.
The normal value is 9–12 atmospheres (0.9–1.2 MPa).
If the compression is less, the piston rings may not have rubbed in yet. In this case, the compression will increase after 5-10 hours of operation with a minimum load.
Compression less than 7-8 after 10 hours of operation under light load indicates that the motor is faulty and unable to deliver nominal power.
This happens due to:
- factory marriage;
- sale of a poorly restored snow blower.
- exchange on the same, only fully serviceable unit;
- carrying out the warranty repair;
- return money and giving up the snow blower.
First engine start
After making sure that the motor is fully functional, pour into the tank appropriate fuel.
Most gasoline snow throwers run on gasoline AI-92. However, this needs to be clarified in the user manual. There are motors for AI-95 gasoline.
For the first run petrol machine, place the snow thrower in a well-ventilated area. Then do the following:
- pump up fuel using the corresponding button.
- Translate switch engine operating mode to the on/on position.
- Turn the lower lever of the carburetor, which is responsible for supplying fuel, to the right until it stops.
- Translate the top lever of the carburetor, which is responsible for the choke, to the right as far as it will go to close the choke.
- Translate throttle lever to maximum.
- Gently but strongly pull the cable towards you manual starter. If you have an electric starter installed, then connect it to a 220 volt network and press the start button for 1-2 seconds.
- If the motor didn't start the first time, pull the recoil starter rope again or press the start button on the electric starter.
- As soon as the motor start up, turn the upper carburetor lever all the way to the left, fully opening the choke.
- The motor should run smoothly and at the same speed. Leave it running for 5-10 hours, checking periodically. Listen to his sound. If a metallic knock appears in it, turn off the engine immediately.
- Through 5–10 hours mute engine, then let it cool for 2 hours and measure the compression. If the compression was below 7 atmospheres, then in a fully functional engine it will rise by at least 0.5 atmospheres.
- After the motor has run 10 hours and cool down, warm up the engine, slate remove the oil from it and fill it with the one recommended by the manufacturer.
First start of auger
This operation can combine with the first start of the engine, and can be performed after it. 
You will need to do the following:
- Start the engine.
- Move the cleaning system activation lever to the on position.
- Hold it for 5-10 seconds and ask an assistant to make sure that the auger turns normally. If the auger turns jerkily or does not turn at all on the snow blower, you need to adjust the length of its cable.
- Then release the lever, walk around the snow blower and make sure the augers come to a complete stop. If the augers twitch even a little, adjust the length of the cable, this operation is described in detail in the instructions for the unit.
- Turn on the auger activation lever and secure with tape or soft copper wire. Let the device run for 1-2 hours without load.
- Then stop the engine, release the snow clearing lever, and carefully feel the gearbox. If it is cold or slightly warm, everything is fine. If hot or very hot, then the gearbox is faulty and will soon break.
First engine start
Used on snow blowers three types mover(chassis):
- wheel without differential;
- with differential;
- crawler.
Read more about the differences in the type of propulsion in.
Working with the first type of propulsion comes down to connecting and disconnecting the transmission using the appropriate handle. Therefore, to check, connect and disconnect the corresponding handle several times to make sure that the propulsion unit is working properly.
 Wheel drive with differential and crawler drive they work on the same principle - blocking a wheel or track on one side leads to a turn in that direction.
Wheel or track locking system works regardless of gearbox.
Therefore, any transmission can be used for verification.
By manipulating the triggers or handles (depending on the snow thrower model), make sure that the snow thrower follows your commands well and turns accurately in the given places.
When wheels/tracks fuzzy on or off, adjust the length of the respective cables. If the adjustment does not help, contact the store where the snow blower was purchased to have the chassis diagnosed.
Necessarily check tire pressure.
What pressure should be in the tires of a snow blower is indicated:
- on the side surface of the wheels;
- in the instruction manual.
Maintain the specified pressure in the tires of an approved gasoline snow blower. ±5 percent.
If you have caterpillar unit, then check the tension of the tracks and, if necessary, you will need to either tighten them or loosen them. For a detailed description of this procedure, see the owner's manual for your snow blower.
First application
For the first application, we recommend using dry shallow snow(the height of the snow is not greater than the diameter of the auger). Such snow can be removed in the maximum gear, in which wear of the friction disc is minimal. Start the snow thrower and let it run for 2-3 minutes to warm up the engine. 
After that, do the following:
- Align the chute in the desired direction. Keep in mind that the distance of throwing snow forward is almost 2 times greater than to the side at an angle of 90 degrees.
- Turn on auger.
- On the self-propelled device, shift into the highest gear, then connect the chassis and steer the snow blower. Move the non-self-propelled device forward with your hands.
- Run the snow blower for 10-20 minutes, then turn it off. When the motor and augers have completely stopped, feel the gearbox, it should be cold. If the gearbox is warm or hot, then there is a problem with it. To check the condition of the gearbox, contact the seller or an authorized dealer.
- If the gearbox is cold, operate the snow blower for 1 hour. Make sure it handles the snow easily. Periodically disengage wheel or track drive and shift gears to keep the machine running in different modes. Actively use the differential lock, forcing the unit to turn on its own.
- When finished with work, do not turn off the augers and chassis, but do not turn off the motor for 3-5 minutes. This is necessary to dry the case. Then turn off the unit and, making sure that the motor and augers have stopped, feel the gearbox. A cold or barely noticeable warm gearbox indicates that all gears are working, but if it is hot, then the brass gear or grease needs to be replaced.
- Using a special shovel, which is supplied with any snow blower, thoroughly clean the snow from the augers, gearbox and rotor. Just as thoroughly clean the body of snow. If you skip this operation, there is a high chance that the gearbox or auger will become covered with ice and you will not be able to start the unit normally.
Weekly maintenance
Petrol snow throwers are reliable and unpretentious devices, so during weekly maintenance it is enough to do following:
- check the oil level;
- check the fixation of the augers and the condition of the shear bolts;
- check the tightness of all nuts and bolts;
- check the condition of all cables;
- check the beating of the auger;
- measure tire pressure;
- lubricate all cables with WD-40 fluid or frost-resistant liquid oil.
If the oil level has changed even slightly once, then add oil, recommended by the manufacturer. If you don't have the instruction manual, visit the manufacturer's official website or type in the search engine the question “what oil to use for the snow blower engine (model name)”.
If oil has to be added at least once a month, the engine needs to be seriously checked.
It can be done:
- on your own, if you are well versed in gasoline engines;
- contacting a certified workshop.
As long as the auger bearings are fully functional, beat in him completely missing.
 If beat appeared, then it can be called:
- bearing wear;
- weakening their attachment.
Overpressure by 0.5–1 atmosphere:
- worsens grip on snow and ice;
- increases the chance of a wheel explosion.
Monthly maintenance
During monthly service perform All:
- weekly work;
- daily work.
- check the condition of the contacts of the electric starter;
- clean the spark plugs and check the condition of the engine on them.
If the motor is running normally, then candle color will be light gray.
Black, red and other candle colors talking about:
- problems with the carburetor;
- dirty air filter;
- poorly working candle;
- broken ignition.
At home, without special equipment and knowledge, you can only:
- check the condition of the air filter and clean it;
- clean/replace spark plug.
In addition, it is necessary remove augers and lubricate shafts gearbox with engine oil. This operation must be carried out with the engine off and the spark plug removed from the spark plug. Read more about this operation in the instruction manual of your snow blower.
During this operation, also lubricate the rest of the auger drive and shear bolt holes.
Another important operation backlash check reducer. To do this, with the engine off, hold the input shaft with one hand, and gently shake the auger with the other.
If the play of the auger does not exceed 1 mm, then everything is fine. If the backlash is 1-2 millimeters, the bronze gear of the gearbox is worn out, but will still work for some time. If the play is more than 2 mm, the gear must be changed, because its teeth can be cut off at any time.
Service before and at the end of the winter season
 Maintenance before the start of the winter season should be carried out in the same way as recommended for new equipment.
This will help you find problems. at the initial stage, so the repair of the unit (if necessary) will be much cheaper.
We know from experience that they rarely work longer than 1.5 seasons, so they can fail at any time.
- engine oil;
- lubricant in the gearbox.
Change the engine oil in the same way as described in the section on starting the engine for the first time.
if you have to clean up a lot packed or wet snow, the oil must be changed at least once a month (not later than after 25 hours of operation).
To change the lubricant in the gearbox, pour into it synthetic engine or gear oil to fill, then:
- start the engine;
- turn on the auger drive;
- let the unit run for 20 minutes;
- turn off the engine and wait for the augers to stop completely;
- drain the old grease;
- fill the gearbox with new grease recommended by the manufacturer.
It is also necessary before the start of the season:
- wash or replace the air filter;
- if a fuel filter is installed on the snow blower, then check its condition and replace if necessary;
- install new spark plugs.
After the end of the winter season save the snow blower.
For this:
- Lubricate all bolts and nuts with a cloth of engine oil. Liberally coat all cables with spindle oil or WD-40.
- Start the engine and let it run until the fuel runs out.
- Then open the gas tank cap, cover it with a clean rag and leave it like that for a day in a ventilated area. Thanks to this, the remaining gasoline will evaporate and the storage of the unit will be safe.
- After that, remove the spark plug and pour 10 ml of engine oil recommended for this engine into the cylinder.
After completing all these procedures, you can install the snow blower into storage.
Diagnostics and repair of faults
All malfunctions of snow blowers can be conditionally divided as follows:
- the engine does not work / does not work well;
- the chassis does not work well / does not work (the snow blower does not drive);
- the auger mechanism does not work / does not work well.
It happens that the snow blower stalls under load, shoots at the muffler. The list of faults is very long. Some problems can be fixed on one's own, others exclusively In workshop.
If the engine does not work / does not work
 If the snow blower engine has started to work poorly, the speed is floating, we recommend that you do the following:
- completely drain the gasoline and fill it with a normal one, from a proven gas station;
- wash the air filter;
- replace the candle;
- carefully read the instruction manual, you may forget to open the air damper;
- check how the engine turns without a candle;
- measure compression.
If these steps fail, and compression below 7 atmospheres, Means:
- rings crumbled;
- burnt gasket;
- burnt valve.
All three malfunctions must be repaired in the workshop, because for this special equipment required.
As you pull the recoil starter, observe how the motor behaves. If it sticks, the crankshaft bearing may be seized. This problem can only be fixed in the workshop.
If compression is good and the crankshaft rotates without jamming, you need to check:
- ignition system;
- carburetor;
- muffler.
You can check these parts and systems at home only in one case - if you are well versed in gasoline engines.due to their physical strength.
All malfunctions of such a chassis can be divided into the following categories:
- does not go forward or backward;
- does not pull;
- moves in jerks.
Does not drive in one or more gears
If the snow blower suddenly stopped moving forward or backward in one of the gears, then one of the reasons for this is a misconfigured variator control.
The gear selector is connected to the drive roller of the variator with a special rod, the length of which can be adjusted. You need to remove the protective cover and, shifting gears, watch how the variator rollers move along the friction disc.
In top gear the roller must be in contact with the edge of the disc. In this case, the first forward and first reverse gears will be near the center. If the traction setting is knocked down, then one of the gears will pass through the center.
Another reason for this result is worn or damaged friction disc, due to which the friction ring of the drive roller for some time is torn off from the disk.
To some extent, installing a new friction ring can help, but the only way to completely eliminate the problem is to replace the disc.
It is desirable to perform this operation In workshop.
Doesn't drive or pull in all gears
If the snow thrower does not move or pull in any gear, there are only three possible causes:
- wear friction ring drive roller;
- weakening belt tension;
- cliff belt.
To determine what the problem is on your unit, remove the protective cover and inspect the friction ring.
 Without starting the engine, turn on the chassis connection lever, then try to turn the friction disc by hand.
If this succeeds, the belt is loose and needs to be tightened. If the disc spins easily, the belt is broken and needs to be replaced.
Due to the fact that this operation is performed differently on different models of snowblowers, we recommend read the description carefully this operation in the instructions for the snow blower.
During long periods of deep snow clearing, the machine may also start lose momentum.
This happens if the snow:
- entered the body;
- melted and got between the pulley and the belt.
Belt drive is very sensitive to water.
In this case, do the following:
- return the snow blower to the garage or shed;
- clear snow and remove all external panels;
- remove the belts, thoroughly wipe the pulleys and frame with a dry cloth;
- put on dry belts; install all external panels;
- make sure there are no gaps between them and the frame.
If the performance not recovered, then the problem is in the auger mechanism of the snow blower, so you need:
- disable screw-rotor mechanism using the appropriate lever;
- roll out the unit on a snow-free flat area;
- drown out engine;
- clear snow device.
After that, you can proceed to the initial examination. To do this, remove the shear bolts and check their condition. If they are sheared, the snow blower auger has hit a hard obstacle and the bolts have protected the motor and gearbox.
Bolt replacement won't solve problems if the obstacle is not removed, because the auger will run into it again and cut off the bolts again.
Therefore, it is necessary to manually remove dangerous obstacle. If this is not possible, then clean the dangerous area with a conventional shovel.
If the shear bolts are intact, you must:
- Deliver snow blower in a dry, preferably heated room.
- Check auger drive belt and, if necessary, replace it.
- dry rag wipe both pulleys.
This operation described in detail in the manual. operating instructions for your snow blower.
A whole and dry belt indicates two possible malfunctions:
- weakening fixing the cable connecting the control handle of the auger mechanism and the pressure roller;
- damage bronze gear reducer.
The first malfunction can be eliminated by yourself by changing the tension of the cable and determining the moment when the lever starts to clearly turn on the auger mechanism. It is advisable to repair the second malfunction in the workshop, because this requires a lot of experience.
conclusions
 After reading our article, you learned how to properly maintain a gasoline snow blower.
You also learned how diagnose And repair minor damage.
They also learned to identify defects that it is desirable to eliminate only in the workshop.
In this video, you can learn a lot of useful tips on how to prepare a snow blower before starting work:
In contact with
The gearbox in the snow blower device is an important element that takes the unit's engine torque and increases it to optimal performance. Let's study the device, types, functions of gearboxes, as well as the procedure and features of their lubrication.
The device of the gearbox - we study the mechanism from the inside
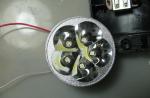
The main element of the mechanism is the snow blower gear, made mainly of soft metals. Basically, bronze is used for this. The use of soft metals is explained by the fact that if the screw jams, the engine will not be damaged. The augers are fixed on the shaft by means of shear bolts, which play the role of the initial protection of the mechanism.
If emergency repairs are needed, the bolts must be sheared off to protect the snow blower motor. If this does not help, then the main blow will be taken by the gearbox of the unit.
All elements of the gearbox are placed in its housing. If the snow blower is used for domestic purposes, then the body of the assembly is made of an alloy of aluminum and silicon. In this design, the gearbox housing consists of two parts, interconnected by bolts. In professional technology, the gearbox housing is made mainly of cast iron.

Depending on the application, the snow blower gearbox can be large or small. In large assemblies, the gear for the snow blower will also be quite large.

Types of gearboxes in snowplows
The torque generated by the motor of the snowplow is transmitted to the working bodies by means of a power take-off shaft and a V-belt drive. By means of a screw mechanism, a gearbox is attached to the shaft, located near the engine of the machine. At the same time, snowplows can be equipped with two types of gearboxes:

- Serviced gearboxes - mechanisms of this type require periodic disassembly for partial or complete service. Such elements have a longer service life, their components are made of bronze, due to which the snow blower gear gear is much less susceptible to wear;
- Maintenance-free gearboxes - such units do not need maintenance, but at the same time they cannot be repaired. In case of any malfunction, the mechanism must be removed and discarded, and a new part must be installed instead.
Reducers of the second type are equipped with cheaper models of snowplows - Chinese and Korean-made units. Mechanisms of the first type have found application in the technique of European, Japanese and American brands.
Faults and repair of the snow blower gearbox
Most experts advise buying snowplows with serviceable gears. The latter requires regular maintenance, but it can last much longer than unattended nodes. At the same time, serviced gearboxes break down from time to time at the most inopportune moment for this. The most common breakdowns of these mechanisms include:

- The appearance of sharp knocks inside the gearbox - most often the cause of such a breakdown is damage to the worm gear or the bearings located next to it. For repairs, you will need to buy a new mechanism or adjust the bearings;
- The gearbox began to heat up quickly - the reason may lie in the lack of lubrication or partially worn bearings. The assembly will need to be disassembled and checked for lubrication and bearing integrity. If necessary, the latter must be replaced immediately;
- The gearbox began to vibrate strongly - such a problem appears when the axis of position of the motor and machine shafts is broken. Repair is carried out by eliminating the defect that has appeared;
- Grease flows out of the gearbox - the reason lies in the blockage of the drainage hole inside the vent. As a repair, the vent should be washed in kerosene and wiped dry with a dry cloth;
- One or more gears of the gearbox have been worn out - if during disassembly it turned out that the edges of the part were erased, then it will need to be completely replaced. When buying a new element, you need to be extremely careful - the snow blower gear must have a certain diameter, otherwise it will not fit inside the gearbox.
In most cases, serviced gearboxes are easy to repair with your own hands. If it is not possible to fix the malfunction, then it is better to contact the service center so as not to further damage the elements of the snow blower.
Self-manufacturing of the mechanism
Often, owners of snowplows supply their units with homemade gearboxes. For their manufacture, you can use improvised and purchased materials. For the manufacture of the mechanism will require the following components:

- Housing - in order not to waste time, it is best to buy a ready-made cast-iron or aluminum housing from an old gearbox;
- Gear for 20 teeth - it is made of metal using special equipment. You can also purchase a finished part from an old snow blower;
- Oil seals - in their quality, you can take gaskets made of dense rubber;
- Shear bolts - you can buy fasteners at any store selling garden equipment;
- Bearings - closed roller bolts can be used to manufacture the gearbox;
- Shaft - for its manufacture, you need to take an ordinary pipe made of steel of the 45th grade.
Having prepared all the necessary components, you need to carefully study the work plan. The assembly diagram is shown in the figure on the right.
The production order is as follows:
- First, the gear and bearings must be fixed on the shaft;
- Then one of the body parts is attached to the shaft. In this case, the gear and bearings must be located inside the housing;
- Further, the spare parts are closed with oil seals, and the second part of the body is installed on top;
- At the end, both parts of the body are fixed with shear bolts.
Of course, you will have to spend a little money on the independent manufacture of the gearbox, however, in any case, creating a mechanism will cost much less than buying a new unit.
Disassembly and lubrication of the snowplow gearbox
Before lubricating the gears and other elements of the gearbox, you need to completely disassemble the mechanism. Today you can hear a lot of advice on how to remove the gearbox on a snow blower. All of them can be described in the following algorithm:

- First of all, it is necessary to dismantle the belt protection cover and the drive auger cable;
- Next, you need to unscrew the bolts that are behind the "snail";
- After that, you will need to remove the auger belt from the pulley;
- Next, you need to unscrew the bolts holding the auger shaft;
- After that, you need to turn the "snail", and pull out the auger along with the impeller;
- Next, you need to remove the shear bolts and disassemble the shaft;
- In the end, you will need to disassemble the gearbox itself.
Many beginners do not know how to properly disassemble the gearbox itself. To do this, proceed in the following order:

- First you need to clamp one of the parts of the shaft with a vice;
- After that, you will need to unscrew the 6 bolts that fix both parts of the gearbox together;
- Next, you need to take a hammer and knock a little on the gearbox housing.
The disassembled gearbox must be dipped in gasoline in order to completely wash off the remnants of the old lubricant.
Lubrication for the snow blower gearbox is applied in a certain algorithm:
- First you need to clean the gearbox and fitting from the remnants of the old oil;
- Next, you need to unscrew the fitting and use a syringe to add the amount of lubricant necessary for work;
- After that, the fitting must be screwed back and the mechanism must be assembled in the reverse order.
Most snow blower manufacturers warn buyers in advance that there is not enough lubricant inside the gearbox. In such cases, the oil must be topped up after the first ten hours of operation of the snow thrower.
Household snowplows are used by many owners of country houses and cottages to clear the area from fallen snow masses. Hardly anyone wants to do it manually, which is why there is a demand for such devices.
Moreover, there are quite a lot of models of snow blowers on the market of special equipment, both domestic and foreign manufacturers.
However, in the process of working with a snow blower, a number of certain problems can arise with it. We are talking about probable breakdowns, from which no owner of these units is insured. One of the most vital parts for a snow blower is the gearbox, which is located close to the engine.
Device and application
The torque from the engine of the snowplow is transmitted to the working system by means of a V-belt transmission and a power take-off shaft, to which the auger mechanism is connected through a gearbox, as well as a rotor. The gearbox itself is divided into two types:
- serviced. This type of gearbox must be periodically disassembled to replace the lubricant. Such gearboxes have a longer service life, because the lubricant contains bronze components that partially restore the gearbox gear.
- Maintenance free. Such gearboxes do not require any maintenance, but they are not subject to repair. In the event of a breakdown, the gearbox is removed, and a new part is purchased in its place.
As for the gear located inside the gearbox, it is made of soft metals. Basically, the material of manufacture is bronze.
This is understandable, because in the event of jamming of the auger mechanism, it is necessary to prevent damage to the engine, which is the main working unit of the snow blower. The augers themselves are attached to the shaft with shear bolts that perform the initial protection.
In case of any emergency, these bolts are cut off, which avoids damage to the engine. If this does not help, then the gearbox will take the brunt, protecting the snow blower motor.
Depending on the classification of snow blowers, more precisely, the scope of their application, the type of gearbox housing also depends. For professional models of snowblowers that are used to clean snow masses from large areas, the gearbox housing will consist of cast iron.
In turn, household-level models have a gearbox made of an alloy of silicon and aluminum. The body itself consists of two halves, which are connected by bolts.
In addition, gearboxes may differ in their overall dimensions, as well as the dimensions of the gear included in their device. This directly depends on the size of the snow blower bucket - the larger it is, the larger the size of the gearbox itself.
When buying, you need to pay attention to this, because snowplows of different capacities must have different gearboxes. If representatives of the same model range of units have different power, but one type of gearbox, then they are unlikely to be completely reliable.
Causes of malfunctions and repairs
Many experts advise choosing snowplows that use a serviced gearbox. Of course, it requires certain handling, but it will also last much longer than a maintenance-free gearbox.
However, this issue has a second side - such gearboxes tend to break at the most inopportune moment. Consider, using the example of snow blowers Patriot, Tselina, Champion and Profi, what kind of gearbox breakdowns can be, as well as methods for their elimination.
Possible problems:
- There are sharp knocks in the gear of the Champion snowblower - the most likely cause of this problem is damage to the turns of the worm or bearings. The way out of the situation is to adjust or replace the bearings, as well as purchase a new worm pair.
- If you observe that the gearbox of the Patriot snow blower is excessively hot, then several factors can be the reasons for this phenomenon. In particular, it may be due to insufficient lubrication, or to bearing wear.
- In the first case, you just need to add the right amount of lubricant, and in the second, you need to adjust the bearings, or replace them with new ones.
- If the gearbox of the Profi snow blower vibrates very strongly, then misalignment of the shafts and the implement motor may be a likely cause. Thus, do-it-yourself repair of the gearbox of the Profi snow blower is carried out by eliminating this misalignment.
- If grease is leaking from the gear of the Celina snow blower, then a clogged drain hole in the vent may be a likely cause. To correct this situation, you need to rinse the vent plug in kerosene, and then wipe it dry.
- Another common cause is gear wear, which is part of the gearbox design. This is quite understandable, because it is made mainly of bronze, therefore, during long-term operation, its edges can simply be erased.
- The only way out of this situation is to completely replace the gear with a new one.
In most cases, snowblower gearboxes can be repaired without requiring replacement. Of course, it may be necessary to purchase separate gearbox components - an oil seal, gears, etc. However, this is not such a big expense as in the case of buying the entire gearbox.
By the way, the cost of components can be different. For example, a 24-tooth snow blower auger gear will cost about 3 thousand rubles. By the way, gears of different types of gearboxes can have a different number of faces in their stock - basically, these are 20 teeth and 24 teeth, depending on the model of the snow blower.
For more information about repairing the gearbox, see the video:
How to do it yourself
Self-manufacturing of the gearbox involves the use of various components from other equipment. The fact is that the gearbox itself is a rather complex part, so making it yourself is quite problematic.
In general, a do-it-yourself snow blower gearbox will consist of several important components:
Gear housing, consisting of two halves
It is impossible to make it yourself, so you need to purchase them separately. Fortunately, the cost of one half of the case is about 700 rubles, which is quite cheap.
Gear
For their manufacture, special metal-cutting equipment will be required, but the purchase of a finished spare part would also be the best solution (see). For example, the gear wheel of the Patriot snow blower, the price of which is about 3 thousand rubles, will be the best solution.
Oil seals
They are used as a seal to keep grease from leaking out. They cost about 100 rubles apiece, so their purchase will not hit your budget.
Snow blower gearboxes must be filled with grease; oil cannot be poured into the snow blower gearbox! Lubricant for gears of snow blowers with a steel-bronze worm pair is specific and contains bronze particles for partial restoration of the gear during operation. Be sure to pay attention to the warnings in the operation and maintenance manual of the snow blower for the presence of grease in the auger gearbox! Keep in mind that when translated into Russian, the instructions may contain the word oil instead of lubricant and that some quite respected brands warn about its absence.
Some snow blower manufacturers warn that the gearbox is 80% full and after 5-10 hours of operation it needs to be re-lubricated or topped up.
In addition, the instructions recommend replenishing lubricant before each season. Having a snowplow bought in a company store, there will be no questions about how to lubricate the snowplow gearbox, as this is written in the instructions. But there are cases of searching for a replacement for a branded lubricant, so it would not be superfluous to make a few tips about this:
- Before replacing, clean the gearbox and its grease fitting from dirt.
- Unscrew the fitting and use a syringe to pump in about 100 grams of grease.
- Install the fitting in place.
Usually, thick transmission lubricants are used for these purposes (Litol, Ciatim, Multifak-264, special oils for Stihl, Arsenal-417, Ronex ED gearboxes).
Remember that the presence of lubrication in the gearbox is a prerequisite for its reliable operation.