The idea of replacing the generator on the classics is ancient, like the history of the car itself, because everyone who puts more bells and whistles on their own machine than a weak Chinese radio tape recorder, everyone’s native 42A G-221 is no longer enough.
True, even those who neglect the troubles with installing a more powerful generator are annoyed by the weak low beam on the twentieth and the poor battery charge.
Once, a friend of mine fitted a 55A generator to me on the ball and the idea arose to tell you how to install it in our classics. Having surfed the Internet to find at least something about installing and connecting it to a car, I didn’t find anything worthwhile, a bunch of comments like “Stuck and forget” or long discussions of professional electricians, but they spoke in such a language that simple Russian to a person, it's like a Chinese song, nothing is clear ...))
In this regard, it was decided to write an understandable article for ordinary people in order to help themselves, without any troubles and special skills in working with electricians, but with their hands, to do this simple procedure for replacing the generator.
Let `s start:
There are many alternatives to a standard generator, since with the right skills, means and desire, it is allowed to install any generator. In the provided article, I examine only “economical” VAZ generators from other models, since:
a) They are cheaper.
b) They are more common, so you will not have problems with their replacement, searching for components to fix them and searching for them.
c) They are easier to change - you do not need to find or make any special fasteners and globally change the electrician.
You can familiarize yourself with the features of VAZ generators from the diagrams below:
42A:


In theory, it can be seen that even the more powerful 47A G222 generator from the VAZ-2105 type is already significantly better than the standard one. Although, in practice, to be honest, there is no particular difference between them. In terms of attachment and inclusion, it is quite suitable for 42A-mu G-221.
The 55A generator will be more than enough for a person who mainly uses the standard electrical equipment of a car. This is not an 80A generator, so if you prefer to use a lot of additional equipment, I would in no way recommend you install it and direct your interest to newer models. Although, if you use it, purely “Tape plus foglights”, it is completely enough. According to the 55A mount, the generator from the VAZ-2108 is no different from the standard g-221, so you shouldn’t have problems here - remove the old 42nd and put in a fresh one, the main thing is not to forget to reset the terminal from the battery and tighten the belt before this after installation.
Difficulties begin with the inclusion - as you can see from the figure, 4 wires go to the standard generator - 2 on the pin and 2 are inserted separately, and one wire is already inserted at 55A. This is explained by the voltage relay already integrated into the generator, the so-called chocolate bar. Therefore, the dark wiring from the relay (B) needs to be isolated, we will no longer need them. Two wires from pin A must be screwed to pin 1, and the remaining yellowish wire B should be connected to plug 2.
As you know, one of the main components of any car is a generator. If this device breaks down, the driver has to face certain difficulties in terms of repair. In this article we will tell you how to repair the VAZ 2110 generator with your own hands. Causes and symptoms of breakdowns, videos and photos can also be found below.
[ Hide ]
When does a generator need repair?
Before we disassemble and carry out the alteration, let's see why it is necessary to make repairs.
So, what are the reasons as a result of which the driver needs to repair:
- Modification of the VAZ 2110 16 valve generator or its repair is necessary if, with the engine running, the light is constantly on or just flashing, indicating the need to charge the battery.
- The mechanism gets hot. If you notice that the generator is heating up, while there are no other visible reasons for its damage, for example, wear of the brushes, mounting brackets or rings, then you need to take the time to diagnose. As a rule, the generator is heated for various reasons. In any case, if it is heated, it needs to be repaired.
- Another symptom of a malfunction is a complete discharge or boiling of the electrolyte in a car battery with a 16- or 8-valve engine.
- The need to remove and disassemble with your own hands also appears if the device gives a small charge. That is, the light of the dipped and main beam lamps has become dimmer. Also, a too quiet steering beep can speak of malfunctions and the need for repair and disassembly.
- When running a 16- or 8-valve injector engine, the alternator revs too high, and the brightness of the lights may also be changed. This is quite possible with an increase in the speed level from idle, however, the lights, after they have lit up brightly, should not increase their brightness in the future. That is, the intensity of the headlights should remain at the same level.
- Uncharacteristic sounds for the operation of the device (the device howls and buzzes). If you notice that the device not only gives less voltage, but also buzzes and howls, this indicates the need to remove, disassemble and repair the generator with further assembly. When the generator is buzzing, this is the first sign of the need for repair (the author of the video about the repair of the generator is TexAs 64 rus).
Possible malfunctions
Since any generator for an 8- or 16-valve injector engine is an electromechanical mechanism, there may be several types of malfunctions. It can be mechanical or electrical failure.
- Mechanical failures include malfunctions associated with the destruction of pulleys, bolts or brackets of fasteners, excitation brushes, collector, rings, rotor, bearing devices or the housing as a whole. Also, malfunctions can relate to clamping springs, belt drives, and other breakdowns that have nothing to do with electrics. By the way, with regard to excitation brushes, this problem is one of the most common for car owners. Often the device cannot work due to the fact that the excitation brushes are worn out - in this case, replacing the brushes will solve the problem.
- As for the electrics, such breakdowns include all kinds of winding breaks, incorrect operation of the diode bridge. Also, the same excitation brushes can be attributed to such breakdowns. When the excitation brushes burn out or wear out, they have to be changed by hand. It can also be various breakdowns, incorrect operation of the rotor, short circuits, failure of the regulator relay, water ingress. By the way, it is the ingress of water that provokes short circuits.
So, for what reasons the car owner is faced with the need to remove the mounts, disassemble the device and repair it with his own hands:
- Apart from excitation brushes, one of the most common causes is a pulley. The failure of the pulley leads to the need to replace it at home. If the pulley breaks, the device no longer provides as much voltage as necessary. The failure of a pulley is usually due to the wear of its teeth, as you can understand, the operation of such a pulley will be impossible. In addition, damage may appear on the pulley, in which case you will also need to remove and disassemble the device yourself.
- Wear of brushes. As mentioned above, one of the most common problems in the operation of the device, which lead to the removal of fasteners and repairs, are brushes. Current-collecting brushes are, in fact, consumables, since the brushes are gradually erased with the operation of the generator. In order to prevent complete erasure of the brushes, it is recommended to change them periodically.
- As for the collector or slip rings. The problem of failure of rings or a collector is familiar to many motorists. If the collector or rings break, the generator cannot perform its functions. When excitation brushes or rings fail, the generator has to work with high power consumption, it usually heats up. If the rings are worn, the problem must be solved as soon as possible.
- In addition to the rings, the problem may lie in the voltage relay.
- The need to dismantle the brackets and remove the device appears when the stator winding is closed.
- Failure of bearing devices, in this case, the generator is also heated.
- Rectifier failure.
- Broken wires (the author of the video about replacing the device belt on a VAZ 2110 car is in Sandro's garage).
Disassembly and Repair Guide
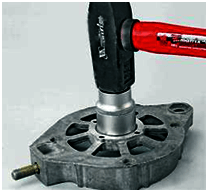
So, in what cases it is necessary to replace the VAZ 2110 generator, we figured it out, now let's start repairing. If there is a problem of wear of the brushes, pulley, mounting brackets, rotor, or the mechanism just heats up, first you need to unscrew the protection.
- To unscrew the protection, unscrew the bolts of the mounting brackets. When you were able to unscrew the protection, put it aside and dismantle the generator. Make a mark on the body of the mechanism, it will allow you to correctly connect the brackets for assembly in the future. On the top cover, release the three latch brackets, the cover can be removed.
- Then you need to unscrew the two bolts that fix the regulator, the wire can be disconnected. After disconnecting the wire, the element can be dismantled together with the brush holder.
- Then you need to unscrew the bolt that fixes the capacitor. In addition, remove the bolts securing the block. To dismantle it, you need to disconnect three wires. Next, unscrew the contact bolt and change the capacitor, you also need to disconnect another wire from this bolt. Unscrew four more bolts, there are washers under them.
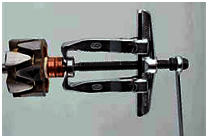
- Remove the rotor and install it in a vise, then unscrew the nut that secures the pulley. Remove the thrust washer, remove the rotor directly, and then pull out the ring from its shaft. All contact rings should be diagnosed; if there are visible damage, they must be treated with sandpaper.
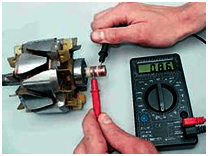
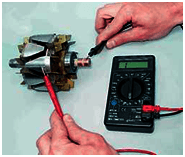
- Use a tester to connect the wires and measure the resistance. If, after connecting the wires and measuring, the ohmmeter shows "infinity", this indicates a wire break. It makes no sense to repair the wires, it is better to change the rotor. Also, the rotor can be checked for short circuits, for this a control light is used.
- If there are no problems in the operation of this mechanism, then you can proceed to the diagnosis of the stator. Please note that when inspecting the device, it should not have any damage from the anchor. If the armature touches the stator, then first of all you need to try to change the bearing parts, if it does not help, then remove the bolts of the cover bracket and replace it completely. You also need to diagnose whether there is a break in the stator itself. To check that it is not there, a test light must be connected to all winding terminals in turn. If during the check you notice that there is no light after connecting, then this indicates the need to replace the element.
- Try to rotate the cover bearing, if there is play or jamming, replace the element, if there are no problems in the operation of the bearing, then proceed to the next step.
- You should also check how freely the bearings located next to the slip rings rotate. If there are any difficulties in its rotation, the element must be changed. Also take the time to inspect the lid itself. In the presence of mechanical damage on it, it is necessary to change the component.
- Upon completion of the repair work or if there are no breakdowns, the device will need to be properly assembled by securing all brackets. The cover must be installed in accordance with the label, if there is no label, then use the service manual. When assembling, be as careful as possible, the process is carried out strictly in reverse order.
Video "How to change the generator at home"
Learn more about how to replace the device with your own hands from home, learn from the video below (the author of the video is in Sandro's garage).
Sorry, there are currently no surveys available.One of the reasons why the battery is not charging is the breakdown of the generator. Before you independently repair the VAZ 2107 generator, you need to find out the causes of the breakdown and familiarize yourself with the technology for removing, restoring and installing it.
Causes of generator malfunction
Generator repair is necessary in such cases:
- winding burned out (rotor or stator);
- worn brushes;
- damaged (cracked) case;
- failed (noisy) bearings;
- broken diodes.
To eliminate these malfunctions, it is necessary to remove the generator and replace parts. It is more convenient to do this if you provide access to the generator from below. To do this, you need a viewing hole or a lift.
Removing the generator VAZ 2107
First of all, disconnect the battery terminals. To facilitate work and improve access to the generator, it is better to remove the battery from the machine. The further order of work is as follows:

Disassembly of the VAZ 2107 generator
For a comprehensive repair, a puller is needed to dismantle the bearing from the shaft, a mandrel for pressing and knocking out the bearing in the generator cover.
Sequence of work:

Tip: To check the bearing, shake the inner ring of the bearing while holding the cover. If there is play, the bearing must be replaced.
- if necessary, unscrew the nuts securing the bearing;
Attention: if the nuts are not unscrewed, you should cut off the ends of the fastening bolts. When assembling, it is necessary to install new bolts and, after tightening the nuts, rivet their ends with a core.

Assembling the generator VAZ 2107
Before assembling the generator, it is necessary to clean the parts from contamination. It is better to wash metal parts with gasoline, wash windings and other complex parts with air from the compressor.
The new bearing is pressed onto the rotor using a mandrel. It can be used as a head or tube with a diameter that matches the size of the inner ring of the bearing.
Before installing the rear and front covers, it is necessary to check the condition of the bearing seats. They must not be damaged or scratched.
If there are cracks in the cover, it is necessary to replace them with new ones. Bolts and nuts of inadequate quality must also be replaced.
The assembly sequence of the generator corresponds to the order of actions when disassembling it.
After installing and connecting the generator, it is necessary to tighten the belt with the necessary force. If it is overtightened, the bearings will fail, if it is weakened, the generator will slip under load and not produce the required charge current.
Most often, the generator for 8 and 16 valve VAZ-2110 fails as a result of moisture and dirt. Another reason is the wear of the components of this assembly, namely the brushes. Most often, the malfunction manifests itself as follows:
- the generator does not produce electricity;
- the output current is either too high or too low;
- while the engine is running, extraneous sounds are heard, most often a squeak or squeal.
The operation of the generator is checked using special stands or a digital voltmeter. If extraneous sounds are heard in the area of \u200b\u200bthe engine compartment, then first of all it is necessary to check the timing belt tension. Most often, the reason is precisely in it, but after checking, remove the belt from the pulley and start the engine. The absence of noise is a reason to check the performance of the oscillator more carefully.
How to remove the generator on the VAZ-2110
 If you have a power unit with 8 valves, then it is best to work from above. In the sixteen-valve version, the generator must be removed from below. To do this, first unscrew the pan. Before work, prepare several different keys. You can remove this knot quickly if you follow the following instructions:
- De-energize the vehicle's on-board system - to do this, just remove the "negative" terminal from the battery.
- On the positive stud of the oscillator, find the M10 nut and unscrew it.
- On the back of the device, wires are connected to the generator, which must be disconnected before the next stage of disassembly.
- Using a 13 wrench, loosen the top and bottom nuts.
- Unscrew the tension bolt with a 10 wrench to loosen the belt tension and remove it.
- Then completely remove both nuts (upper and lower), remove the tension bar.
- Carefully rotate the alternator at a right angle and remove it from the engine compartment.
If you want to repair this unit, you should carefully wipe it with a rag to remove all dirt.
How to disassemble the generator
 First, make two marks on the metal covers. This will help you later assemble the unit without problems.
- Release the metal clips and remove the plastic cover.
- Using a Phillips screwdriver, unscrew the screws securing the voltage regulator.
- Loosen the M10 nut. Then use a screwdriver to remove the screw and remove the capacitor.
- To remove the pulley, clamp the alternator housing in a vise. Put the head on the nut at 21, and through the hole in the head, put the hexagon on it at 8. Only after you unscrew the nut, it will be possible to remove the washer and pulley.
- Remove the four mounting screws to disassemble the generator into two parts.
- From the back of the case, unscrew the screws that secure the stator wire and diode bridge.
- Remove the diode bridge and the winding of the oscillator.
- Press the rotor out of the cover with your fingers along with the bearing.
- Carefully remove the bearing bush.
- Take a puller and remove the bearing.
Replacing a generator in a VAZ 2107 car is a rather rare phenomenon. This unit usually works without failures and does not need to be repaired. However, in fairness, it should be noted that it also has malfunctions, the elimination of which requires immediate repair, or even its complete replacement. The following are the most common generator faults:
- Failure of the diode bridge (rectifier unit);
- Failure of the stator winding (break, short circuit);
- Failure of the excitation winding (open or short circuit);
- Worn or stuck brushes;
- Wear or jamming of bearings;
- Failure of the voltage regulator.
These malfunctions in the VAZ 2107 are quite simply diagnosed, which cannot be said about their elimination. For example, bearing wear is accompanied by the appearance of noise or knocking during operation. In order to make sure that the cause of its occurrence is damage to the generator bearings, loosen and remove the drive belt and shake / rotate the pulley. In the presence of play or difficult rotation, the bearings must be replaced immediately.


Unlike the mechanical problem described above, electrical failures are more problematic in terms of diagnosis. The fact that the VAZ 2107 generator is not working is signaled by a battery charge lamp. But the cause of such a malfunction will be more difficult to establish. If you do not have sufficient experience in handling auto electronics and special measuring instruments, then it is better to entrust this matter to specialists.
If you feel that you are able to solve the problem yourself, then proceed to the initial diagnosis of the malfunction. To do this, at a minimum, you need to have a multimeter on hand, with which you can measure the voltage at the output of the generator and perform continuity of the rotor and stator windings.


It should be noted that with an interturn short circuit in the stator winding, a measuring device can be dispensed with. With such a malfunction, the generator emits a characteristic howl. In other cases, you will still have to remove the generator, disassemble it and try to determine the cause of the malfunction from the inside.

Usually, any of the above faults is eliminated by replacing the failed element: rotor, stator, bearing, brushes. However, if the repair takes time, and the car is needed urgently, a knowingly working generator is installed in place of the faulty one. Usually for classic cars, which include the VAZ 2107, separate replacement units are available both from motorists and in workshops. After the repair of the native generator, a reverse replacement is performed.

Removing the generator from the VAZ 2107 is quite simple. To do this, you need two keys, 17 and 19, m penetrating lubricant such as WD-40 in case you just can’t unscrew the nuts. First, use a 17 key to unscrew the nut designed to tighten the drive belt, and then use a 19 key to unscrew the nut securing the generator to the engine housing.

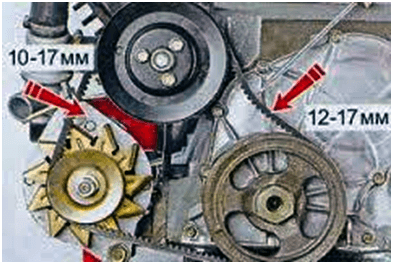
Install the generator in place in reverse order, while controlling the degree of tension of the drive belt. When pressing on it between the pulleys, the degree of deflection should be 10-17 mm. Losing sight of this important point, you can get new troubles in the future, expressed in damage to the belt, premature wear of the bearings, loss of charge due to belt slippage.