Nothing more simple and effective has been invented to transmit torque from the crankshaft to the generator rotor than a belt. It would seem that what is special about this piece of rubber with polymer threads soldered into it? But the rupture of this seemingly insignificant element entails not only the impossibility of charging the battery and the de-energization of many components of the car, but also the possibility of a complete stop of the car. Since the battery charge is mainly designed to start the car, and the functioning of the entire electrical network is ensured by the operation of the generator. To avoid such nuances, you should know the main types of this product, its service life, possible signs indicating its wear, and how the alternator belt is replaced with your own hands.
A variety of engine designs entailed no less number of types, drive belts for mounted units and diagrams for their correct location.
For better contact with the nodes, they are made of various shapes of the inner surface and are divided into three types:
- gear - products with a variety of pitches of the transverse profile, which have a high accuracy of the transmission moment;
- poly-wedge (river) with longitudinally located ribs, which have greater reliability;
- wedge - trapezoidal section, where the working sides are not intended for reverse bending.
For each of these types, respectively, manufacturers also recommend a service life, which can vary within 50-70 thousand kilometers of a car.

Different vehicles - different installation scheme
In earlier models of cars, a direct connection of the generator drive to the engine pulley was used without any bends, but in a modern car, a belt drive is often used to supply torque to the drives of several devices: air conditioning, pump, air conditioning compressor, generator and other units. And lying between these nodes, the belt can write out bizarre configurations and bends, this pattern is called - the correct installation diagram. A thrifty car enthusiast should always have this drawing at hand, so that if a break occurs on the road, they do not suffer, wrinkling their forehead, remembering how to replace the alternator drive belt. And, of course, it is advisable to carry a spare set just in case of an emergency. 
Signs indicating belt wear
Before covering the ways and methods of replacement, let's touch on possible signs indicating that this time has come:
- upon external examination, with the engine turned off, there is a loss of elasticity, cracks, small tears and tattered sides, a clear sign of an imminent failure;
- loosening of the belt tension due to its stretching or breakage of the tension roller;
- a noticeable whistle when starting the engine, increasing speed or turning on electrical appliances, the reason may lie in poor belt tension or jamming of one of the drives involved in the circuit. This can be either a compressor or generator drive, or a failure of the air conditioner clutch bearing or tensioner bearing;
- the appearance of a signal on the sensors, indicating a decrease in battery charging or the performance of the generator itself.
We should not forget about the planned replacement of this product within its service life.

Alternator Belt Replacement Options
To carry out work when it is necessary to replace the alternator belt, you do not need special skills and knowledge, you cannot call such work simple, but there is nothing extraordinary in it. Initially, you should disconnect the mass from the battery, and figure out which parts, protective covers or other components prevent access to the belt and generator.
 If in a car the generator drive is directly connected to the engine shaft pulley, then everything is very simple here, since in this case the tension is made by the generator mounting bolts, plus an additional fixing bolt. Having freed up space for free access to the belt and the generator, the above-described bolts are unscrewed and the belt tension is loosened.
Watch related videos:
In another option, where the functioning of not only the generator, but also the air conditioner, pump and other components depends on the belt, the work of replacing the generator belt is slightly more complicated. It may be necessary to remove the front wheel fender and crankcase to gain access to the belt, tensioner and wires of the involved units.
After removing all the interfering parts, loosen the belt:
- if the tension is due to the roller, then loosen the bolt or nut fixing the roller;
- if this function is performed by a spring tensioner, then the same result is achieved by simply acting on the roller in the desired direction.
 After removing the belt, it is advisable to carry out, if its condition is in doubt, then replace it. Also, after examining the belt, you should pay attention to the nature of the damage, and find out why they were formed. Often the failure of various mechanisms can provoke its wear and tear.
It would be useful to compare the old and new belts: length, width, number of teeth (streams), etc. There are precedents for discrepancies in some parameters of a seemingly branded product.
The installation of a new belt must be carried out in the same sequence and according to the existing layout for a particular vehicle.
Welcome!
This part connects the alternator pulley to the crankshaft pulley and the water pump pulley on classic models. On front-wheel drive vehicles, the pump pulley ties the timing belt. A break in the alternator belt on the classic will cause poorly functioning devices, because the energy will come only from the battery, respectively, if the charge is poor, the devices will junk. On the contrary, if the battery is powerful and sufficiently charged, then for some time the devices will not go out and you may not even notice that the belt has broken. And here it is necessary to remember about the pump and pay attention to it, since the belt connects it, then the gap will stop the circulation of the coolant in the system and the machine will start to get very hot.
Note!
you will need the following tools: a mounting spatula (a convenient thick stick or a small metal scrap will do), wrenches will be needed for “17” and “19”.
Belt location
Located at the front of the car. In the photo, the red arrow shows the radiator of the cooling system and the bar on which the battery stands (now removed). The belt connecting the three pulleys is indicated in the photo with a blue arrow.
When to change the belt?
The main reason is wear: various kinds of cracks, worn edges, worn teeth. We do not recommend tightening with the replacement of the belt, otherwise the gap will lead to overheating of the engine and even boiling during extreme heat. The battery will quickly discharge in the absence of support from the generator, which will stop spinning and giving energy.
Note!
Have you ever heard a car whistle? The timing belt makes a sound, it occurs for various reasons:
- severe wear often leads to whistling;
- water or any liquid getting on it (for example, coolant gets on the belt when the pipes of the cooling system are worn out, leaking. Inspection of the belt and pulleys for moisture will help to recognize the problem);
- weak belt tension (adjustment will come to the rescue, read below);
- poor quality of the belt, there is a straight oak belt (by the way, it hardens in frost).
Most cars in the winter season make a whistle when starting the motor, and a warm car no longer whistles - a sign of a hardened belt.
The video below can save you in an emergency: if the belt suddenly breaks on the road, and there is no spare, an ordinary belt or tie will come to your aid! Watch the video in detail and shake your head, you never know, anything in life will come in handy.
We change the belt on the VAZ 2101-VAZ 2107
Withdrawal
Note!
Removing the battery will make it easier to access the belt. The process is described in the article: "Replacing the battery on cars".
Check out the look of the belt. In case of good condition, check the tension, tighten it if necessary. It is easy to check: squeeze the belt with your fingers with a force of 10 kg anywhere. Either in place "A" the distance that the belt should bend is 10-15 mm, or in place "B" 12-17 mm (see picture).
Note!
It is more convenient to press and check the deflection at point "A". Any deviation from the norm requires tightening the belt. Remember, do not remove the belt from the pulleys unless you are going to replace it!
Move to the lower car part and unscrew the lower generator nut one turn (see small photo), get out from under the car and go to the engine compartment. Loosen the top nut of the generator by one or two turns (red arrow in the photo), an extension cord with a universal joint and a cap head will help you (tools are indicated by a blue arrow). Loosen through the battery installation strap.
Note!
The upper nut that secures the generator to the bar is twisted differently for everyone, so as soon as you feel that the nut goes easily (look, do not unscrew it completely), then immediately stop unscrewing it!
We proceed directly to changing the belt. Move the alternator towards the engine with your hands and remove the belt. If you just need to adjust, then insert a mounting blade between the engine and between the generator itself (see photo below), and using the blade as a lever, move the generator away from the engine. Holding the spatula in this position, tighten the upper nut securing the generator to the bar and the lower one too. Release the blade and remove it, check the belt tension and, if necessary, repeat the operation (if the tension is not within the norm).
Installation
First, install the belt on the crankshaft pulley. On the image above, see the pulley is indicated by the number 3, the pulley of the generator with the number 2 and the pulp of the pump number 1. Up the end the generator to the engine, if it is shifted, but the belt is still not installed, then carefully scroll the pump with your hand (upper), or as far as the assistant, so that it use the crooked starter, scrolls the pulley slight In pumps.
Attached equipment (generator, air conditioning compressor) is installed on the car engine, driven by a V-ribbed belt. Over time, the product wears out and cracks, which can lead to rupture. The need to change the alternator belt on your own may arise if the trouble happened on the road and away from the service.
[ Hide ]
When should the alternator belt be changed?
The frequency of replacing the drive belt of the electric generator is indicated in the vehicle maintenance instructions. It should be remembered that the period on the same machine supplied to different markets may differ. This is due to different climatic conditions and dust content of the air, which additionally destroy the material of the product.
For example, Volvo recommends that an initial change be made after 80,000 km of run, and each subsequent change is carried out after 60,000 km. At the same time, the belt changes on a car from the European market every 180 thousand km. On VAZ cars, the product rarely serves more than 30 thousand kilometers.
A typical sign of a stretched belt is a whistle that occurs when starting the engine or after driving through a puddle. The source of the sound is the material of the strap sliding over the surface of the pulley. Usually the whistle disappears quickly and occurs again when the engine is started or after another puddle. In this case, the owner needs to check the belt tension and try to bring it up to the standard.
Worn belt (right)
What affects wear?
Factors affecting the resource of the drive belt:
- Product operating conditions. The ingress of dust, abrasives or chemicals will significantly reduce the life of the strap. Long-term operation at low air temperatures negatively affects the material.
- Pulley condition. The appearance of beats or deformations leads to the destruction of the tracks and edges of the belt.
- Tension. With a reduced or excessive tension, the belt wears out at an accelerated rate.
- Belt release date. Rubber is subject to aging, so the strap may break when in storage in the packaging. Violations of storage rules have an additional negative impact.
- Belt manufacturer. There are products made by small companies from low-quality materials. Such straps can collapse after several thousand kilometers.
Signs of belt wear and product replacement are shown in a video shot by the author Vladimir Bazekin.
How to check the belt?
The condition of the belt should be checked not only when a whistle appears, but also periodically. Most car manufacturers recommend a visual check of the condition of the strap and tension every 6 months or 25 thousand kilometers. It does not matter if the car is being used or parked.
Approximate check sequence:
- Open the car hood. located on the side of the crankshaft pulley. It is necessary to check the condition and tension carefully, keeping your hands away from the cooling system fans. This is due to the fact that the fan can start at any time, even on a cold engine.
- Checking the visual condition is done by turning the inside of the belt to the light. Cracks, abrasion and delamination of the product are unacceptable. If damage occurs in a small area, the belt is considered unsuitable for further use. The element is pulled by scrolling the crankshaft behind the central nut.
- The tension is checked by measuring the deflection under a load of 10 kg. With a distance between the axes of the pulleys up to 300 mm, the deflection arrow should be 6 mm. With a distance between the axes within 300-450 mm, a deflection of 12 mm is allowed.
You can check the tension of the alternator belt by applying the maximum load, that is, by turning on all energy consumers, except for the starter. If the whistle does not occur, then the tension is sufficient.
How to tighten the belt
If there are no cracks or tears on the surface of the belt, then you can try to tighten it. A similar procedure is relevant for Russian-made cars and foreign cars equipped with a mechanical manual tensioner, which is often the generator itself. The belt is tensioned until it stops slipping on the pulleys. At the same time, the motorist must remember that excessive tightness loads and disables them.
If the tension of the strap does not allow for normal operation, then the part must be replaced. It is forbidden to install spacers under the tension rollers, which will allow you to choose an excessive length of the belt.
Instructions for replacing the drive belt
Replacing the alternator drive belt is not a problem for most motorists. After removing the worn strap, it is recommended to inspect the wear pattern. If it has damage to the edges and the contact part, then this may indicate misalignment of the pulleys. In this case, you need to find the damaged element and replace it. Installing a new belt on a damaged pulley is pointless as the rubber will be quickly worn down by the sharp edges. When replacing the strap, you must follow the sequence of steps recommended by the vehicle manufacturer.
When replacing the alternator drive belt, it may be necessary to install a new idler and associated fasteners. Information on the list of parts to be replaced can be obtained in the instructions for the repair and operation of the car.
What will be needed for replacement?
Before changing the alternator belt, you will need to prepare a set of tools and materials (the maximum list is given):
- wrenches and heads;
- new belt and tension roller;
- rod for fixing the roller;
- mounting blade for removing the belt;
- protective gloves;
- a sheet of paper and a pencil for drawing the installation diagram.
A new non-original drive belt may be several millimeters longer than the standard product. The difference in length will be compensated by the tensioner.
Scheme
Installing a belt on engines with two or three pulleys is not difficult. The situation changes when the belt is installed on a motor equipped with a large number of pulleys. In this case, it is recommended to draw a product installation diagram. Such an event will speed up the installation process and avoid errors.
 An example of laying a belt on a Chevrolet Cobalt
 Circuit designations:
- 1 - crankshaft pulley;
- 2 - generator pulley;
- 3 - guide roller;
- 4 - air conditioning compressor clutch;
- 5 - pump pulley and additional booster pump drive pulley;
- 6 - belt;
- 7 - tension roller.
Action algorithm
The procedure differs depending on the design of the engine and the number of attachments. The following are step-by-step instructions for changing belts on common vehicles. On other vehicles, the operation takes place according to a similar technology.
By car VAZ Granta
You can replace the belt on a VAZ Grant car without a tensioner according to the algorithm:
- Cut off the old strap with a knife.
- Turn the alternator mounting bolt from below by 3-4 turns.
- Loosen the upper fixing bolt completely and remove it from the hole.
- Push the alternator forward until the mounting eye is behind the bracket.
- Secure the mechanism with wire or otherwise.
- Put the belt on the alternator pulley and the upper part of the crankshaft pulley. Some car owners use an additional device that holds the strap on the device during donning.
- Turn the motor shaft with a wrench to fully fit the belt.
- Fix the generator in place. Check the operation of the units with a full load of the generator and various crankshaft speeds.
On Kia Seed
You can change the alternator belt as follows:
- Unscrew the fixing bolt located on the top of the generator.
- Raise the latch up, removing the bolt from the guide groove.
- Rotate the device with respect to the lower bolt. If the mount is “sticky”, then the generator turns with light hammer blows applied through a wooden block.
- Remove worn belt and pressure roller.
- After that, it is necessary to mount a new roller, and only then you can put on the belt.
- Tighten the strap according to the instructions in the user manual. Check the operation of the unit, if a whistle appears, slightly increase the tightness.
For Volkswagen Polo Sedan
An example of replacing a belt on a Volkswagen Polo Sedan engine equipped with an automatic tensioner:
- Loosen the belt tension by releasing the tensioning roller fixing bolt. Nut size 16 mm.
- Turn the roller mounting bracket counterclockwise. Turning takes place with effort, as the tension spring is compressed.
- Carefully remove the belt from the crankshaft pulleys and drive units.
- Remove the roller with a 16 mm head inserted into the recess under the generator. If the tension roller does not change, then it is fixed in the spin position with a metal rod inserted into the hole in the housing.
- Put the belt on the pulleys, then carefully release the tension roller. The tensioner automatically adjusts the tension level of the product.
Video "Maintenance and replacement of the alternator belt"
Maintenance and replacement of the alternator belt is shown in the video tutorial filmed by the avto-blogger channel. ru.
The generator in the car generates the electricity needed to charge the battery and the normal operation of all onboard auto electricians. Immediately after starting the engine, the mechanical energy to rotate the rotor is transferred from the engine through the alternator belt, the rotor rotates, and the generator starts to work. On modern cars, a single drive with a system of rollers is often used, which, in addition to the generator itself, drives other attachments through a system of rollers and tensioners: a pump, an air conditioning compressor, a power steering pump, etc. Over time, the alternator belt needs to be replaced, as well as the replacement of its rollers and tensioner. The replacement periods are prescribed in the instructions for the car and should be carried out during scheduled maintenance, but very often they are neglected, especially when the warranty period has ended. And of course, the drive, having worked out all the deadlines, does not withstand the load and breaks. In such cases, we offer services for replacing the alternator belt with a visit to the site of the breakdown. And we recommend that all car owners purchase and carry a spare drive belt in advance. The video below shows how to change the alternator belt.
Let's make a reservation right away, not on all car models, and not in all cases it is possible to change drive belts on the road, in such cases we offer a stationary car service.
Alternator belt replacement video
The video shows examples of replacing an attachment drive with a Ford Focus 2.Timing for replacement of drive belts
As mentioned above, the terms for replacing parts are written in the service book of your car, but there are signs that allow you to notice the stretching of the belt: first, when the engine is started, a characteristic unpleasant whistle is heard, which disappears as the engine speed increases, then such a whistle also appears when the engine is running in wet weather.
All modern cars are equipped with sensors that signal a malfunction of the generator (a warning light with a battery image), but on many models the sensor only shows the very fact that the belt is broken or has fallen off.
Therefore, when you turn on the ignition NO!, before the starter starts, check the battery indicator light. Sometimes car owners do not pay attention that this lamp is not lit, especially near other lamps - this is an important signal of problems with power generation and / or battery charging voltage.
The main reasons for the failure of the alternator belt:
- Stretching and breakage due to aging - prompt repair and replacement at the site of failure is possible;
- Loosening the belt tensioner (and replacing the alternator belt rollers) - prompt repair is possible, replacing both the tensioner and the rollers at the site of failure (check with the operator for your machine);
- Foreign objects (stones, branches) getting under the belt - prompt repair and replacement at the site of the breakdown is possible;
- Damage, misalignment of pulleys, tensioner rollers, jamming of the generator or any other attachments on the same belt - we only offer a call and repair to the service station, because. breaking, stretching or slipping of the belt is a consequence of mechanical damage to attachments, and the usual replacement will not be able to help - when the engine starts, the belt will fly off or burst again. (See attachment drive diagram on engine)

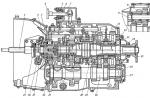
The diagram shows that, in addition to the generator itself, the belt drives several nodes, passing through the rollers and the tensioner - the water pump, and the hydraulic booster, and, accordingly, damage to any of these nodes leads to a break or rally of the drive.
The difference between alternator belt replacement and timing belt replacement
Sometimes car owners confuse the replacement operation: the alternator belt and the timing belt (gas distribution mechanism).
Carefully inspect the damaged drive:
- smooth or with longitudinal grooves for pulleys and rollers - this is a generator belt,
- if you see transverse teeth on it, this is the timing drive.
The generator set is the main element in the electrical network of any car. It is necessary to immediately eliminate its malfunction. Below we will talk about replacing the Ford Ford Focus 2 alternator belt on our own.
[ Hide ]
Why do you need to change the belt on time?
The alternator belt in Ford Focus 100, 105, 115, 125 restyling and dorestyling cars, according to official data noted in the technical book, should be changed every 60 thousand kilometers. If the replacement interval is violated, the belt may break, which will cause inconvenience to the car owner. The service life of the strap may be shorter, everything here is determined by the conditions of use, correct installation and the quality of the part itself.
The need to change the product can be understood by the presence of defects and other damage on the structure itself. If the generator strap breaks, all equipment will be powered directly from the battery. When functioning properly, electrical appliances receive power from the generator set, which also restores the battery charge spent on starting the engine. If the strap breaks, the battery will not be able to renew its capacity, which will lead to its rapid discharge and the impossibility of driving a car.
Also, the installed drive strap is used to ensure the correct operation of the Ford Focus hydraulic power steering. If a break occurs, the power steering will turn off, and the driver will have to make efforts to turn the steering wheel.
Signs of an imminent replacement
The appearance of a whistle may indicate that the strap will soon fail. In wet weather, the whistle appears when the engine is started and disappears over time. If the belt is worn out, then it will whistle incessantly, especially when turning on electrical appliances and other equipment, for example, optics. In some cases, a battery light appears on the control panel of the car. This may be due to both problems in the battery, and malfunctions of the generator device.
Other "symptoms" of product wear:
- the appearance of cracks on the outside of the strap;
- the product is greatly stretched, it has lost elasticity;
- the appearance of tears on the structure of the strap;
- the formation of damage on the inside;
- the structure of the belt began to delaminate.
Part selection options
When choosing a strap, it is necessary to take into account that the purchased product must correspond to the length and size of the worn part. The Ford Focus uses straps ranging in size from 705mm to 975mm. Here you need to rely on the year of manufacture of the vehicle, its version and model. You can find out exactly which belt is used in your car from the technical manual. Focus 2 models equipped with a 1.4-1.6 liter gasoline engine and an air conditioning system can use products: original Ford production, German Kontitek belts, Italian Daiko or Bosch. The latter manufacturer is considered the most popular among consumers.
If cars with the same engine do not have an air conditioning system, it is desirable to use original manufacturer's straps, as well as Gate and Kontitek manufacturers. Daiko, Kontitek and original parts are allowed for use in Focus 2 models equipped with 1.8 or 2 liter units. Similar belts can be installed in restyled vehicles. Also, products of the listed manufacturers are allowed for use in machines equipped with diesel engines.
User Pavel Menshakov provided instructions for replacing the alternator drive belt with his own hands.
Step-by-step instruction
You can replace, put on and tighten the product yourself.
Required Tools
Change the belt after all the tools are assembled:
- set of wrenches;
- dressing device;
- tensioner;
- Screwdriver Set;
- jack;
- rollers.
A donning device can be purchased at a store, rented at a service station, or developed a drawing and made by yourself. A slip-on tool will allow you to complete the installation procedure faster, and rollers will be required provided that the old parts have begun to wear out.
User Ernest told how to independently change the generator strap.
Replacement steps
In order to properly remove, install and tighten the drive belt of the generator set and air conditioner, it is necessary to proceed according to the following scheme:
- The Ford Focus alternator belt is replaced by dismantling the product. To do this, remove the key from the car ignition and open the hood. Unscrew the screws securing the terminals connected to the battery, then remove them.
- Loosen the screws that secure the front right wheel. Jack up this part of the car. Unscrew the screws completely, and remove the wheel.
- After dismantling the wheel, you can remove the fender liner. Disconnect and set aside the mudguard. Having gained access to the generator belt, remove it. To do this, use a pre-prepared knife. After cutting and dismantling the belt, clean the surface of the shaft.
- Visually evaluate the condition of the installed rollers. If there are defects, the parts must be replaced.
- Now you need to install a new belt and stretch it. The strap should be centered between the power steering pump and the crankshaft. You will see the pump wheel, a tool for installing the part is mounted on it. When the tool is installed, it should be turned counterclockwise.
- It is necessary to put a strap on the drive pulley. It is mounted in such a way that the number located on the surface is directed towards the machine motor. The belt is being mounted on the shafts of the hydraulic booster, air conditioning system and generator set.
- The product is being stretched. The 19 key turns the water pump pulley. The procedure is done carefully. While the pulley is spinning, the strap is stretched. Scrolling is carried out until the belt stretches and fully sits on the pulley. Take an 18 wrench, use it to turn the crankshaft a few turns. As a result, you can check the correct installation of the part.
- To tighten the strap on the compressor drive of the conder, place the mounting tool on the pulleys of the accessories. Installation is carried out in such a way that the tool is between the axes of the pulley. The device is placed on the device and installed on the compressor shaft.
- The crankshaft turns again. This is done until the product is completely seated on all shafts. If you manage to do this, then the mounting tool is removed, and the crankshaft rotates 2-3 turns. Check whether all actions are performed correctly and evaluate the quality of the product tension. Too little or too much tension can cause the strap to wear out quickly. After installation, make sure that the grooves of the product are properly seated on the grooves on the shaft. Otherwise, the strap may warp when starting the engine, which will also lead to wear and tear.
- Assemble everything in reverse order. Reinstall the fender liner and wheel, tighten the bolts securely. Start the engine and check that the belt is working properly. At first, he may make noise that is uncharacteristic for his work. Subsequently, the sounds will disappear when the belt is worn. You can use a special softener, sold at any store with automotive chemicals. With it, get rid of extraneous sounds.