Daytime running lights are not related to dimensions and are lighting devices that improve the visibility of the driver in the daytime.
Standard DRLs are LEDs that shine brightly and are characterized by a long working life. When you use daytime running lights on the VAZ 2107, you should not additionally turn on the dipped or fog light.
 Daytime running lights on the VAZ 2107
 Installation rules
Installation of additional lighting on a domestic car does not require qualifications and experience. However, if you install it incorrectly, you run the risk of running into a fine from traffic cops, becoming the owner of an administrative violation.
To prevent this from happening, connect following the rules:
- read GOST R 41.48-2004. It concerns the rules for installing lighting fixtures on a car and vehicle certification in this regard. It contains all the parameters that you must consider when installing these devices;
- choose the appropriate shape of the DRL body. Keep in mind that not all lighting devices are suitable for the VAZ 2107. Drivers consider it the best choice in terms of price-quality ratio;
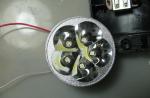
 Philips LED DayLight 9 daytime running lights
 - check for proper housing size, taking into account the blocks of adjacent Daytime Running Lights. Install lighting fixtures in the air intake or on the bumper, depending on the situation;
- the height of the body of products in the frame is 250-1500 mm from the road surface. The width between the inner edges of the 2 surfaces visible on the vehicle must be at least 600 mm;
- products are located in front of the machine, and the beam of rays is directed forward;
- consider the overall brightness of the LED lighting. It is 150-330 lumens.
Installation process
After buying ordinary ones or before you, the question is: how to connect new devices to the VAZ? This requires:
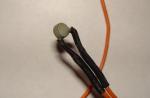
- take a five-pin relay from a domestic manufacturer;
 Five-pin relay of a domestic manufacturer
 - to terminal No. 30, take a positive charge from the ignition (as an option - a wire from the button responsible for heating the rear window);
- connect connection No. 86 to the low beam using the button for activating the dimensions and low lamps;
- No. 85 - throw on the ground;
- No. 88 - connect to DRL;
- No. 87 is not required during operation and is not connected to anything.
 Wiring diagram for daytime running lights on the VAZ 2107
 Relay - put in the cabin. Under the car hood, only run the wiring that goes directly to the lighting fixtures. Such
On the territory of the Russian Federation, for more than 8 years, amendments to the rules of the road (SDA) have been in force, according to which a moving vehicle during daylight hours must be indicated by dipped beam headlights, fog lights (PTF) or daytime running lights (DRL). The use of head and fog lamps for these purposes has a number of disadvantages. Therefore, drivers prefer to buy ready-made navigation light modules and install them on their own in their car. How to properly connect daytime running lights so that their operation is safe and does not contradict applicable laws?
The nuances of turning on running lights
The main requirements regarding the installation, technical parameters and connection of navigation lights are listed in paragraph 6.19 of GOST R 41.48-2004. In particular, the electrical functional diagram of the DRL must be assembled in such a way that the running lights automatically turn on when the ignition key is turned (engine start). At the same time, they should automatically turn off if the headlights are turned on.
Paragraph 5.12 of this standard states that the headlights (FGS) should be turned on only after the dimensions are turned on, with the exception of short-term warning signals. When connecting DRLs independently, this feature must be taken into account.
The correct connection of DRL is not limited to a well-thought-out functional diagram. It's time to think about the stabilization unit for LEDs. In the running lights themselves, the resistors act as a current limiter, however, due to voltage drops, the resistors cannot limit the current at the same level. That is why a voltage stabilizer in the navigation lights connection circuit is essential. Otherwise, the service life of LED DRL modules is significantly reduced due to constant changes in on-board voltage. Some motorists say that you can connect running lights without a stabilizer.
Connecting and installing an LED driver is a waste of time, because DRLs on LEDs regularly shine for months without any stabilization ...
However, this assertion is easy to dispute. The fact is that with each power surge, more than 12 V appears on the LED module, the direct current through the LEDs exceeds the nominal value, which leads to overheating of the radiating crystal. The brightness of the LEDs decreases, such DRLs will no longer be able to fulfill their immediate task - to warn drivers of oncoming vehicles from afar, and over time they will completely flicker and fail.
Using LED DRLs without a voltage stabilizer means throwing away at least a few hundred rubles every year on new modules and wasting time replacing them.
For ease of understanding, the circuits below are shown without the use of a stabilizer.
The simplest circuit
The simplest scheme for switching on DRL when starting the engine is shown in the figure. The positive wire is connected to the "+" terminal of the ignition switch. The negative wire is attached to the machine body in a convenient place. In this form, the scheme has a significant drawback. LED daytime running lights will emit light as long as the ignition key is turned. In addition, their work is not coordinated with the work of the other headlights, which means that they do not meet the requirements of GOST.
Switching on through the dimensions or dipped beam
The second version of the DRL connection scheme involves using the power supply circuit of the marker light bulb. To do this, the positive wire from the navigation lights is directly connected to the "+" from the battery. In turn, the negative wire is connected to the "+" side light, which is currently electrically neutral. As a result, the following current flow path is formed: from the “+” battery through the LEDs to the size, and then through the light bulb to the case, which serves as the minus of the entire circuit. Due to the low current consumption (tens of mA), the LEDs begin to glow, and the lamp coil remains extinguished.  If the driver turns on the side lights, then +12 V appears on the plus side of the marker, the potentials on the DRL wires are equalized and the LEDs go out. The circuit goes into normal mode, that is, current flows through the side light bulbs.
This circuit solution has several disadvantages:
- running lights remain in operation when the engine is turned off, which is contrary to current regulations;
- the circuit will not work if LEDs are also installed in the dimensions;
- the circuit will not work correctly if powerful SMD LEDs are placed in the DRL, the rated current of which is commensurate with the current of the light bulb;
- for safety reasons, an additional fuse must be installed.
This connection method can be improved by connecting the positive wire of the LED module not to the “+” of the battery, but to the “+” of the ignition switch, thereby getting rid of the first drawback.  Some motorists use circuits for switching on running lights through a low beam lamp. That is, when the dipped beam is turned on, the DRLs automatically go out, and in other cases they work. In addition to the above disadvantages, this method does not comply with GOST R 41.48-2004 and traffic rules.
When the car is parked at night, marker lights are used to indicate it, the use of DRL traffic rules is prohibited.
Connection via 4 contact relay from generator or oil sensor
The two following methods have a common basis and involve the operation of daytime running lights only after the engine is started. The DRL switching circuit from the generator is based on switching four contact relays and a reed switch.  DRL relay contacts are connected as follows:
- 85 - on the positive wire to the dimensions;
- 86 - to any output of the reed switch;
- 87 and the second output of the reed switch - to the "+" of the battery.
After checking the reliability of all contacts, proceed to the setting. To do this, start the engine and, moving the reed switch near the generator, achieve its operation and a stable glow of the DRL. Then the reed switch is hidden in a thermotube and fixed in the found place with the help of nylon ties.
At the moment of starting the engine, and then the generator, the contacts of the reed switch and the relay are closed, supplying voltage to the LEDs of the running lights. At the same time, the indicator lamps remain off, since the current through the relay coil is small to ignite them.
In the absence of a reed switch, it is possible to power the DRL from the oil pressure sensor. In this case, the 86th contact is connected to an oil pressure lamp. The rest of the circuitry is duplicated.  Both schemes have a common drawback. They cannot be used if LEDs are installed in the dimensions.
Connection via 5 pin relay
Now it's time to learn how to connect running lights through a five-pin relay. The scheme is the most universal, and is assembled in order to eliminate the shortcomings of the previous options.  First, about connecting the relay for DRL:
- 30 - to the positive terminals of the LED modules;
- 85 - on the positive wire of the marker lamp;
- 86 - on the car body;
- 87a - to "+" from the ignition switch;
- 87 - do not connect (isolate).
The circuit with five contact relays works as follows. When the key is turned, +12 V is supplied to the DRL, thereby turning them on. If you turn on the side lights or headlights, the relay will open contact 87a and close the inactive contact 87. As a result, the DRL will go out and the dimensions will turn on. The circuit fully complies with the requirements of GOST and SDA and can work with side lights even based on LEDs.
However, the scheme still has one negative point - DRLs will turn on immediately after turning the ignition switch. That is, if you turn the key in the ignition, but do not start the car, the DRLs will burn.
Despite the existing drawback, the circuit is quite successful, but in order to properly connect the DRL through a five-pin relay, it will be necessary to supplement the circuit with a voltage stabilizer.
This switching option is interesting in that the current flow path through the running lights is independent. This allows you to install light sources of any type and power in the headlights and DRLs.
DRL control unit
The most reliable and simplest is the option of connecting DRLs without a relay, but using a special running lights control unit. It ensures that the DRL is turned on after starting the engine, guarantees safe operation, protects against overloads and can be installed on cars with any type of lamps, including LED ones.
Unfortunately, among the whole variety of industrially manufactured DRL blocks, the vast majority does not comply with GOST and has a mediocre build quality.
This concerns, first of all, products from AliExpress, which do not meet the requirements in almost all respects.
Among all the variety, only 2 options can be noted: the Russian DayLight + DRL control unit and German products from Philips and Osram. The DayLight+ control unit was developed by the Russian radio engineer Fedor Isachenkov, taking into account all the features of the car's on-board network and has a number of positive aspects:
- there is a built-in voltage stabilization;
- full compliance with GOST;
- the maximum long-term load power is 36 watts (significantly less is required for DRL);
- the simplest wiring diagram.
In addition to the above points, the DayLight + block is universal and fits all cars with a 12-volt on-board network, and also has good build quality and a high degree of protection against moisture and dust.  German products from Philips and Osram also have all the advantages of the DayLight + unit described above, however, German control units are only supplied with daytime running lights and are more expensive.
Read also
Installation of daytime running lights for VAZ 2107

Daily running The lights are not related to size and are lighting devices that improve the visibility of the driver during the day.
Standard DRLs. LEDs that glow brightly and are characterized by a long service life. When you use day running lights on the VAZ 2107, you should not additionally light up the dipped or fog light.
 Daily running lights on VAZ 2107
Installation rules
Installing additional lighting on a domestic car does not require qualifications and experience. However, if the setting is incorrect, you risk facing a fine from the police, becoming the owner of an administrative violation.
To prevent this from happening, connect the navigation lights yourself, following the rules:
- read GOST R 41.48-2004. This applies to the rules for installing lighting fixtures on a car and car certification in this regard. All the parameters that you must consider when installing these devices are written;
- choose the suitable DRL body shape. Please note that not all lights are compatible with the VAZ 2107. Drivers are considered the best choice for value for money DRL Philips Led Daylight 9;
Installing DRL on a car in accordance with GOST, an easy way
Installed on 2107 and of course, according to this scheme, you can install on any car. We go here vk.com/pro_dip.
Collective farming \ installation of daytime running lights on the VAZ 2107
Kolkhozim HDO for classics or any other car, guided by GOST.
 Daylight Philips LED Daylight 9
- Check the body size according to the adjacent daytime running lights. Install lighting in the air intake or on the bumper, depending on the situation;
- the height of the frame in the frame is 250-1500 mm from the road surface. The width between the inner edges of the 2 surfaces visible on the vehicle must be at least 600 mm;
- products are located in front of the machine, and the beam of rays is directed forward;
- consider the overall brightness of the LED lighting. This is 150-330 lumens.
Installation process
After buying a conventional or flexible DRL with turn signal function, the question arises: how to plug new devices to VAZ? It requires:
- take a five-pin relay from a domestic manufacturer;
 Five-pin relay of a domestic manufacturer
- for contact with No. 30, take a positive charge from the ignition (as an option, a wire from the button responsible for heating the rear window);
- Connect 86 to the low beam with the button to turn on the clearance and short lamps;
- No. 85. Throw on weight;
- No. 88. connect to DRL;
- No. 87 is not required during operation and does not bind anything.
 Scheme for connecting daytime running lights to the VAZ 2107
Relay. put it in the saloon. Under the car hood, pull only the wiring going directly to the lights. This scheme for connecting a daytime running light to a VAZ 2107 automatically turns on the LEDs when the ignition key is inserted and turns them off when the engine is turned off. Also, when the car is near-light, if the engine is on, the light fixture will go out and turn back on when the daylight is turned off.
Post Views: 0
Many car enthusiasts have not yet installed daytime running lights on their car, but maybe they have been thinking about it for a long time. It's no secret that the lack of navigation lights, as well as the low beam / fog lights turned off, can cause your vehicle to be stopped by a vigilant traffic police inspector, which is not very desirable for most drivers, unless the latter lack communication with people and are happy any company at any time.
In addition, if you use dipped beam or fog lights as daytime running lights (hereinafter referred to as DRL), you will probably have to change the lamps in these headlights much more often. There is still a moment of increased gas mileage with constant driving with the low beam on. Of course, this expense is negligible compared to the main one, but still it takes place.
If you have a certain amount of time (depending on skills and experience) and desire, correctly installing DRL on a car is not such a difficult task for people who know how to hold a soldering iron in their hands and crimp terminals with wires, and in this article I will tell you how to do it .
Of the tools and materials we need: a crimping device (if you have some skill, pliers are also suitable), a soldering iron, wire cutters, a knife, a lighter (as an option for tightening a heat shrink tube), 3-4 meters of a two-core wire in PVA insulation 2x1.5 (2x0 can be .75 if the DRLs are LED, not fog lights with halogens!). This wire will be needed to connect two lights in parallel to each other.
You will need a standard 12-volt automotive relay, four-pin, reed switch (any), a single wire with a diameter of 1.5 to 2.5 mm. about 2-3m., plastic clamps, heat shrink. It seems to be all.
Now a few words about connection options.
Option 1. You can make the DRLs turn on when the ignition is turned on and not turn off until the engine is turned off. This is the easiest option. The negative wire is attached to the car body in any convenient place, the positive wire is attached to the positive from the ignition switch or to terminal D of the high-voltage module, preferably through a fuse (not indicated in the diagram).
Option 2. The same option, but when the dipped beam is turned on, the DRLs go out. In this case, we connect the plus in the same way as in the first option, and the minus to the positive wire of the low beam lamp (either of the two). The fact is that an incandescent lamp consumes much more current and has much lower resistance than LED DRLs, and therefore, when DRLs are turned on in this way, the filament of the lamp will not heat up even to the minimum glow at full heat, and at DRL operation, the resistance of the lamp filament ( even warmed up) practically will not affect.
As soon as you turn on the dipped beam, a plus will appear on the minus of the DRL, and they will go out. True, if you turn on the distant, the DRLs will light up again. In this case, you can connect the DRL to the marker lamps in the same way (if incandescent lamps are used as such, and not LED ones!). In most cars I know, marker lamps are a priori connected in parallel, so you can connect a common negative wire from two DRL lights to any marker lamp.

Option 3. This is an option when the DRLs turn on automatically only when the engine is started and running. In this case, we connect the minus of the DRL also to the car body, and the plus to the 30th relay contact. 87 contact is connected to a more powerful plus (you can connect to the positive terminal of the battery), 85 contact of the relay - to the ground of the car through the running lights, and 86 - to the reed switch, to one of its outputs.
We also connect the second output of the reed switch to any plus nearby (you can from the generator or from the same place - from the battery). We start the car and moving the reed switch around the generator, we achieve the operation of the relay and the ignition of the DRL. We fasten the reed switch, pre-packaged in heat shrink, with a plastic clamp to the generator in the found position and you're done.

Option 4. If there is no reed switch. Everything is the same, only 86 pin - to the oil pressure lamp in the instrument panel.

That's all. In conclusion, I will say that using something that is made by one's own hands is much more pleasant than that which is made by strangers. Good luck in implementing your and not yours, but, most importantly, interesting ideas.
In general, in connection with the further implementation of the obligation regarding the presence of DRLs in the car, it was decided to independently make daytime running lights. I think it’s no secret to anyone that there is such paragraph No. 17 in the document “On Amendments to the Technical Regulations on the Safety of Wheeled Vehicles”, namely: daytime running lights, as well as corner lights, if installed, must comply with the established requirements UNECE Regulations. The installation of daytime running lights is mandatory from January 1, 2016;
And I want to connect them so that when the ignition switch is on, they themselves light up ... But more on that later.
By the way, here is a photo of what I did first - etched the board, soldered 60 LEDs (30 for each "headlight"), for every 3 diodes there is a 500 Ohm resistor. It remains to assemble the case from plastic and connect it through the lock. So let's see how the etched boards look like:

But we already have the LEDs soldered on them, which were mentioned earlier:

We test the performance of the diodes by connecting them to a power source:


Next, we make a housing for our DRLs from improvised materials, here are pictures of almost finished lights, I made a plastic housing, glued everything together. I pasted a "frame" of black film on the front transparent part, it remains to seal the whole thing and put it on the bumper, making holes in them))


Actually, the DRLs themselves are ready, we cut out the glasses of a suitable size for them and we seal this whole kitchen well (although there is an opinion that it is necessary to leave holes for ventilation and perhaps this is more correct):


Regarding the connection to the electrical system of the car. There are several options, here are the schemes of the main ones:


You can also connect a meringue relay: + DRL is connected through a switch in the cabin to + ignition coils, and "-" DRL to the wire going to + low beam headlights. The resistance of the filament of the lamp is very small and this will be enough for the DRL, when the dipped beam is turned on, there will be + at the minus of the DRL and they go out.
The dipped beam is 50 + 50 W in the front + 5 + 5 in the rear + number plate light + all the paws in the instrument panel and other lights. Fuck the extra load on the generator.
Also, for DRL, the luminous intensity should not be lower than 400cd and not higher than 800cd.
You can use any connection scheme, or come up with your own.
Regarding the location of the DRL on the car - here, too, everything is not so simple and there is a regulation:

Here is a little more about DRL, the main requirements:
Quote: "GOST R 41.48-2004 (UNECE Regulation N 48) Uniform regulations regarding the certification of vehicles regarding the installation of lighting and light signaling devices. State standard of the Russian Federation
6.19 Daytime running light
6.19.1 Installation - Optional on vehicles. Not allowed on trailers.
6.19.2 Number - Two.
6.19.3 Installation plan - No special requirements.
6.19.4 Placement (photo a few posts above)
6.19.4.1. Width - the point on the surface as seen in the direction of the reference axis, which is farthest from the median longitudinal plane of the vehicle, shall be not more than 400 mm from the edge of the overall width of the vehicle.
The distance between the inner edges of the two visible surfaces must be at least 600 mm. This distance may be reduced to 400 mm if the overall width of the vehicle is less than 1300 mm.
6.19.4.2 Height - at a distance of 250 to 1500 mm above the ground.
6.19.4.3. In length, on the front of the vehicle. This requirement is considered to be met if the emitted light does not interfere with the driver directly or indirectly as a result of reflection from the rear-view mirrors and/or other reflective surfaces of the vehicle.
6.19.5 Geometric visibility
Horizontal angle beta = 20° out and in.
Vertical angle alpha = 10° up and down from the horizontal.
6.19.6 Direction - Forward.
6.19.7 Functional wiring diagram
If fitted, the daytime running lights should turn on automatically when the engine start/stop control is placed in the "on" position. It shall be possible to activate and deactivate the operation of the automatic switching on of the daytime running lamps without the aid of a tool.
Daytime running lights should turn off automatically when the headlights are turned on, except when the headlights are turned on for a short period of time to signal traffic.
6.19.8 Control signal - Optional in the form of a closed loop.
6.19.9 Miscellaneous - No."
In simple terms, PTFs are designed to illuminate the road along the lower edge in order to improve the visibility of the roadway in conditions of limited visibility, the beam of light should not be directed upwards and blind oncoming people.
DRL are intended to designate tr. wed-va in the daytime, and not for visiting the road, the DRL light should be clearly visible to drivers of oncoming traffic. Wed-in, which means it should be directed above the roadbed, it turns out in the eyes.

We thank our user gavalik for the idea for writing an article.