DTOZH or a sensor that measures the temperature of the liquid of the cooling system is a mandatory part in the engine control system. Based on the data received from it, the composition of the fuel-air environment is automatically adjusted, as well as the crankshaft speed and ignition timing.
Therefore, control of the operation of the DTOZH is necessary, and in such Lada models as Grant, Largus, Priora, Vesta, Kalina Xray and the all-wheel drive Niva, this manipulation is carried out in the same way.
Symptoms of a DTOZH malfunction
The readings of the sensor that measures the temperature of the cooling liquid affect the functionality and speed of starting the motor. However, it also happens to be faulty, as evidenced by the presence:
- engine start delay, especially in the cold season,
- increased demand for fuel
- exhaust emissions when the engine is cold,
- deviations in the operation of the fan of the motor cooling system.
Sensor replacement
DTOZH is located in the thermostat and to replace it, you must:
- drain fluid from the cooling system,
- disconnect it from the wires,
- remove DTOZH.
Installation is carried out in reverse mode. You can prevent possible leakage after replacement by replacing the copper washer. Or we cover the sensor thread before fixing with a heat-resistant sealant.
Control of operating parameters DTOZH
We start with an external inspection, we reveal corrosion and damage. But it is easier and more reliable to immediately replace it with a new and serviceable one.
To check the performance you need to stock up:
- multimeter,
- thermometer
- heat-resistant capacity of 0.5 liters.
Preparation procedure
Everything is simple, but carried out very carefully:
- switch the multimeter to voltmeter mode,
- remove the block and wires with DTOZH and start the ignition,
- we connect the "-" of the multimeter probe with the "mass" of the motor, and the second with the output of the block under No. 1,
- voltage output from 12V.
Verification procedure
Not difficult, but
- multimeter in ohmmeter mode,
- pour water into the container at about 100 ° C,
- we connect the probes of the multimeter to the terminals of the DTOZH and dip the working area of the latter into hot water,
- we make several measurements of DTOZH in a gradually cooling liquid.
The obtained data are compared with what is given in the table. The discrepancy will show the degree of its serviceability.
| Coolant temperature, °С | DTOZH resistance, Ohm |
|---|---|
| 100 | 177 |
| 90 | 241 |
| 80 | 332 |
| 70 | 467 |
| 60 | 667 |
| 50 | 973 |
| 45 | 1188 |
| 40 | 1459 |
| 35 | 1802 |
| 30 | 2238 |
| 25 | 2796 |
| 20 | 3520 |
| 15 | 4450 |
| 10 | 5670 |
| 5 | 7280 |
| 0 | 9420 |
If everything is within the normal range with discrepancies, then the error in operation occurs due to poor contact, a malfunction of the computer, or a violation of the integrity of the wiring.
We do not forget about the timely change of antifreeze or antifreeze, as well as the fact that it is best to use the liquid that the manufacturer offers.
With the ignition off, disconnect the block of the engine management system wiring harness from the coolant temperature sensor
The terminals of the block "A" and "B" are marked on its body.

By connecting the tester probes to the terminal "B" of the block and to the "mass" of the engine,
with the ignition on, measure the voltage of the sensor input signal circuit.
The device should fix the voltage of 4.8-5.2 V.
If the voltage does not match, we check the health of the circuit (open and short to ground)
between terminal "B" of the wiring harness block and terminal "39" of the controller.
If the circuit is OK, the controller is faulty.

By connecting the tester probes to the terminal "A" of the block and to the "mass" of the engine, we measure the resistance.
Sensor resistance values at different coolant temperatures
With a good sensor ground circuit, the device should detect a resistance of less than 1 ohm.
The reason for the increased resistance may be an unreliable connection in the pads connected to the sensor or to the controller.
To check the sensor, disconnect the block of the wiring harness of the engine control system from it.
With a tester, we measure the resistance of the sensor for two values \u200b\u200bof the temperature of the coolant - an unheated and a warm engine. We compare the obtained values with the control ones.
If the measured resistance values do not match the control values, the sensor must be replaced.
The cooling system is responsible for the optimal temperature regime of the power plant, at which the power output is maximum. This system includes a cooling jacket, a radiator, and pipes through which fluid circulates. Circulation is provided by a pump driven by the crankshaft.
The system also includes a thermostat that provides quick engine warm-up by shutting off the pipeline going to the radiator, while the liquid circulates only inside the cooling jacket. When a certain temperature is reached, the thermostat opens the pipe, after which the liquid circulates in a large circle, including the radiator.
In the radiator, the heated liquid is cooled. For faster cooling of the liquid, a fan is installed on the radiator, which creates an additional air flow. But this fan does not always work, it turns on only when a certain liquid temperature is exceeded.
A coolant temperature sensor is included in this system to monitor the coolant temperature. The readings of this sensor are displayed on the dashboard, which provides the driver with information about the temperature of the engine.
But this is not the main task of this sensor. The coolant temperature sensor transmits temperature data to the electronic control unit, after which this unit corrects the fuel supply depending on the temperature. When the engine is cold, based on the readings of this sensor, the control unit sets an enriched mixture, after warming up the fuel mixture becomes normal. Still based on the readings of this element, the electronic unit regulates the ignition timing.
So the normal operation of the engine, fuel consumption largely depends on this sensor. It also drives the radiator fan. On some cars, a separate sensor is used to turn on the fan. It can be located both near the temperature sensor and in the radiator.
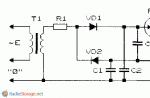
Design, principle of operation

The design of this sensor includes a thermistor - a resistor that changes resistance from its surrounding temperature. This thermistor is housed in a threaded metal case. Attached to this body is a tail section made of plastic. In this part there are contacts for connecting the wiring. One contact is positive and it comes from the electronic unit, the second is negative and it is connected to ground.
For the thermistor to work, a voltage of 5 V is constantly applied to it. This voltage is supplied to it by the electronic unit through a resistor with a constant resistance. Since the coolant temperature sensor thermistor has a negative temperature coefficient, as the temperature rises, its resistance will decrease, and the voltage applied to it will also decrease. According to the drop in this voltage, the electronic unit calculates the temperature of the engine, and also displays its value on the dashboard.
The exact installation location of this temperature sensor differs for different cars, but only slightly. It can be installed in the cylinder head near the thermostat housing, or on the thermostat housing itself. It is necessarily located near the outlet pipe, through which the liquid goes to the radiator. Near this nozzle it is located in order to transmit accurate temperature data.
Sensor symptoms

This sensor is considered to be very reliable due to the comparative simplicity of the design. However, there can be problems with it too. Usually they come down to a violation of the calibration, which leads to a violation of the resistance and, as a result, the incorrect operation of the electronic unit, since it performs part of its functions based on the temperature of the engine.
One of the most obvious signs of the failure of this sensor is the lack of activation of the fan when the temperature exceeds the set value. But this indicator will not be reliable if there are two sensors - the main one, for transmitting the temperature value to the electronic unit, and the additional one, responsible for turning on the fan. In this case, not switching on the fan will indicate damage, oxidation of the wiring, or failure of the sensor responsible for its operation.
On modern cars, a malfunction indicating incorrect operation of the coolant temperature sensor is displayed on the on-board computer display. However, a fault message does not always indicate sensor failure. Often, problems in its operation are associated with a broken wiring or oxidation of contacts.
Incorrect functioning of the coolant temperature sensor or a break in its wiring leads to excessive fuel consumption, high idle speed, detonation. It is possible that the power unit will not start well after warming up. The biggest trouble that can occur due to the inoperability of this sensor is overheating of the power plant, which can cause the cylinder head to move.
Sensor test

Checking the performance of this sensor is not difficult. But before you make it, it is advisable to check the integrity of the wiring going to it. You can also check the voltage coming from the control unit. To do this, you need to disconnect the chip with wires from the sensor and connect it to a voltmeter. After that, start the engine and measure the value of the voltage supplied to the sensor, it should correspond to 5 V. If the voltage is normal, check the sensor for resistance.
To remove, check and replace the sensor, you will not need so much:
- Key on 19;
- Multimeter;
- Capacity for draining the coolant;
- Electric kettle;
- Thermometer;
Before removing the element, it is necessary to partially drain the liquid from the system. It is not necessary to drain everything, since it is located at the top of the engine, it is enough to drain to a level below the position of the sensor.
Then the wiring chip is disconnected from the sensor. With a key of 19, he turns out of his seat.
Video: Checking the coolant temperature sensor
The sensor is checked using an electric kettle with a thermometer and a multimeter switched to resistance measurement mode. You can check in two ways.
- In the first method, the working part of the sensor is immersed in an electric kettle with cold water, and a thermometer is also placed there. Only an electronic thermometer capable of measuring high temperatures may be used. A multimeter is connected to the sensor itself and the electric kettle is connected to the network. As the water temperature rises, the resistance of the sensor will drop. So, at a water temperature of +15 C, the resistance should be 4450 ohms. At +40 C, the multimeter reading should be 1459 ohms. You need to heat the water to a temperature of 100 C. With this value, the resistance is minimal - 177 ohms. If the values are different, then the sensor is giving incorrect information.
- The second method is suitable if there is no thermometer. To measure the resistance, the sensor is immersed in water after it boils. In this case, the water temperature will approach 100 C, approximately 95-97 degrees. This is quite enough for measurements. After lowering the working part of the sensor, the resistance on it should be slightly more than 177 ohms. If the difference is large, the sensor is defective.
Replacing the coolant temperature sensor
The coolant temperature sensor is non-repairable, so if it detects incorrect operation, it is simply replaced.
Video: Replacing the coolant temperature sensor (DTOZH) VAZ 2115 (2113, 2114)
After acquiring a new sensor, it is advisable to immediately check it with the indicated methods. If all readings are normal, it is installed in place of the removed one. Before screwing it into the seat, the thread is treated with a sealant.
After installing a new element, a leash is connected to it, it is impossible to confuse the position of the chip, since it has special guide grooves. Next, the coolant in the system is brought to normal. After that, you should check if fluid is flowing through the sensor, and then start the motor.
If the replacement of the sensor did not give any result, the engine continues, for example, to overheat or does not gain the proper temperature, they look for the cause in the remaining elements of the system. It is possible that the thermostat does not work and the liquid constantly circulates either in a small or in a large circle.
More than ten digital sensors are installed on the car of the Lada Kalina family, which control the operation of mechanisms and assemblies. Most often, drivers complain about the premature wear of the coolant temperature sensor (hereinafter - DTOZH).
Like, it displays incorrect data, and sometimes, it is generally inactive. The process of self-replacing DTOZH is not at all complicated. The task is within the power of a driver without experience in servicing equipment.
ATTENTION! Found a completely simple way to reduce fuel consumption! Don't believe? An auto mechanic with 15 years of experience also did not believe until he tried it. And now he saves 35,000 rubles a year on gasoline!
If you have never encountered the replacement of standard equipment, then the article is a recommendation to help you.
What temperature sensors are installed
The principle of operation of the DTOZH is as follows: after receiving data on the current temperature of the antifreeze, the measuring device sends the readings to the electronic control unit of the computer.
The on-board computer compares the received data with the programmed ones. In case of discrepancy, it signals an error on the dashboard. The owner of the car, seeing a system error, decides on the nature of the breakdown, visits the service station to order a comprehensive diagnosis.
In addition to DTOZH, an outside temperature sensor (hereinafter referred to as DNT) is installed on a Lada Kalina car. However, not on all trim levels, but only in Lux and Premium.

If desired, the owner can install the measuring equipment himself. Installation work is not difficult at all. Time no more than an hour.
DTOZH
DTOZH is designed to monitor the temperature of antifreeze in the cooling system circuit of the power unit. After receiving data on the "degree", the ECU increases or decreases the speed of the power unit in order to adjust the temperature.
The quality composition of the fuel mixture depends on the accuracy of the DTOZH readings. The service life of the sensor is unlimited, except for mechanical damage, short circuit in the circuit.
Where is it located: the regular installation location is the outer part of the thermostat housing. The base is screwed into the body of the thermostat. Two power contacts are connected to the upper part for power supply from the on-board network.
A melting element is installed inside the DTOZH base. As soon as the degree of antifreeze reaches "90", the contacts close, the on-board computer signals an error.
Catalog numbers, prices of temperature sensors for Lada Kalina:


The device is installed in the place where the front bumper is fastened, to the left of the center of the radiator grille. The shape of the DNT is conical with two contacts on the back.
The fuse in the mounting block number 24 is responsible for the operation of the DNT. The absence of temperature readings on the dashboard is the first sign of a malfunction.

How to replace temperature sensors on a Lada Kalina car yourself
Preparatory stage:
- Open-end wrench on "19";
- Rags;
- Additional lighting as needed;
- New "measuring device".
Replacement algorithm:
- We install Lada Kalina in the perimeter of the repair area;
- We turn off the engine, open the hood;
- We provide priority safety measures: we block the rear row of wheels with wheel chocks, we squeeze out the parking brake;
- We remove the terminals from the DTOZH, unscrew the sensor with the key;
- We replace the device with a new one, screw it on, put on the power terminals again.
We turn the key in the ignition, activate it, check the functionality of the equipment. Top up the missing amount of antifreeze as needed.
We do not need special tools, we will limit ourselves to a screwdriver, wires, terminals, a new device.
The sequence of actions when replacing DNT with your own hands:
- We install Lada Kalina on a flat platform, squeeze the parking brake for safety reasons;
- Open the hood, remove the power terminals from the battery. This is necessary in order to prevent a short circuit in the circuit during work;
- To the left (right) of the center of the front bumper, we screw the sensor onto one self-tapping screw;
- We lay power cables inside the engine compartment through technological holes;
- We start the wiring under the dashboard of the cabin;
- We remove the instrument panel, connect the outputs to the CAM - bus;
- We assemble the structure in the reverse order;
- We put the power terminals on the battery.
We start the engine, check the functionality of the measuring device. Hardware replacement completed.
Causes of premature failure of DTOZH, DNT
- Third-party mechanical damage;
- Marriage at production;
- Crack on the plinth, body;
- Short circuit;
- Loose terminal fastening;
- Moisture ingress into measuring instruments;
- Burnout of the melting element of the fuse of the fuse mounting block;
- Incorrect operation of the system firmware of the electronic control unit of the computer.
- Strictly follow the manufacturer's recommendations on the timing of vehicle maintenance;
- Buy preferential parts with original catalog numbers. The exact data is indicated in the instruction manual for your technical tool;
- At the first signs of an engine malfunction, contact the service station.

| coolant pump- bladed, centrifugal type, driven from the crankshaft pulley by a toothed timing belt. Pump body - aluminum. The roller rotates in a double-row bearing. The grease in the bearing is incorporated for the entire service life. The outer ring of the bearing is locked with a screw. A toothed pulley is pressed onto the front end of the roller, and an impeller is pressed onto the rear end. A thrust ring made of a graphite-containing composition is pressed against the end face of the impeller, behind which there is an oil seal. The pump housing has an inspection hole to detect fluid leakage when the pump fails. The pump is recommended to be replaced as an assembly. The redistribution of fluid flows is controlled by a thermostat. |
 |
The cooling system consists of two so-called circles of circulation:
- The movement of fluid through the cooling jacket and radiator forms a large circle of circulation.
- The movement of liquid along the engine cooling jacket, bypassing the radiator, is a small circle of circulation.
heater radiator built into the engine cooling system and is designed to heat the passenger compartment by circulating hot coolant through it.
Fan maintains the thermal mode of the engine, is switched on through a relay at the signal of the controller.
Scheme of the engine cooling system LADA Kalina
Cooling system: 1 - a hose for draining coolant from the heater radiator; 2 - a hose for supplying coolant to the heater radiator; 3 - hose of the inlet pipe of the coolant pump; 4 - expansion tank hose; 5 - expansion tank; 6 - steam outlet hose of the engine radiator; 7 - thermostat; 8 - a hose for supplying fluid to the throttle assembly; 9 - a hose for supplying fluid to the engine radiator; 10 hose for draining fluid from the engine radiator; 11 - engine radiator; 12 radiator drain plug; 13 radiator electric fan; 14 coolant pump; 15 coolant pump inlet pipe; 16 coolant outlet hose from the throttle assemblyBasic data for monitoring, adjusting and maintaining the cooling system
| Temperature of the beginning of opening of the main valve of the thermostat, °С | 85-89 |
| Full opening temperature of the main thermostat valve, °С | 102 |
| Expansion tank plug outlet valve opening pressure, kPa (bar) | 110-150 (1,1-1,5) |
| Inlet valve opening pressure of the expansion tank plug, kPa (bar) | 3-13 (0,1) |
| Coolant temperature in a warm engine at an ambient temperature of 20-30 °C and a fully loaded vehicle driving at a constant speed of 80 km/h, not more than, °C | 95 |
| Additional resistor resistance, Ohm | 0,23 |
| Liquid volume in the engine cooling system, l | 7,8 |
| Coolant (mixing liquids of different brands is not allowed) | OZHK-KHT; OZH-40-XT; OZh-65-HT; OZH-K Antifreeze; OZH-40 Antifreeze; OZH-65 Antifreeze; OZh-40; OZh-65; OZHK-KSK; OZh-40SK; OZh-65SK; Lada-A40; OZH-K Tosol-TS; OZH-40 Tosol-TS; OZh-65 Tosol-TS; Antifreeze G-48; AGIP Antifreeze Extra; GlysantinG03; Glysantin G913 |