Almost all modern lithium-ion batteries have excellent energy capacity, as well as high compact dimensions. It is with their help that you can power high-power devices with the greatest efficiency. And for this it is absolutely not necessary to buy a ready-made charger in a store, because there is a more budget-friendly option that radio amateurs will especially like - to assemble a charger for lithium-ion batteries with your own hands.
Precautions: overcharging is prohibited
It is extremely important to remember one simple thing before starting to assemble a battery for batteries - lithium batteries are strictly prohibited from recharging. They have very strict requirements for the charging mode and operation, so they cannot be charged to a voltage greater than 4.2 V. It is even better to be guided by information about the safe threshold for each individual can. By the way, even a lower threshold may be indicated there, which is considered acceptable for this instance.
It’s even better if you’re going to do your own lithium battery charging, check the materials and equipment used several times. If you have doubts about the accuracy of your voltmeter readings or the origin of the cans, as well as the maximum permissible power of their charge, it is better to set the threshold even lower. The optimal range will be within 4.1–4.15 V. In this case, charging batteries that do not have a built-in protection board will be safe for you.
Otherwise, there is a high probability of strong heating and swelling of the cans, copious release of gas with a strong unpleasant odor, and even their subsequent explosion. Check everything several times before proceeding with assembly and charging.
How to assemble a lithium charger DIY batteries

One of the simplest, if not the simplest, option for creating a charger. It involves the use of the LM317 chip. It is cheap and widely available, plus it is equipped with a charge indicator.
The setup comes down to setting the output voltage to 4.2 Volts using trimming resistor R8. Just be sure to not have the battery connected. The charging current is also set by selecting resistors R4 and R6. The recommended power of resistor R1 should be at least 1 Watt.
When the LED on the circuit goes out, this signals the completion of the battery charging process. In this case, the charging current will never decrease to zero.
Microcircuits of the LM317 type, like its analogues, are very widely used in all kinds of current and voltage stabilizers. At the same time, you can buy them at any radio market, and they will cost mere pennies.
The disadvantage of the circuit can be considered the supply voltage, which must be from 8 to 12 V. This is due to the fact that for the normal functioning of the microcircuit, a difference between the voltage on the automatic transmission and the supply voltage is required to be at least 4.25 V, that is, power the device using the USB port will not work.
The sequence for collecting lithium battery charging with your own hands is as follows:
- select a suitable case;
- attach the power supply (5 V) and the elements of the specified circuit to it (necessarily in the correct order);
- take brass and cut out two strips from it, attach them to the sockets;
- using a nut, set the distance between the contacts and the battery that you are going to connect;
- attach the switch if you want to later be able to change the polarity on the sockets (if not, leave everything as is).
But if the task is to assemble a charger designed to work with 18650 batteries, then you should immediately move on to more complex circuits, or buy a ready-made device. Without the appropriate technical skills, it will not be possible to assemble the unit. Sometimes it’s really easier to spend a little more money, but take a factory charger with the necessary parameters and protection.
How to assemble a charger for lithium-ion batteries with your own hands?
Since Li-Ion batteries are sensitive to sudden voltage during charging, special chips are built into branded batteries. They provide voltage control and do not allow the permissible limits to be exceeded. Therefore, in order to assemble a charger for 18650 lithium batteries with your own hands, you need a more complex circuit than the one discussed above.
This version of the battery will be much more difficult to create than the previous one, and at home it is only possible if you have certain skills and relevant experience. In theory, you can get a charger whose characteristics are in no way inferior to branded batteries. But in practice this is not always the case.
Have you assembled a charger at home from scrap materials? Tell us about your results in the comments.
Batteries
What current should I use to charge a li ion 18650 battery? How to properly use such a battery. What should lithium-ion power sources be afraid of and how can such a battery extend its service life? Similar questions can arise in a wide variety of electronics industries.
And if you decide to assemble your first flashlight or electronic cigarette with your own hands, then you definitely need to familiarize yourself with the rules for working with such current sources.
A lithium-ion battery is a type of electric battery that has become widespread in modern household and electronic equipment since 1991, after it was introduced to the market by SONY. As a power source, such batteries are used in cell phones, laptops and video cameras, as a current source for electronic cigarettes and electric cars.
The disadvantages of this type of battery start with the fact that the first generation lithium-ion batteries were a blast in the market. Not only literally, but also figuratively. These batteries exploded.
This was explained by the fact that a lithium metal anode was used inside. During the process of numerous charging and discharging of such a battery, spatial formations appeared on the anode, which led to the short circuit of the electrodes, and as a result, to a fire or explosion.
After this material was replaced by graphite, this problem was eliminated, but problems could still arise on the cathode, which was made of cobalt oxide. If operating conditions are violated, or rather recharging, the problem could recur. This was corrected with the introduction of lithium ferrophosphate batteries.
All modern lithium-ion batteries prevent overheating and overcharging, but the problem of loss of charge remains at low temperatures when using devices.
Among the undeniable advantages of lithium-ion batteries, I would like to note the following:
- high battery capacity;
- low self-discharge;
- no need for maintenance.

Original chargers
The charger for lithium-ion batteries is quite similar to the charger for lead-acid batteries. The only difference is that the lithium-ion battery has very high voltages on each bank and more stringent voltage tolerance requirements.
This type of battery is called a can because of its external similarity to aluminum beverage cans. The most common battery of this shape is 18650. The battery received this designation due to its dimensions: 18 millimeters in diameter and 65 millimeters in height.
If for lead-acid batteries some inaccuracies in indicating the limit voltages during charging are acceptable, with lithium-ion cells everything is much more specific. During the charging process, when the voltage increases to 4.2 Volts, the supply of voltage to the element should stop. The permissible error is only 0.05 Volt.
Chinese chargers that can be found on the market can be designed for batteries made from different materials. Li-ion, without compromising its performance, can be charged with a current of 0.8 A. In this case, you need to very carefully control the voltage on the bank. It is advisable not to allow values above 4.2 Volts. If the assembly with the battery includes a controller, then you don’t need to worry about anything, the controller will do everything for you.
The most ideal charger for lithium-ion batteries will be a voltage stabilizer and current limiter at the beginning of the charge.
Lithium must be charged with a stable voltage and limited current at the beginning of the charge.
Homemade charger
To charge the 18650, you can buy a universal charger, and not worry about how to check the necessary parameters with a multimeter. But such a purchase will cost you a pretty penny.
The price for such a device will vary around $45. But you can still spend 2-3 hours and assemble the charger with your own hands. Moreover, this charger will be cheap, reliable and will automatically turn off your battery.
The parts that we will use today to create our charger are available to every radio amateur. If there is no radio amateur with the necessary parts at hand, then on the radio market you can buy all the parts for no more than 2-4 dollars. A circuit that is assembled correctly and installed carefully starts working immediately and does not require any additional debugging.

Electrical circuit for charging a 18650 battery.
In addition to everything, when you install the stabilizer on a suitable radiator, you can safely charge your batteries without fear that the charger will overheat and catch fire. The same cannot be said about Chinese chargers.
The scheme works quite simply. First, the battery must be charged with a constant current, which is determined by the resistance of resistor R4. After the battery has a voltage of 4.2 Volts, constant voltage charging begins. When the charging current drops to very small values, the LED in the circuit will stop lighting.
The currents recommended for charging lithium-ion batteries should not exceed 10% of the battery capacity. This will increase the life of your battery. If the value of resistor R4 is 11 Ohms, the current in the circuit will be 100 mA. If you use a 5 Ohm resistance, the charging current will be 230 mA.
How to extend the life of your 18650

Disassembled battery.
If you have to leave your lithium-ion battery unused for some time, it is better to store the batteries separately from the device they power. A fully charged element will lose some of its charge over time.
An element that is charged very little, or discharged completely, may permanently lose its functionality after a long period of hibernation. It would be optimal to store the 18650 at a charge level of about 50 percent.
You should not allow the element to be completely discharged and overcharged. Lithium-ion batteries have no memory effect at all. It is advisable to charge such batteries until their charge is completely exhausted. This can also extend the life of the battery.
Lithium-ion batteries do not like either heat or cold. The optimal temperature conditions for these batteries will be the range from +10 to +25 degrees Celsius.
Cold can not only reduce the operating time of the element, but also destroy its chemical system. I think each of us has noticed how the charge level in a mobile phone quickly drops in the cold.
Conclusion
Summarizing all of the above, I would like to note that if you are going to charge a lithium-ion battery using a store-made charger, pay attention to the fact that it is not made in China. Very often, these chargers are made from cheap materials and do not always follow the required technology, which can lead to undesirable consequences in the form of fires.
If you want to assemble the device yourself, then you need to charge the lithium-ion battery with a current that will be 10% of the battery capacity. The maximum figure may be 20 percent, but this value is no longer desirable.
When using such batteries, you should follow the rules of operation and storage in order to exclude the possibility of an explosion, for example, from overheating, or failure.
Compliance with the operating conditions and rules will extend the life of the lithium-ion battery, and as a result, save you from unnecessary financial costs. The battery is your assistant. Take care of her!

Features of charging lithium batteries and chargers for them
Modern people use many electronic gadgets. This is a laptop, mobile phone, tablet, camera and many others. Most of these devices are powered by lithium batteries. After all, we value them precisely because they are mobile devices. However, portability comes at the cost of having to constantly charge the batteries. To do this, you will need a lithium battery charger. In most cases, chargers are supplied with the device itself. This is the same power adapter for a laptop or phone. Ideally, of course, the standard charger should be used for charging. But what to do if it is lost or damaged. You need to choose a suitable charger. What to take into account will be discussed in this article.
In general, the charger should have an output voltage of 5 volts and a current whose value corresponds to (0.5─1)*Cn. CH is the nominal capacity of the battery. For example, for a lithium cell with a capacity of 2200 mAh, charging should produce a current of 1.1 amperes.

Most chargers from reputable manufacturers charge Li batteries in several stages. The first stage occurs at a constant current value of 0.2─1 C and a voltage of 4.1─4.2 V (here we mean the voltage per element or jar). This stage lasts approximately 40-50 minutes. The second stage is carried out at constant voltage. There are devices that use pulse mode to speed up the charging process. For lithium-ion systems with a graphite system, voltages must be limited to 4.1 volts per cell.
If you use a voltage higher than 4.1 volts, you can increase the energy density of the battery. But at the same time, oxidative reactions begin, which shorten the battery life. In later models this problem was corrected with additives. And the voltage on them during charging can be increased to 4.2 volts with a deviation of 0.05 per element.
If we talk about lithium batteries for industrial use and for the military sector, then chargers for them support a voltage of 3.9 volts. This ensures long service life and reliability.
If the charger produces a current of 1C, the battery will charge in about 2-3 hours. When the charge is fully charged and the voltage reaches the cutoff value, the current decreases sharply and amounts to several percent of the original value.
It is worth saying that as the charging current increases, the charging time practically does not decrease. At a higher current, the voltage rises faster in the first stage of the process, but the second stage of recharging in this case takes longer.
There are chargers that can charge a lithium battery in about an hour. This charger for lithium batteries does not have a second stage and the battery is ready for use after the completion of the first stage. The battery charge level will be 70 percent. But, due to the nature of lithium batteries, this is not critical for them.

In the graph above you can see three stages of charging a Li battery:
- First. The maximum possible (1C) charge current flows through the battery. This stage ends when the voltage increases to a threshold value;
- Second. The voltage remains maximum (4.1─4.2 volts), and the charging current decreases to 3 percent of the original value;
- Third. Compensating charge during storage (carried out approximately once every 20 days).
During the storage phase, trickle charging is not possible for lithium batteries due to the fact that this leads to metallization of the Li. But short-term recharging with direct current compensates for the loss of charge. This charging should be performed when the cell voltage drops to 4.05 volts. The charging process stops at 4.2 volts.
And one more important point. Lithium battery cells are very sensitive to overcharging. Even with a slight recharge, lithium metallization begins on the surface of the negative electrode. It is very active and interacts with the electrolyte. As a result of the reaction at the cathode, oxygen is released and the pressure increases. As a result, element depressurization, ignition, and even a small explosion may occur.
In addition, if the charging voltage is continually exceeded, the life of lithium batteries will be reduced. Therefore, in most lithium batteries, in addition to the cells themselves, there is a protection board.

The board controls the process of charging and discharging elements according to the lower and upper voltage limits. Temperature sensors are often used to switch off elements at 90 degrees Celsius. Some types of batteries have a mechanical valve that opens when the pressure inside the case increases above a certain limit.
There are exceptions. For example, batteries containing manganese do not have such protection. Manganese strongly inhibits metallization at the anode and the formation of oxygen. Therefore, such protection is not necessary.
All this needs to be kept in mind when choosing a charger. If you will charge the lithium can directly without a controller, the voltage must be monitored constantly. But it is much better to use devices with automatic control or charge the battery through a protection board.
Chargers for various gadgets
Chargers for smartphone batteries
If you have lost the standard charger for your phone, the “frog” will help you. This is one of the most common devices. The charge received its name for its characteristic shape.

It couldn't be easier to use. The charger has 2 width-adjustable contacts: plus and minus. You need to install them in a position suitable for the battery being charged. Then the battery is inserted so that there is contact with its terminals, and is fixed with the upper clamping bar. Naturally, polarity must be observed during installation. Then the device is inserted into the 220 volt connector and charged until the indicator shows the end of the process.
Many people probably have a problem with charging a Li-Ion battery without a controller; I had this situation. I received a dead laptop, and there were 4 SANYO UR18650A cans in the battery that were alive.
I decided to replace the LED flashlight with three AAA batteries. The question arose about charging them.
After digging around on the Internet I found a bunch of diagrams, but details are a little tight in our city.
I tried charging from a cell phone charger, the problem is in charge control, you need to constantly monitor the heating, it just starts to heat up, you need to disconnect from charging, otherwise the battery will be damaged in the best case, otherwise you can start a fire.
I decided to do it myself. I bought a bed for the battery in the store. I bought a charger at a flea market. To make it easier to track the end of the charge, it is advisable to find one with a two-color LED that signals the end of the charge. It switches from red to green when charging is complete.
But you can also use a regular one. The charger can be replaced with a USB cord and charged from a computer or charger with a USB output.
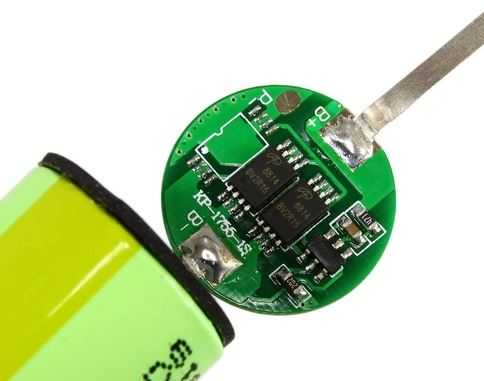
My charger is only for batteries without a controller. I took the controller from an old cell phone battery. It ensures that the battery is not overcharged above a voltage of 4.2 V, or discharged below 2...3 V. Also, the protection circuit saves from short circuits by disconnecting the bank itself from the consumer at the moment of a short circuit.
It contains the DW01 chip and an assembly of two SM8502A MOSFET transistors (M1, M2). There are also other markings, but the circuits are similar to this one and work similarly.
Cell phone battery charge controller.

Controller circuit.

Another controller circuit.
The main thing is not to confuse the polarity of soldering the controller to the bed and the controller to the charger. The controller board has “+” and “-” contacts.

It is advisable to make a clearly visible indicator in the bed near the positive contact, using red paint or self-adhesive film, to avoid polarity reversal.
I put everything together and this is what happened.


Charges great. When the voltage reaches 4.2 volts, the controller disconnects the battery from charging and the LED switches from red to green. Charging is complete. You can charge other Li-Ion batteries, just use a different bed. Good luck to all.
Since the number of visits to the site’s pages for the request “li-ion battery charging circuit” has increased significantly. You can even say the majority of these requests per day. Therefore, in order to satisfy the information demand, we will devote a separate section to this topic.
To begin with, I present to you the simplest charging circuit for 3.7 volt lithium ion batteries. The power supply is 5 volts, in this circuit it is supplied from a USB computer, a 5 volt DC adapter (for example, a charger from a mobile phone) or a low-power solar battery. The charger power is assumed to be about 1 ampere.
The brain and heart of the circuit is the MCP73831 microchip. Very easy to obtain or purchase at a radio store. The average price is about 1.5 - 2 American evergreens. You can order from the Chinese via the link for only $3.88 for 10 pieces. The MCP73831 is one of the inexpensive microchips in the line of charge controllers for use in limited board space. The datasheet for the MCP73831 can be viewed at. This chip uses a constant current/constant charging algorithm. It also stops charging when the battery is fully charged.
Here's a general diagram:

Have become popular in portable electronics because they boast the highest energy density of any battery used in commercial applications. Advantages include thousands of recharges and no “” occurrence, unlike batteries. However, Li-ion batteries must be charged under careful control of constant current and constant voltage. Overcharging and careless handling of lithium-ion cells can cause damage or unstable operation of the battery.
So, as already mentioned, the charge current should be about 1 ampere. The supplied voltage should not exceed 5 volts. The estimated dimensions of the charger board are not large, about 25 x 19 x 10 mm.
All necessary elements are shown in the diagram. The mini USB socket serves as a 5 volt receiver, but your imagination is not limited. You can at least directly solder the wires from the 5 v adapter.
- The ammeter can only be connected to the +5 v input.
- If the input voltage is still slightly higher, the charging current will also be correspondingly higher. But this is okay, since the MCP73831 microchip will cut off excess voltage at the output.
- The microcircuit will also stop charging when the battery voltage reaches 3.7 V.
- It is best that the charging current is 35 - 37% of the capacity of the battery being charged. That is, if the battery is rated at 1000 mA, then the charging current should be about 400 mA.

Ready-made scarves for soldering:

This is what the finished lithium-ion battery charger board looks like.
Let me remind you that the dimensions should be about 25 x 19 x 10 mm.

Although the circuit is extremely simple to design and assemble, and assembling it will not be difficult, I think it is necessary to notify you that you can purchase this circuit for no more than $2, as you may have guessed, from the Chinese.
You can fasten the battery can itself, for example, using neodymium magnets, and also see other options for attaching contacts for can batteries
That's all, soon I will show others and circuits of balancing chargers.