In our turbulent times, any car needs an alarm. The budget option for reliable car protection is the Sheriff alarm. What is this car alarm is disclosed in the article. In addition, it talks about its model range with a photo, and gives detailed instructions with a connection diagram and do-it-yourself alarm setup.
[ Hide ]
Peculiarities
The creator is the American company Progressive Innovative Technology (PIT). The Sheriff protective system works flawlessly in any weather; during testing, it has shown its reliability, functionality and ease of use. PIT conceived the Sheriff feedback alarm as a budget option.
The main advantages of Sheriff protective systems are as follows:
- at a distance with installation on protection and blocking of doors and windows;
- the presence of a satellite module;
- two modes of arming: passive and active;
- two-way communication;
- scan protection: burglars will not be able to turn off the alarm;
- recognition of the owner when he approaches the car;
- arming the car alarm, even if the engine is running;
- launch and at a distance;
- communication with the car using multifunctional key fobs;
- shock sensor with alert capability;
- motion recognition and audio listening to the cabin with the notification of the owner.
Almost all Sheriff models have the listed functions, but each of them is equipped with additional functionality, there is a Valet button, with which you can disable the vehicle security for a while.
Types and models
Sheriff alarms with auto start make it possible to start and block the engine from a distance, control doors and windows, arm and disarm the car, have a Valet button. The Sheriff closed-loop security system allows the car's control unit to exchange radio signals with the key fob at a distance. This makes it possible to receive information about the current state of the machine, which is transmitted to the key fob screen. All models in the kit contain instructions with which you can do it yourself.
Below is an overview of several popular models.
APS-2500
This model is equipped with a key fob with two buttons, can be configured for 4 sets of keys. With a button called Valet, you can fully control the performance of the car. Arming is possible even if the motor is running. Equipped with a two-level shock sensor. It has its own charger, so the car will never be left without protection (video by Yaroslav450).
Sheriff ZX-750
The model has two-way communication, carried out using a key fob. Communication is available at a distance of up to 2 km. Two-way communication allows you to find a car in the parking lot. With the help of a car alarm, you can control the emergency light alarm. In addition, the model is equipped with anti-theft equipment, a Valet button and a panic alert sensor. Inside the car there is a button, when pressed, a signal is sent to the owner's key fob. In the event of theft, the car alarm will block the engine and notify the owner.

APS 35PRO
The model with auto start, makes it possible to start the car at a decent distance. Using the key fob, you can control passive and active modes, as well as anti-theft passive theft. The car alarm has a two-channel receiver, a two-level shock sensor, a Valet button. The audible alarm can be turned off at night, and when a threat is detected, the signal will be sent to the control key fob. The receiver can be programmed to receive a signal from up to four transmitters.

Instructions for use
All types of Sheriff alarms in their kit have instructions that describe in detail how to connect and set up a car alarm with your own hands.
How to connect?
To connect a car alarm, you first need to find a place to install the main control unit. Most often it is installed under the ventilation and air conditioning control unit or behind the glove compartment. You should not choose the engine compartment as the installation site, as there is a lot of equipment installed there that will interfere with the radio signal. The block is attached to the selected place with the help of screws or ties that come with the kit.
It is better to install the siren in the engine compartment in an inaccessible place, away from moving parts. In addition, it must be protected from moisture. must be attached to a metal surface that is securely connected to the body.
It is better to place the shock sensor on the side of the passenger compartment on the hard surface of the jumper between the engine compartment and the cab. The LED must be placed in a conspicuous place so that the criminal is warned that a security system is installed on the car. Particular attention should be paid to the installation of the magic Valet button, which should be located in a secret place, but always be available to the driver.
The manual has a wiring diagram showing the colors of the wires and where they are connected.

Since each model has its own functionality, the settings should be performed according to the instructions and connection diagram that is attached to the kit.
Possible malfunctions
Despite the reliability of the Sheriff alarm, its elements can fail.
The following problems are possible:
- sometimes the security system with feedback does not catch the signal from the key fob, or it turns out to catch it only from the second, and sometimes even from the third time;
- problems arise due to the high sensitivity of the sensors;
- for the key fob to work, you have to press the button hard;
- during arming, the windows do not block or the locks do not close completely, you have to close them yourself.
If revealed immediately after the purchase and installation of it on the machine, you should return it to the seller or exchange it for a serviceable one. In case of serious problems after prolonged use, it is better to contact specialists.

Pros and cons of the anti-theft system
Security car alarm Sheriff with feedback and auto start is very popular due to the following advantages:
- low cost;
- do-it-yourself installation and configuration options thanks to the instructions and connection diagram attached to the kit;
- ergonomics and beautiful appearance of the key fob.
It has a Sheriff alarm and disadvantages:
- small range of the key fob;
- according to user reviews, false alarms are possible due to poor-quality interaction with the immobilizer;
- problems may arise during installation, as some places in the instructions and the wiring diagram are not clear.
If the installation does not work out with your own hands, you should contact the specialists.
Video “Connecting the Sheriff ZX 1090 alarm”
In this video from the Home Automaster channel, we figure out how to install a Sheriff ZX 1090 car alarm on a Mitsubishi Lanser X car.
Car alarm SHERIFF APS-2500 USER MANUAL AND INSTALLATION INSTRUCTION
APS-2500
USER MANUAL AND INSTALLATION INSTRUCTIONS SHERIFF APS-2500
IMPORTANT!
To ensure the highest level of protection for your vehicle, this security system has the functions of manual arming, manual disarming (disarming), disarming the system in two steps. In cases where the key fob transmitter of the remote control system is lost or does not work (or, perhaps, your key fob transmitter is blocked by the powerful radio emission of a jammer device), control of the security system is possible and is performed manually. Read the sections "Manually Arming the System", "Manually Disarming the Security System", AV function- the function of disarming the system in two stages.
If programmed function F9 "Secret code", then writing the codes of new key fobs, changing the secret code, changing the status of the programmed functions with F8 By F14, emergency disarming of the system, shutdown of the system when triggered in the modes "Anti Hi Jack" possible only after entering the secret code! Changing function settings from F1 By F7 does not require entering a secret code and is always available.
STANDARD FEATURES OF THE SHERIFF APS-2500 SYSTEM
- KeeLoq+ dynamic code
- Two-channel receiver (possibility of programming up to four transmitters).
- Two two-button programmable transmitters.
- push button switch Valet.
- Dual-zone piezoelectric shock sensor.
- Siren.
- Built-in tail light control relay.
- Built-in universal power output for controlling door locks.
- Remote control of the central locking of the car in the mode Valet and with the engine running.
- Two detachable connections for connecting external shock and volume sensors.
- Limitation of false alarms for all zones, all sensors.
- Two complementary blocking circuits (requires installation of an additional relay).
- Two channels for controlling car service devices (additional lock channel, power window control, polite backlight output, trunk opening control, independent pager control).
- Multifunctional LED indicator.
- Trip memory.
- Manual arming of the system in any time with button Valet in full protection mode, even without the ignition key.
- Silent arming and disarming of the system.
- Temporarily disable the shock sensor(s).
- Silence the alarm from the remote control.
- Remote control of the Panic function in all modes.
- Beep mode confirmation Valet.
- Sound and light warning about system operation.
- Limited time alarm mode.
- Perimeter security.
- Fault zone bypass.
- State memory Valet, DISARM(disarmed) TRIGGERS(state of security inputs) when the system power is turned off.
- Immediate activation of the alarm when the system power is turned off in ARM (armed) mode.
- Trunk opening control with temporary shutdown of sensors and hood/trunk protection channel.
- Long-term remote turning off / on of the siren (night mode) in armed mode
PROGRAMMABLE FUNCTIONS OF THE SHERIFF APS-2500 SYSTEM
- Programmable personal code to disable and control the system.
- Programmable system arming delay: 5 sec, 35 sec.
- Passive/active arming of the system.
- Programmable automatic door locking when the ignition is switched on.
- Programmable automatic door unlocking when the ignition is turned off.
- Programmable re-arming function.
- Programming the central lock control mode when re-arming.
- Programmable duration of an impulse of management of locks of doors: 1 sec, 3,5 sec.
- Double impulse to unlock the doors.
- Close all (COMFORT) - programming the impulse to close the doors for 15 or 30 seconds when arming.
- Programmable auxiliary channel control function 2.
- Programmable auxiliary channel control function 3.
- Programmable function Anti Hi Jack when the ignition is turned on.
- Long-term remote disabling / enabling of the siren alarm (night mode) in armed mode.
- Programmable function of shutdown of "false" operations of system.
- Protection when the engine is running.
- AV function- disarming the system in two stages.
- Restoring factory settings.
Transmitters with technology to protect digital codes from interception (KeeLoq)
The key fobs included with this security system use the most advanced and reliable form of radio frequency transmission of any automotive security system currently available. Some of today's sophisticated car thieves use devices known as code grabbers, which allow the signal transmitted by the car's security remote control to be received and stored in memory. After the driver leaves, the hijacker uses this code to disarm the system.
Unlike the remote control devices described above, the keyfob transmitters included with your security system change the transmitted signal code each time a button is pressed, so when the hijacker plays an intercepted signal from your keyfob transmitter, the security system simply will not respond to it. If the button on your keyfob transmitter was pressed more than 30 times when it was out of control of the security system (for example, if children played with it), the system will not respond to the call of the keyfob transmitter when you decide to use it again. You need to synchronize your key fob transmitter with the security system receiver. To do this, simply press the system arming/disarming button on the key fob transmitter twice within one second. After that, the system will again respond to all remote control commands.
BUTTON FUNCTIONS OF THE SHERIFF APS-2500 TRANSMITTER
| Function | Button number | A comment |
|---|---|---|
| Arming | 1 | Press and release |
| Disarming | 1 | Press and release |
| Lockout (ignition) | 1 | Press and release |
| Lock release (ignition) | 1 | Press and release |
| Block locks (Valet) | 1 | Press and release |
| Unlocking locks (Valet) | 1 | Press and release |
| Switching on the guard with the engine running | 1 | Press and hold for more than 3 seconds |
| Disabling the guard when the engine is running | 1 | Press and release |
| PANIC (on/off) | 1+2 | Press and hold for more than 2 seconds |
| Disabling / enabling the siren in the security cycle | Double 1+2 | Press buttons 1+2 twice at the same time within 1 second |
| Activate channel 2 | 2 | Press and hold for more than 1.2 seconds |
| Silent arming | 2,1 | |
| Silent disarming | 2,1 | Press button 2, then button 1 |
| Arming with complete disabling of both sensors | 1,2 | Press button 1, then button 2 |
| Silent arming with complete disabling of both sensors | 2, 1,2 | Press button 2, then button 1, then button 2 |
ACTIVE ARMING OF THE SYSTEM SHERIFF APS-2500
- Press and release the large arm/disarm button on the key fob transmitter once.
- The siren will give one short confirmation beep.
Silent active arming
- Turn off the engine, get out of the vehicle and close all doors, hood and trunk.
- Briefly press the small button and then the large arm/disarm button on the key fob transmitter.
- The red LED indicator on the car's dashboard will flash slowly.
- The vehicle's side lights will flash once. There will be no confirmation beep.
- If there is an additional lock/unlock circuit, the vehicle doors will be locked.
TEMPORARY DISABLE THE SHOCK SENSOR
If you leave your vehicle on a busy city street and there is a high possibility of false alarms, DISABLE the SENSOR(S) when arming the system.
Briefly press the large button, and then within 4 seconds the small button on the key fob transmitter. The siren will give a long beep, confirming that the shock sensor has been disabled for the current armed period.
MANUAL ARMING THE SYSTEM
If for some reason you cannot use the key fob transmitter to arm the system, you can do this using the Valet button at any time, even if the ignition key is not available.
Full arming of the system
- Briefly press, release, and then press and hold (more than 3 seconds) the button Valet until confirmation by a sound signal of the activation of the arming mode.
- The LED indicator will flash rapidly to indicate that the last door is waiting for the door to close:
- if the door was closed, the system will wait for the last door to open and then close,
- if the door was open, the system will wait for the last door to close.
- After the last door is closed and after a 3-second time interval, the full armed mode will turn on.
- If there is an additional circuit for locking/unlocking the door locks and enabled programmable function F6/3(locking the door locks when the system is re-armed), then the car doors will be locked.
Manual arming is performed only for one cycle before disarming the system.
Note After turning off the ignition, manual arming can only be performed after a 5 second delay.
PROTECTION OF THE VEHICLE WHEN THE ARMED MODE IS ON
Opening the hood, trunk or door of the vehicle will immediately activate the system and activate the alarm. For 30 seconds, the siren will sound and the parking lights of the car will flash. After that, the sound of the siren and the flashing of the marker lights will stop and the system will continue to monitor all the vehicle's security circuits. If a burglar or thief left the door open, the siren will sound for six 30 second cycles and then turn off; this protection zone will be isolated and the system will continue to monitor the rest of the vehicle's protection circuits.
Each time the system is armed, the red LED indicator installed in the vehicle's dashboard will flash slowly. The blinking LED indicator serves as a visual warning to potential burglars or thieves. A light-emitting diode is used as an indicator, consuming a small current. Therefore, even if the system is left armed for a long time, the operation of the LED indicator will not drain the car battery.
Each time the system is triggered, the vehicle's parking lights flash for the entire 30-second alarm cycle to draw attention to the vehicle.
Additional feature. Each time the system is armed, the vehicle's starter circuit is disabled. In this case, the car engine cannot be started even with the ignition key.
When the system is armed, any strong blow to the body or glass of the car will trigger the shock sensor and turn on the alarm.
Weaker impacts will trigger the shock sensor warning zone, after which the siren will emit several short bursts of warning tones.
DISARMING THE SYSTEM
Approaching the car, press and release the large arm/disarm button on the key fob transmitter.
- The system will disarm.
- The siren will give two short confirmation beeps.
Note If F6 enabled- automatic re-arming, then when the system is disarmed, the LED indicator will begin to flash quickly, indicating that if none of the doors is opened within 20 seconds, the system will arm the system. If at least one door is opened within 20 seconds, the LED indicator will turn off and the arming mode of the system will be canceled.
SILENT DISARMING
- Approaching the car, briefly press the small button, and then the large button for arming / disarming the system on the key fob transmitter.
- The system will perform actions according to the modes of the programmed functions.
- The vehicle's side lights will flash twice.
- If there is an additional lock/unlock circuit, the car's door locks will be open.
ARMING THE SYSTEM WITH THE ENGINE RUNNING
Guarding a car with a running engine allows you to prevent an attempt to steal a car when performing, for example, the engine warm-up procedure.
Arming:
- turn on the ignition and start the engine,
- close all doors, hood and trunk.
- Press and hold the large button to arm/disarm the system for 3 seconds,
- the red LED indicator on the car dashboard will flash slowly,
- the parking lights of the car will flash once,
- The siren will give one short beep.
- If there is an additional lock/unlock circuit, the vehicle doors will be locked.
The engine running arming feature is a programmable F10 feature and can be enabled or disabled.
SILENT ARMING WITH ENGINE RUNNING
- Turn on the engine.
- Close all doors, hood and trunk.
- Briefly press the small button, and then press and hold the large system arming/disarming button on the key fob transmitter for 3 seconds.
- The red LED indicator on the car's dashboard will flash slowly.
- The vehicle's side lights will flash once.
- The siren will not beep confirmation.
- If there is an additional lock/unlock circuit, the vehicle doors will be locked.
PROTECTION OF THE VEHICLE WHEN THE ARMED MODE IS ON AND THE ENGINE IS RUNNING
Opening the hood, trunk or door of the vehicle will immediately activate the system and activate the alarm. All blocking circuits will turn on. In this case, the car engine will stall and attempts to start it again will lead to nothing. For 30 seconds, the siren will sound and the parking lights of the car will flash. After that, the sound of the siren and the flashing of the parking lights will stop, and the system will continue to monitor all the security circuits of the car. If a burglar or thief left the door open, the siren will sound for six 30 second cycles and then turn off; this protection zone will be isolated, and the system will continue to monitor the rest of the vehicle's protection circuits.
The LED indicator will start flashing slowly. Each time the system is triggered, the vehicle's parking lights flash for the entire 30-second alarm cycle to draw attention to the vehicle.
DISARMING THE SYSTEM WITH THE ENGINE RUNNING
Disarming the system with the engine running is carried out by briefly pressing the large button for arming/disarming the system.
The LED indicator will turn off.
If the alarm was triggered in your absence, then when disarming, the LED indicator will flash according to the code, indicating the zone protected by the system that was triggered in your absence.
- The vehicle's side lights will flash twice.
- The siren will give two short beeps.
- If there is an additional lock/unlock circuit, the car's door locks will be open.
Note Attempting to disarm the system after the system has been triggered (siren sounded) will only silence the alarm. The system will not be disarmed. To disarm the system, press the large arm/disarm button on the key fob again when the system does not beep.
SILENTLY DISARMING THE SYSTEM WHILE THE ENGINE IS RUNNING
Approaching the car, briefly press the small button, and then the large button for arming / disarming the system on the key fob transmitter.
- The LED indicator installed in the car dashboard will turn off.
- The vehicle's side lights will flash twice.
VEHICLE ENTRY ALARMS
If in your absence an attempt was made to break into the car, the security system will inform you about it.
When the system is disarmed, four short beeps will sound and the parking lights or direction indicators will flash four times.
Get in the car and watch the LED on the car dashboard flash before turning the key in the ignition.
- If the LED indicator flashes once after a pause, then the system was triggered by a shock sensor or from a trigger of an additional device connected to the system.
- If the LED indicator flashes twice after a pause, then the system was triggered by the trunk or hood limit switch (when trying to open the hood or trunk).
- If the LED indicator flashes three times after a pause, then the system was triggered by the door limit switch (when trying to open the car doors).
Vehicle entry warnings are stored in the system memory and are cleared when the ignition is turned on.
Valet BUTTON SWITCH (Valet mode)
push button switch Valet allows you to temporarily disable all security functions of this system, which eliminates the need to give the transmitter control of your system to a parking attendant or a mechanic at a service station. When the system is in mode Valet, all security functions are disabled, except for the remote mode control function Panic and remote control functions for locking and unlocking car doors.
Enabling Valet Mode
- Disarm the system from the key fob transmitter or button Valet or enter your personal code to manually disable the system.
- Valet.
- The LED indicator will turn on continuously.
- The system is in service mode Valet
Note In mode Valet each ignition off will be accompanied by a short sound signal.
Don't forget to turn off the Valet service mode when you no longer need this mode. This will provide complete protection for your vehicle.
Turn off Valet mode
- Turn the ignition ON and OFF.
- Within 5 seconds, briefly press and release the button Valet.
- The LED indicator will turn off.
- The system will enter the operating mode.
MANUAL DISABLED ALARM SYSTEM USING THE SWITCH Valet
This security system can be disarmed without using a remote control transmitter. This feature is provided in the event that you need to disarm the system and use the car, but the key fob transmitter is lost or defective. If the switch is selected to manually shut down the system when programming the system Valet, then to turn off the system, do the following:
- open the car door,
- the security system will work and the siren will turn on,
- turn on the ignition,
- within 10 seconds, briefly press the button Valet
Please note that the system will not be in Valet mode!
DISCONNECTING THE SYSTEM USING YOUR PERSONAL CODE
The choice of the coded shutdown mode of the system is carried out function F9. To do this, contact your master installer or see the "Programmable Features" section and the system installation instructions. Please note that the choice of this function also determines how the mode is turned off. Anti Hi Jack (Valet or encoded).
In case the coded disarming mode is enabled, you can use the factory code (11) or, for maximum protection of your car, you can program your personal disarming code at any time.
The code consists of two digits, each of which can be any number from 1 to 9.
To remove the system using a personal code
- Open the door with the key (the system will work and the marker lights will turn on, etc.).
- Exclude, turn off and then turn on the ignition again.
- Valet
- Within 10 sec. Valet
- Switch the ignition off and on again. The alarm mode will turn off and the engine can be started.
Note In the event that the wrong code was entered 3 times in a row, the system will stop accepting further attempts to enter the code for some time.
PROGRAMMING A PERSONAL SYSTEM SHUT OFF CODE
Do not choose the number 3 as the first digit of the secret code!
Function F9 must comply with the Secret code
System shutdown factory code -11.
To program your personal code
Enter a valid personal code to allow the operation of changing the secret code
- Disarm the system.
- Within 10 seconds, press the pushbutton Valet the number of times corresponding to the first digit of your personal code (factory setting once).
- Switch the ignition off and on again.
- Within 10 seconds, press the pushbutton Valet the number of times corresponding to the second digit of your personal code (factory setting once).
- Switch the ignition off and on again.
- If the entered code is correct, one short siren signal will sound.
- Switch off the ignition within 5 seconds. Follow the procedure for writing a new secret code
- Immediately press the button switch Valet 5 times. You will hear one short and one long siren tone to confirm that the system is ready to program a new personal code.
- Within 5 seconds after the siren sounds, press button 1 (large button) of the transmitter to start entering the first digit of the personal code. You will hear one confirmation siren.
- Within 10 seconds, press the pushbutton Valet the number of times corresponding to the first digit of your personal code (from 1 to 9). The siren will give the appropriate number of signals, confirming the entry of the first digit of the code.
- Within 10 seconds, press button 2 (small button) of the transmitter to start entering the second digit of the personal code. You will hear two siren beeps for confirmation.
- Within 10 seconds, press the pushbutton Valet the number of times corresponding to the second digit of your personal code (from 1 to 9). The siren will give the appropriate number of signals, confirming the entry of the second digit of the code.
- Turn on the ignition. You will hear one short and one long siren to confirm that programming of the new personal code has been completed.
Note If the system does not confirm the entry of the secret code with a beep, arm the system using the transmitter key fob, then disarm the system and repeat the procedure for entering the secret code.
Be sure to write down or memorize your personal code well. Please note that if function F10 programmed as Secret code, a personal code will also be required to disable the function Anti Hi Jack.
ANTI-HI-JACK MODE WHEN THE IGNITION IS ON - PROTECTION AGAINST THEFT AND CAPTURE OF THE VEHICLE (programmable function F11)
- Ignition on or engine running.
- Within 20 seconds after the ignition is turned on, the system does not manifest itself in any way. Switching off the ignition cancels the function. Subsequent switching on of the ignition activates the function Anti Hi Jack at first.
- During the next 20 second interval (warning cycle), the system will generate short warning beeps. Switching off and then on the ignition activates the function Anti Hi Jack with a warning loop.
- During the next 20 second interval (safe stop cycle), the system activates alarms and alternates interlocks. Switching the ignition off and then on will activate all the blocking circuits completely and turn on the alarm in continuous mode.
Note After the alarm is turned on in continuous mode, the sound and light alarms will work until the car battery is completely discharged.
DISABLE Anti-Hi-Jack
If function F9 in mode Valet, disable function Anti Hi Jack performed by pressing the button once Valet. To do this, turn off, then turn on the ignition again and within 10 seconds press the button switch Valet.
If function F9 in mode Secret code, turn the ignition off and on again 2 times, then enter the personal secret code to disable the system.
AUTOMATIC LOCKING OF THE DOORS WHEN THE IGNITION IS ON (function F4)
If your vehicle is equipped with optional power door locks, this system can be programmed to automatically lock the doors when the ignition is turned on. Every time you turn on the ignition, after 3 seconds, the car doors will be locked for your safety. If any of the doors is open at this moment, the doors will not be locked. If you wish to enable this feature, please contact your installer or see Programmable Features.
AUTOMATIC UNLOCKING OF THE DOOR WHEN THE IGNITION IS OFF (function F5)
If your car is equipped with additional electric door locks, then every time you turn off the ignition, the car doors will be automatically unlocked. If you wish to disable this feature, please contact your installer or see Programmable Features.
REMOTE CONTROL Panic
To enable the mode Panic press and hold both buttons of the keyfob transmitter together, which allows you to turn on the siren of the system in an emergency. To remotely turn on the mode Panic
- press both buttons on your key fob transmitter and hold them down for at least 3 seconds; this will immediately turn on the siren and flash the parking lights.
- to turn off the siren, once again briefly press both buttons of the transmitter simultaneously; unless you disable the mode Panic, the system will turn off automatically after 30 seconds.
Note In mode Panic all normal key fob transmitter functions will work.
Mode Panic works both with the ignition off and with the ignition on.
AUXILIARY REMOTE CONTROL (Channel 2) PROGRAMMABLE FUNCTION F7
This system has an additional channel 2, which allows you to control various additional devices connected to the system. Basically, this channel can be used for
- remote opening of the trunk of the car,
- remote start of the car engine, etc.
To send a control signal to an additional device via channel 2, press the small button 2 on the key fob transmitter and hold it down for 1.5 seconds.
- Channel output CH2 connects to the "mass" during the entire time of holding button 2 on the key fob transmitter.
- Channel output CH2 connects to ground for 1 second.
- Channel output CH2 connects to ground for the time until the next moment of channel control and only when the ignition is on. Turning off the ignition does not turn off the channel. Channel off CH2 is carried out by pressing and holding button 2 for more than 1.5 seconds in any ignition state.
Note For pp. 1,2: If the channel 2 output was activated while the system was armed, the system will simultaneously disable the shock sensor and the hood/trunk trigger for a while so that opening the trunk does not trigger the system. After the trunk is closed, the system will automatically arm this circuit and turn on the shock sensor.
For item 3: when the channel is activated, the system disables only shock sensors.
REMOTE CONTROL OF AUXILIARY DEVICES (channel 3)
Additional programmable channel 3 (line of additional blocking "ARM" - black wire with a white stripe) allows you to control additional devices connected to the system. This channel is programmed as
- Additional blocking output (complimentary to the main blocking output).
- Pulse output of negative polarity for 30 seconds when the system is armed (use option - as a power window control output).
- Pulse output of negative polarity for 20 seconds when the system is disarmed (option of use - polite backlight control output). Turning the ignition on will cancel the pulse at any time.
- Independent channel control external device type Pager.
REMOTE SIREN CONTROL
In some cases of using the security system, it is required to turn off the siren, for example, to maintain silence at night. The APS-2500 SHERIFF system allows you to remotely turn off, as well as remotely turn on the siren at the request of the user. The siren can only be controlled in armed mode. Turning the siren off or on is done by pressing both buttons of the key fob-transmitter twice simultaneously within one second. Disarming the system and then arming will automatically restore the siren to normal operation. When the system is armed, the siren can be turned off or on any number of times.
AV SYSTEM FUNCTION (F12) -
two-step disarming function
F12 enabled - when the security mode is disarmed using a keyfob transmitter, the system unlocks the door locks, disables shock sensors and security perimeter input triggers. All chains locks remain active and can only be turned off by pressing the button again Valet or by entering secret code.
CODE PROGRAMMING FOR NEW TRANSMITTERS
ATTENTION When a new transmitter code is written to the system memory, all previously programmed transmitter codes are erased, so all transmitter codes must be reprogrammed in one cycle.
ATTENTION Since the transmitters use a constantly changing (dynamic) code, in some situations (for example, when the key fob buttons are pressed more than 30 times outside the system coverage area), the key fobs and the system may become out of sync. In this case, approach the car and press the transmitter button twice within 1 second. Synchronization will be restored and the key fob will be able to control the system again.
PROGRAMMING TRANSMITTERS
Transmitter programming (F9 - Valet state)
ATTENTION Remember that each operation must be completed within 5 seconds of the previous operation. If the 5 second interval is exceeded, the system will automatically exit programming mode, which will be confirmed by one short and one long siren beep. If the ignition was turned off during programming, the system will immediately exit the programming mode, confirming this with one short and one long signal from the siren.
- Disarm the system, get into the car and turn on the ignition.
- Push button switch Valet 3 times. You will hear 1 siren tone to confirm that the system is ready to program new transmitters.
- Press and hold button 1 of the first transmitter until you hear a long siren tone confirming that the programming of the first transmitter has been completed (the transmitter channels will be programmed automatically). In this case, the LED will begin to blink slowly.
- Press and hold button 1 on the second transmitter until you hear a long siren tone confirming that the programming of the second transmitter has been completed.
- Repeat step 4 for other transmitters.
- To exit transmitter programming mode
- turn off the ignition or
- wait 8 seconds without doing anything.
You will hear one short and one long siren tone to confirm you have exited transmitter programming mode, and the system LED will turn off.
Transmitter programming (F9 - Secret code state).
- Disarm the system using the key fob and enter the secret code or immediately enter it with the button Valet secret code
- Turn on, turn off, then turn on the ignition.
- With switch Valet enter the first digit of the code.
- Turn off and then turn on the ignition.
- With switch Valet enter the second digit of the code.
- Turn off and then turn on the ignition. The system should confirm with a beep that the correct code has been entered.
- Push button switch Valet
- Press the first button of the first key fob transmitter. The system will confirm the entry of a new key fob code into the memory with a sound signal.
- Press the first button of the second key fob transmitter. The system will confirm the entry of a new key fob code into the memory with a sound signal.
ATTENTION Remember that each operation of writing the codes of new key fobs deletes the codes of old key fobs from memory and must be performed for all key fobs at a time. The system maintains up to 4 keyfob codes in memory, regardless of whether the codes of four different keyfobs or the same code are written to the system four times.
PROGRAMMABLE FUNCTIONS OF THE APS-2500 SHERIFF SYSTEM
Function table
| FN# | 1 tone | 2 tones | 3 tones | 4 tones | |
|---|---|---|---|---|---|
| One click on ARM/ DISARM | Double click on ARM/ DISARM | Three clicks on ARM/ DISARM | Four clicks on ARM/DISARM | ||
| F1: Limit False Positives | OFF | ON | |||
| F2: Arming Delay | 5 sec | 35 sec | |||
| F3: Lock/unlock pulse width | 0.9 sec | 3.5 sec | Imp. locking 1sec, two imp. unlocking by 1 sec | ||
| F4: Locking the doors when the ignition is ON | OFF | ON | |||
| F5: Auto. unlocking when ignition is OFF | OFF | ON | |||
| F6: Auto Rearm | OFF | ON | ON with door locks | ||
| F7: Programming the controlled channel CH2 | Exit (-) as long as you hold | Pulse output (-) 1 sec | Trigger output (-) (with ignition on) | ||
| F8: Factory Restore installations | OFF | - recovery | |||
| F9: System shutdown | Valet | Secret code | |||
| F10: Guarding when the engine is running | OFF | ON | |||
| F11: Enable Anti-Hi-Jack when ignition is turned on | OFF | ON | |||
| F12: AV trigger for ARM, ARM (disarm in two steps) | OFF | ON | |||
| F13: Programming aux. SNZ channel | Output ARM (-)-DOP. blocking | Impulse(-) 20 sec when system is disarmed (polite backlight) | Impulse (-) 30 sec when arming (power window control) | Pager output | |
| F14: Close ALL (comfort) | OFF | 15 sec | 30 sec | ||
factory setting
CODE PROGRAMMING OF THE NEW SHERIFF APS-2500 TRANSMITTERS
ATTENTION When a new transmitter code is written to the system memory, all previously programmed transmitter codes are erased, so all transmitter codes must be reprogrammed in one cycle.
ATTENTION Since the transmitters use a constantly changing (dynamic) code, in some situations (for example, when pressing the key fob buttons more than 30 times outside the system coverage), the key fob and the system may become out of sync. In this case, approach the vehicle and press the transmitter button twice within one second. Synchronization will be restored and the key fob will again be able to control the system.
PROGRAMMING SYSTEM FUNCTIONS (F9 in Valet Mode)
1. Enter programming mode
- Disarm the system.
- Turn on the ignition.
- Within 3 seconds after turning on the ignition, press the button switch Valet 3 times. You will hear one long siren chirp.
- F1 functions
In the programming mode of a particular function, the number of LED flashes corresponds to the number of the programmable function, and one or two siren sounds indicate the status of this function.
After the siren sounds, you can either
- change the state of this function (by pressing button 1 of the transmitter). At the same time, you will again hear 1 or 2 siren signals, according to the new state of the function,
- Valet),
Note
- After turning on the ignition, you will hear 1 or 2 siren signals, according to the state F1 functions(one beep - the function is off, two beeps - the function is on).
- To change state F1 functions F2 functions.
- Push button switch Valet F2 functions
- You will hear 1 or 2 siren signals characterizing the status F2 functions
- To change state F2 functions press transmitter button 1 or go to programming F3 functions Valet. etc.
PROGRAMMING SYSTEM FUNCTIONS (F9 in Secret Code mode) SHERIFF APS-2500
reprogramming functions F1-F7 does not require entering a secret code and does not depend on the state F9 functions, however, an attempt to move on to programming functions F8-F14 will exit the system from programming mode.
1. Entering the programming mode is possible only after entering the Secret code
Enter a valid personal code to enable the function reprogramming operation.
- Disarm the system.
- Switch the ignition on, off and then on again.
- Within 10 seconds, press the pushbutton Valet the number of times corresponding to the first digit of your personal code (factory setting once).
- Switch the ignition off and on again.
- Within 10 seconds, press the pushbutton Valet the number of times corresponding to the second digit of your personal code (factory setting once).
- Switch the ignition off and on again.
- If the entered code is correct, one short siren will sound.
Entering programming mode
- Within 5 seconds, press the pushbutton Valet 3 times. You will hear one long siren chirp.
- Within 3 seconds after the siren signal, turn off the ignition. You will hear one short and one long siren.
- Within 3 seconds after the siren signals, turn on the ignition. You will automatically enter programming mode F1 functions. The LED will start flashing in single flashes.
In the programming mode of a particular function, the number of LED flashes corresponds to the number of the programmable function, and one or two siren sounds indicate the status of this function.
After the siren sounds, you can
- change the state of this function (by pressing button 1 of the transmitter). At the same time, you will again hear one or two siren signals according to the new state of the function,
- move to the next function (by pressing the pushbutton once Valet),
- exit the programming mode (for example, by turning off the ignition).
Note Do not allow more than 10 seconds between your actions, otherwise the system will automatically exit the programming mode and you will hear one short and one long siren chirp.
2. Programming the F1 function
- After switching on the ignition, you will hear 1 or 2 siren signals, according to the state of the F1 function (one signal - the function is disabled, two signals - the function is enabled).
- To change state F1 functions press transmitter button 1 or go to programming F2 functions
3. Programming the F2 function
- Push button switch Valet once. You will enter programming mode F2 functions. The LED will start flashing in series of two flashes after a pause.
- You will hear one or two siren beeps to indicate the status of the F2 functions(one beep - when arming is delayed by 5 seconds, two beeps - when arming is delayed by 35 seconds).
- To change state F2 functions press transmitter button 1 or go to programming F3 functions by briefly pressing the button switch Valet. etc.
SYSTEM LED OPERATING MODES
(installed in the dashboard of the car)
SHORT CONFIRMATION BEEPS BY THE SYSTEM SIREN
SHERIFF APS-2500 SIDE LIGHTS OPERATION MODES
Note If the alarm was triggered in your absence, then when the system is disarmed, four short beeps will sound and the parking lights or direction indicators will flash four times, and the LED indicator will flash according to the code that corresponds to the zone that was triggered in your absence.
Before starting the car's engine, watch the LED on the car's dashboard flash. The number of flashes of the LED indicator indicates the zone protected by the system that triggered the system in your absence. For more information, see the "Vehicle Burglar Alarms" section of this manual.
Attempting to disarm the system after the system has been triggered (siren sounded) will only silence the alarm. The system will not be disarmed. To disarm the system, press the arm/disarm button on the keyfob transmitter when the system does not beep.
BATTERY REPLACEMENT
A small red LED is installed in the transmitter housing, which confirms the pressing of the transmitter buttons, and also shows the battery status. As the battery discharges, you may notice a decrease in the range of the transmitter.
To replace the battery
- open the cover by unscrewing the small screw on the back of the transmitter housing,
- remove the dead battery, remember the polarity of its installation and dispose of it properly,
- install a new battery (type GP27A), make sure the polarity is correct,
- carefully install the cover without damaging the LED or switches on the circuit board.
SYSTEM INSTALLATION
INSTALLATION OF THE MAIN COMPONENTS OF THE SHERIFF APS-2500 SYSTEM
Main unit (control module)
Choose a place in the passenger compartment to install the main unit of the system (behind the dashboard of the car) and fix the unit with two screws. The main unit of the system can be fixed with cable ties.
Never install the main unit of the system in the engine compartment of a car, because the body of this module is not sealed. You should avoid installing this unit directly on the regular electronic components of the car. Vehicle electronic components can generate radio frequency interference, which in turn may shorten the operating distance of the system's transmitter or cause system interruptions.
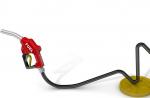
Siren
To install the siren, choose a place in the engine compartment where the siren will be protected from access from the bottom or arches of the front wheels of the car. The selected location in the engine compartment must be free of hot or moving parts. The siren should point downwards to avoid water build-up and the horn should point out of the engine compartment for maximum sound propagation. Fix the siren in the chosen place on the special bracket with screws.
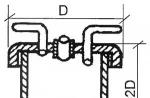
Hood or trunk limit switch
The limit switch supplied with this system is designed to protect the areas of the trunk (rear door in cars with a hatchback or station wagon) or the hood of the car. In any case, the limit switch should be mounted on a metal surface electrically connected to the vehicle ground. It is very important to install the limit switch in a place where water does not leak or accumulate. Never install a limit switch in the drains that are located on the fenders of the car along the hood and trunk. To install the limit switch, choose a place protected by a rubber seal with the hood or trunk lid closed.
The limit switch can be installed using the included bracket or directly into a 6 mm (1/4 in.) diameter hole drilled in the vehicle body. In any case, the limit switch must be installed in such a way that, when closed, the hood or trunk lid presses the limit switch and moves its moving contact by at least 6 mm, and when opened, allows the moving contact to fully rise.
Car dashboard mounted LED indicator
This system includes a small red LED indicator that shows the status of the security system and is a visual warning to potential burglars and thieves. The LED indicator should be installed in the car dashboard in a place where it will be clearly visible both from the driver's seat and from the outside through the car windows. Before drilling a hole in the selected location on the dashboard, inspect it from all sides so as not to damage the wires of the car's standard electrical wiring with a drill and make sure that the LED indicator wires can be connected to this place.
Carefully drill a 6 mm (1/4 inch) hole in the selected location, pass the red and blue LED wires through the hole on the front of the panel. Press down on the LED and firmly install it into the mounting hole.
Valet switch
To set the switch Valet choose a place where the car driver can easily use it. It is not necessary to carefully hide the switch, but it is still recommended to use certain masking methods, because this will increase the level of system security and make it more difficult for hijackers to act.
push button switch Valet can be mounted on the dashboard of the car from below on the driver's side. You need to make sure that when you install the system further, you can easily connect wires to the switch.
shock sensor
To install the shock sensor, select a flat hard surface on the partition separating the engine compartment and the car interior, from the passenger compartment. Attach the shock sensor to the selected location using the two self-tapping screws included with the system. The sensor can be attached to the stands to which the car dashboard is attached using cable ties.
Regardless of which shock sensor mounting method is used, the sensor sensitivity adjustment potentiometer must be freely accessible, which may need to be used when setting up the system later.
WIRING THE SHERIFF APS-2500 SYSTEM
ATTENTION! When connecting additional relays to the outputs of the security system, make sure that there is a damping diode on the relay control contacts. Connect the output of the security system to the additional relay only from the anode side of the damping diode. Make all security system wire connections only with the security system power circuit fuses removed.
Large 12-pin system connector
White wire: pulse output +12 V for connecting the parking lights of the car (maximum current 15 A). The white wire in the system unit is designed to supply a +12 V pulse signal to the power supply circuit of the parking lights of the car. Connect these wires to the positive polarity wires of the parking light circuits of the vehicle.
Red wire protected by a 15A fuse: constant power supply + 12 V. This wire is used to power the built-in power circuits - control of the side light of the car.
Red wire with white stripe protected by a 5A fuse:+12 V DC power supply. This wire is used to power all main circuits of the system.
White wire with black stripe: power supply output for the siren (+12 V). Route this wire through the rubber grommet hole in the partition between the engine compartment and the vehicle interior to the location where the siren is installed. Connect the white wire with black stripe to the red wire of the siren (+12V power supply). Connect the black wire coming from the siren to ground (a metal part of the car body).
Black wire: power supply input ("mass"). Connect the black wire to ground (a metal part of the car body). Do not confuse this wire with the thin black antenna wire, which is connected separately to the main unit of the system, and not in the wiring harness.
Dark blue wire: second channel output CH2. The negative output of the second channel 300 mA with a delay is activated by pressing and holding for more than 1.5 seconds button 2 of the transmitter. The operating mode of the second channel is programmed F7 functions.
The dark blue wire of the system is a low current transistor output, so it is only used to turn on the external relay.
Warning: Directly connecting the dark blue wire to the high-current output of the car trunk release circuit, as well as to the input of some car remote start devices, will damage the main unit of the security system.
Connect the dark blue wire to pin #86 of an AS-9256 type relay (or equivalent 30A automotive relay). Connect wires to other relay contacts according to which function will be controlled by channel 2 of the system.
Dark green wire: input for connecting limit switches for the negative polarity of the hood and trunk. The dark green system wire is the momentary negative trigger wire. This wire must be connected to the previously installed hood and trunk limit switches, permanently connected to ground.
Purple wire: positive door limit switch input, most Ford vehicles and some non-US vehicles.
Connect the system's purple wire to the positive output of one of the vehicle's door switches, as most vehicles have door switches connected in parallel.
Note Do not connect the system's purple wire if the vehicle has a negative door limit switch circuit (in this case, the system's brown wire is connected).
Brown wire: input for connecting door limit switches of negative polarity (General Motors vehicles and most non-US vehicles).
Connect the brown wire of the system to the negative output of one of the vehicle door limit switches.
Note Do not connect the system's brown wire if the vehicle has a positive door limit switch circuit (in this case, the system's purple wire is connected).
Yellow wire: input for connecting the ignition wire + 12 V.
Connect this wire to the ignition wire that is supplied with +12V when the key is turned in the ignition switch to the "ignition" or "starter" position. Make sure that this vehicle wire is not receiving power when the key is turned in the ignition switch to the "off" position.
Orange wire: negative polarity signal output 300 mA (when the system is armed); normally closed starter inhibit relay (requires installation of an additional relay). This system wire allows you to control the operation of the starter inhibitor relay.
Connect the orange wire to pin #86 of the relay. Connect terminal #85 of the relay to the vehicle's ignition wire, which is supplied with +12 volts when the key is turned to the ignition and starter positions, and 0 volts when the key is turned to the off position. (The yellow wire of the system is also connected to the same regular wire of the car). Cut the low current wire of the vehicle's starter solenoid and connect one end of the cut wire to terminal #87 of the installed relay. Connect the other end of the cut wire to terminal #30 of the relay.
Note This connection is used when a normally closed starter inhibit relay is installed. When using such a connection, turning off the power supply to the security system causes the starter blocking function to stop working, and this, in turn, allows you to start the car engine.
Black wire with white stripe: channel output SNZ
- Negative polarity signal 300 mA (when the system is disarmed); Normally open lockout relay (optional relay required).
- Negative polarity signal 300 mA (when the system activates the channel according to the programmed function (requires the installation of an additional relay).
Two-pin blue connector: switch Valet Route the black and gray wires from the switch Valet to the main unit of the system and connect the two-pin blue connector to the corresponding blue connector on the main unit of the system.
Two-pin white connector: system LED indicator.
Route the red and blue wires from the LED to the main system unit and connect the two-pin white connector to the corresponding two-pin white connector on the main system unit.
Two four-pin white connectors: shock sensor and additional sensor. Route the red, black, blue and green wires (4-pin white connector) of the shock sensor to the main system unit and connect the connector located at one end of the harness to the shock sensor, and the other connector to the corresponding white connector on the main system unit.
6-pin power connector for controlling the electric drives of car door locks: orange, blue with a white stripe, yellow, white, green and blue wires of the large 6-pin connector of the system are connected to the contacts of the built-in relays for locking / unlocking car doors. The functions of each of these wires are listed below.
Lock relay
Blue wire with white stripe protected by a 15A fuse = normally open relay contact.
Dark green wire = normally closed relay contact.
Yellow wire = relay common.
Release relay
Orange wire protected by a 15A fuse = normally open relay contact.
Dark blue wire = normally closed relay contact.
White wire = relay common.
STANDARD LOCK/UNLOCK CONFIGURATIONS FOR VEHICLE DOORS.
3-wire unlock/lock circuit negative polarity
Negative trigger (most Japanese cars)

When installing the system in these vehicles (most Japanese vehicles), the dark green and dark blue lock/unlock wires of the vehicle are not used.
The orange wire and the blue wire with a white stripe must be connected to ground (a metal part of the car body).
The yellow wire is the negative polarity lockout pulse output, it must be connected to the control wire of the standard negative lockout relay.
The white wire is the negative polarity unlock pulse output, it must be connected to the control wire of the standard negative polarity unlock relay.
3-wire lock/unlock circuit positive polarity
Positive trigger (most GM cars)

When installing the system in these vehicles (most GM cars), the dark green and dark blue lock/unlock wires of the vehicle are not used.
The orange wire and blue wire with white stripe must be connected to +12V power supply.
The yellow wire is a positive lock pulse output, it must be connected to the control wire of the standard positive lock relay.
The white wire is the positive polarity unlock pulse output, it must be connected to the control wire of the factory positive unlock relay.
5-wire unlock/lock circuit with polarity reversal
When installing the system on such vehicles, it is necessary to cut the standard wires for controlling the electric drives of the car door locks. These wires are routed from the main lock/unlock switch to the secondary lock/unlock switches and from there to the power door locks.
Cut the original lock wire and connect the yellow wire of the system to the end of the cut regular wire that goes to the additional switches (power door locks). Connect the green wire to the end of the cut stock wire that goes to the main switch.
Cut the factory unlock wire and connect the system's white wire to the end of the cut factory wire that goes to the auxiliary switches (electric door locks). Connect the blue wire to the end of the cut stock wire that goes to the main switch.
The orange wire and blue wire with white stripe must be connected to a fused +12V power supply.
ADDITIONAL CAR CENTRAL LOCK CONTROL SCHEMES
CONTROL DIAGRAM FOR VACUUM SYSTEMS "Mercedes-Benz", "Audi"

CONTROL SCHEME FOR ADDITIONAL DRIVES

COMPLETING THE SYSTEM INSTALLATION
Antenna wire
Be sure to run the thin black antenna wire all the way where it cannot be damaged and secure it with cable ties. It is forbidden to wrap this wire around bundles that include high-current wires and wires of powerful switched loads.
Setting the shock sensor
The warning zone of this sensor is automatically set to a 30% lower sensitivity than the trigger zone. Using a small screwdriver, carefully turn the shock sensor sensitivity adjustment screw all the way counterclockwise. (Do not use excessive force when turning the adjusting screw to avoid breaking it; the maximum turning angle of this adjuster is 270°.) Close the hood and trunk of the car and arm the system. Wait 6 seconds for the accessory trigger zone to stabilize, then hit the car's rear bumper hard with your fist. The impact force must be no less than that required to break the glass of a car.
Attention Never hit the car glass when checking the sensitivity of the shock sensor. You can break it.
Turn the adjustment screw clockwise (increasing the sensitivity of the shock sensor) approximately 1/4 turn and retest the sensor operation. Repeat this procedure until the system operates and the alarm sounds. Eventually one significant bump to the car's bumper will trigger a series of siren warnings.
Warning! Selecting too high shock sensor sensitivity will result in false alarms of the system due to strong vibration, which is created, for example, by passing trucks or heavy equipment. To reduce the sensitivity of the shock sensor, turn the sensor adjustment screw counterclockwise.
System Wire Protection
Always run security wires in corrugated tubing or protect them by wrapping electrical tape in a spiral. Secure wire harnesses along their entire length with cable ties. A secure fit will prevent the harness from getting into contact with hot engine surfaces or sharp moving parts of the vehicle, which could damage the insulation of the system wires.
Exploitation
The master installer must mark all installed options and programmed settings in the user manual and fully explain to the car owner the rules for operating the security system.
APS-2500 DIAGRAM

Almost every car today is equipped with an anti-theft system. - this is not a tribute to fashion, but the need to protect your vehicle from breaking and stealing. Consumers are offered a large selection of different signaling, and each model has its own characteristics, advantages and disadvantages. Find out what functions the Sheriff alarm has, how to connect it correctly and what malfunctions can occur in its operation - find out in this article.
[ Hide ]
Peculiarities
How to connect a signaling system with feedback and auto start to a car, how to set up a start, how does the device turn off and how best to install it? First, let's look at the features of the system. Produced by Progressive Innovative Technology from the USA. As a result of numerous tests, the signaling of this brand has shown its effectiveness and functionality. Initially, the Sheriff car alarm was conceived as a budget anti-theft system.
Key Features:
- the presence of two-way communication on almost all modern models;
- car alarm allows you to control the central lock from a distance, locking the car doors;
- work with the satellite module;
- the car owner can set and turn off the security, while focusing on the indications of the key fob;
- active and passive modes of setting the car for protection;
- if the Sheriff car alarm has an automatic start function, the driver will be able to start and block the engine at a distance;
- the presence of a shock controller with an alert function;
- the ability to recognize the owner of the vehicle at a distance, when approaching the car;
- reliable protection against interception of signals and scanning, which significantly increases the safety of the machine;
- the ability to set the security mode on the car even if the engine is running;
- the ability to recognize movement, as well as wiretapping the interior of the vehicle with further notification of the car owner (the author of the video is the Avtozvuk.ua channel - Autosound Base).
These functions are typical for almost all signaling models.
Types and models
Briefly about the most popular signaling models:
- ZA-1095. It is characterized by the presence of four service channels, as well as additional protection against theft. There is an option to autostart the power unit.
- APS-2500. It is equipped with a two-level shock controller, it is possible to activate the guard when the engine is running. A distinctive feature is that this model has its own charger.
- ZX-945. It is characterized by the presence of a dynamic signal coding system, as well as the Disarm Dialog option.
- ZX-750. Long range of up to 2 km, of course, if we are talking about clean areas.
- APS-2400. This model is characterized by the presence of one-way communication, but this does not make it less reliable and functional. The presence of a dynamic encryption code, which allows you to reliably protect the system from signal interception.
- APS 35PRO. Full "stuffing" - autorun, the ability to remotely control using the remote control, the presence of a two-channel receiver, a two-level shock controller, etc.
- ZX-1055. This system belongs to the category of multifunctional. A device with 5 communication channels, as well as advanced protection against vehicle theft. If the car is hacked, the motor will be blocked (the author of the video is Andrey Tarakanov).
On sale you can find many other models of anti-theft systems, but the most "running" of them are listed above.
Instructions for use
Included with the signaling should go:
- Sheriff alarm connection diagram;
- instruction manual - installation and configuration must be carried out in accordance with the manual;
- two key rings;
- siren;
- control block;
- a set of wires and connectors for installation and connection;
- antenna;
- Valet button;
- diode status indicator;
- shock sensor.
Briefly about how to install and how to connect the signaling:
- The control block is installed first. It is best to install it behind the center console so that possible intruders cannot gain access to it.
- The siren is placed next, its installation is carried out in the engine compartment, the siren is placed with the mouthpiece down.
- Then connect the shock sensor - you need to put it somewhere in the center so that it reacts to touches on the car from all sides.
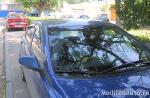
- The antenna module and the diode indicator lamp must be installed on the windshield. The antenna connection is made after it is installed, but the installation must be done so that there are no metal components near this device.
- Then you need to install the Valet service button - it also needs to be installed in a place inaccessible to criminals.
- Now you need to organize a circuit between all the connected elements - to do this, lay the wires and connect all the system components with them.
The setup procedure is carried out in accordance with the service book.
If you do not know how, while the system does not respond to keyfob commands, then you have two options:
- Perform manipulations with the signaling wiring, that is, disconnect the power from the control module. This method is radical, it can be resorted to as a last resort.
- Disabling can be done using the Valet button. The shutdown procedure should also be described in more detail in the service book, since it is individual for each model. In Sheriff signaling, as a rule, to turn off, you need to activate the ignition, then press the button, turn off the ignition and activate it again, and then press Valet again.
The Sheriff alarm, produced by the American brand PIT, has the option of remote start, feedback and other useful features. The main disadvantage of Sheriff car alarms is the range of the key fob, which actually turns out to be less than that declared by the manufacturer. This indicator can be affected by the discharge of the power supply in the communicator, as well as electromagnetic interference in the area.
[ Hide ]
Functional features
Description of the main and additional features of the Sheriff car alarm:
- The possibility of effective functioning in a wide temperature range from -45 to +85 degrees. This allows you to use the systems of this manufacturer in the northern regions.
- Remote monitoring of the state of the characteristics is possible through the use of a remote control with a display and an alert system. When one of the protection zones is activated, the communicator screen will display the corresponding information with a description of the enabled area.
- The ability to drive a car remotely. The alarm may have the function of autostart of the power unit. In addition to the standard settings, the engine start time of the machine can be changed. It is also possible to control the car's interior lighting system.
- The transmission of packet data in any model of the security system with or without feedback is carried out via a secure channel. To send and receive information, a special encoding is used to prevent the interception of signals. The manufacturer positions the Sheriff alarms as the most protected from the effects of scanners or code grabbers.
- Ease of installation. This becomes possible due to the fact that the Sheriff signaling package includes a minimum of electronic components and devices. The user's service manual will allow you to independently install and connect the system to the car.
- Ability to control additional electrical equipment. We are talking about an electric sunroof, power windows, etc. The implementation of this function is carried out using glass closers.
- The ability to turn on the silent protection mode using a key fob. The main feature of this function is that when the anti-theft system is activated and deactivated, the siren does not turn on.
- Automatic arming option. You can set the function so that the signaling will be triggered when the last door is closed or the driver exits the car.
- The latest signaling models are equipped with a special label. It is used to authorize the owner of the vehicle. Identification is carried out automatically when the driver approaches the car. The principle of operation is to use a chip in the key that interacts with the transceiver in the control unit.
- Ability to set the door locks to automatically close when the vehicle starts to move.
- Option to activate the protection mode when the car engine is running.
- The presence of the "Panic" function. Its operation allows you to turn on the siren, as well as the optical devices of the machine. The option is useful for scaring off possible criminals and is launched from the control panel.
- The ability to control the protection mode using a secret code or a standard switch, but this option is available in the latest models. The car owner must know the password, which is configured during installation and connection of the system.
- The presence of a function to alert the driver about the state of the vehicle when the engine blocker is turned on.
User Vladimir Taraban, using the model 2500 as an example, spoke about the functional features of Sheriff systems.
One way models
These systems include:
- APS 2625;
- APS 2400;
- APS 2500;
- APS-35 Pro.
Sheriff APS-2625
To provide maximum protection for the vehicle, the alarm has options:
- manual activation of the protection mode;
- disabling the guard function manually;
- from protection in two stages.
System Features:
- if the remote control is inoperative or lost, the security system is controlled manually;
- a two-channel remote control is used to control the system, and if necessary, the consumer will be able to add up to four devices to the signaling memory;
- emergency activation and deactivation of the alarm mode can be carried out using the Valet service button;
- to ensure reliable protection, a dual-zone magnetic resonance sensitivity controller is used.
Download Sheriff APS-2625 Operating and Installation Instructions
The manuals that will allow you to install and connect the alarm are presented in the table.
What is the price?
The approximate cost of signaling is given in the table.
You can buy this model in the automotive market or in a specialized store on the Internet.
Sheriff APS-2400
Alarm features:
- system with one-way communication APS-2400 works with dynamic coding of signals;
- the alarm package includes a two-level sensitivity controller that allows you to quickly determine the physical effects on the car;
- the presence of the service key Valet allows you to control the alarm in case of a breakdown of the remote control;
- the system package includes two two-channel transmitters, in total, the consumer will be able to program the operation of the signaling with four remotes.
Each Sheriff APS-2400 alarm communicator must be linked to a microprocessor module before use.
Download Sheriff APS-2400 Operating and Installation Instructions
You can download the service manual from the links below.
What is the price?
User Sergey Kuchynsky spoke about the functions and capabilities of the APS-2400 anti-theft installation.
Sheriff APS-2500
System Features:
- this one-way communication alarm model is characterized by the presence of a remote control of the "Panic" option, regardless of the mode;
- sound is used to confirm the activation of the Valet function;
- the alarm system has a limited alarm mode time;
- the system protects the entire vehicle along the perimeter, and if one of the security zones does not work, then the signaling bypasses it.
Download Sheriff APS-2500 Operating and Installation Instructions
You can download the technical documentation for systems of this model using the links provided in the table.
What is the price?
The average cost of security systems models 2500 is shown in the table.
Sheriff APS-35 Pro
The anti-theft agent is equipped with two additional channels, to which, if necessary, power windows and a luggage compartment lock are connected. One of the channels is power, and this is a rarity among alarms with such a low price. In addition to the built-in blocking relay, there are also two additional inputs. The package includes two remote controls, made in durable shock-resistant cases.
The main functions of the system:
- silent and passive protective mode;
- anti-robbery option;
- two-step shutdown of protection mode;
- search for a vehicle in the parking lot;
- remote control of the "Panic" function;
- turbo timer, which is especially useful for cars with diesel engines;
- separate opening of the locks installed in the driver's and passenger's doors.
The main advantage of the Sheriff APS-35 Pro alarm is its low cost.
Download Sheriff APS-35 Pro User and Installation Instructions
You can download the technical documentation for installation and control of the system using the links shown in the table.
What is the price?
Approximate prices for this alarm model are presented in the table.
Photo gallery "Sheriff with one-way communication"
Photo of alarms that do not have an alert option.
Packing from signaling Sheriff APS-2625 Complete set of signaling Sheriff APS-2400 Security system Sheriff APS-2500 Car alarm Sheriff APS-35 Pro
Two-Way Models
Systems included in this list:
- Sheriff ZX-945;
- ZX-1095;
- ZX-1090;
- ZX-1070;
- ZX-940;
- ZX-750;
- APS-2600.
Sheriff ZX-945
Alarm features:
- this signaling model supports dialog signal coding with the Disarm Dialog option;
- the ability to receive signals in a range of up to two kilometers;
- the microprocessor module of the system is equipped with four service channels;
- the main key fob is equipped with a liquid crystal screen;
- the system is characterized by the presence of two modes of protection of the vehicle from theft - active and passive;
- the consumer can additionally connect two types of blocking relays - R350 and R450, they will stop the engine in case of unauthorized start.
Download Sheriff ZX-945 Operating and Installation Instructions
What is the price?
The approximate cost of the alarm is presented in the table.
The Arnage channel spoke about the configuration, as well as the functional features of the ZX-945 car alarm.
8968- the range of the main communicator with a display in two-way mode is 1 km, as an emergency call source - up to 2.2 km;
- the range of the three-button communicator (spare) is up to 50 meters;
- when transferring data between the remote control and the microprocessor module, dynamic dialogue encoding is used;
- the operating frequency parameter when sending pulses is 868 MHz.
Download Sheriff ZX-1095 Operating and Installation Instructions
You can download service manuals for maintenance and installation of anti-theft system 1095 from the links below.
What is the price?
The average price for the purchase of the system is presented in the table.
Sheriff ZX-1090
The feedback signaling model is characterized by the presence of four service channels. In this signaling, the developers have upgraded the system of protection against theft and power capture of the vehicle. For more convenience of driving, the function of automatic start of the internal combustion engine is implemented. The start of the power unit can be implemented by the command of the engine or by a timer.
Separately, it is necessary to highlight the security functions:
- dynamic coding of CFMII signal;
- passive or active disabling of the protective mode;
- separate control of protection activation and deactivation functions;
- the ability to disable the security function in several stages;
- the presence of the option of a passive engine blocker;
- using an external motion controller.
The main disadvantage of the Sheriff 1090 model is that its package does not include a siren, this device will have to be purchased separately.
Download Sheriff ZX-1090 Operating and Installation Instructions
In this section, you can download service manuals for this system model.
What is the price?
The approximate price for the alarm is shown in the table.
User Yaroslav540 spoke in detail about the main functions and capabilities of the alarm model 1090.
Sheriff ZX-1070
Eight independent security zones are used to protect the vehicle. If one of them stops working, the microprocessor module automatically bypasses it.
To block the power unit, relays can be additionally installed:
- with normally open contacts;
- R350 class devices.
There is an anti-robbery mode, which is controlled remotely. If a robbery occurs on the car, the engine will be automatically blocked. You can set the function to be activated when the ignition system is activated.
The configuration of this model also does not include a siren, so the device will have to be purchased separately.
Download Sheriff ZX-1070 Operating and Installation Instructions
The service manual, which can be downloaded from the links in the table, will allow you to independently install and configure the alarm.
What is the price?
The average price for a security complex is given in this section.
Auto electrician Sergey Zaitsev spoke in detail about the connection points when installing this model of anti-theft system.
Sheriff ZX-940
Alarm features:
- the car alarm is equipped with four service communication channels;
- there is a notification function - all messages are sent to the key fob of the owner of the car, equipped with an LCD screen;
- to ensure better protection, active and passive protection systems are used;
- the consumer has the ability to control the value of the air temperature, as well as the voltage in the mains, information about this is sent to the main key fob with a display;
- there are also three modes of operation and control of the light indication of the system;
- the range of the system in the mode of sending commands to the control unit is up to 900 meters, and when receiving pulses from the microprocessor module to the communicator - up to 2 kilometers.
Download Sheriff ZX-940 Operating and Installation Instructions
What is the price?
The cost of car alarms is given in this section.
Sheriff ZX-750
Standard options:
- to ensure high-quality protection in this model, dynamic encoding of signals is used;
- anti-robbery mode;
- silent and passive activation of the protective mode;
- disabling the security function in two stages;
- search for a car in a large parking lot;
- "Panic" function;
- the number of security zones to provide protection with the ability to bypass faults is 9 pieces;
- turbo timer, which will reduce the rapid wear of structural elements of a diesel engine;
- separate opening of passenger and driver doors;
- calling the car owner from the car.
The main disadvantage is the lack of an automatic engine start option. Nevertheless, the signaling has many functions that will ensure comfortable driving and maximum safety.
Download Sheriff ZX-750 Operating and Installation Instructions
If there is no technical manual to manage and configure the system, you can download the file from the table below.
What is the price?
The approximate cost of a car alarm is shown in the table.
The Kodgrabber channel talked about how you can hack this car alarm model using a code grabber.
Sheriff APS-2600
System Features:
- the presence of a built-in relay for controlling the headlights of the side lighting;
- using the built-in power output to control door locks;
- remote opening and closing of the central lock when the engine is running, for this the Jack mode is used;
- the presence of two connections for connecting external controllers of volume and impact;
- limiting the number of false alarms for any security zones and controllers;
- data transfer between the microprocessor and communicators is carried out via a communication channel with KeeLoq+ encoding;
- the package includes two two-channel key fobs, but the consumer has the ability to bind four communicators;
- if the remote control breaks down, the car owner will be able to control the protection mode using the Valet service key;
- to fix physical impacts on the car body, a two-zone piezoelectric sensitivity controller is used.
Download Sheriff APS-2600 Operating and Installation Instructions
The service manual includes photos and recommendations for installing and connecting the anti-theft system.
What is the price?
Average prices for this model are given in this section.
Photo gallery
Photo systems with feedback.
Equipment Sheriff ZX-945 Sheriff APS-2600
Video "Detailed overview of the APS-2600 car alarm functions"
User Yaroslav540 spoke in detail about the capabilities and options of the Sheriff 2600 security complex.
The safety of a modern car depends on the chosen security system. On the modern market, you can find a large number of anti-theft devices, among which is the Sheriff alarm. Its manufacturer is an American company that has been operating in the automotive electronics market for a long time. Thanks to the latest technologies, and the full adaptation of this security system to the CIS market, the Sheriff alarm system is popular with car enthusiasts.
Specifications of this anti-theft system
As mentioned above, the sheriff alarm is a development of American electronics engineers, adapted to the market of the CIS countries. Before this signaling hit our market, it was tested in various weather conditions, as well as the resistance of elements and circuits to constant vibrations and other loads caused by poor quality roads.
As a result, a product has appeared that belongs to the middle price segment, but according to some indicators, is not inferior to elite and expensive security systems. The main technical indicators that this car alarm has are as follows:
- efficient use at different ambient temperatures, that is, it can be installed on machines that operate at low and high temperatures (in the north and in Asian countries);
- monitoring the condition of the car at a distance, the sheriff alarm key fob is equipped with the function of alerting the driver with information about what is happening with his car parked or in the garage (electronic feedback system);
- car remote control, in different modifications of this alarm, various functions are provided for starting the engine, turning on the lighting in the cabin, and in addition to the standard settings, there is a key fob reprogramming, that is, changing the engine starting settings;
- instruction manual in Russian, the manual of this anti-theft system is compiled in the language of the country where it is sold, thanks to an extensive dealer network;
- the presence of a special security code, anti-theft system Sheriff with auto engine start, encodes its signal with a special security code that does not allow it to be read by various electronic devices;
- ease of installation, thanks to the minimum amount of equipment, as well as the available instructions, you can connect the sheriff car alarm yourself, without any help.
It is important to remember that this anti-theft alarm, despite the fact that it belongs to the middle class, is not inferior in its functions to such security systems as starline and jaguar, and even surpasses them in some of its functions.
Pros and cons of sheriff alarm
Almost all the advantages of this alarm are described above. It should also be noted that its cost will pleasantly surprise motorists who do not have significant financial resources. And this suggests that it is successfully installed both on used domestic cars and on modern foreign cars.
But this security system also has its drawbacks.
- Wiring diagram. The manufacturer does not recommend installing it in the engine compartment, or the trunk of a car, as many metal parts will interfere, so it is possible to turn off the alarm on your own, or poor interaction between the key fob and the central unit.
- Vulnerability to code grabbers. Code grabbers are special electronic devices that can read a dynamic alarm code. The sheriff, unfortunately, is dynamic.
- The alarm cannot be turned off, or put the car under protection. This happens when batteries run out, or defective individual parts of the unit.
- The alarm starts to turn off only when the key fob button is pressed hard.
There are no other negative qualities of this product.
Some drivers are interested in the question of how to turn off the alarm if the key fob does not work, or its other elements on their own. To do this, press the VALET button, which must be installed in a hidden place, but accessible to the driver.

Model Specifications

There are several modifications of this alarm on the market that require detailed consideration.
- Model sheriff zx 750, the instruction of which is in Russian, is a security system with two-way communication between the driver and the car. The signal range is two kilometers, and it is also possible to control the emergency light signal.
- Model sheriff APS 2500, installation instructions included, is a two-level security system (shock sensor). The design has the ability to install an additional shock sensor, the presence of a pincode for emergency shutdown of the system, the ability to turn it on while the motor is running. APS 2500 has a low cost, so this model is in great demand among used car enthusiasts. In addition, the APS 2500 can be reprogrammed.
- Alarm sheriff aps95lcd b4 , reprogrammable manual, characterized by a set of standard technical features and low price. It can be purchased for 3000 rubles. This includes the connection of the car with the driver, the function of auto-starting the motor. The sheriff 5btx925lcd model differs from the previous one in the keychain design.
- Model sheriff 1070, instructions for installation and reprogramming. It is also a budget option. Includes an improved key fob, the ability to start the motor from a distance. A variation of this modification is the 925 model. 925, the instruction of which provides for a special pincode for emergency unlocking.
- The sheriff ZX 900 alarm, installation instructions, is recognized as the most successful development of the company. It includes all possible functions, it is even mistakenly referred to as an elite security system. It was created on the basis of the ZX 725. The instructions for this system do not provide for the possibility of turning on the lighting in the car.
Sheriff car alarms differ from similar anti-theft equipment in reliability, as well as low cost. This makes them in demand in the markets of all CIS countries.