BSZ on IZH Jupiter
Electronic ignition of the motorcycle "IZH-Jupiter" with one Hall sensor.
Of the whole mass of useful alterations and improvements, contactless electronic ignition will bring the greatest benefit. The point is not at all a powerful spark, but the fact that the mixture ignites on time. As you know, the main bearings on the Jupiter crankshaft half shaft are put on by hand and without the slightest effort. Among other things, the bearing itself often has a backlash of the order of several hundredths of a millimeter. Add to this company of unfavorable circumstances a large breaker cam console, add up all these backlashes and radial runouts. Get a nightmare! After some 10,000 km, the ignition timing spread due to crankshaft chatter will be about 4 mm from the set value. What precise operation of the engine can we talk about here?
In a non-contact system, due to the absence of a mechanical connection between the rotor and the sensor, the backlash of the crankshaft semi-axis practically does not affect the moment the spark appears. Engines improved in this way became faster throughout the entire speed range, and the nature of their work turned out to be softer - due to the synchronous ignition of the mixture in both cylinders and the absence of detonation. By the way, the operation of the engine without detonation significantly increases its resource.
I put the BSZ on my Jupiter, though I fiddled with the installation, but it was worth it. I forgot what misfiring ignition is in general (it’s not even afraid of dampness!), The engine began to run much smoother, softer, dynamics improved, the engine became much more sensitive to gas at speed, idling became smoother and more stable. Starts up even with a decently run down battery with a "half a kick"
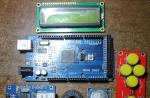
What we need:
A). Switch for contactless electronic ignition of a VAZ front-wheel drive car. Take the switch only in the original packaging in the AUTO SHOP and with a guarantee of at least a year. The average price is 350 rubles.
b). Hall Sensor. Any from the same "VAZ", but also in the original packaging. The price is about 80 rubles.

V). The ignition coil is two-pin, from the Gazelle, but always from the 406th engine. You can take it from the Oka for electronic ignition, there is absolutely no difference between them. (350 rubles)

G). Two silicone armored wires with rubber caps. Price from 100 rubles.

e). Hall sensor modulator and mount
They need to be sharpened by a turner. I do not advise you to put an ordinary plate as a modulator. Its width is no more than 12 mm, which is not enough for the full accumulation of energy of the coil. Of course, you can set it, but more than 4000 revolutions per minute you can’t see how your ears

f) We also buy instant diagnostics MD-1 and emergency ignition AZ-1 in a car shop. The prices for these devices are around 70 rubles for each

g) Wiring kit with connectors for contactless ignition VAZ price 80-100 rubles.

Well, have you bought everything and are ready to collect? Go...
The old ignition system (breaker contacts, ignition coils, capacitors, armored wires) is completely abolished. The switch is installed in the right glove compartment, the ignition coil is under the tank. Unfortunately, there are no holes or mountings for the bracket on the coil, so I did not come up with anything better than how to attach it to the frame on a thick layer of copper wire.
We assemble the modulator and the DH mount, install everything on a regular generator, as shown in the figure:


The main thing during installation is to maintain the diameter of the modulator (the gap between the lower partition of the hall sensor and the modulator should be 1-1.5 mm) and the mounting alignment (the radius of the modulator should pass along the axis of symmetry of the hall sensor). I also screwed the sensor connector to the generator from the side. After installing the hall sensor, we put on the modulator and see if it falls into the slot of the sensor. If not (and this is 90%), then we put spacers on the stud. After the necessary gap is maintained, we put the grower and tighten the modulator with a standard generator bolt.
Next steps:
We put rubber caps on the armored wires, and the armored wires themselves (they must have special copper tips) are inserted into the candlesticks and into the coil. From above we pull the aforementioned caps. If you don't, you'll be pushing the bike on foot when riding in the rain. We immediately insert the candles into the tips and provide reliable contact with the "mass" of the motorcycle.
With the help of wiring, we simply connect the switch, the hall sensor, the coil and the AZ-1 with wires. (AZ will have to be soldered and a switch button connected to its 1st connector so that a constant spark turns on at our discretion). Moreover, we “pack” the wires into a PVC tube or simply wrap them with electrical tape. From the entire purchased heap, we need to display only the general "plus" of the system on the "panel". We "lead" it to the right "Move-stop" switch, having previously unsoldered the standard wires from it. We connect the second wire from the on-going switch to terminal "1" of the ignition switch (the second wire from the same terminal goes to the signal).
Here is the wiring diagram itself:

Here:
1 battery
2 ignition switch
3 spark plugs
4 ignition coil
5 AZ
6 switch
7 Hall sensor
Well, everything seems to have been collected, and you can configure it.
Checking the performance - we throw both candles on the cylinders, take a screwdriver (you can also make a manufactured modulator, insert it into the slot of the hall sensor and pull it out. At this moment there should be a spark (on both candles).

If there is still no spark after the above steps, check the connections. I assure you, when using "non-left" components, everything should work as it should.
Now setup. We adjust the piston of one of the cylinders to TDC, take it back 2.8 mm (when using AI-92 gasoline, it is desirable to reduce the angle to 2.5 mm). Next, we connect the MD-1 instead of the switch and begin to slowly twist the DX mount around the modulator (clockwise). As soon as you "catch" that the "D" indicator lights up on instant diagnostics, fix the DH mount in this position.

Well, what can I say, we screw in the candles, put on the candlesticks, reconnect the switch, pump up gasoline ... Dryn-dyn-dyn ... Soft rustle of the engine, no detonation, idle 500 rpm and excellent battery charging ... Now the You have bsz. And when you turn on the AZ button, you can now start the motorcycle even without a kick starter, although riding in the AZ mode (constant spark) is recommended only if the DH fails and at a speed of no more than 90 km / h
Lastly, a few tips:
1. Do not allow the BSZ to work when the battery is disconnected. Check the connections to ensure that the battery does not turn off unexpectedly.
3. If, when installing the generator cover, the BSZ completely refuses to work, swap the brushes of the generator excitation winding.
4. Check the voltage of the on-board network with the engine running. A strong spread of parameters can affect the operation of the BSZ, and even disable it (if the voltage exceeds 16 V).
Well, perhaps that's all. Good luck.
BSZ how to put Jupiter on izh 5 Of the whole mass of useful alterations and improvements, contactless electronic ignition will bring the greatest benefit. The point is not at all a powerful spark, but the fact that the mixture ignites on time. As you know, the main bearings on the Jupiter crankshaft half shaft are put on by hand and without the slightest effort. Among other things, the bearing itself often has a backlash of the order of several hundredths of a millimeter. Add to this company of unfavorable circumstances a large breaker cam console, add up all these backlashes and radial runouts. Get a nightmare! After some 10,000 km, the ignition timing spread due to crankshaft chatter will be about 4 mm from the set value. What precise operation of the engine can we talk about here? In a non-contact system, due to the absence of a mechanical connection between the rotor and the sensor, the backlash of the crankshaft semi-axis practically does not affect the moment the spark appears. Engines improved in this way became faster throughout the entire speed range, and the nature of their work turned out to be softer - due to the synchronous ignition of the mixture in both cylinders and the absence of detonation. By the way, the operation of the engine without detonation significantly increases its resource. I put the BSZ on my Jupiter, though I fiddled with the installation, but it was worth it. I forgot what misfiring ignition is in general (it’s not even afraid of dampness!), The engine began to run much smoother, softer, dynamics improved, the engine became much more sensitive to gas at speed, idling became smoother and more stable. Starts even with a decently run down battery with a "half a kick" What we need: a). Switch for contactless electronic ignition of a VAZ front-wheel drive car. Take the switch only in the original packaging in the AUTO SHOP and with a guarantee of at least a year. The average price is 350 rubles. b). Hall Sensor. Any from the same "VAZ", but also in the original packaging. The price is about 80 rubles. V). The ignition coil is two-pin, from the Gazelle, but always from the 406th engine. You can take it from the Oka for electronic ignition, there is absolutely no difference between them. (350 rubles) d). Two silicone armored wires with rubber caps. Price from 100 rubles. e). Modulator and hall sensor mount They must be sharpened by a turner. I do not advise you to put an ordinary plate as a modulator. Its width is no more than 12 mm, which is not enough for the full accumulation of energy of the coil. Of course, you can put it in, but you can’t see how your ears are over 4000 revolutions per minute. The prices for these devices are around 70 rubles for each g) Wiring kit with connectors for contactless ignition VAZ price 80-100 rubles. Well, have you bought everything and are ready to collect? Let's go ... The old ignition system (breaker contacts, ignition coils, capacitors, armored wires) is completely abolished. The switch is installed in the right glove compartment, the ignition coil is under the tank. Unfortunately, there are no holes or mountings for the bracket on the coil, so I did not come up with anything better than how to attach it to the frame on a thick layer of copper wire. We assemble the modulator and the DC mount, install everything on a standard generator, as shown in the figure: The main thing during installation is to withstand the diameter of the modulator (the gap between the lower partition of the hall sensor and the modulator should be 1-1.5 mm) and the alignment of the mount (the radius of the modulator should pass along the axis of symmetry hall sensor). I also screwed the sensor connector to the generator from the side. After installing the hall sensor, we put on the modulator and see if it falls into the slot of the sensor. If not (and this is 90%), then we put spacers on the stud. After the necessary gap is maintained, we put the grower and tighten the modulator with a standard generator bolt. Next steps: We put rubber caps on the armored wires, and the armored wires themselves (they must have special copper tips) are inserted into the candlesticks and into the coil. From above we pull the aforementioned caps. If you don't, you'll be pushing the bike on foot when riding in the rain. We immediately insert the candles into the tips and provide reliable contact with the "mass" of the motorcycle. With the help of wiring, we simply connect the switch, the hall sensor, the coil and the AZ-1 with wires. (AZ will have to be soldered and a switch button connected to its 1st connector so that a constant spark turns on at our discretion). Moreover, we “pack” the wires into a PVC tube or simply wrap them with electrical tape. From the entire purchased heap, we need to display only the general "plus" of the system on the "panel". We "lead" it to the right "Move-stop" switch, having previously unsoldered the standard wires from it. We connect the second wire from the on-going switch to terminal "1" of the ignition switch (the second wire from the same terminal goes to the signal). Here is the actual connection diagram: Here: 1 battery 2 ignition switch 3 spark plugs 4 ignition coil 5 AZ 6 switch 7 Hall sensor Well, everything seems to have been assembled, and you can configure it. Checking the performance - we throw both candles on the cylinders, take a screwdriver (you can also make a modulator, insert it into the slot of the hall sensor and pull it out. At this point, there should be a spark (on both candles). If there is still no spark after the above steps, check the connections. I assure you, when using "non-left" components, everything should work as it should. Now setup. We adjust the piston of one of the cylinders to TDC, take it back 2.8 mm (when using AI-92 gasoline, it is desirable to reduce the angle to 2.5 mm). Next, we connect the MD-1 instead of the switch and begin to slowly twist the DX mount around the modulator (clockwise). As soon as you "catch" that the "D" indicator lights up on instant diagnostics, fix the DH mount in this position. Well, what can I say, we screw in the candles, put on the candlesticks, reconnect the switch, pump up gasoline ... Dryn-dyn-dyn ... Soft rustle of the engine, no detonation, idle 500 rpm and excellent battery charging ... Now the You have bsz. And when you turn on the AZ button, you can now start the motorcycle even without a kick starter, although riding in the AZ mode (constant spark) is recommended only if the DH fails and at a speed of no more than 90 km / h
Once again, the replaced contacts made me think about what I was doing wrong and how to get rid of it. After starting on new contacts, and showing me cartoons, I finally realized that it was time to look for an alternative to contact ignition (or change the right crankshaft bearing). I started on my own, without anyone's help or advice. For me, BSZ was new, when I read in the MOTO magazine for some year about the possibility of installing a contactless ignition system. Began searching for articles on the Internet. Only the essentials were taken.
So about the sore. It's no secret that the 21st century is in the yard, and we are still using the technologies of the last century with might and main. The contact ignition system is a rudiment (https://ru.wiktionary.org/wiki/rudiment) of the Izh motorcycle, that is, an underdeveloped residual organ. Advanced users get rid of the contact ignition system, replacing it with a non-contact (microprocessor), and forget about the vagaries of a motorcycle like a nightmare. What is good about this microprocessor ignition system. From user feedback, it was found that this ignition system is unpretentious, resistant to temperature-voltage changes, not afraid of water, confident operation at minimum engine speeds. Easy to maintain, availability of spare parts. Minimum current consumption from the power supply system. Easy to mount on a motorcycle. Everything can be done at home. And this is not all the advantages of this device. It's hard to name the cons.
What is needed to install a BSZ on an IZH Jupiter motorcycle instead of a contact ignition.
1) Switch BSZ VAZ, the company does not play a role.
2) Spit BSZ 2101-07 popularly commutator bundle
3) Ignition coil with two outputs (Gazelle, Volga, OKA)
4) Hall sensor VAZ, the model does not play a role.
5) Platform for the Hall sensor
6) Modulator (breaker)
Let's move on to replacement.
We completely dismantle the old absolutely unnecessary contact ignition system. We install a new ignition coil, a switch, we lay a BSZ braid, we connect it to the on-board network according to the diagram below. The rest of the work will be on turning, it is necessary to carve a platform for the hall sensor. I used 1.5 mm thick aluminum sheet. The modulator, also known as the interrupter, was machined from 1mm metal. according to the drawing. The principle of operation is simple, the modulator passes through the slot of the Hall sensor, thereby interrupting the magnetic field in it, when the field resumes, the pulse passes to the switch, this is the moment of sparking. For the convenience of installing the ignition, you can use the instant diagnostic device (MD-1), it is sold in car dealerships, it is connected to the switch connector. The top dead center is set, using a device for setting the ignition timing, we retract the piston 2-2.8 mm back (you can use a conventional caliper with a depth gauge), then set the modulator to break, if set with MD-1, then the moment the LED lights up. If the modulator is made symmetrically, then the installation of ignition on the second cylinder is not required. If everything is done correctly and there is no spark, swap the alternator brushes. From myself I will say the system has earned beyond praise. The video below shows a side effect of this ignition, the motor can also work in the opposite direction. 


Motorcycles IZH are rightfully considered legends of the domestic automotive industry. The use of these vehicles was especially relevant in the Soviet years, however, even today ILs are successfully used by many domestic motorists. In this article we will talk about what Jupiter 5 is and how the ignition system (SZ) is configured.
[ Hide ]
General information
On IZH Jupiter 3, (BSZ) 1137.3734 is used, designed for all models equipped with a 12-volt generator. The ignition coil module for Jupiter 4 or another model makes it possible to select the appropriate mode of operation of the motor due to the serial connection of the output wires.
The device as a whole improves the technical parameters of the vehicle due to:
- improved engine start at low temperatures;
- more stable operation of the power unit, which is achieved by reducing the asynchrony of spark formation, as well as by optimizing the lead angle of the SZ in accordance with the engine speed;
- lowering the level of toxicity of exhaust gases, fuel consumption, as well as reducing plaque on candles;
- stable start of the power unit even on a battery that has run down to 6 volts, provided that certain models of ignition coils are used;
- easier installation and maintenance of the system as a whole.
Technical data

Let us briefly consider the main technical parameters characteristic of the third IL model:
- The negative terminal of the battery is always grounded, the battery voltage level is 12 volts.
- If the ignition switch is turned off, respectively, the motor is not working, the current consumption parameter will be no more than 0.15 amperes.
- The knot allows you to ensure the uninterrupted appearance of a spark if the number of revolutions of the crankshaft does not exceed 7 thousand per minute. The level of current that the node consumes in this case will be no more than 2.5 amperes.
- In addition, the mechanism also makes it possible to ensure the uninterrupted formation of a spark if the voltage parameter in the electrical circuit changes from 6 to 16 volts. During this time, the voltage indicator on the candles will not change.
- According to the technical data, the unit can function normally if the air temperature is from 25 degrees below zero to 60 degrees Celsius.
- Thanks to the use of a microprocessor component in the operation of the unit, the formation of the moment allows you to ensure the correct and stable operation of all other mechanisms. Of course, if the power unit is operating in normal mode.
Scheme

As for the circuit, the optical ignition on IZH Jupiter 5 or any other SZ is mounted using the spare parts and fasteners that are included in the kit. As you know, the mechanism is designed to ignite the air-fuel mixture. The mixture itself, which is located in the engine cylinder, ignites due to a spark formed between the electrodes of the candle. It's no secret that the quality of the functioning of the SZ largely affects the operation of the entire vehicle.
As practice shows, one of the problems of IZH is that the lead angle periodically goes astray. This is due to the wear of the cams, as well as the contacts of the interrupting device. It should be noted that mechanical effects in the electronic SZ are completely absent.
The pulse is removed in a separate unit, while the signal is fed to the switch, where it is amplified. Subsequently, the impulse enters the coil, then everything happens as usual. A discharge enters the candle, which contributes to the ignition of the mixture, as a result of which the crankshaft begins to move. It is not so difficult to replace the device or adjust it at home, but you need to remember that incorrect actions can lead to possible malfunctions in the future.
You can ride a motorcycle without worrying about its technical condition. But the owners of the "iron horse" love their cars, take good care of them, carry out the necessary maintenance, showing true concern for their beloved friend.
Modernization - gives a lot of pleasure to the owners of this type of transport. Many people have one dream - to install it on contactless ignition. The "ancient" contact-type systems have long outlived their usefulness. On modern motorcycles and cars, they are no longer used. One headache:
- loss of gap between the contacts of the breaker;
- changing the contact geometry;
- not constant sparking;
- failure of the insulation of high-voltage wires;
- unstable operation of the high-voltage coil;
- the impossibility of starting the engine with a low battery voltage.
- the spark does not ignite the combustible mixture in the engine cylinder
Electronic ignition on Izh Jupiter 5 with a Hall sensor allows you to completely get rid of these shortcomings.
Obvious advantages of the electronic ignition system
- the spark plug gap is always “punched” by a spark and does not depend on the engine speed;
- the switch of the spark formation system does not lose its performance when the voltage in the on-board network of the motorcycle drops to 12 volts;
- there are no rubbing parts and nothing to break;
- the ignition moment is set when adjusting the electronics once;
- the engine stops and the spark coil is de-energized and not subject to overheating.
Contactless ignition on Izh - we deal with incomprehensible terms
- BSZ- contactless ignition system;
- Modulator- metal disc (steel 0.8-1.0 mm thick), plate, shutter. Mounted on the axis of the ignition timing mechanism (distributor shaft). Produces "generation" of magnetic pulses on the Hall sensor.
- Switch- an electronic device that supplies electrical impulses to the ignition coil;
- Hall Sensor- a device capable of detecting the presence or absence of a magnetic field. If there is a field, a control pulse goes to the switch. Sensor position is fixed.
- Ignition coil- Converter of pulses coming from the switch into high-voltage voltage pulses supplied directly to the spark plugs.
Making ignition elements for Izh Jupiter 5 with your own hands
You can make individual elements and make electronic ignition on Izh Jupiter 5 with your own hands. To do this, you need to make your own modulator. The quality of its manufacture determines the reliability of the entire BSZ.
The modulator is made perfectly symmetrical. The fixed curtain should cover 30 degrees of area when it is rotated. Once again, it must be emphasized that the modulator is a defining link in the motorcycle ignition system. The precise operation of the engine is determined by this small device. If the modulator is correctly made, then its shutter should not, in the state of openness, overlap the magnet and the magnetic circuit of the Hall sensor.
The closed state should ensure their simultaneous closure for the passage of the magnetic flux. The switch must receive clear pulses of a certain magnitude from the Hall sensor, ensuring this condition is the task of the modulator.
To perform electronic ignition on Izh Jupiter 5 with your own hands, it is also necessary to make a plate for attaching the Hall sensor. Bsz does not require periodic adjustment of the ignition timing. But for the initial adjustment, it is necessary that the Hall sensor be able to rotate. The plate must be slotted.
The Hall sensor itself, together with the plate, is installed on a corner, which can also be made independently.
All the main elements in order to install electronic ignition on a motorcycle Izh Jupiter 5 are made. You need to buy an ignition coil, purchase a switch and a Hall sensor. These BSZ elements cannot be made independently. You will also need a wiring harness. It is advisable to change the candles - the spark on them may be weak. After solving all the questions, it remains to solve the last one - how to put electronic ignition on Izh Jupiter 5.
Installing electronic ignition on izh jupiter 5 yourself
How to install the modulator and the Hall sensor so that the BSZ system works correctly was described above in the text. A new ignition coil with two outlets is put in place of the old coil. High-voltage wire from each candle - to the corresponding fasteners of the coil.
Switch - in any place protected from water. Proper installation of the BSZ elements will ensure sparking for the Jupiter 5 engine in any weather.
After installing all the elements of the equipment, the contactless ignition on the Izh must be configured and checked for operability. First of all, set the ignition timing. The use of an ordinary light bulb as "dialing" and control equipment is not allowed. It does not respond to electronic impulses.
It is necessary to use an electronic tester as a voltmeter. We measure the voltage on the Hall sensor. The “positive” wire of the device is connected to the 2nd contact, the “negative” wire is connected to the 3rd contact.
We install any of the Jupiter motorcycle engine cylinders at the spark formation point. It is advisable to use a stroboscope for this purpose. We turn on the ignition. We turn the modulator in the direction of rotation of the crankshaft.
As soon as the voltmeter shows a sharp change in voltage, we stop the rotation and fix the position of the modulator. Similarly, we check sparking for the second cylinder of the engine. We are not twisting anything, we are only checking. The engine should run smoothly, without interruption at any speed.
On this, we can say that the contactless ignition system on Izh Jupiter 5 is installed. Motorcycles love grooming. Installing bsz is a gift to the engine and the owner himself.