Headlights, especially at night, are an integral part of traffic safety. But it happens that adjustment of the light beams, or rather their directions, is required. Many Chevrolet Lacetti owners prefer to do this operation themselves, but not many know how to do it. This article will help you understand how to adjust headlights, and will also tell you about some of the nuances and subtleties of the process.
Video about adjusting headlights
The video material will clearly show the process of adjusting the headlight beam, and will also tell you how to carry out the process correctly
Light on the road and safety
The location of the headlight adjustment knobs is marked with arrows.
Headlights are, first and foremost, a safety factor when driving.
Thus, it is necessary to create visibility on the road, to identify the car for pedestrians, but at the same time, the light rays should not blind an oncoming car. To do this, every car enthusiast must adjust the light beams.
Adjustment process

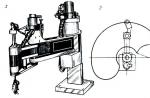
Device for adjusting headlights.
Many car enthusiasts do not know how to adjust the headlights on a Chevrolet Lacetti, and turn to a car service center, where it is not so cheap. But, this process can be carried out at home, with a minimum amount of necessary materials and tools.

Scheme for adjusting the headlight beam.
So, to complete the process you will need a garage or just a flat wall, chalk and a little time. In fact, the whole process can be completed in half an hour, if you don’t rush at all. For those who don’t want to go through the hassle of drawing lines, special canvas screens with already drawn lines are sold. Having settled in with everything you need, you can proceed directly to the process.
First you need to draw lines on the wall according to the diagram below:

Screen layout diagram for adjusting headlights.
The next step is to find the light trigger regulators. These tools are located behind the headlamp on the engine compartment side.
Sedan and station wagon
For sedan and station wagon vehicles:

Location of headlight adjustment screws for a sedan class car
- Regulator of the horizontal plane of the light beam.
- Regulator of the vertical plane of the light beam.

Headlight adjustment bolts.
Hatchback
For vehicles with a hatchback body:

Location of headlight adjustment screws for a hatchback car
- Regulator for vertical plane of light beam
- Regulator for horizontal plane of light beam
In order to perform manipulations, you will need Phillips screwdriver . So, by moving the regulators, the light beams of the headlights are adjusted. The distance of the car from the wall or screen should be five meters. This indicator is mandatory, since it is in this case that the adjustment will be considered correct.

Headlight from a hatchback.
conclusions
Adjusting the headlight beams on a Chevrolet Lacetti is quite simple and every motorist is able to cope with this simple task on their own within half an hour.
> Adjusting the direction of headlight beams of Chevrolet Lacetti
Chevrolet Lacetti Adjusting the direction of headlight beams
We adjust the direction of the headlight beams on a fully fueled and equipped car, with normal air pressure in the tires. We install the car on a flat horizontal area at a distance of 5 m from the screen (you can use a garage wall, a sheet of plywood or hardboard measuring 1x2 m). We draw a horizontal line 1 on the screen at a height equal to the distance from the center of the headlights to the floor. Below it, 65 mm, draw a parallel line 2.
We draw on the screen a vertical center line 0 (the distance from it to the center of the left and right headlights should be equal) and lines corresponding to the centers of the headlights (AE and BE).
Set the headlight range control switch to position “0” (single driver or driver with a passenger in the front seat) and turn on the low beam headlights. Cover one of the headlights with opaque material.
When adjusting, the upper boundary of the light beam should coincide with the lower horizontal line (see Fig.), and the break point of the beam (the point of intersection of the horizontal and inclined sections of the light flux) should coincide with the vertical line corresponding to the center of this headlight.
Scheme for adjusting the direction of headlight beams

The location of the light beam direction regulators on the headlight housing of a car with a hatchback body: 1 - light beam regulator in the vertical plane; 2 - regulator of the light beam in the horizontal plane

Location of light beam direction regulators on the headlight housing of cars with sedan and station wagon bodies: 1 - light beam regulator in the horizontal plane 2 - light beam regulator in the vertical plane

We adjust the direction of the headlight beam by rotating the regulators with a Phillips screwdriver.
Similarly, we adjust the direction of the light beam of the other headlight.
We adjust the light beams of the fog lights under the same conditions as when adjusting the headlights (see above). We measure the distance between the centers of the fog lights and the distance from the surface of the site to the center of the fog lights. We draw lines on the screen and draw another horizontal line below the height line of the center of the fog lights by 50 mm.
The adjustment is made from under the car's bumper. By rotating the headlight adjustment screw with a Phillips screwdriver, we bring the upper horizontal border of the headlight beam to the height line of the center of the fog lights.

Screen marking diagram for adjusting fog lights: A - distance between the centers of fog lights; H - the height of the center of the fog lights on the car

We change the direction of the light beam of the fog lamp by rotating the adjusting screw with a Phillips screwdriver (for clarity, shown on the removed headlight).
The content of the article:
Tuning / Tuning Chevrolet Lacetti. Adjusting Chevrolet Lacetti headlights. I still couldn’t understand why they constantly shine high beams on me at night. Video.
Chevrolet Lacetti > Maintenance > Adjusting the direction of Chevrolet Lacetti headlight beams. We adjust the direction of the headlight beam by rotating the regulators with a Phillips screwdriver.
![]() This is interesting! The most popular Chevrolet model is rightfully the Camaro. The history of Camaro begins in 1966. The name is taken from the word “Komrad” - comrade. The powerful car quickly conquered the market in this segment. The car turned out to be not only powerful, but also aesthetically attractive. It’s not for nothing that the Camaro is constantly seen in various films.
This is interesting! The most popular Chevrolet model is rightfully the Camaro. The history of Camaro begins in 1966. The name is taken from the word “Komrad” - comrade. The powerful car quickly conquered the market in this segment. The car turned out to be not only powerful, but also aesthetically attractive. It’s not for nothing that the Camaro is constantly seen in various films.
6 videos Play all Chevrolet Lacetti.. Door adjustment - Duration: 7:51 vDungeon 310,831 views. Parking and economic day. firewood. headlight Nexia, etc.
You can place a sheet of plywood in front of the car under the same conditions. Projector headlights and FF reflectors are in demand. Add a comment Cancel reply. My car: Chevrolet Lacetti HB SE. By turning the adjusting screw of the left headlight with a Phillips screwdriver, we bring the horizontal border of the light beam to line C.


Adjusting the headlights of Chevrolet Lacetti - logbook Chevrolet Lacetti 1.4 manual transmission 100 hp. |
Lighting on a car is one of the conditions for the safety of the driver and passengers, both in conditions of poor visibility and at night. In order for the headlights to illuminate the road surface efficiently and not blind oncoming drivers, they need to be adjusted. The article talks about optics, the criteria for its selection, and how the Chevrolet Lacetti headlights are adjusted. The car's optics consists of head lights, tail lights, daytime and side lights, turn signals, fog lights, interior lighting, trunk lights, and instrument panel lighting.
Optics can be divided into two types: standard and tuning. The first type is installed at the factory. Halogen lamps are more often used in standard optics. They are losing their popularity because they poorly illuminate the side of the road due to the weak luminous flux. Xenon is used mainly in alternative optics, but many drivers install xenon lamps instead of standard ones, or change the headlights completely.

Drivers are attracted by the brightness of xenon and the ability to choose the color of the light beam. LEDs are no less popular among car enthusiasts. They are less susceptible to mechanical damage and consume a small amount of electricity.
After upgrading the headlight, replacing optics or lamps, it is advisable to adjust the headlights so that they correctly illuminate the road. Even a novice driver can perform this procedure.
In this way, the conditions in which the machine is usually operated will be created. Tire pressure must be normal. Before adjusting the headlights, the vehicle should be rocked under load to allow the suspension to settle.
Adjustments should be made in the dark. You need to put markings on the wall according to which the headlights will be adjusted. On the stand, a vertical center line is drawn and two parallel lines at the same distance from it, corresponding to the left and right headlights.
The horizontal line is drawn at the same height as the centers of the headlights from the floor. First, you should adjust the light from one low beam lamp by covering the second with cardboard or an opaque cloth. The upper boundary of the light beam should coincide with the lower horizontal line.
We align the bend in the border of the light beam with line A. The light beam of the second headlight is adjusted in the same way. Correctly adjusted optics provide high-quality illumination of the road and the side of the road and do not blind oncoming drivers. One of the common tuning options is replacing standard lamps with xenon or LEDs. A great way to improve the appearance is to modify the headlights - with angel eyes or eyelashes. For tuning, LEDs and headlight covers are used.
For this it is better to use a special film. Installing alternative equipment makes it possible to choose different color schemes.
Replacing the low beam headlight bulb of a Chevrolet Lacetti
Correct adjustment of the car's headlights plays an important role in ensuring safety on the road. It is important that the headlights shine at a certain angle and do not blind other road users. In this article we will talk about how it happens adjusting the headlights of a Chevrolet Lacetti. The information presented will be useful to motorists who are repairing their Chevrolet on their own.
Adjusting the headlights of a Chevrolet Lacetti
- To properly adjust the headlights, you need to select a flat area and park the car 10 meters from a smooth wall.
- Fill the fuel tank full and check the tire pressure (2.1 atm.). Also, when adjusting the headlights, a person of average weight should sit in the driver’s seat.
- You must first draw adjustment markings on the wall.
- First you need to drive up to the wall stand at a distance of 13 meters and rock the car from side to side to optimize the correct position of the Chevrolet suspension
- Set the illumination width control to 0 and check for defects and cracks on the headlight glass
- We make the adjustment with the low beam on, one at a time to the right, and then to the left, covering the glass with previously prepared cardboard.
- We mark the center points of the headlight beam on the wall at the same height from the floor and at the same distance from each other as the center of the headlights on a car.
- Draw horizontal line No. 1 along the established marks
- Then draw another parallel line No. 2 12 cm lower
- Line No. 3 is also drawn parallel to and below line No. 1 by 22 cm
- If the position is correct, the upper limit of the light spots of the headlights on the wall should coincide with line 2. If the adjustment is violated, we adjust the light beam using special correctors on the headlight body.
- The marked gears at the edges of the headlight adjust the light beam to the right and left
- Gears in the center adjust the beam of light up and down
Adjusting fog lights on a Chevrolet Lacetti
Having completed all of the above steps to adjust the main headlights, you can at the same time check and, if necessary, adjust the fog lights
Lacetti headlight adjustment
Adjusting car headlights
To carry out the work you will need an assistant, as well as:
a flat horizontal area (preferably near the wall of a house, fence or gate);
tape measure 5 m long;
a sheet of cardboard (to cover the second headlight when adjusting).
The adjustment must be made in the dark. The vehicle must be
in equipped condition (fully fueled and without additional cargo). So
Screen layout diagram for adjusting the light of the headlights: A vertical line indicating the placement of the low-beam lamp of the left headlight; In the vertical line indicating the placement of the low-beam lamp on the right block - headlights; C is a horizontal line indicating the placement of low-beam headlight lamps; D line indicating the height of the rise of the even border of the light beams; O center line; / = 1275 mm gap between the centers of close-light lamps; h the distance from the plane of the platform on which the car is placed to the headlight lamps
How to find an acceptable plane as a screen is not easy; it is easier to use a plywood shield measuring 1x2 m with markings applied to it. In this case, you need to prepare a stop or stand to place the protection vertically.
The order of adjustment of the headlights
1 We mount the vehicle on a flat horizontal platform perpendicular to the surface selected as the screen and at a distance of 5 m from it. You can place a sheet of plywood in front of the car under the same conditions.
The necessary measurements can be taken using a tape measure.
4. Turn the gearbox of the electric headlight adjustment to the position corresponding to the minimum vehicle load (o).
5. Place the assistant in the driver’s seat. Then we actively rock the vehicle from the side to self-install the suspension.
6. Having turned on the close beam of the headlights, we cover one of the headlights, for example, the right one, with a sheet of cardboard.
7. By turning the handle of the adjustment screw (1) of the left headlight, we bring the horizontal boundary of the light beam to line D, and then, by turning the adjusting screw (2), we align the bend in the boundary of the light beam with line A.
We adjust the right headlight in the same way.
The sequence of adjusting the fog lights
1. We mount the vehicle on a flat horizontal platform perpendicular to the surface selected as the screen and at a distance of 5 m from it. You can place a sheet of plywood in front of the car under the same conditions.
2. Mark the screen according to the picture.
The necessary measurements can be taken with
involving roulette.
3. We monitor the tire pressure and, if necessary, bring it to normal.
4. Place the assistant in the driver’s seat. Then we actively rock the vehicle for self-installation of the suspension.
5. Turning on the fog lights, cover one of them, for example, the right one, with a sheet of cardboard.
6. We adjust the fog lights from under the bumper. By turning the adjusting screw of the left headlight with a Phillips screwdriver, we bring the horizontal border of the light beam to line C.
Screen marking diagram for adjusting the light of a car's fog lights: A vertical line indicating the placement of the left fog light lamp; B is a vertical line indicating the placement of the right fog lamp lamp; C is a horizontal line indicating the placement of fog lamps; D line indicating the height of the rise of the even border of the light beams; O center line; / = 1165 mm gap between fog lamps; h the distance from the plane of the platform on which the vehicle is located to the fog lamps